Sign Up & Registration – How to Create Your Drivable Account
We walk you through signing up on Drivable, verifying your email address and phone number, and uploading your driving licence and ID. The whole process takes under 5 minutes.
To rent a sports car on Drivable, you need a verified account. Verification confirms that you are a real person with a valid driving licence — protecting both you and the host. The whole process usually takes under 5 minutes and consists of four steps: confirming your email, verifying your phone number, uploading your driving licence, and uploading your ID. Once that's done, you can send your first booking request straight away.
- Verify your email address
- Confirm your phone number by SMS
- Upload your driving licence (front and back)
- Upload your ID
Create an account
1
Open the Profile tab and start signing up
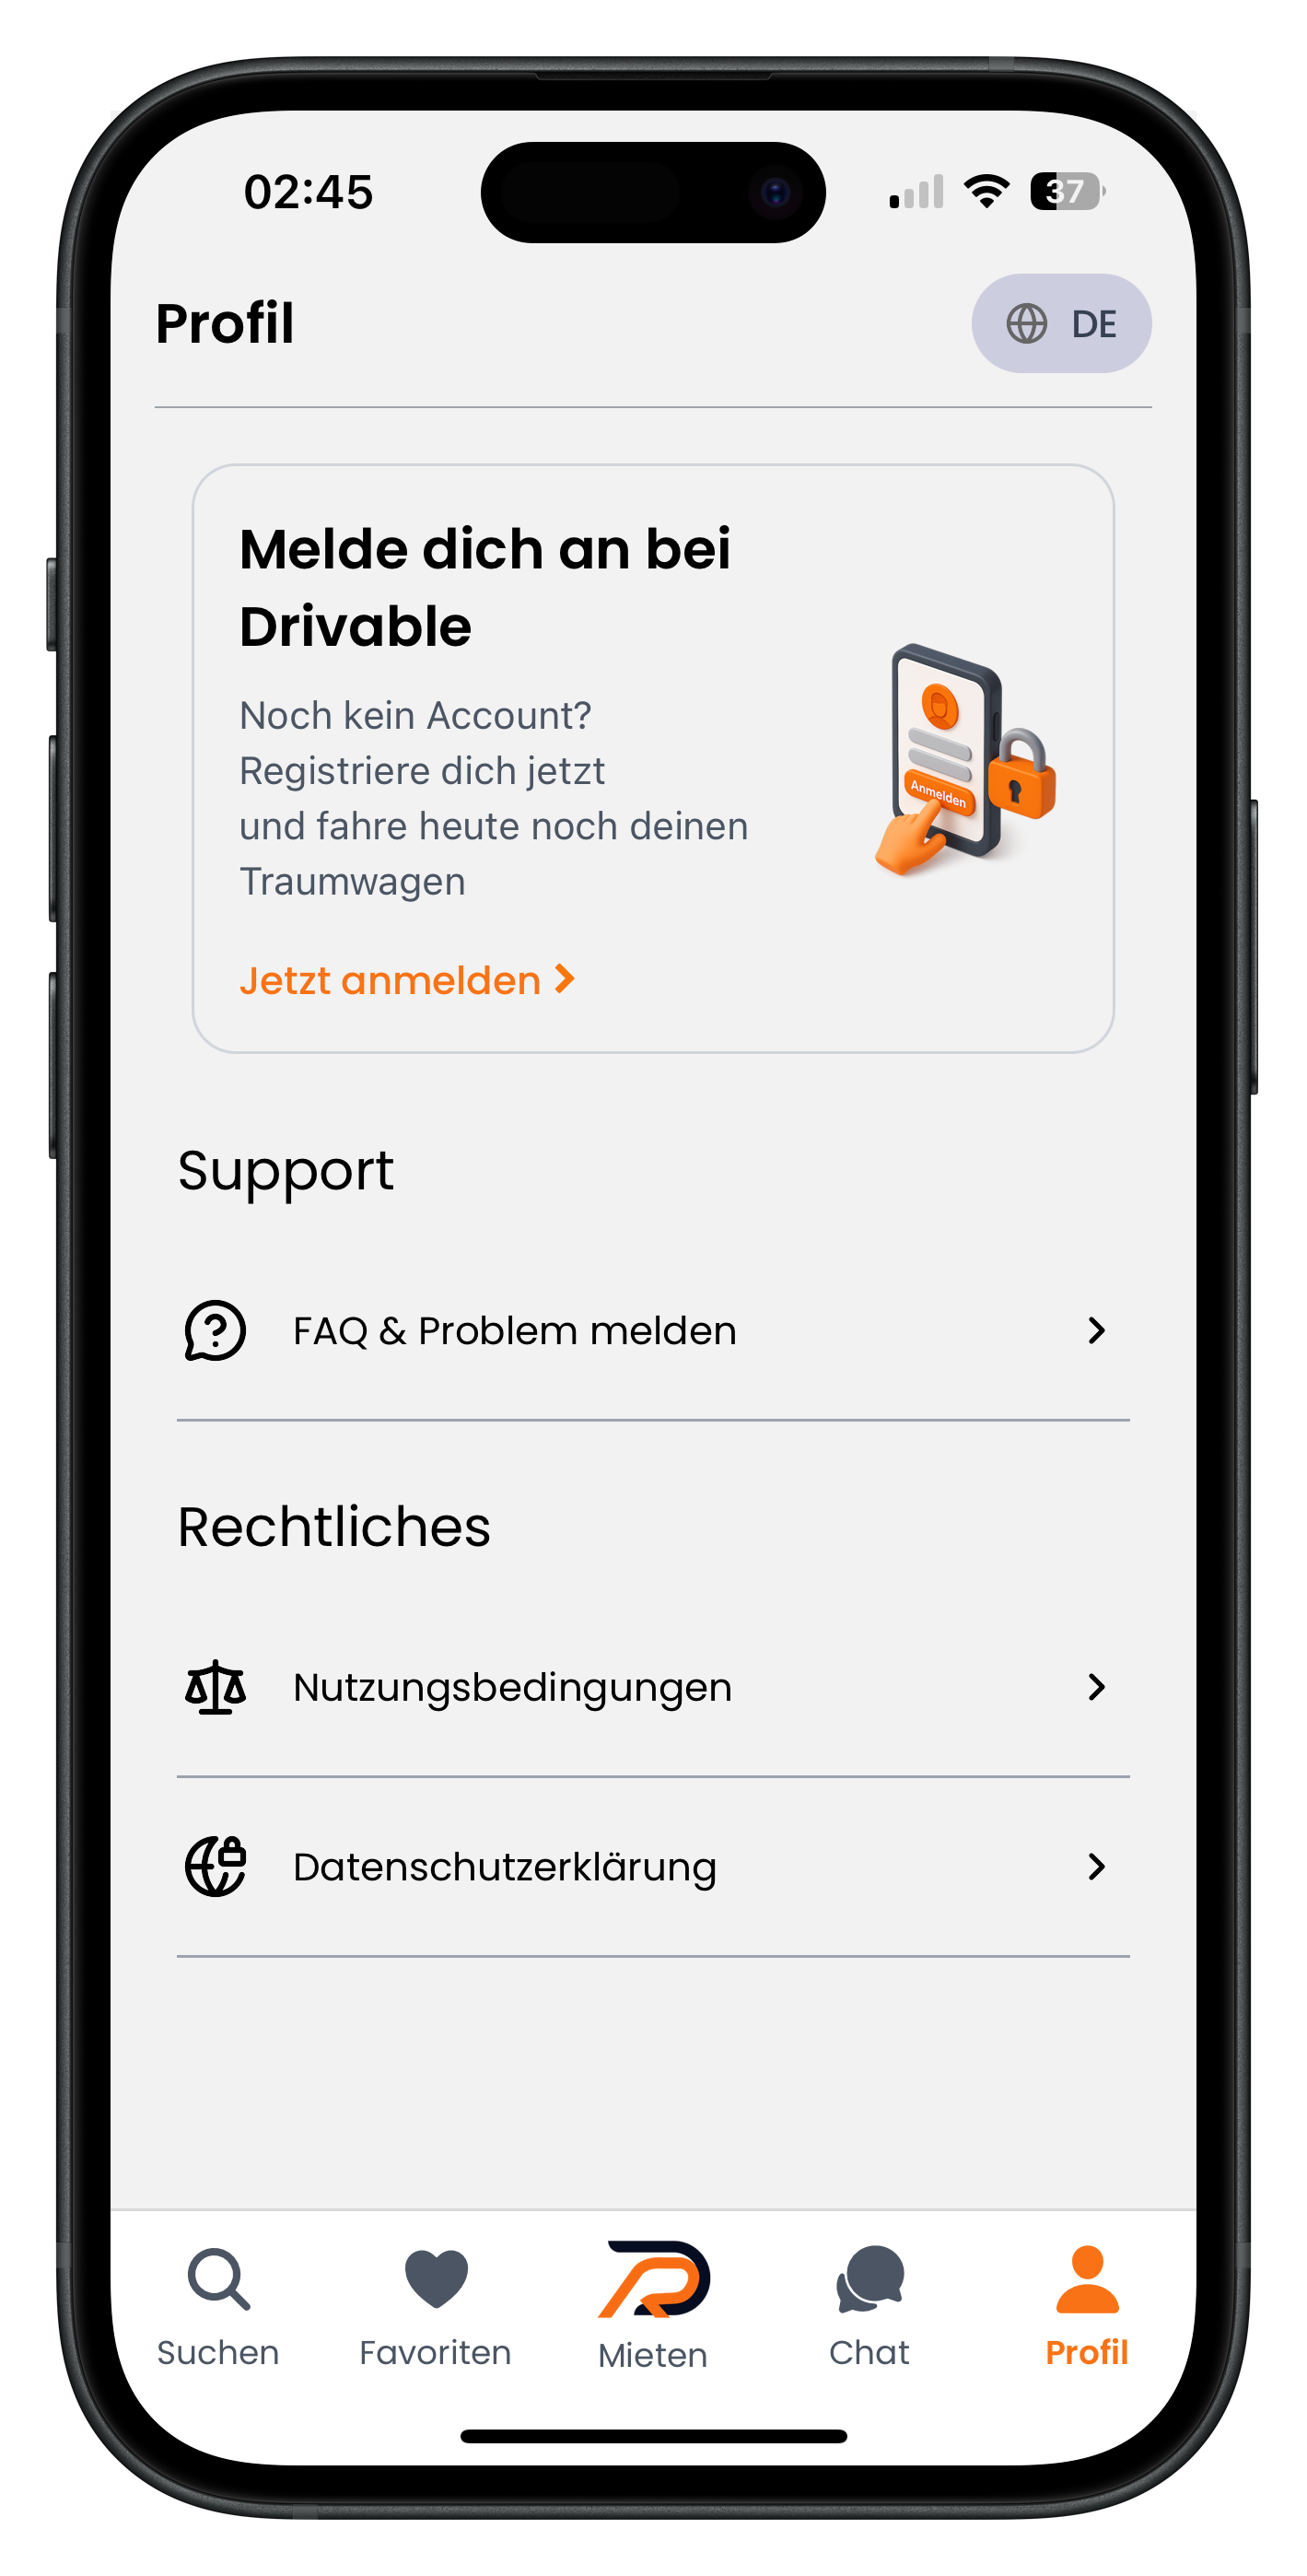
Open the Drivable app and tap Profile in the far right of the bottom navigation. As you are not yet logged in, you will see a welcome box with the text "Sign in to Drivable". Below it you'll find "No account yet? Sign up now and drive your dream car today". Tap the orange link "Sign up now" to start the registration process.
- The Profile tab is always the last icon in the bottom right of the navigation
- Below the sign-in box you'll also find the Support and Legal section
2
Enter your email and start registration
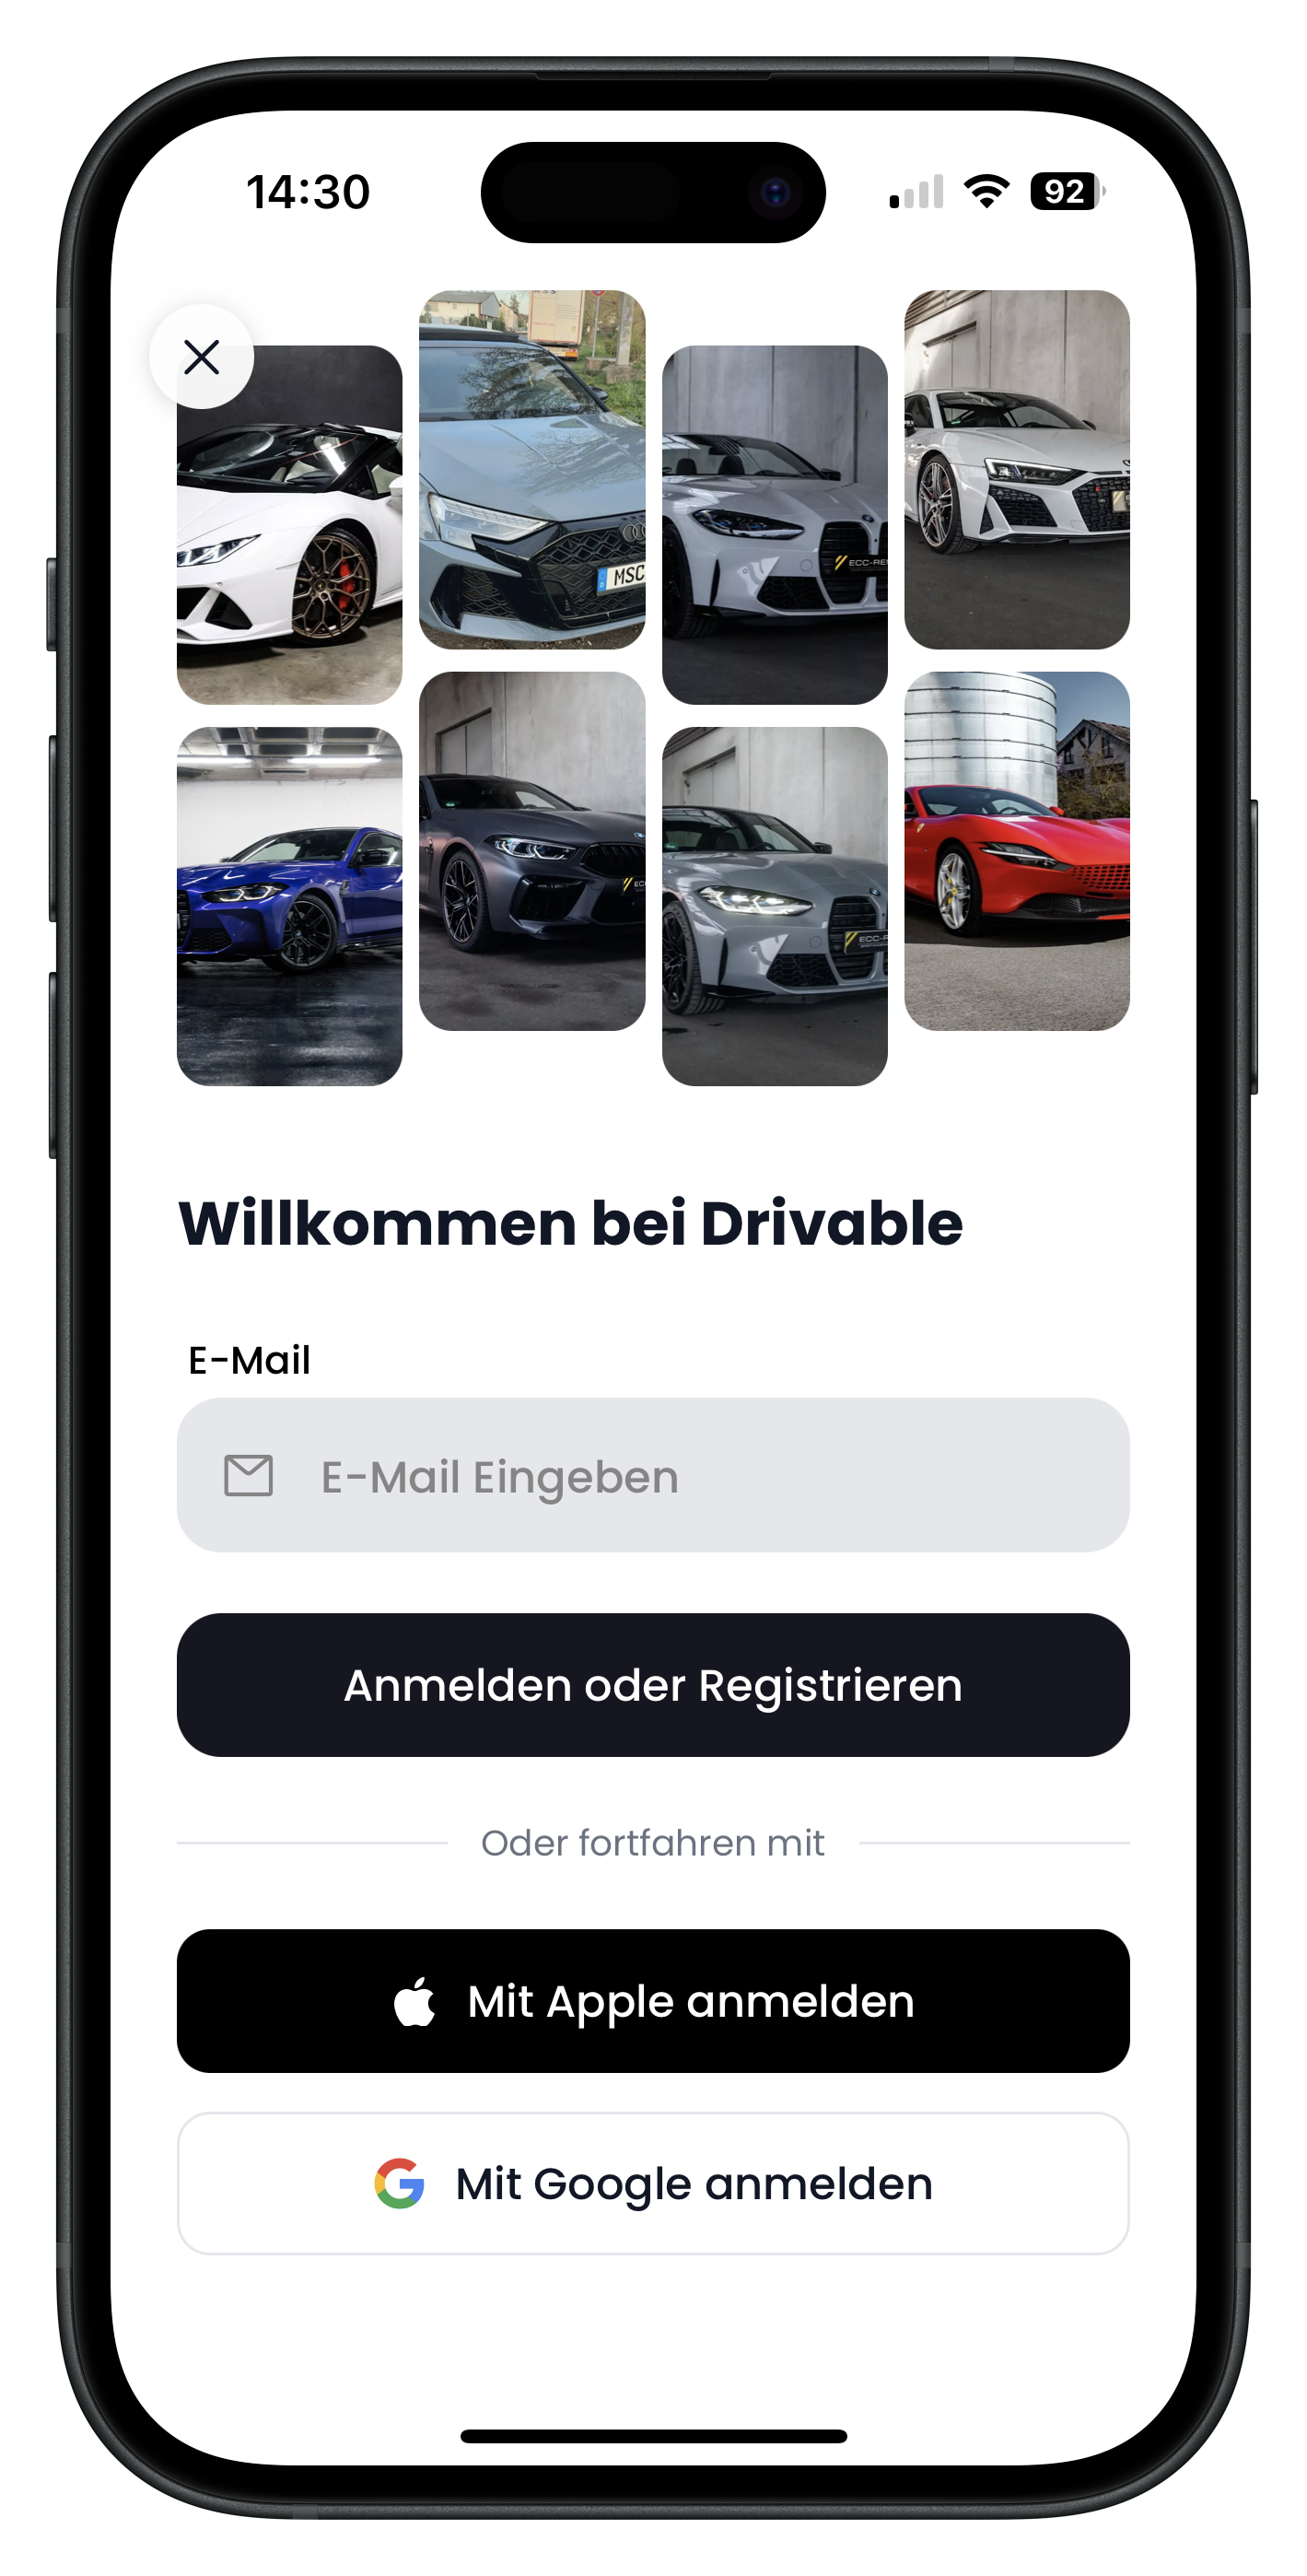
You land on the Drivable welcome screen. At the top you'll see a small gallery of sports cars, with the heading "Welcome to Drivable" below it. Enter your email address in the "Email" field and tap the black button "Sign in or Register". Drivable will automatically detect whether you already have an account or are new, and guide you accordingly. Alternatively, tap to sign in with Apple or Google. In that case email verification is skipped, as your account is confirmed automatically through the respective service.
- Enter your email and tap "Sign in or Register": Drivable automatically detects whether you're new or logging in
- Sign in with Apple: Quick registration via your Apple ID, no email verification needed
- Sign in with Google: Register via your Google account, no email verification needed
3
Fill in the registration form
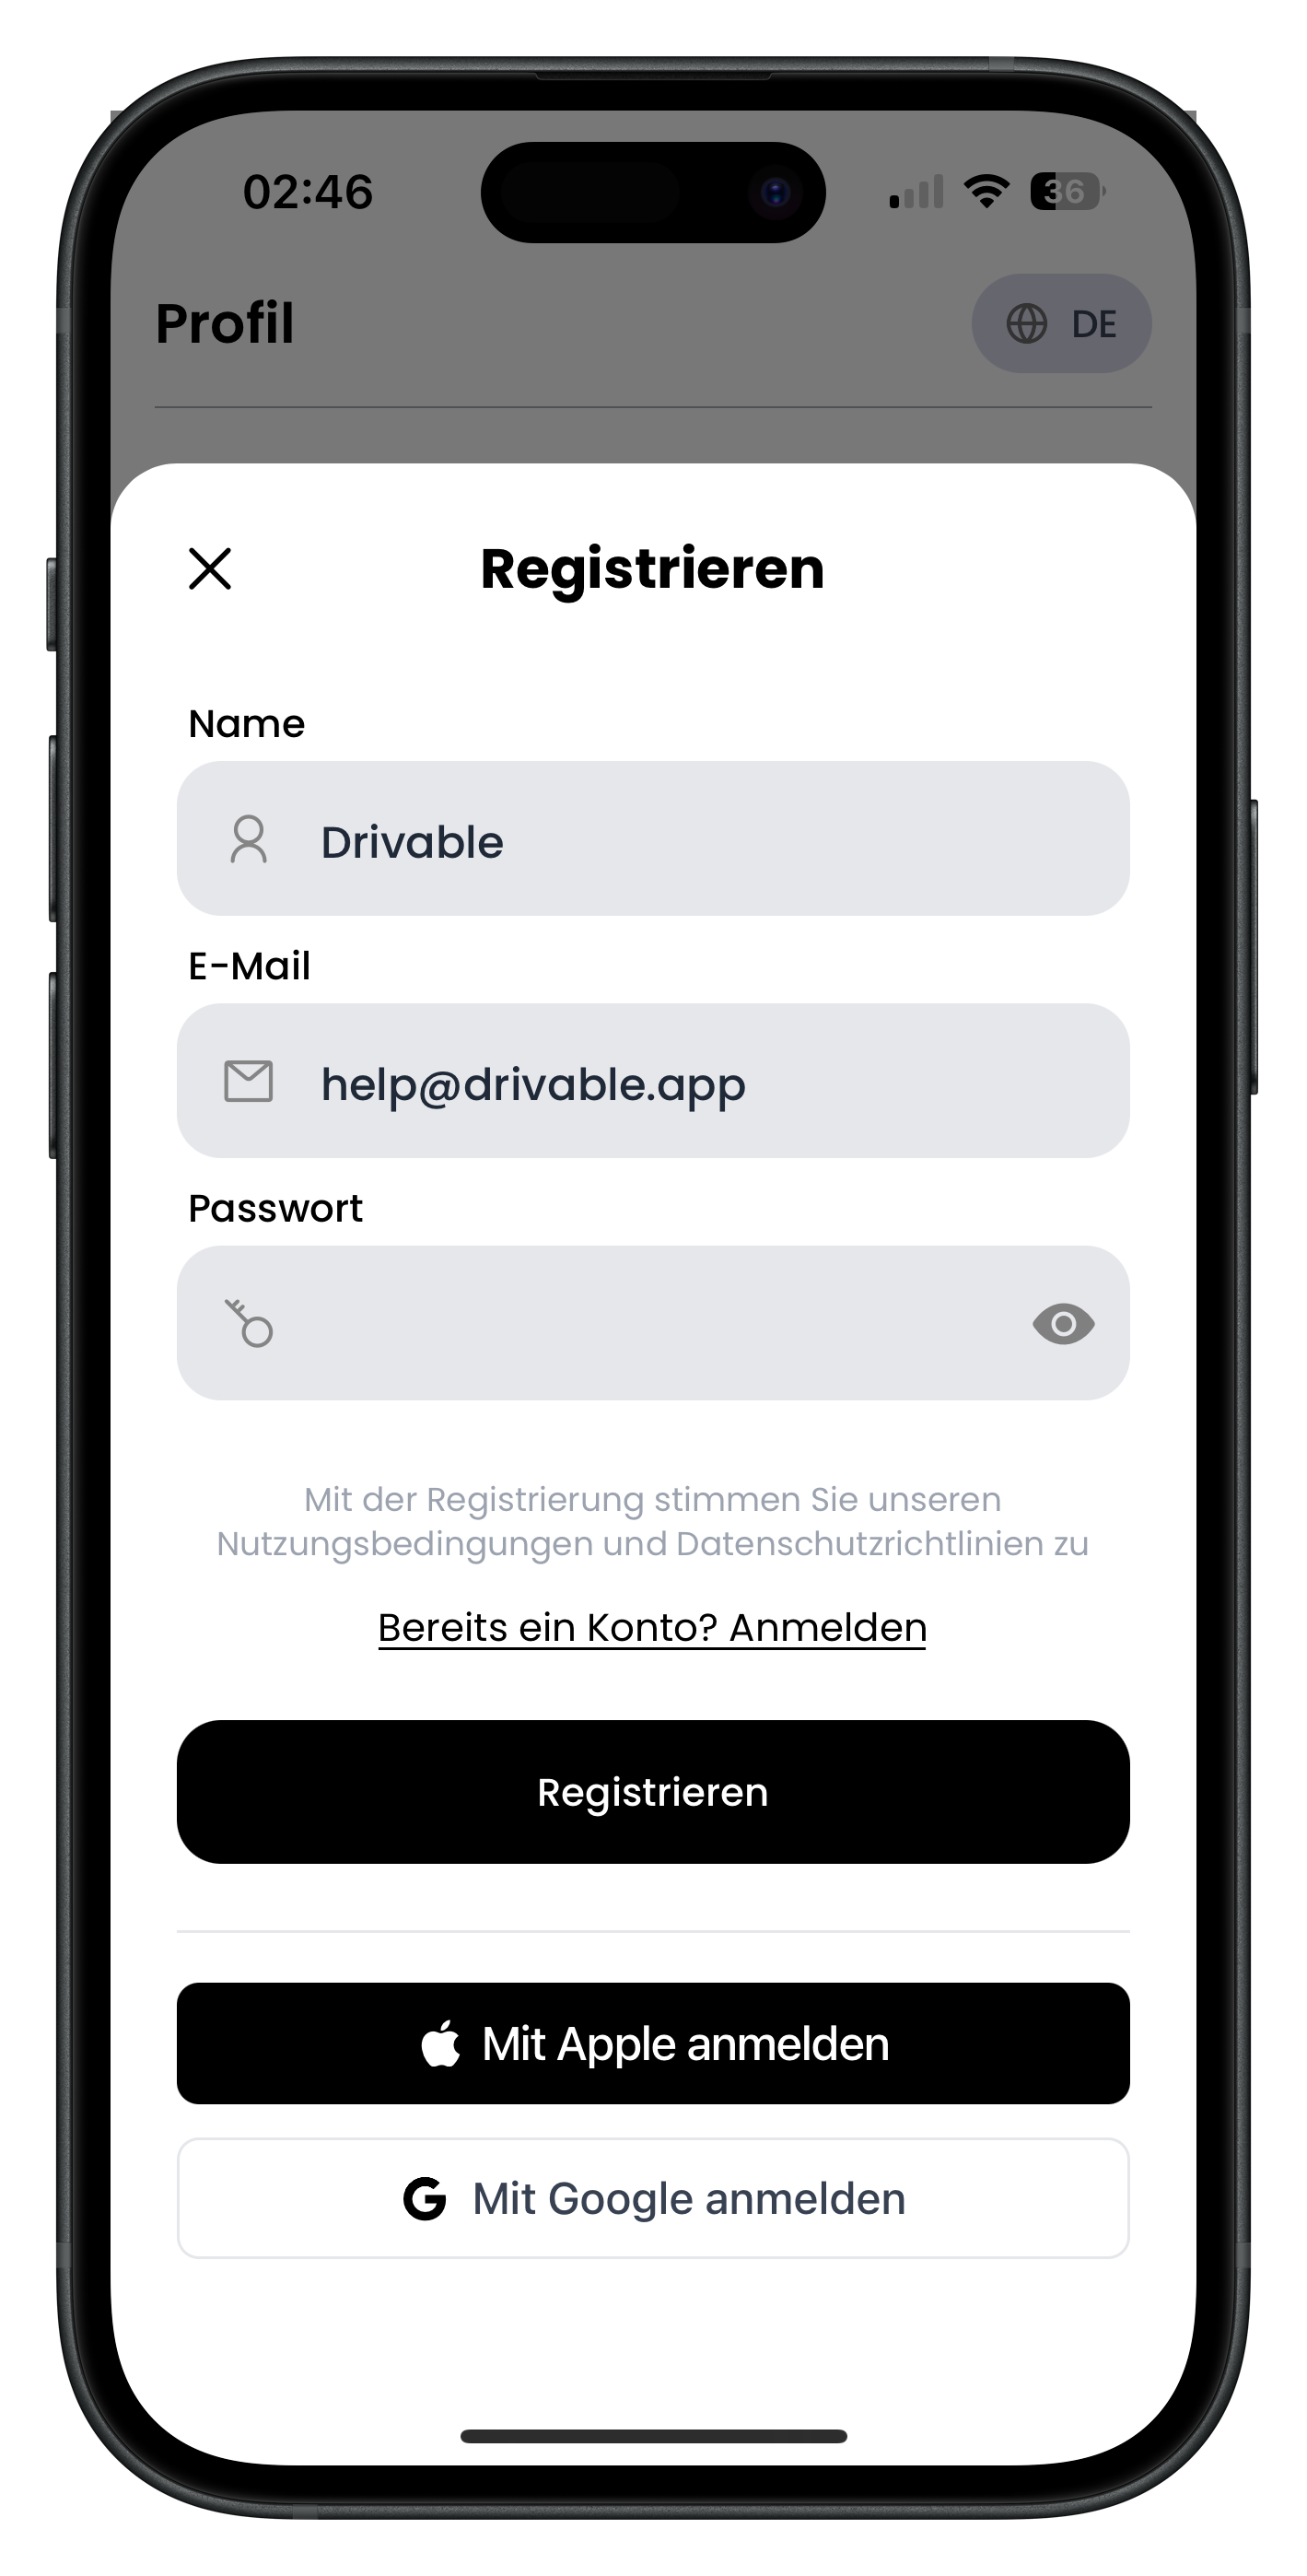
Enter your full name, email address and a secure password. Your name is used as your display name in the app — hosts will see it when you send a booking request. We use your email address for verification and for important notifications about your bookings. Once all fields are filled in, tap "Register".
- Use your real name — it must match your ID
- Use an email address you have access to
- Choose a password of at least 8 characters
It's best to use your main email address. That's where you'll receive booking confirmations, messages from the host, and all important updates about your bookings.
Verify your email
4
Request a verification code
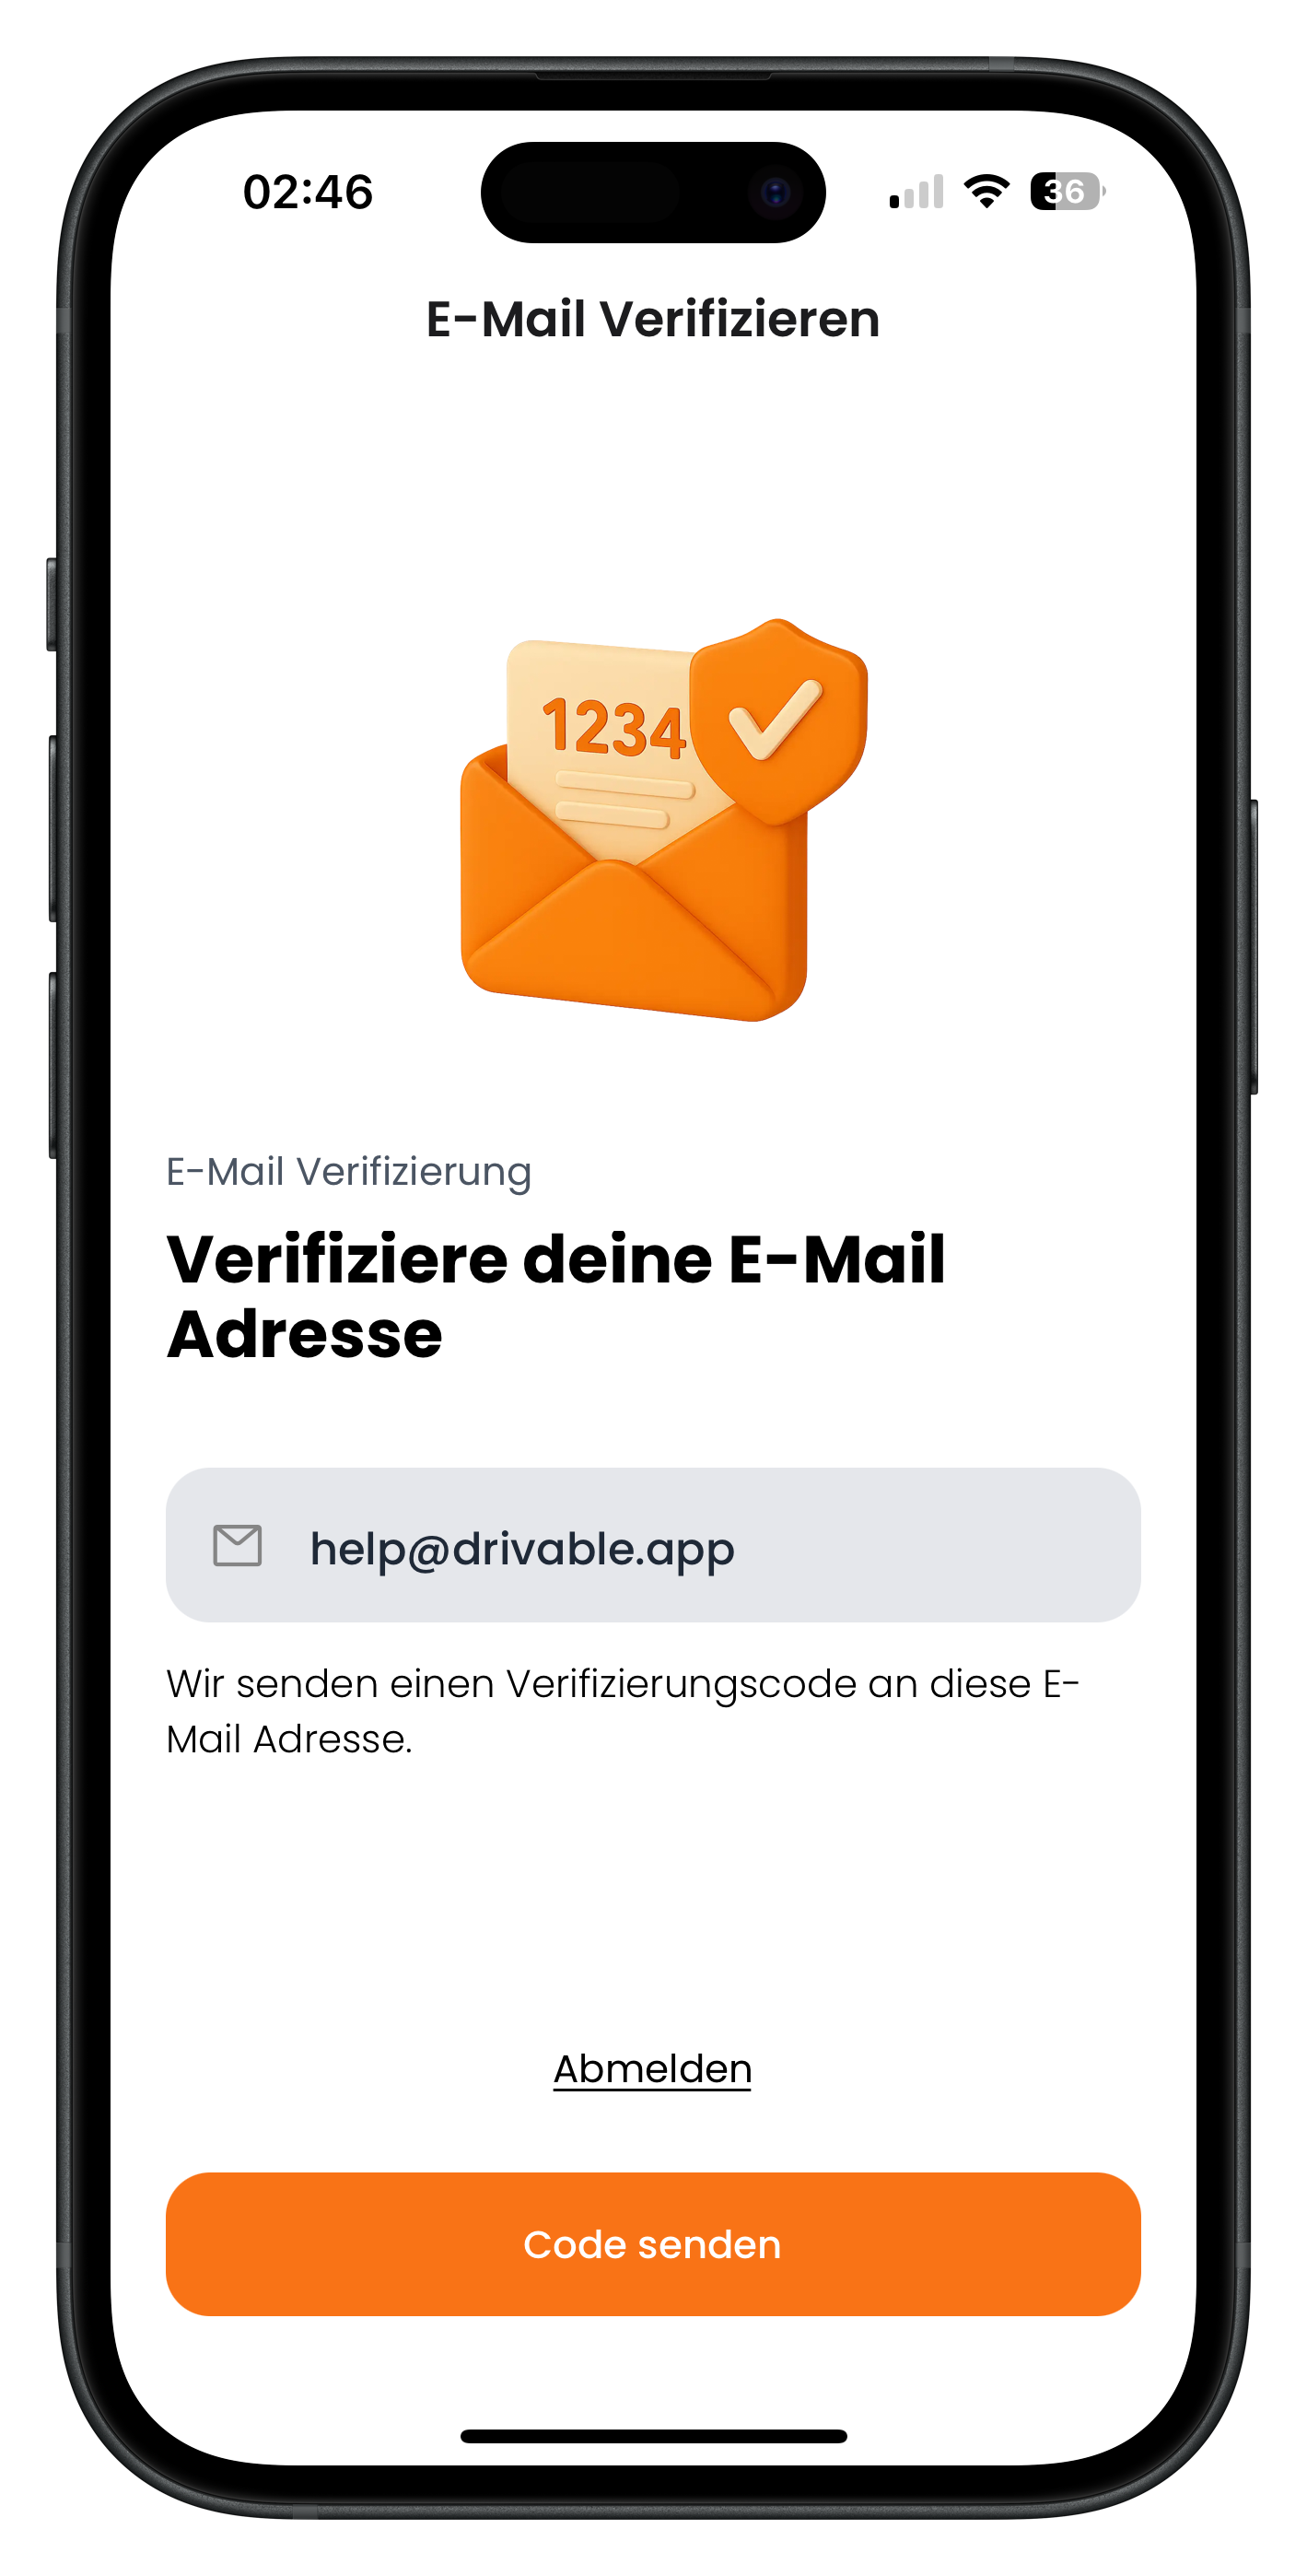
After registering, you land directly on the email verification screen. The email address you entered is shown for you to check. Tap the "Send code" button to send a 6-digit verification code to your inbox. The email usually arrives within a few seconds.
- Check that the email address shown is correct
- The code is 6 digits long and expires after a limited time
- You can request a new code if it doesn't arrive
5
Enter the code and confirm your email
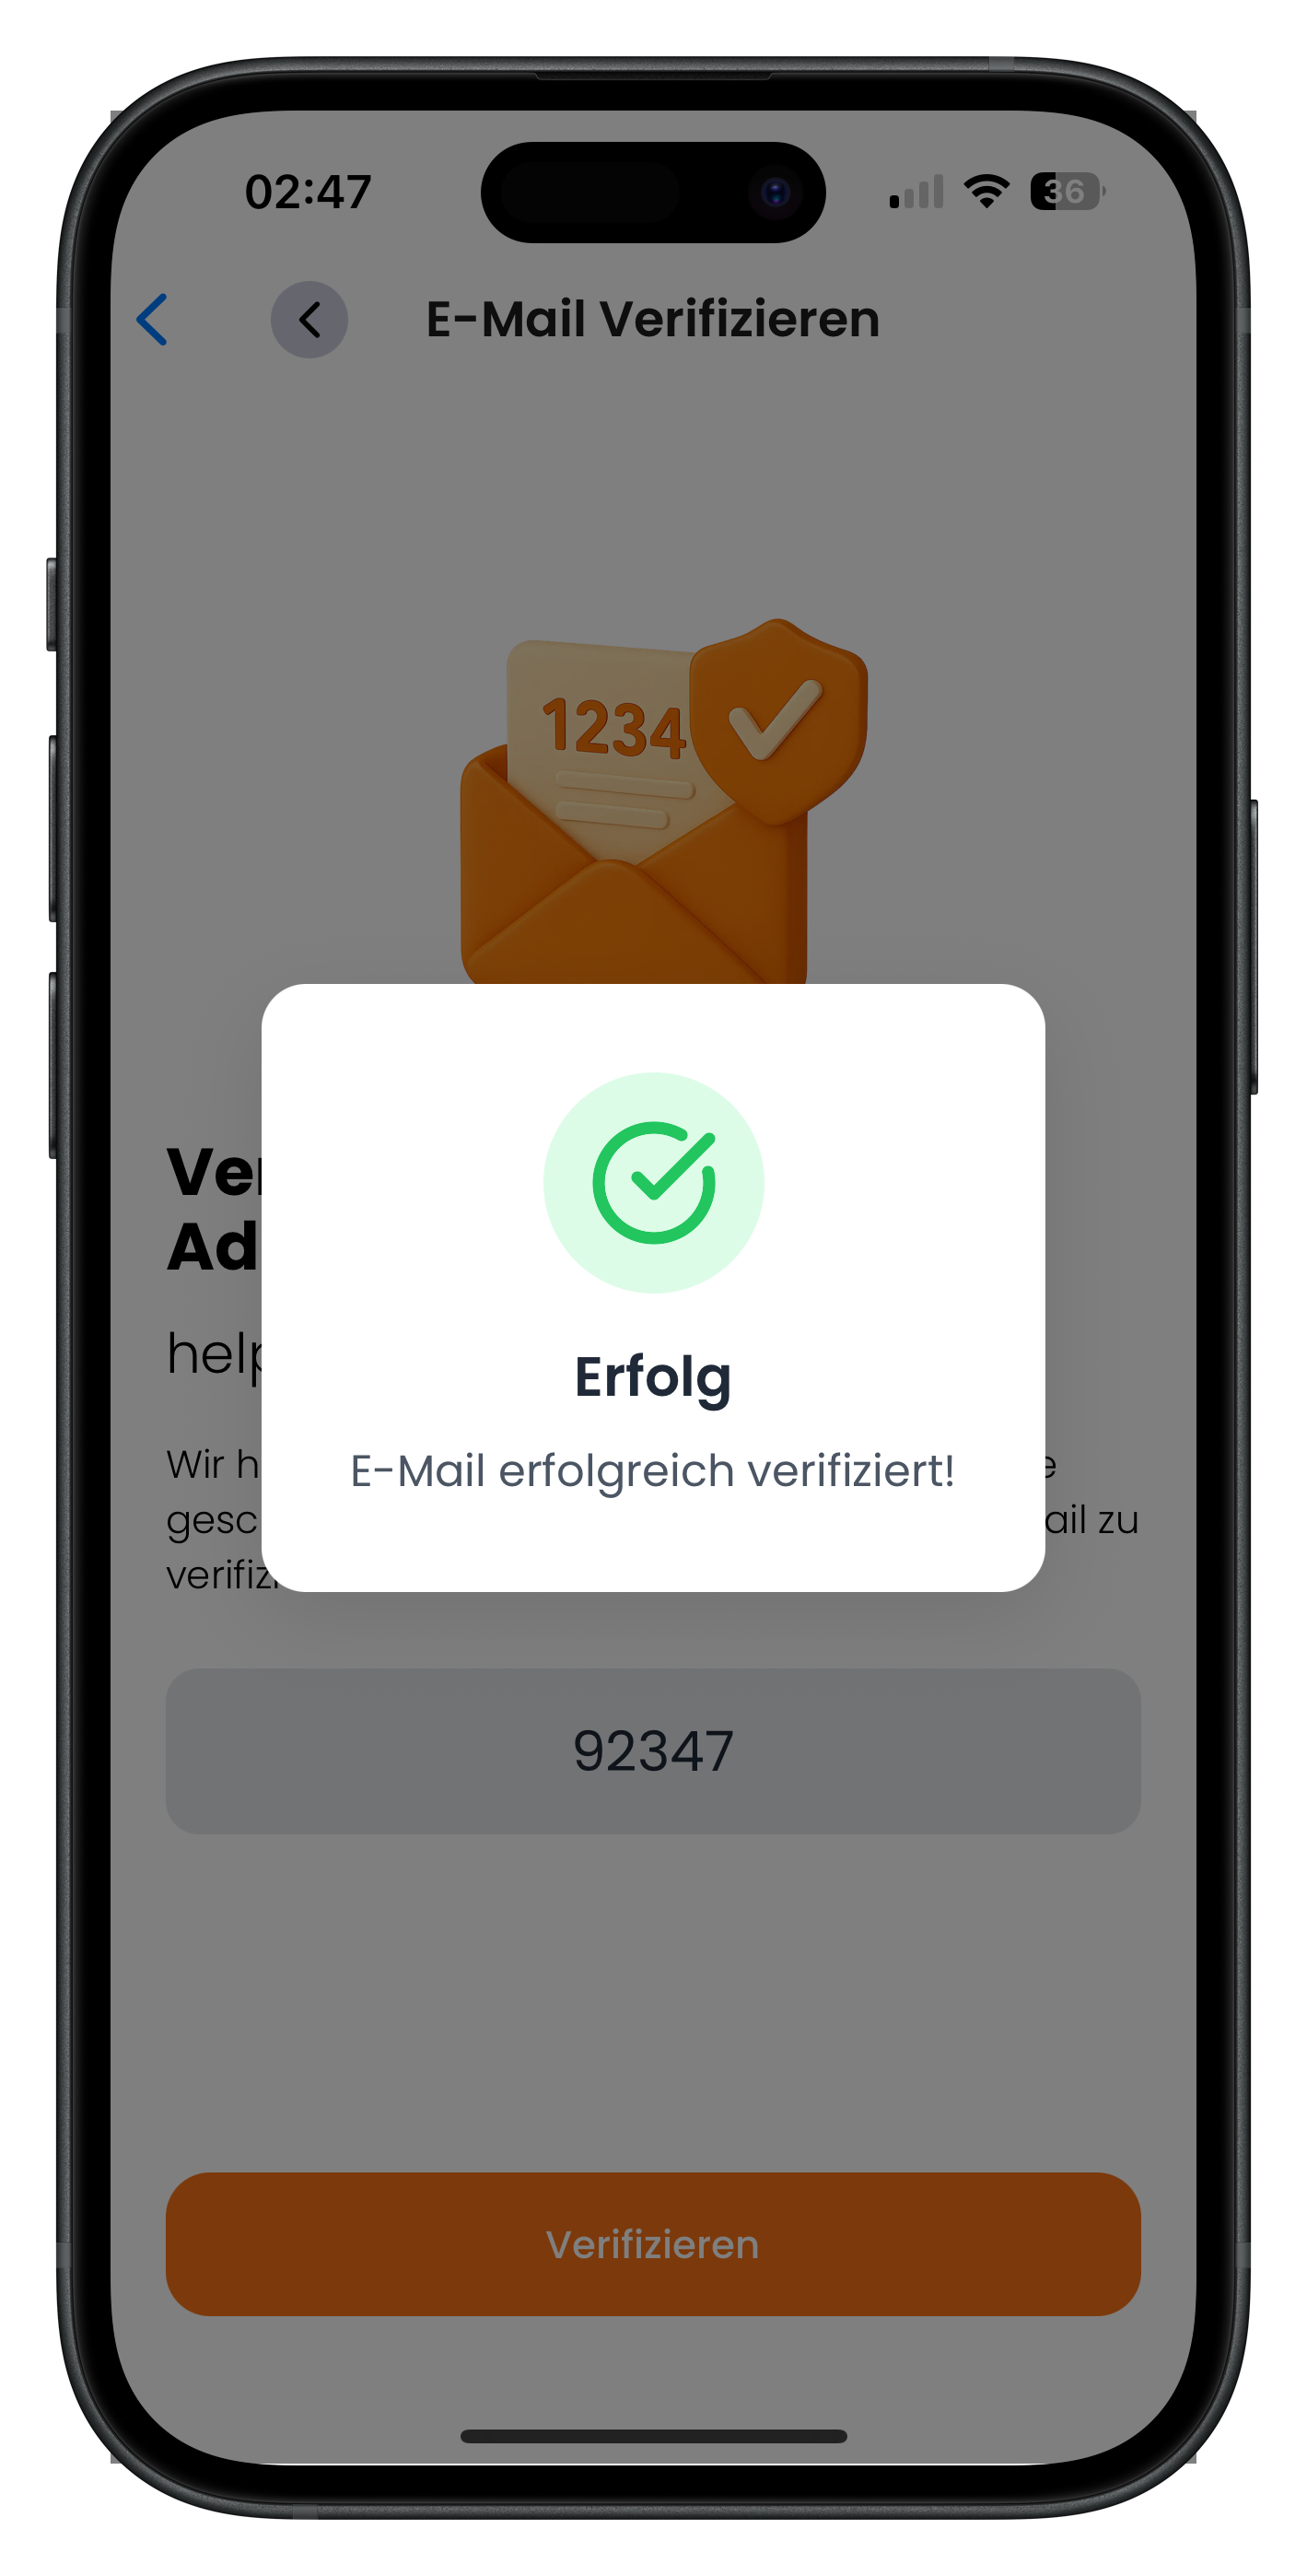
Open your inbox, copy the 6-digit code from the Drivable email and enter it in the app. Once you've entered it successfully, a green confirmation dialogue appears with the message "Email successfully verified!". That's the first of four verification steps done.
- The email is from Drivable — the subject line contains your verification code
- If you can't find it, check your spam or junk folder
No email arrived? Check your spam folder first. If there's nothing there either, tap "Resend code". Make sure you entered the correct email address.
Continue verification
6
Verification checklist
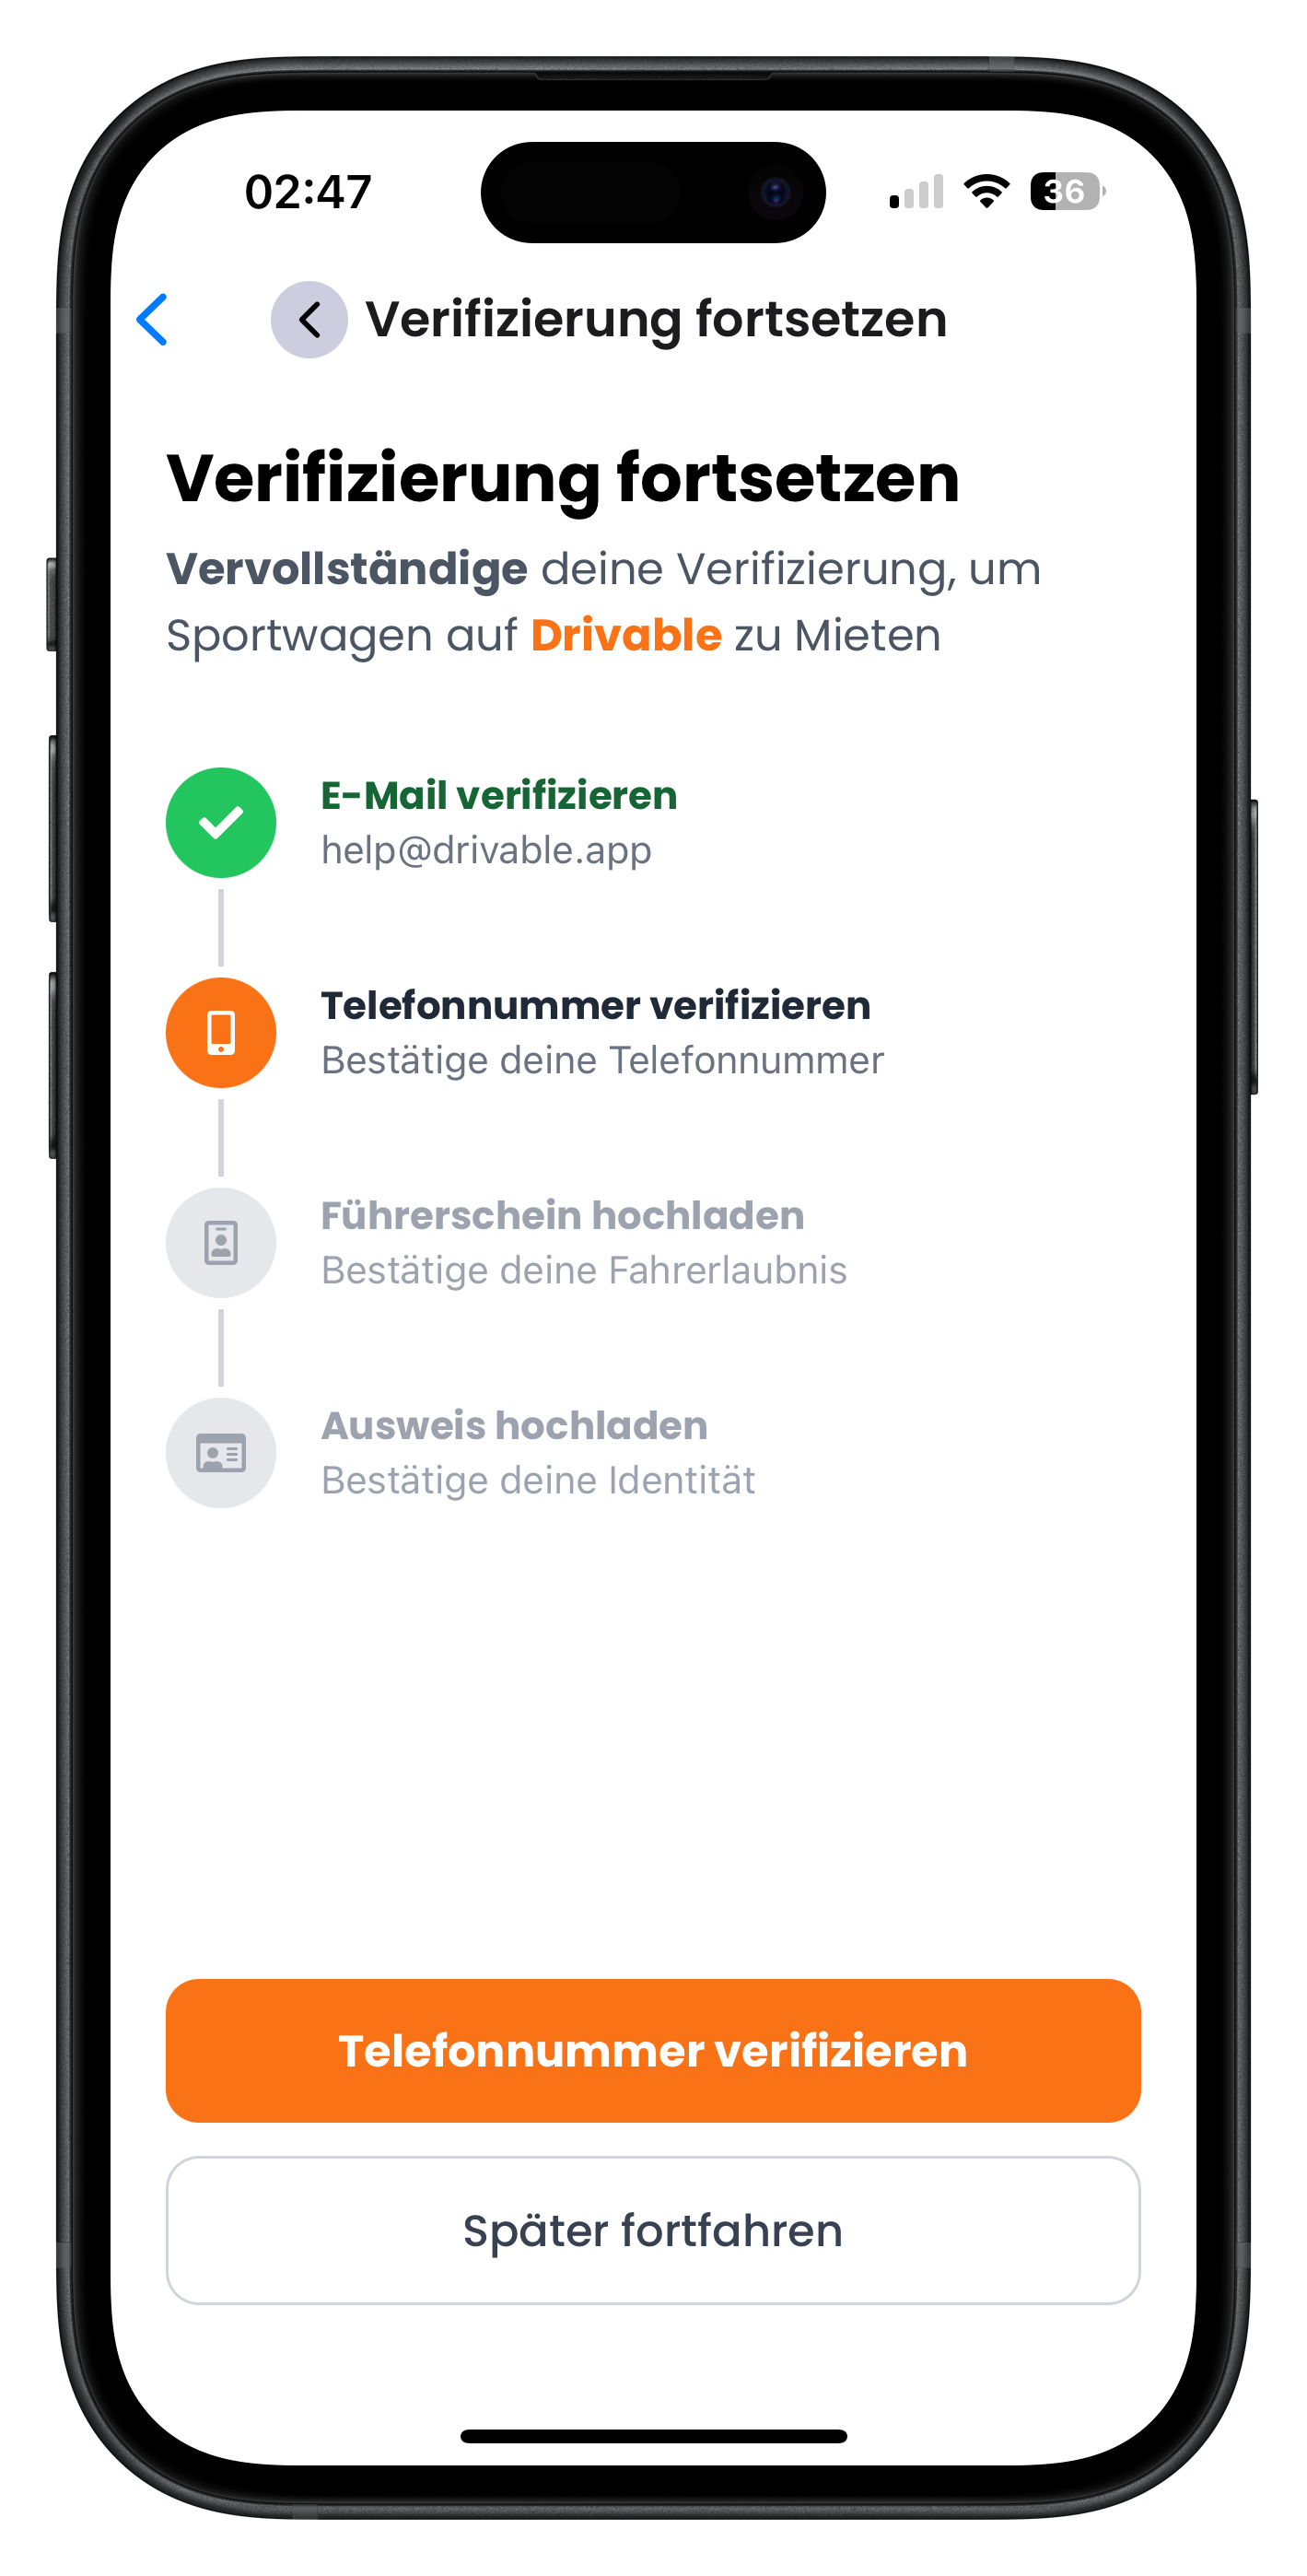
After confirming your email, the app shows you the full verification overview. You can see all four steps at a glance. Your email is already marked with a green tick. The remaining three items — phone number, driving licence and ID — are still outstanding and shown with an orange or grey icon. Tap the orange button "Verify phone number" to continue.
- Verify email — done (green tick)
- Verify phone number — up next (orange)
- Upload driving licence — still to do
- Upload ID — still to do
You can pause the verification at any time by tapping "Continue later". You'll be taken back to the app. When you're ready to carry on, just head back to your profile — the app remembers where you left off.
Verify your phone number
7
Enter your mobile number and request an SMS
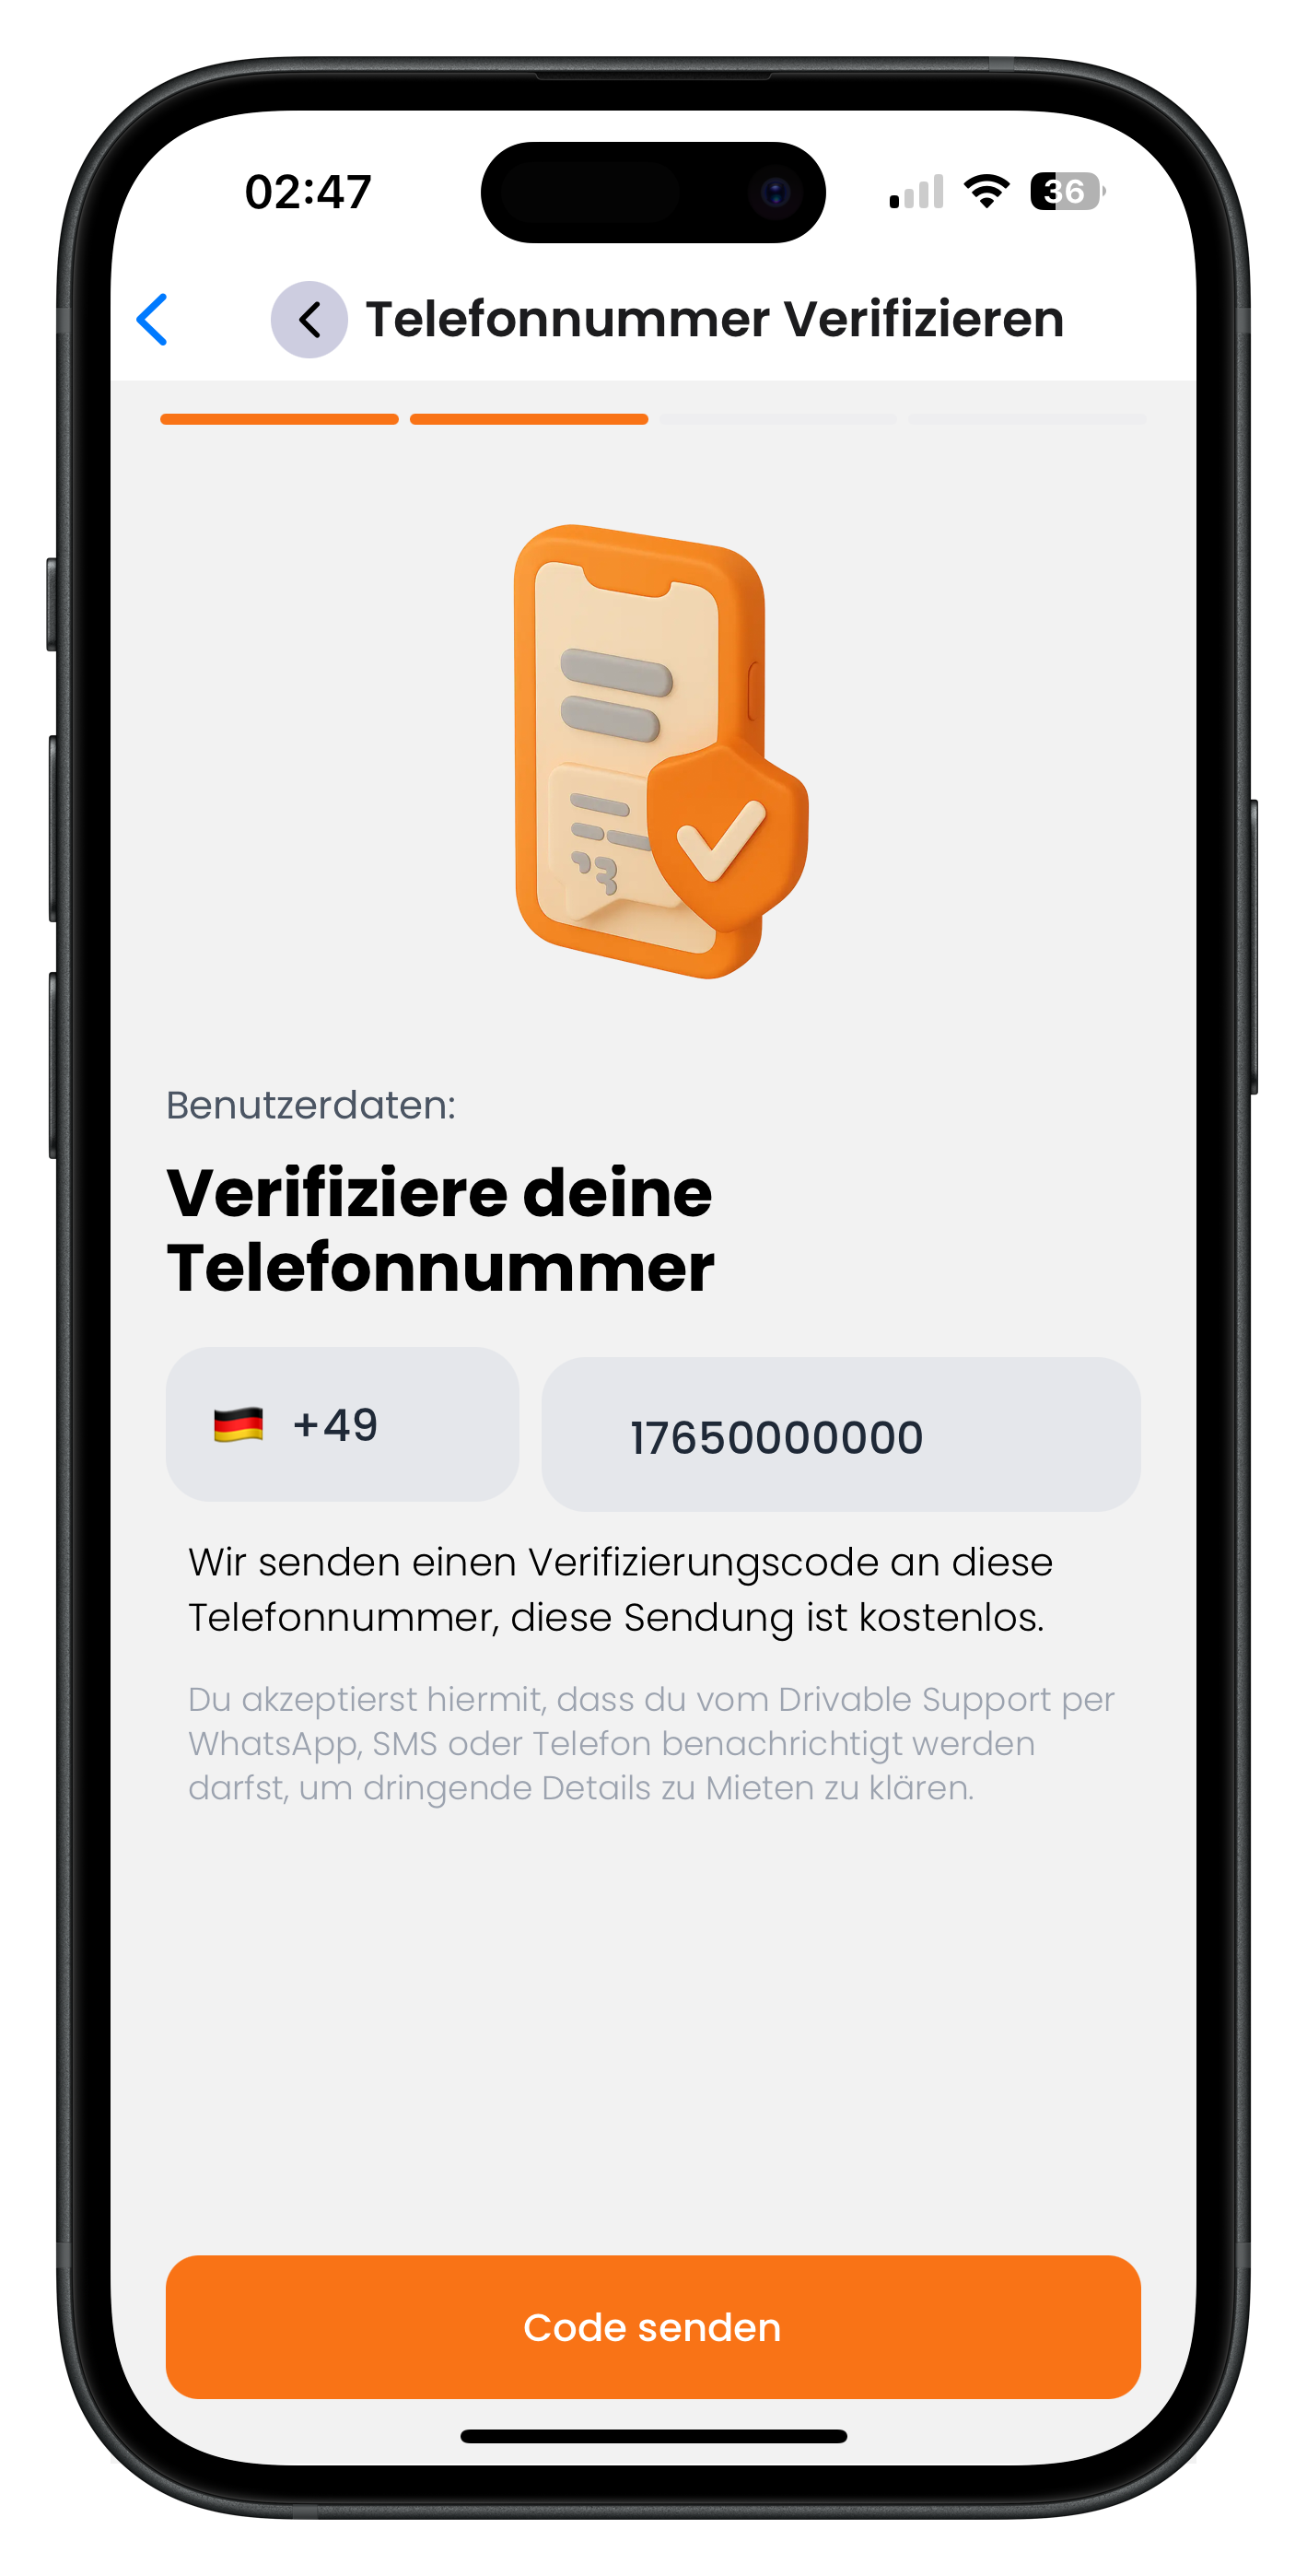
Enter your mobile number. The German country code +49 is already pre-filled — just enter your number without the leading 0. For example, if your number is 0176 1234567, type 176 1234567. Then tap "Send code". You'll receive an SMS with a verification code within a few seconds.
- The +49 country code for Germany is already set
- Enter your number without the leading 0
- The SMS usually arrives within 10 seconds
8
Enter and confirm the SMS code
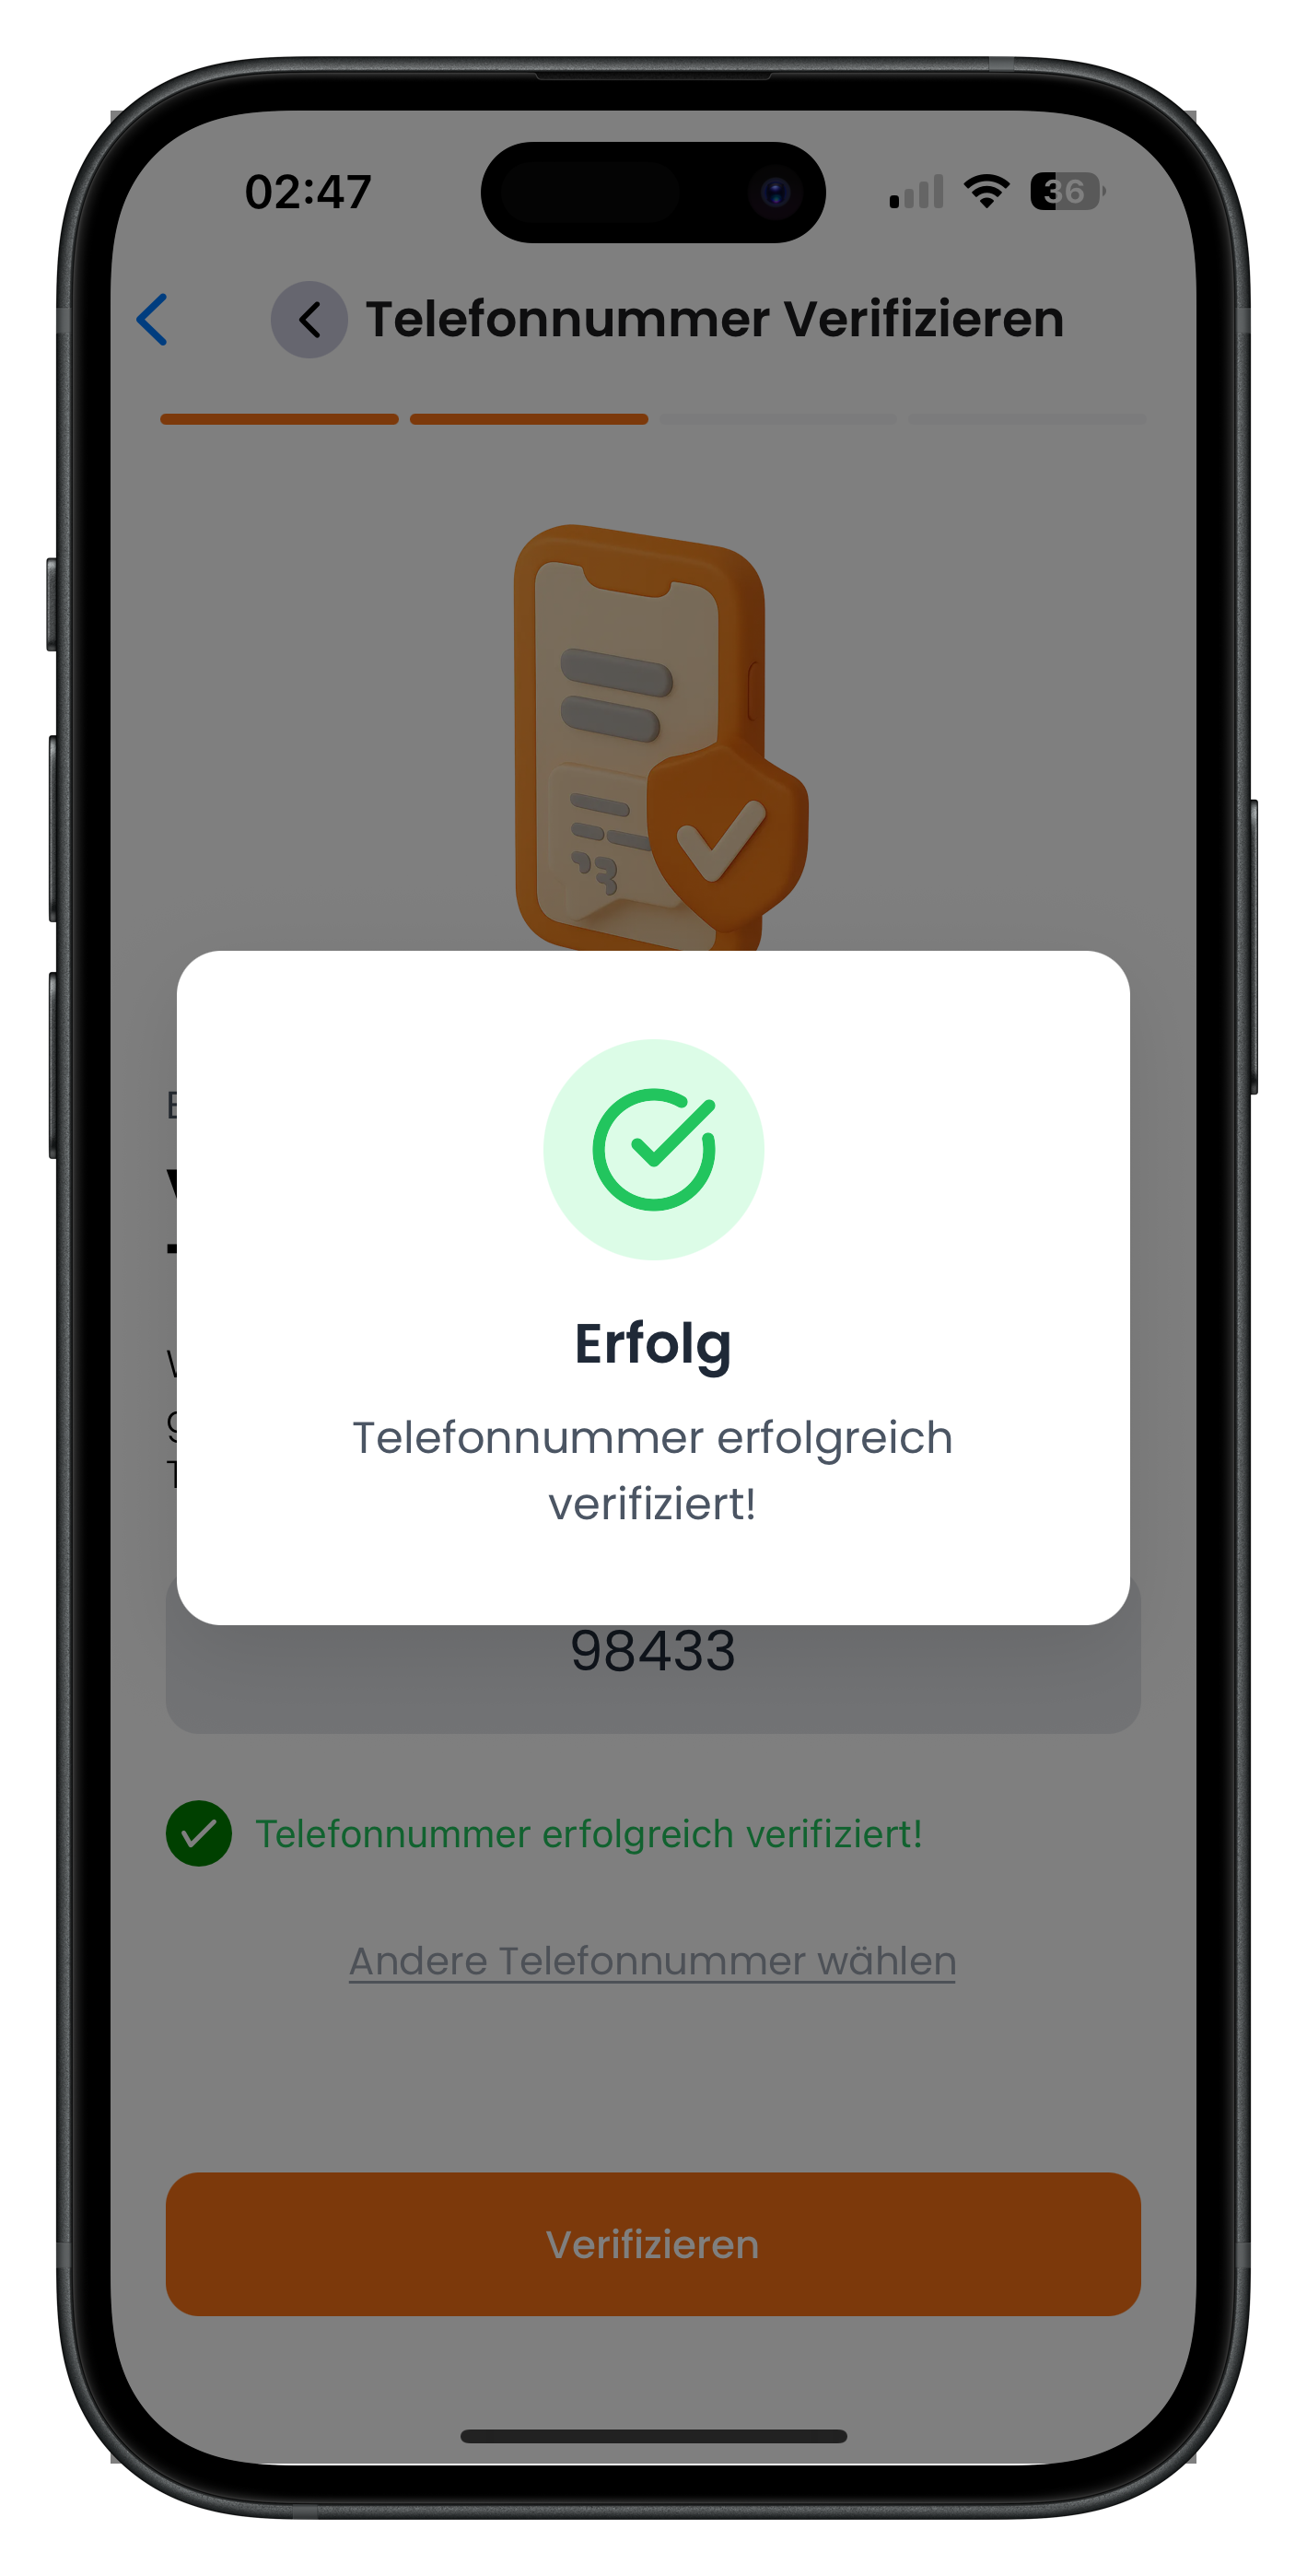
Enter the code from the SMS and tap "Verify". If successful, the confirmation dialogue "Phone number successfully verified!" will appear. That's two of four steps done — you're on the home straight.
- No SMS received? Wait 30 seconds and request the code again
- Make sure you can receive SMS messages (not in flight mode)
Upload your driving licence
Now we need your driving licence. This is the most important step, as it lets the host check that you have a valid licence. You need to upload both the front and the back. The app shows you an example image and tips for both sides so the photo comes out right first time.
9
Photograph the front of your driving licence
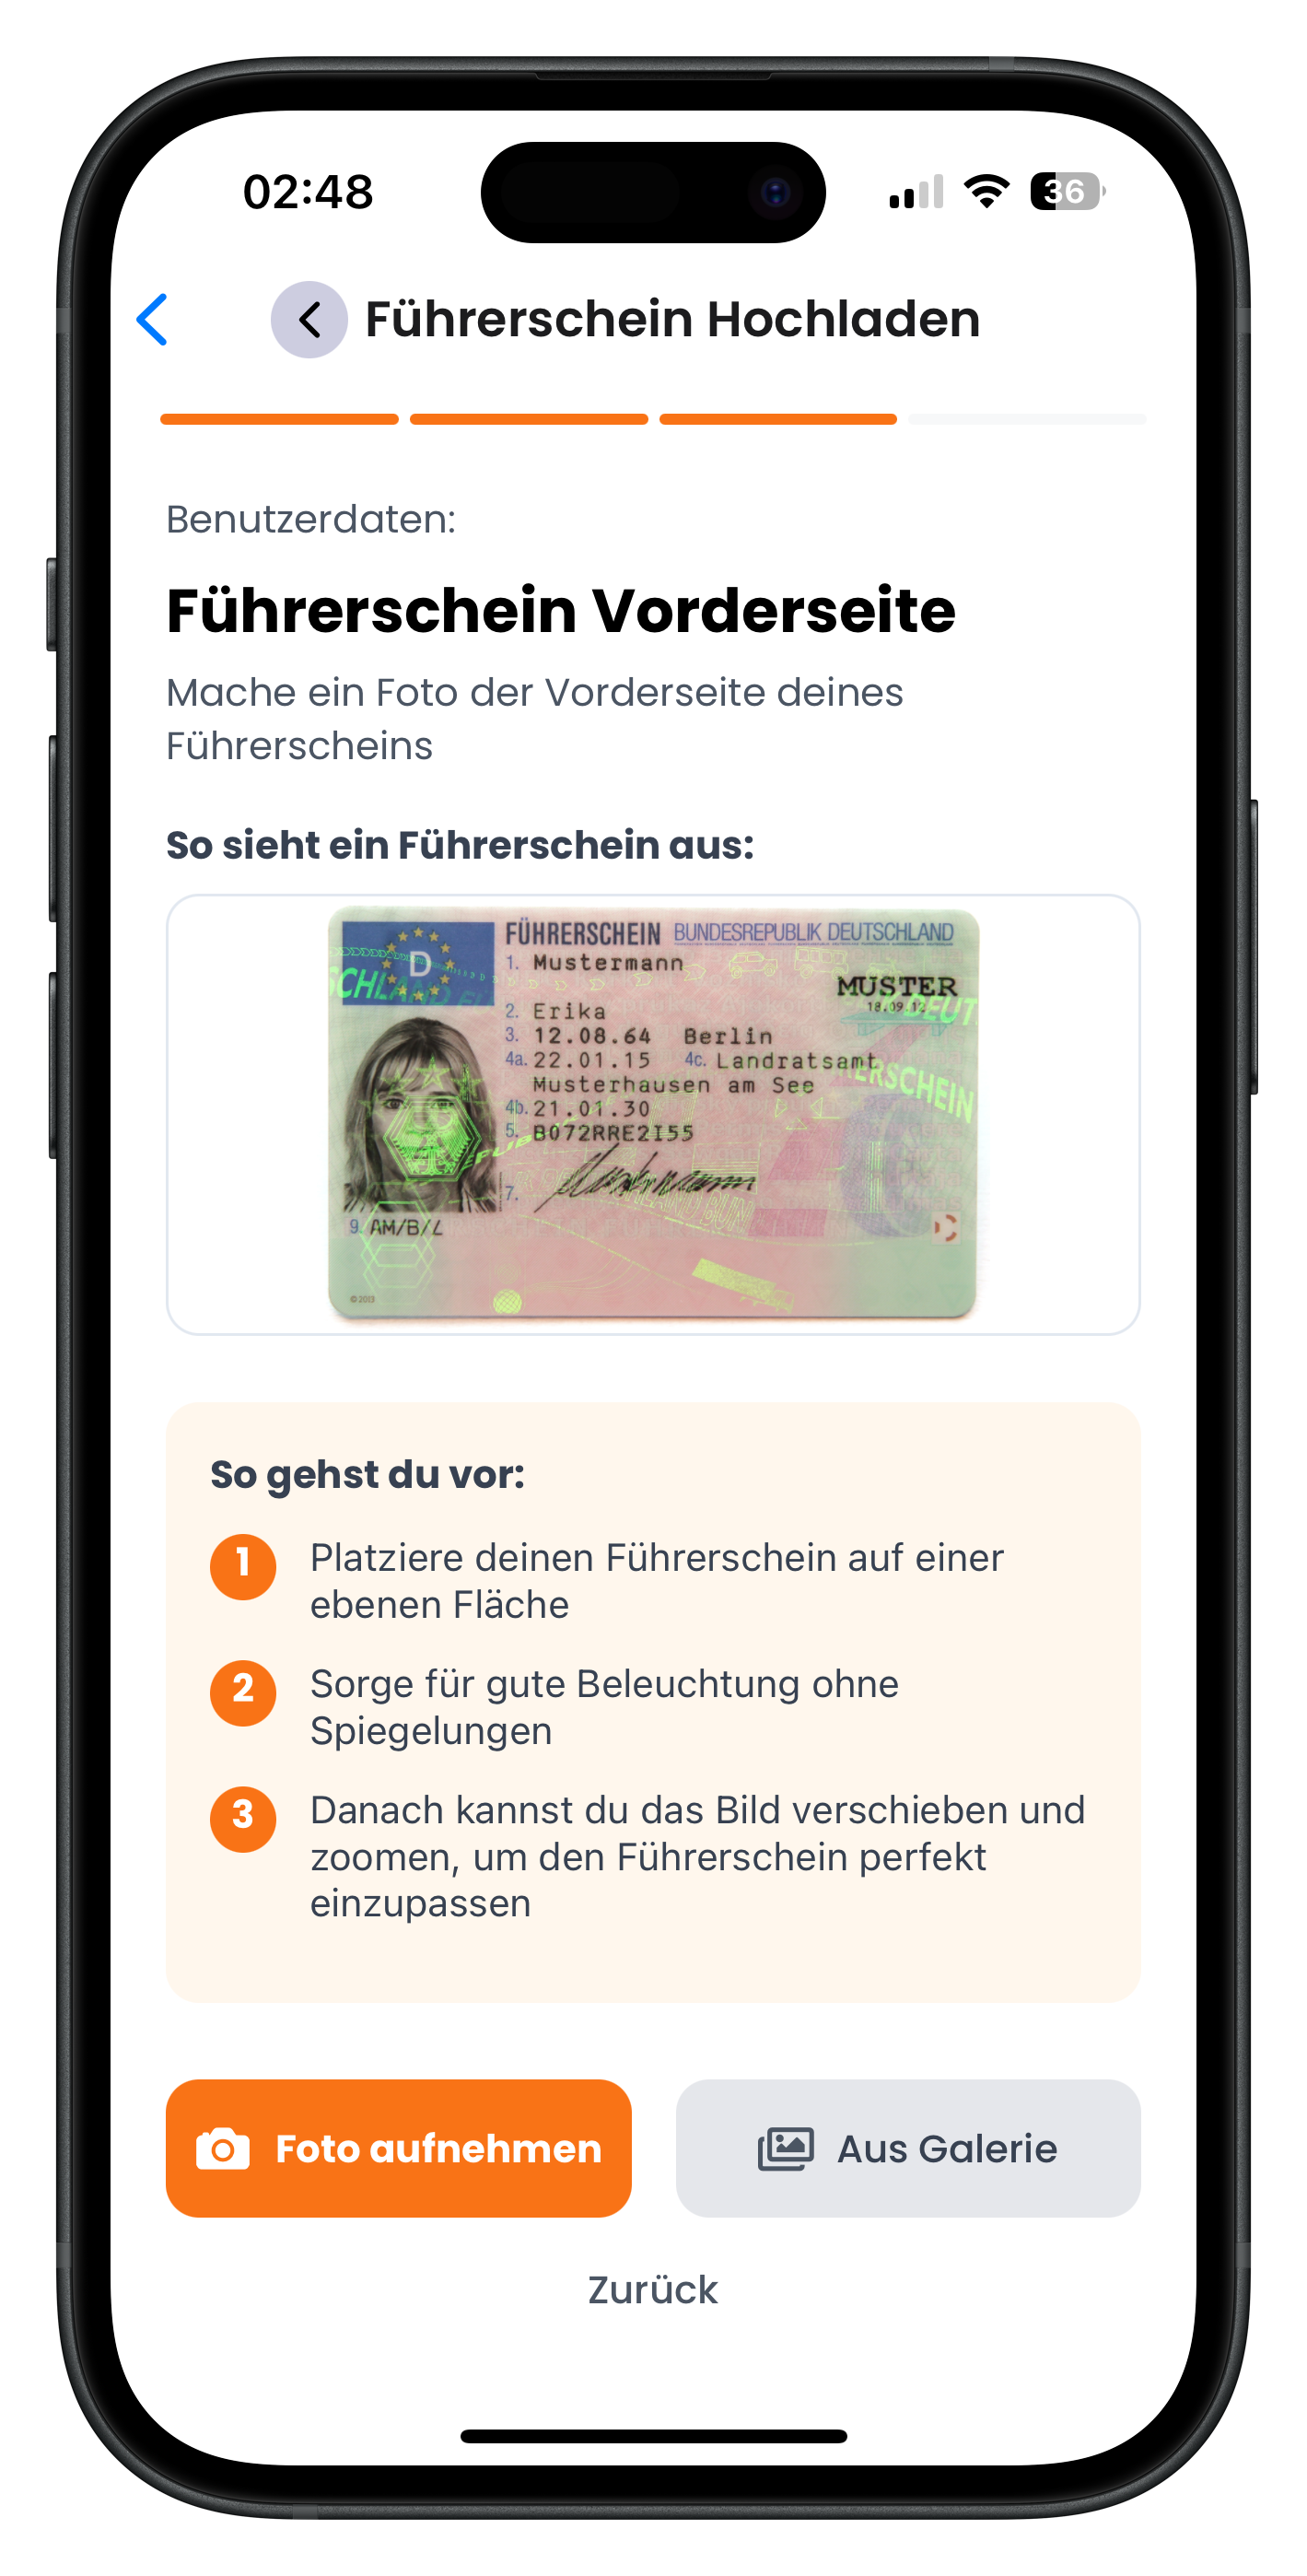
The app shows you a sample driving licence as a guide. Below it you'll find three tips for a good photo. Place your driving licence on a flat, bright surface and make sure all the details are clearly legible. You have two options: "Take photo" opens the camera directly, while "From gallery" lets you choose an existing photo. After uploading, you can still pan and zoom to frame the licence perfectly.
- Place the driving licence on a flat surface
- Ensure good lighting with no reflections or shadows
- All four corners of the driving licence must be visible
- After taking the photo, you can still adjust the crop
10
Photograph the back of your driving licence
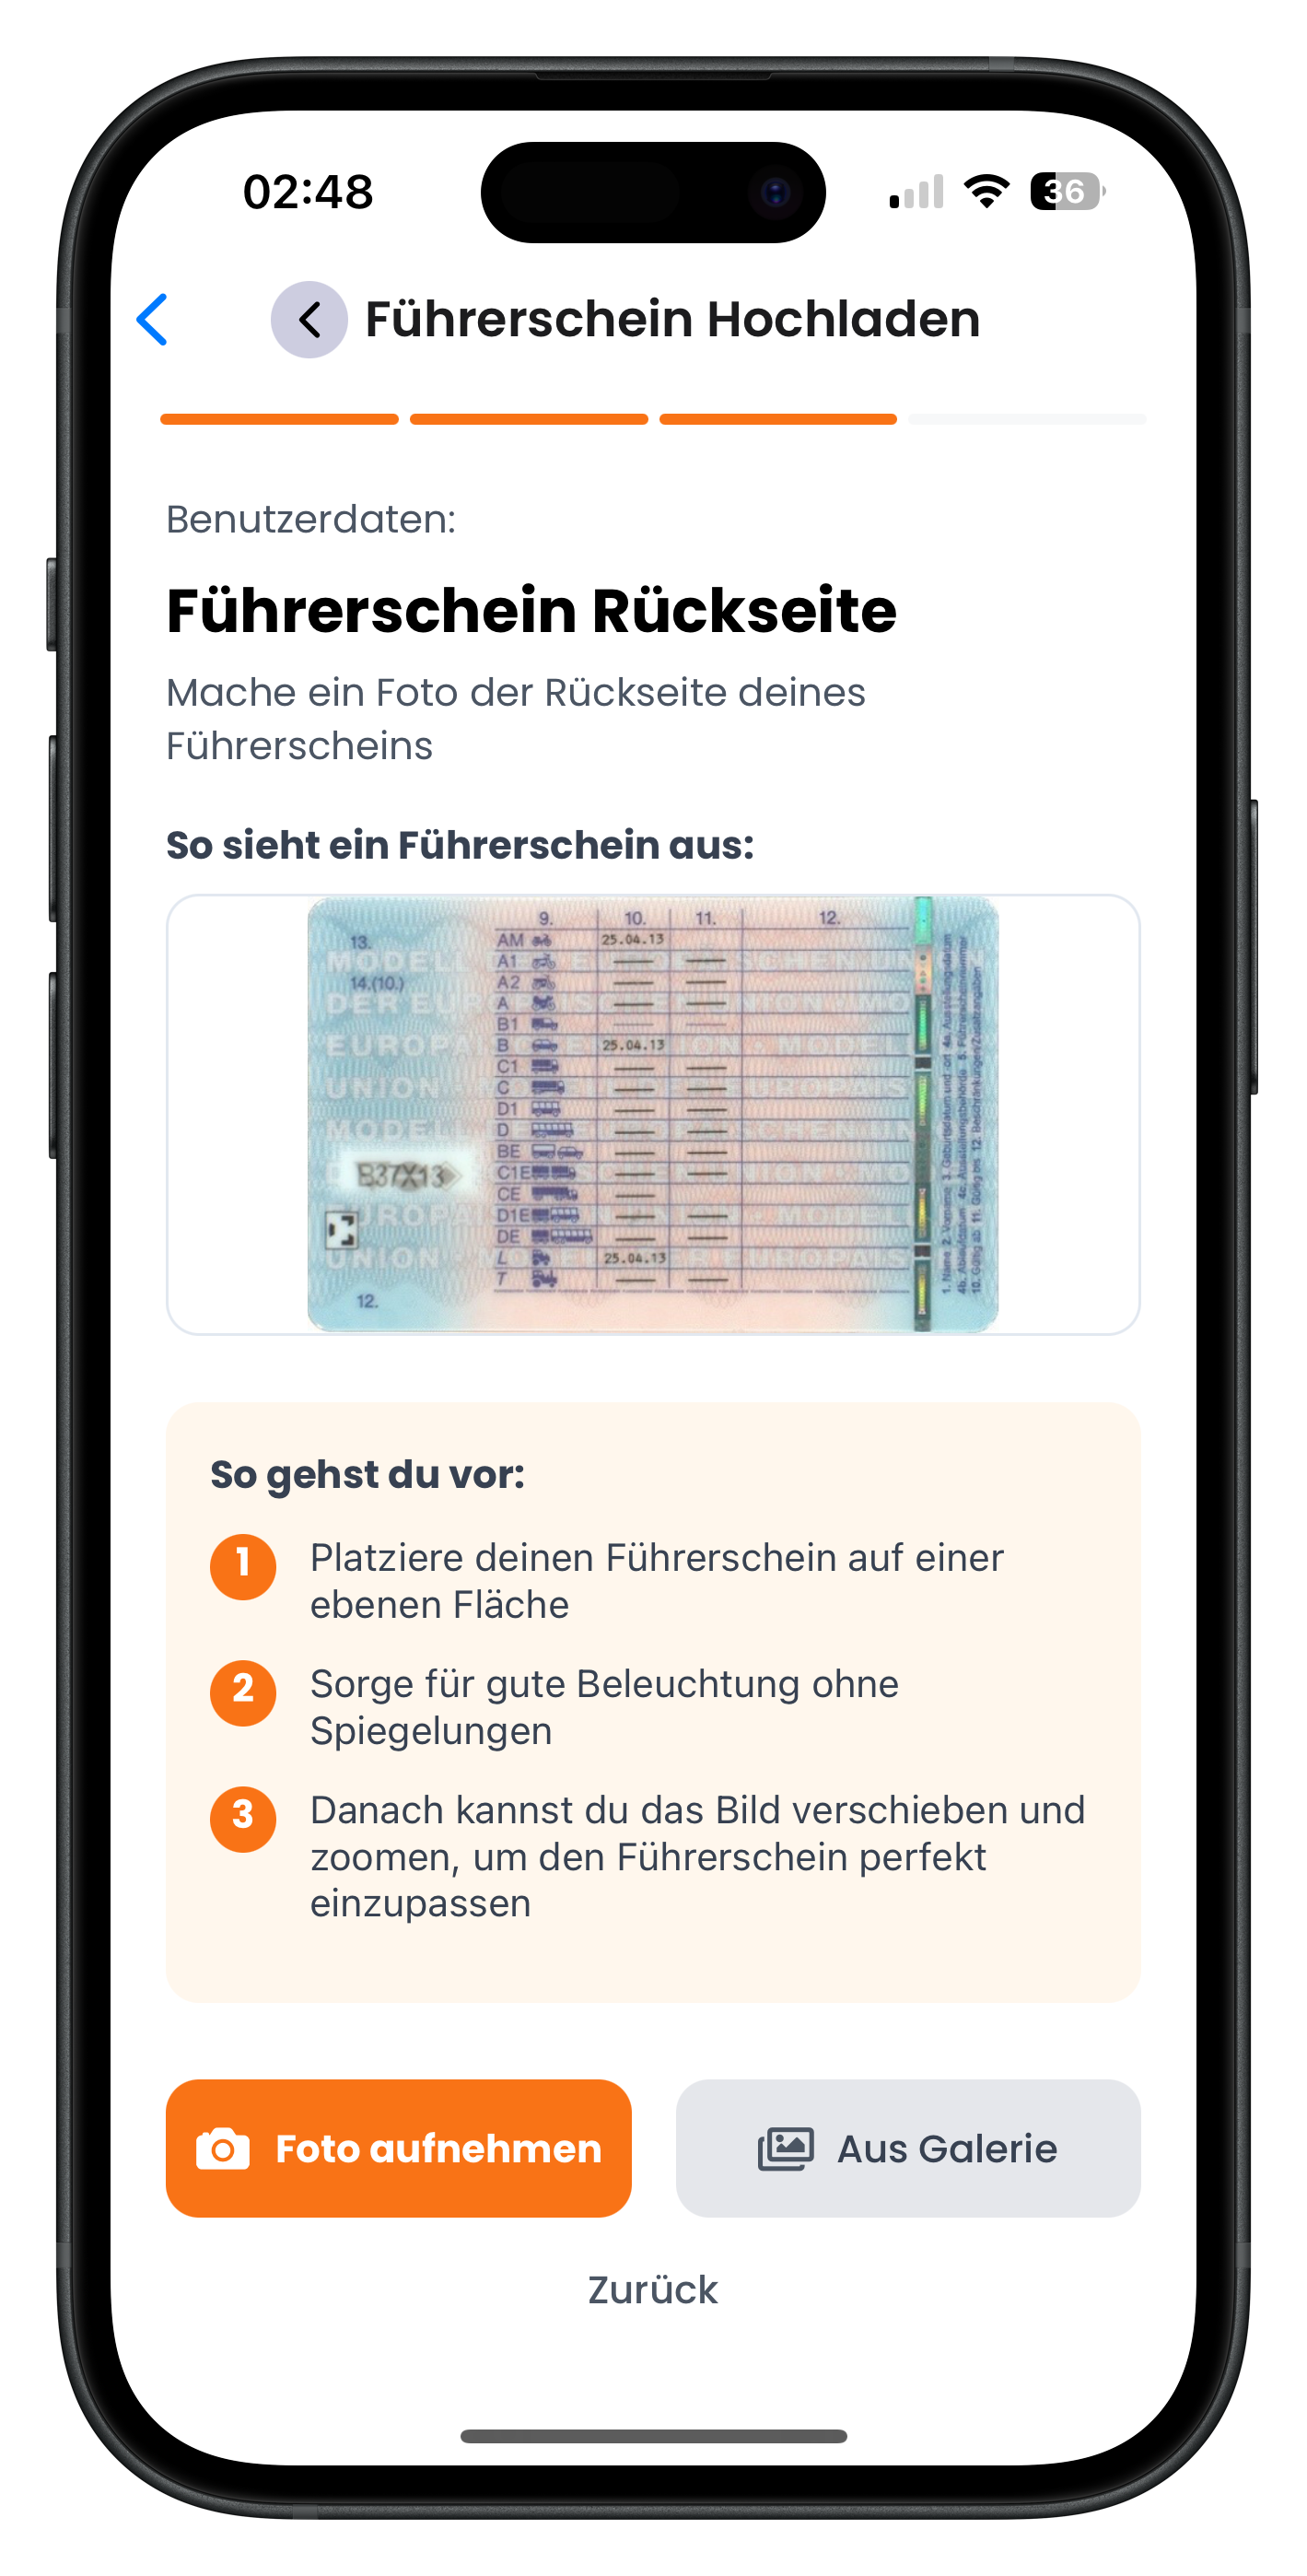
Turn your driving licence over and photograph the back. The app shows you a sample image here too. The same rules apply: flat surface, even lighting, no reflections. The back contains important information such as the vehicle categories your licence covers.
- Same tips as for the front: flat, well lit, no reflections
- Make sure the barcode on the back is readable
Upload your ID
11
Photograph the front of your ID
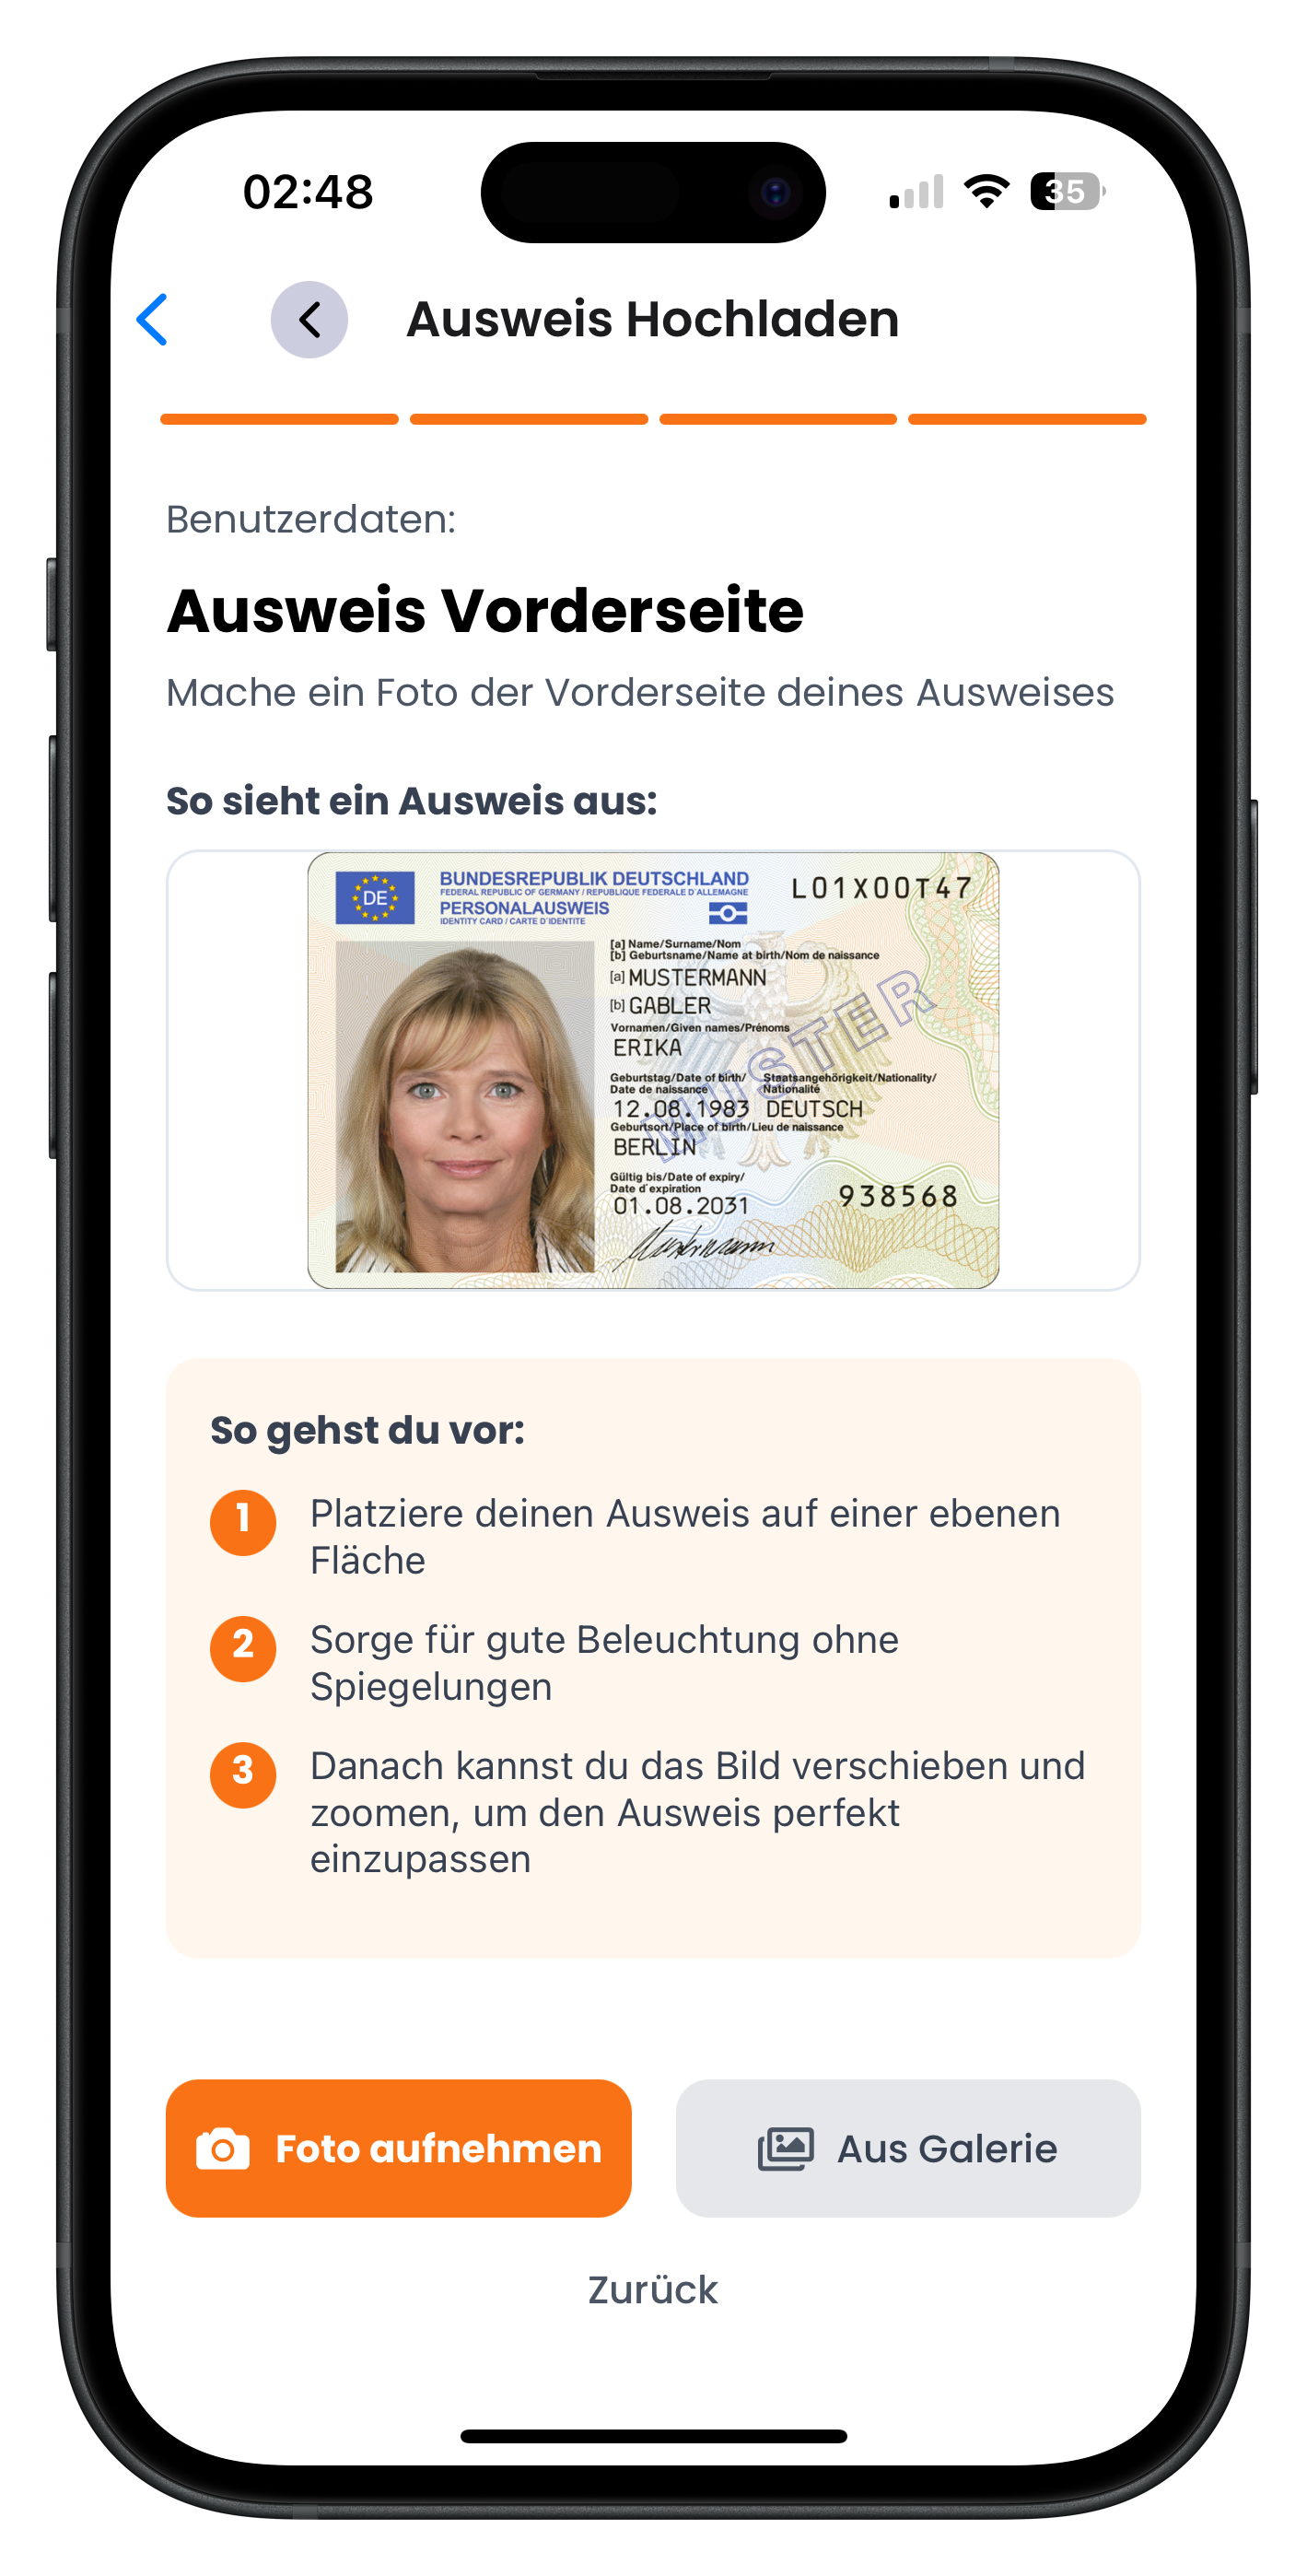
Last document: your ID. The app shows you a sample image here as well. Lay the ID flat and photograph the front. The ID is used for identity verification — it lets the host confirm that you are the person named on the driving licence. Your data is used solely for verification purposes and treated in strict confidence.
- Your ID must be valid (not expired)
- All details must be clearly legible
- A passport is also accepted as an alternative
Why does Drivable need your driving licence and ID? Every host on Drivable is a professional rental company and needs to know who the vehicle is being rented to. Your driving licence and ID confirm that you are a real person with a valid licence. This protects both parties and builds trust on the platform.
Verification complete
12
All four steps done — you're verified!
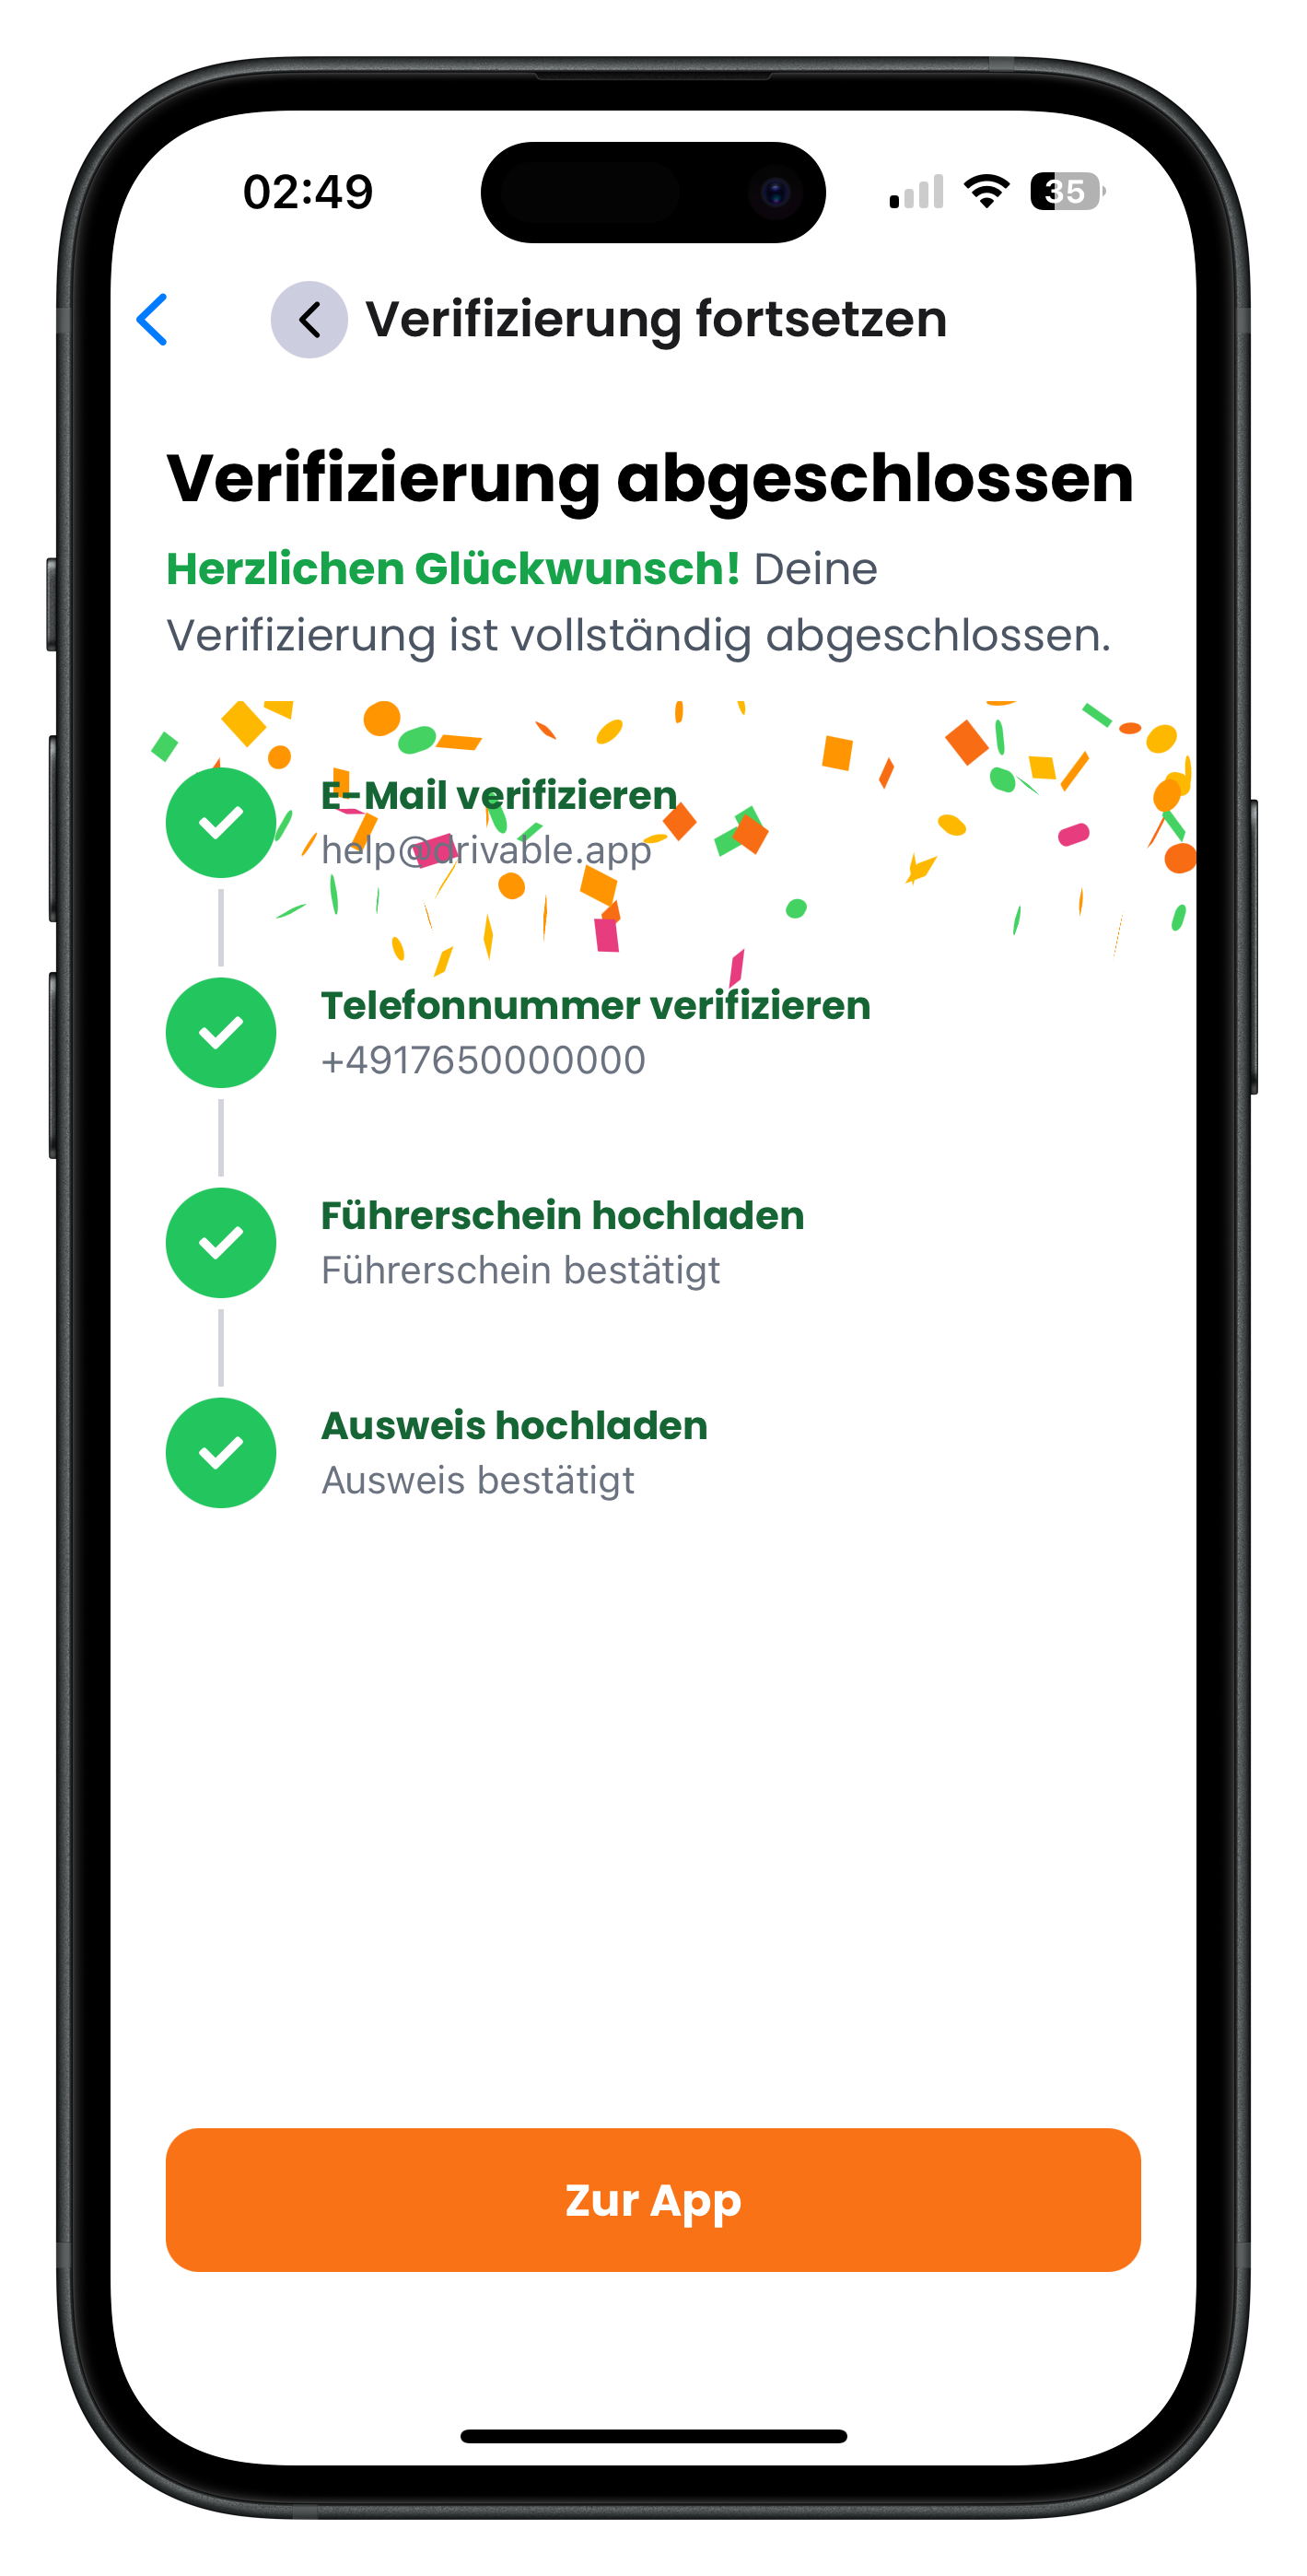
Once all four items are marked with a green tick, your verification is fully complete. The app congratulates you with confetti on the screen. Next to each step you can now see the confirmed details: your email, phone number, and confirmations for your driving licence and ID. Tap the orange button "Go to app" to get started and search for your first sports car.
- All four ticks are green — you're fully verified
- You can now send booking requests to hosts
- Your verified status remains permanently active
Your profile after registration
13
Profile overview and settings
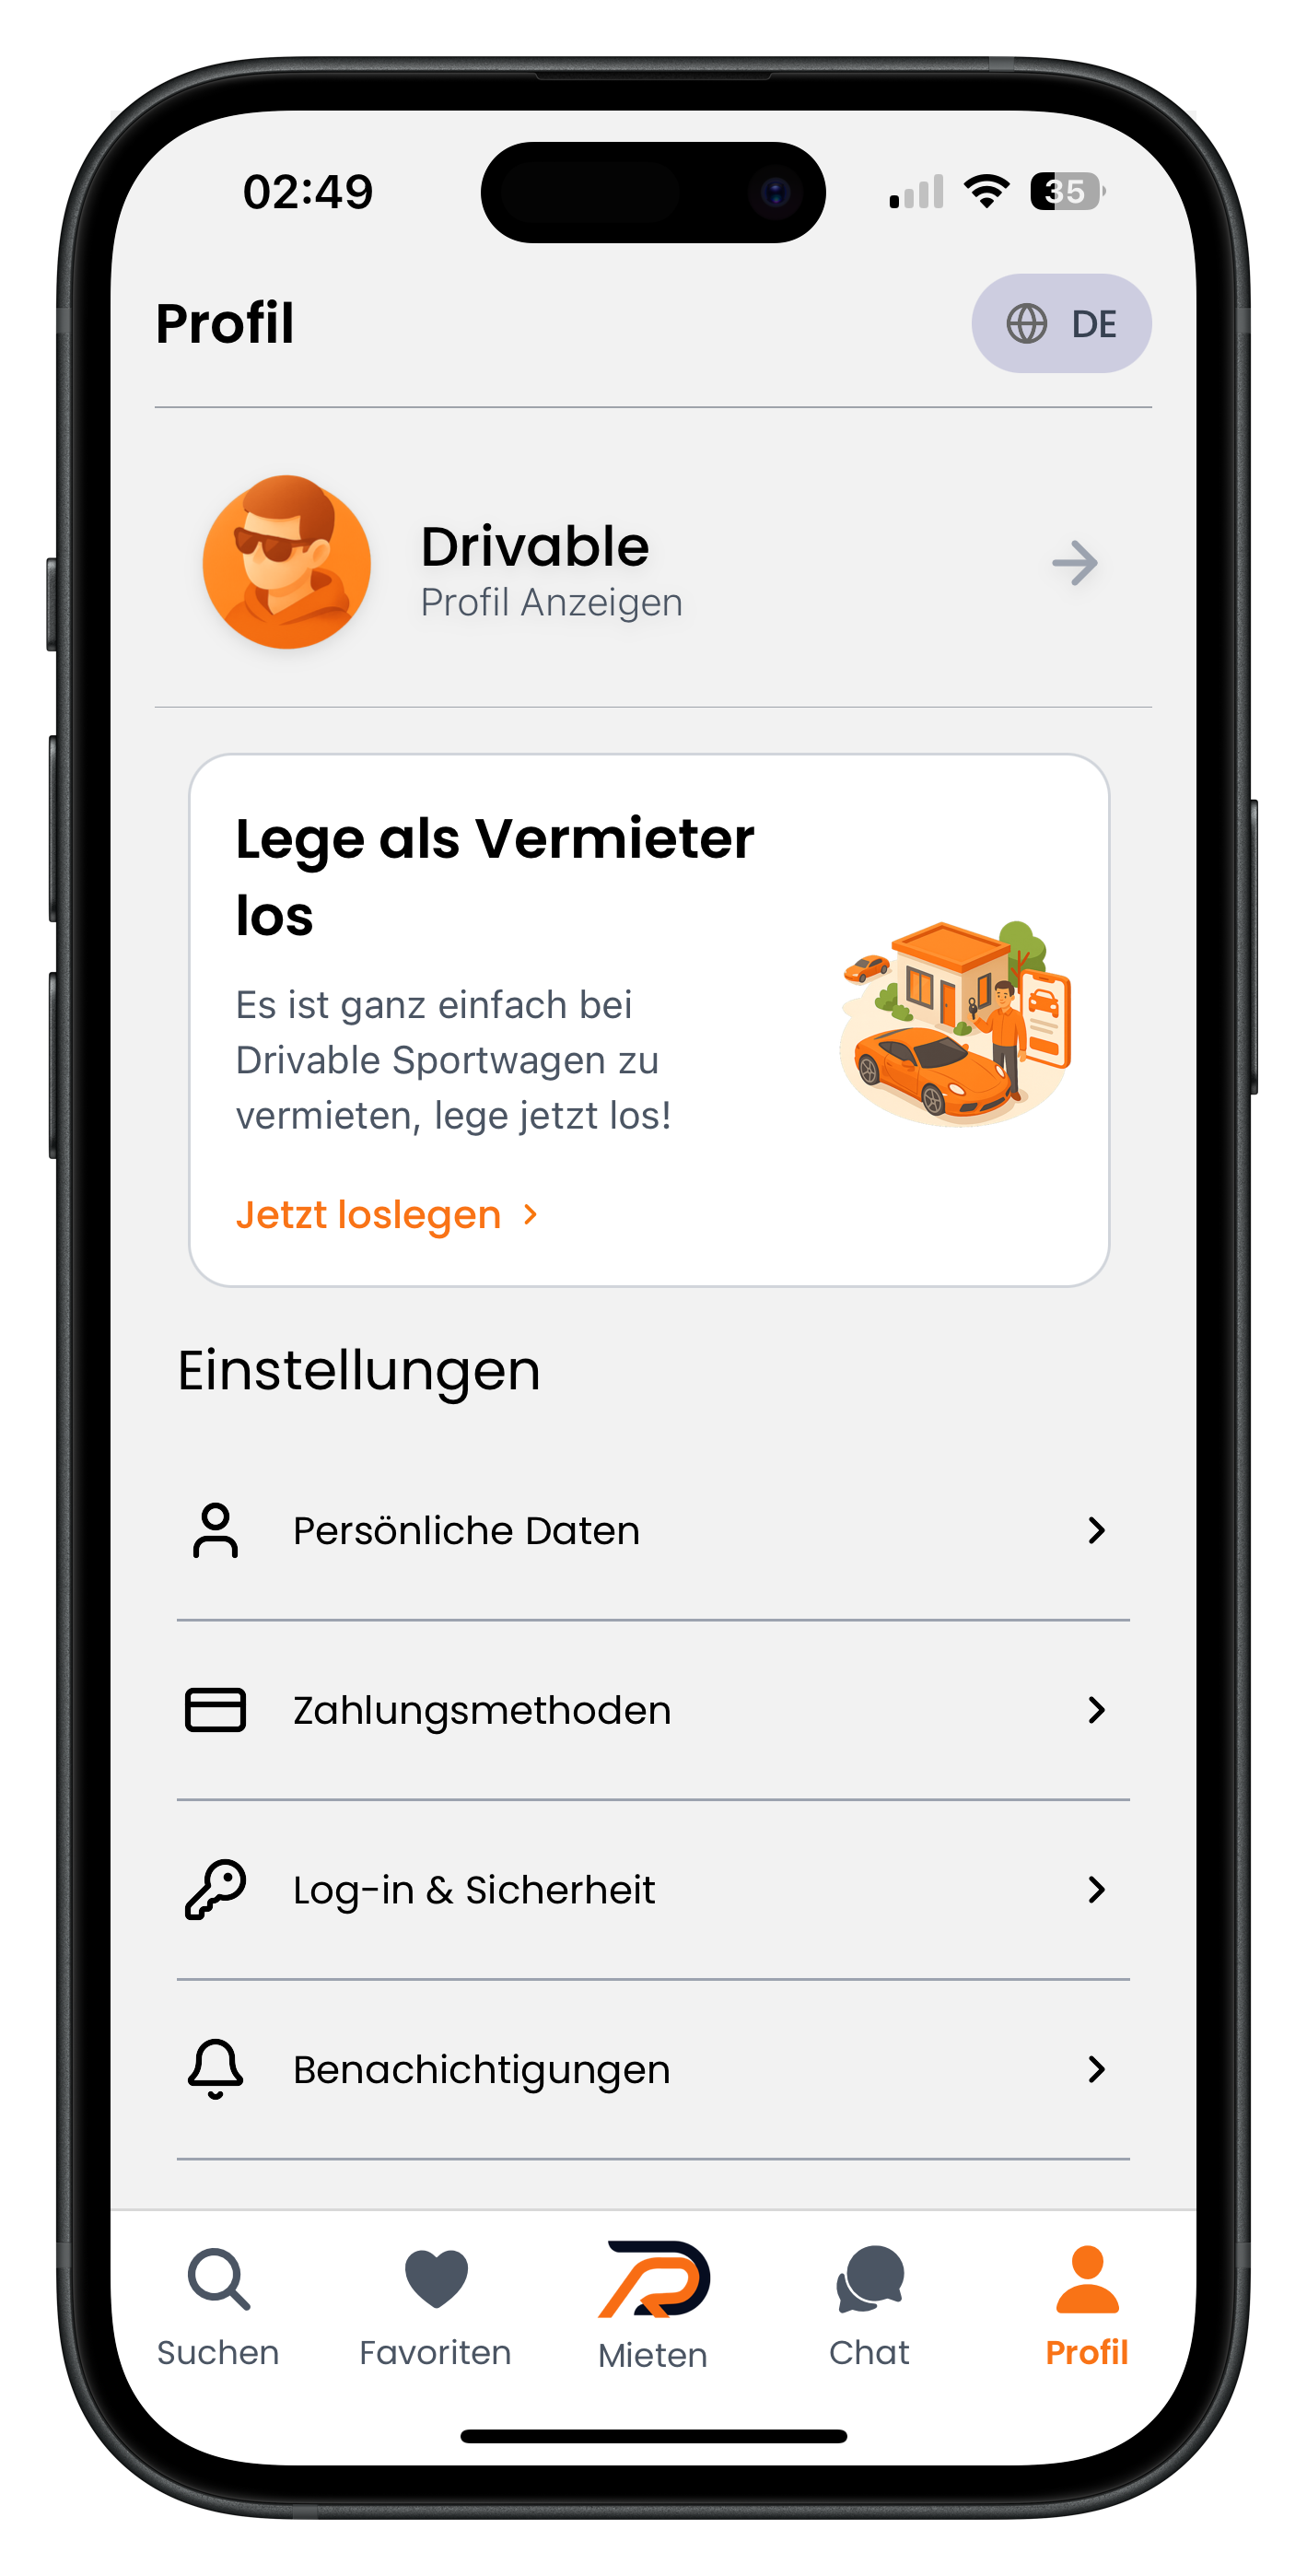
Back in the Profile tab you'll now see your name and profile picture (if you've added one). At the top you'll find the option "Get started as a host" — useful if you are a professional sports car rental company and want to list your fleet on Drivable. Below that is the Settings section with various sub-items where you can manage your account.
- Personal details: view and edit your name, contact information and documents
- Payment methods: add credit cards, Apple Pay, Google Pay or Klarna
- Login & security: change your password, manage two-factor authentication
- Notifications: configure push notifications and email notifications
14
View and edit your personal details
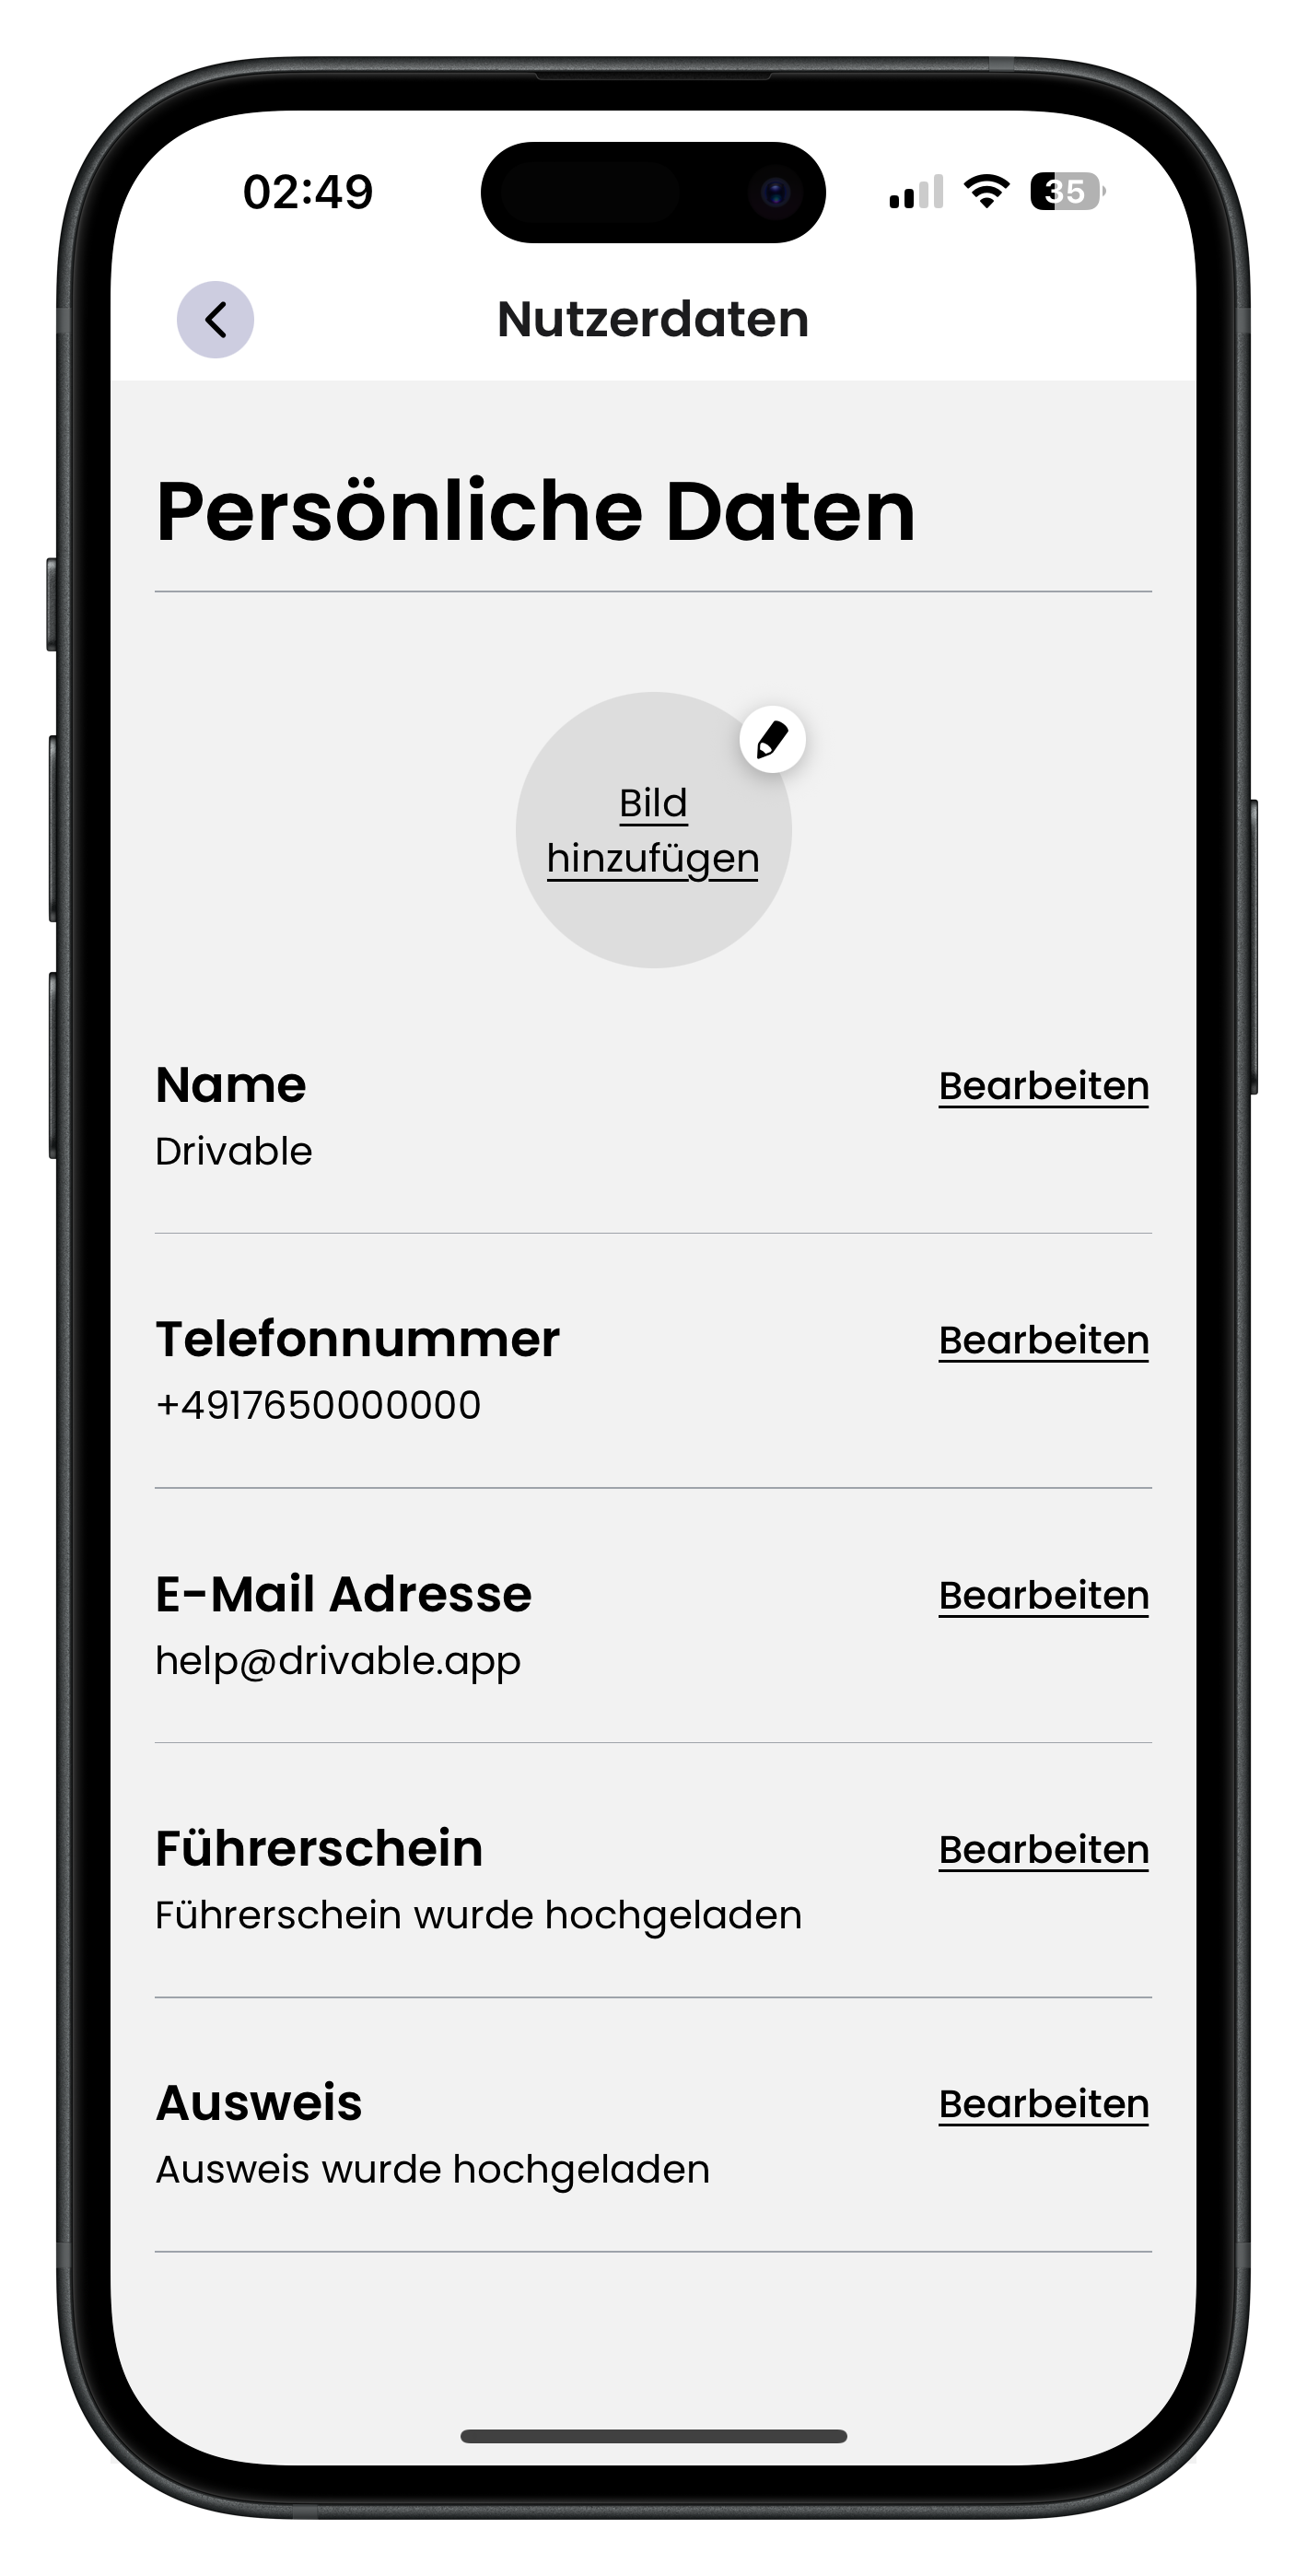
Under "Personal details" you'll find all the information you provided when registering. Each entry — name, phone number, email address, driving licence and ID — has an "Edit" link on the right-hand side. This lets you update your details at any time, for example if you have a new phone number or your driving licence has been renewed. Changes to your driving licence and ID need to be verified again.
- Profile picture: shown to the host when you send a booking request
- Phone number: can be changed, requires SMS verification again
- Email: can be changed, requires email verification again
- Driving licence and ID: upload a new photo, will be reviewed again
Keep your details up to date. If your driving licence expires or you move house, update your profile. This helps you avoid problems at the vehicle handover.
Frequently asked questions

Drivable Team
Help & Support
Das Drivable Team erklärt dir Schritt für Schritt, wie du die Plattform und App nutzen kannst.
9. April 2026
War dieser Artikel hilfreich?