Edit your listing – update vehicle details
Want to update the description, technical specs, rental terms or pricing on an existing listing? This guide walks you through every step — showing you exactly where to edit each detail in the Drivable app and what to keep in mind. All changes are saved automatically.
Your vehicle is already live, but you want to make some changes? Maybe a new description, a different weekend price, or an extra mileage package. That's exactly what the Edit screen is for. You can reach it from your Garage and change every detail of your listing there. The best part: Drivable saves every change automatically, so you never need to tap Save separately.
- Update the description, title and photos
- Edit technical vehicle data such as horsepower, top speed, drivetrain and fuel type
- Set rental terms: minimum age, deposit, excess and trips abroad
- Configure included mileage and additional mileage packages
- Edit pricing, pick-up location, delivery, cancellation policy and extras
Before you get started: if your vehicle isn't listed yet, begin with Create a listing – List your vehicle. This article covers editing an existing listing.
Opening the Edit screen
1
Open the listing in your Garage and tap "Edit Listing"
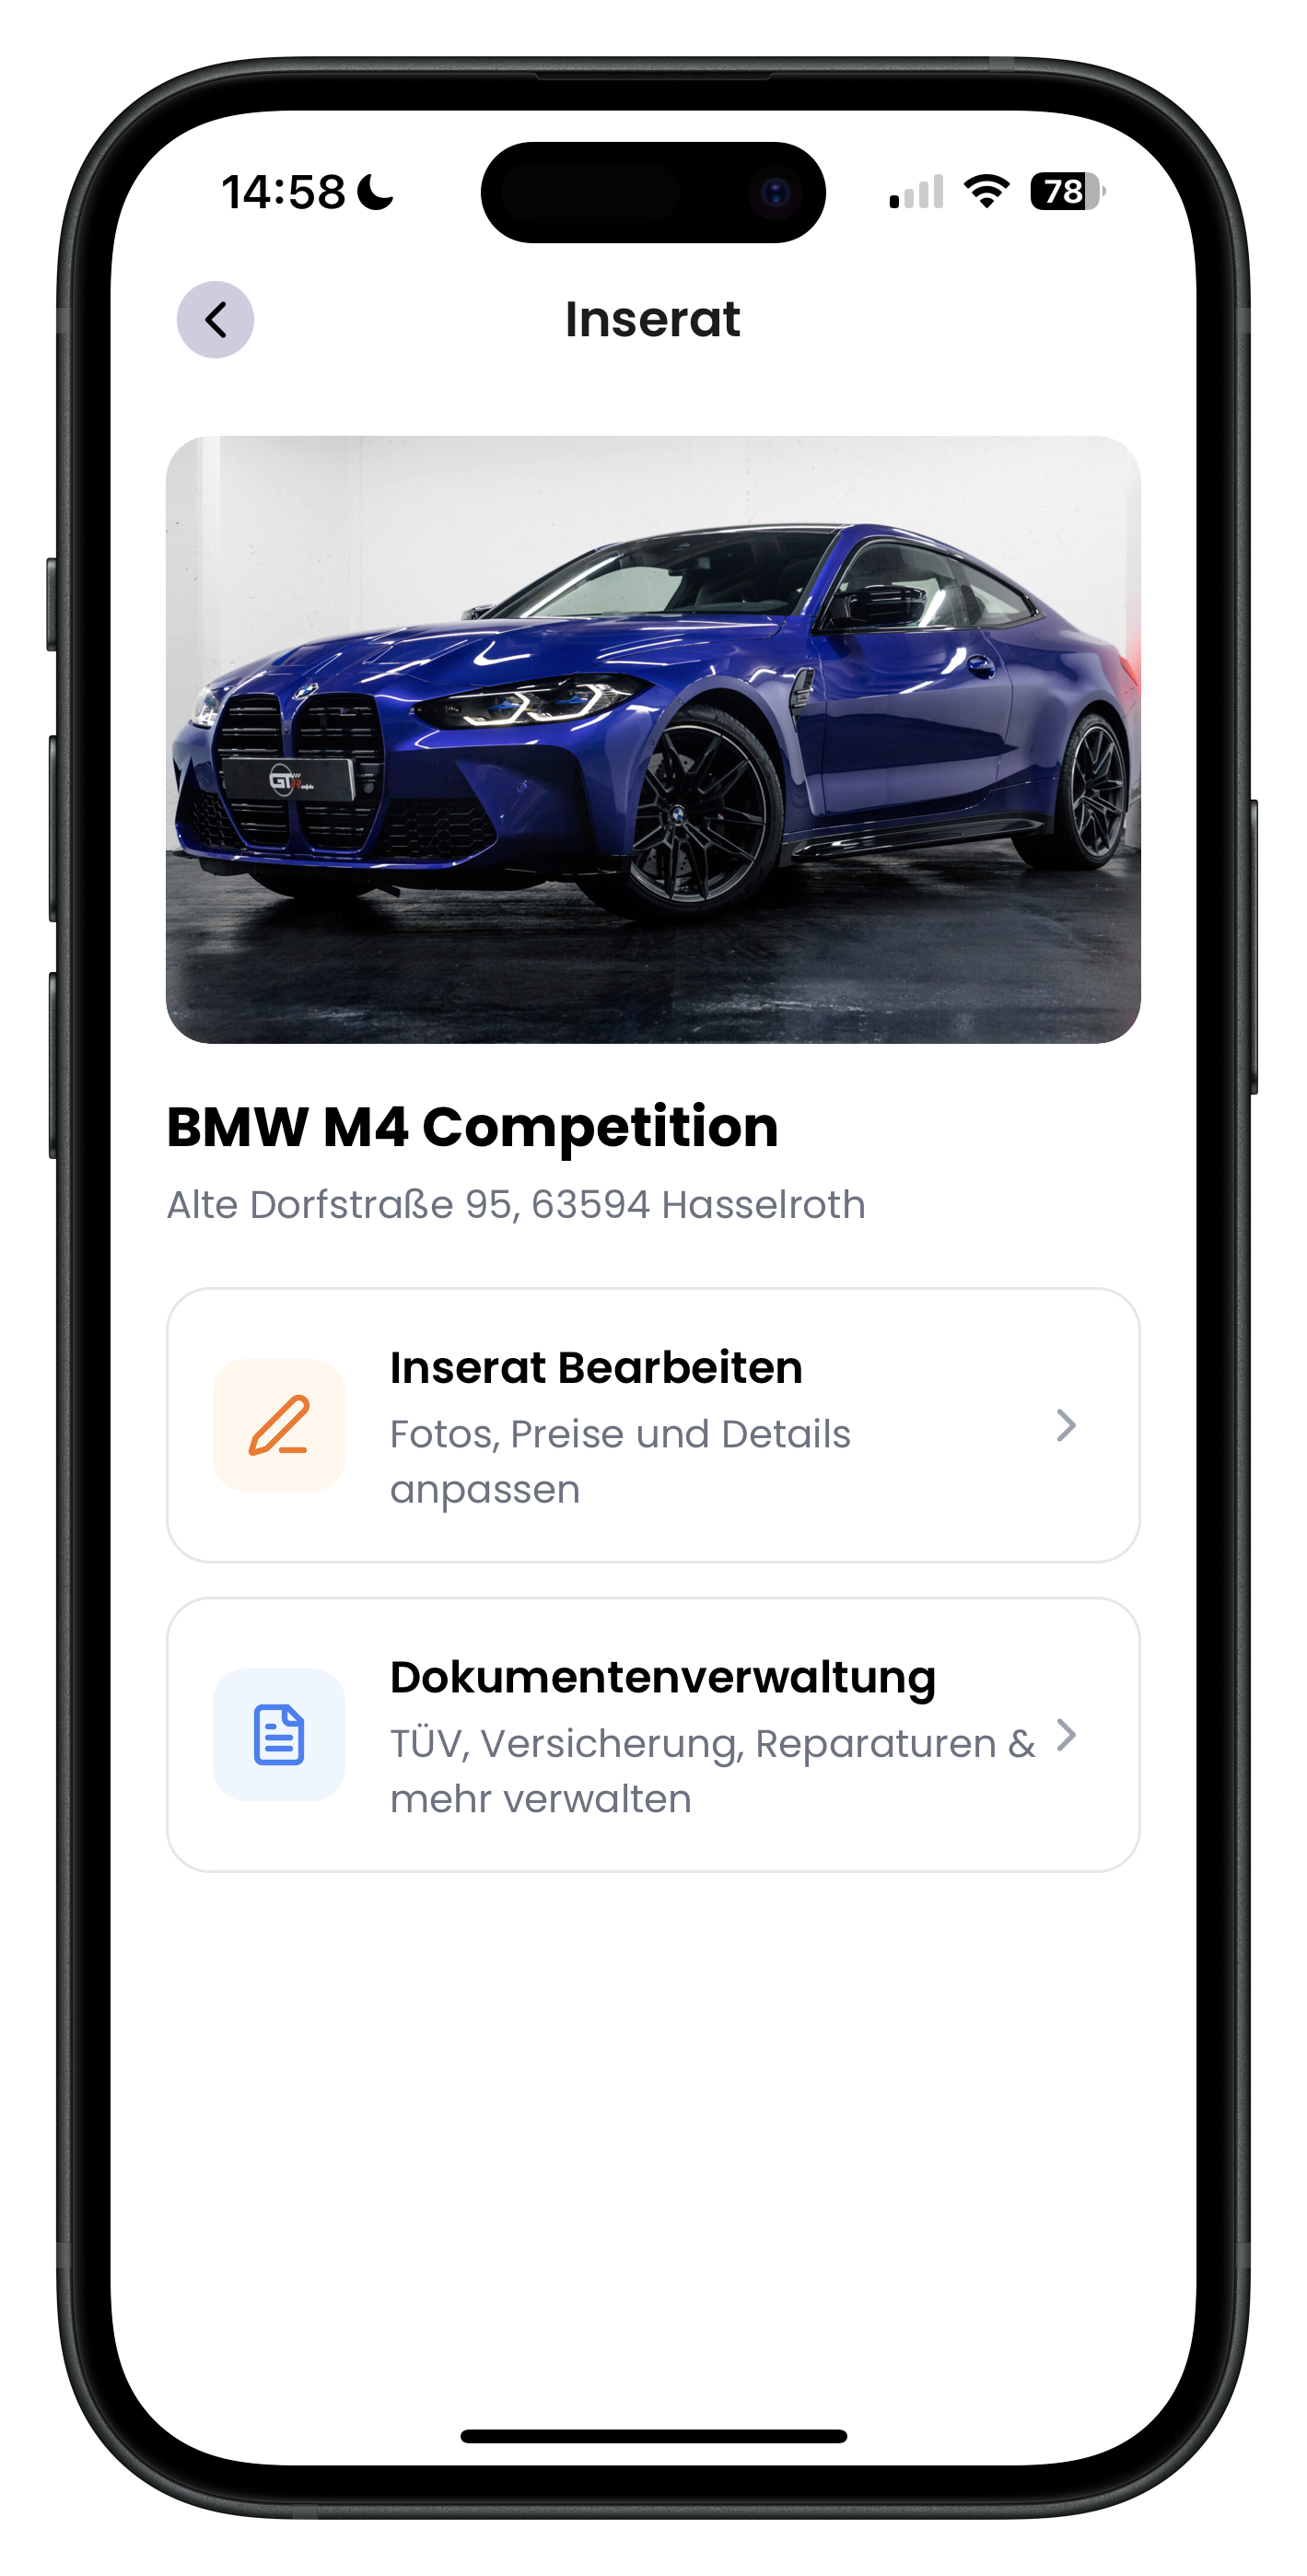
In your Garage, tap the vehicle you want to update. At the top you'll see the main photo, with the vehicle name below it — for example BMW M4 Competition — plus the saved address. Directly below that you'll find two tiles. Tap the top one with the orange pen icon and the label Edit Listing – Update photos, pricing and details.
- The second tile, "Document Management", is for MOT certificates, insurance and repairs — not for the listing itself
- You can spot the right section by the orange pen icon
- The vehicle name and address at the top help you make sure you've selected the right car
2
Find photos, title and vehicle data in the overview
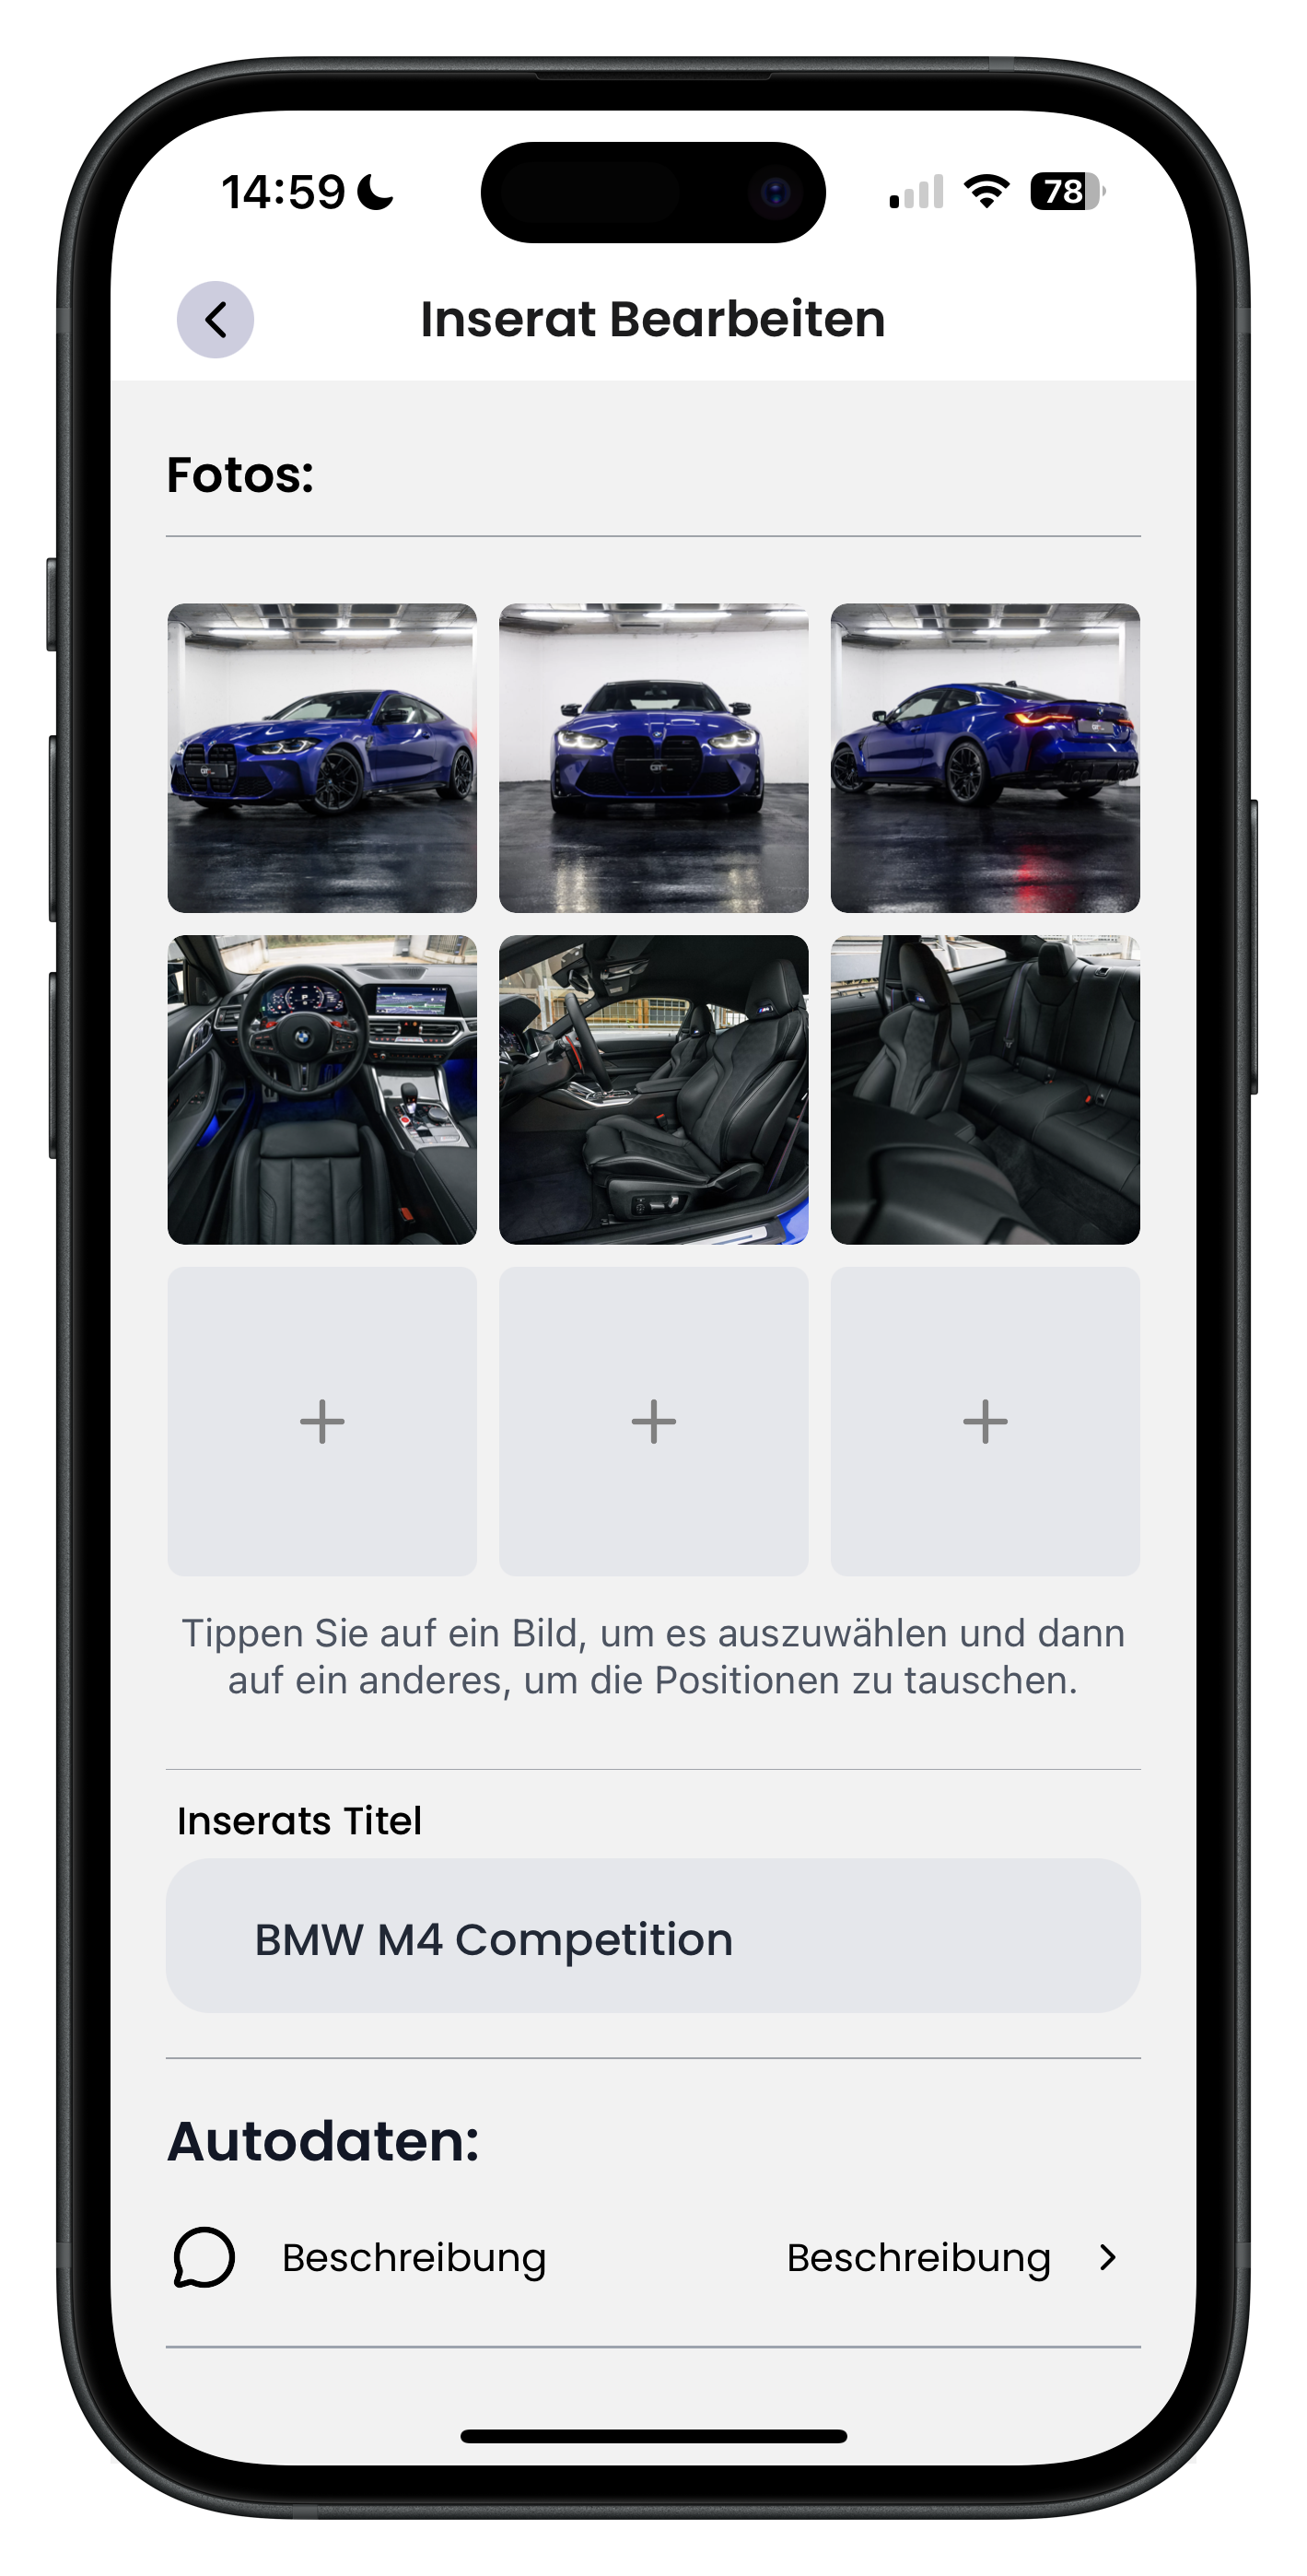
You're now on the Edit Listing screen. At the very top you'll see your photos displayed as a grid. Use the grey plus tile to add new images; tap a photo to swap its position. Below that you'll see your Listing Title and the Vehicle Data: section, starting with the Description row. Just scroll down — every row is tappable and opens its own window.
- Tap a photo to select it, then tap another to swap their order
- The first photo is your cover image and is the first one renters see
- Tap the "Description" row to move on to the next step
Great photos are your most powerful selling point. Put your best shot first and use bright exterior images along with a few interior photos. This will get you more clicks in search results.
Updating the description and technical vehicle data
3
Write your vehicle description and let it save automatically
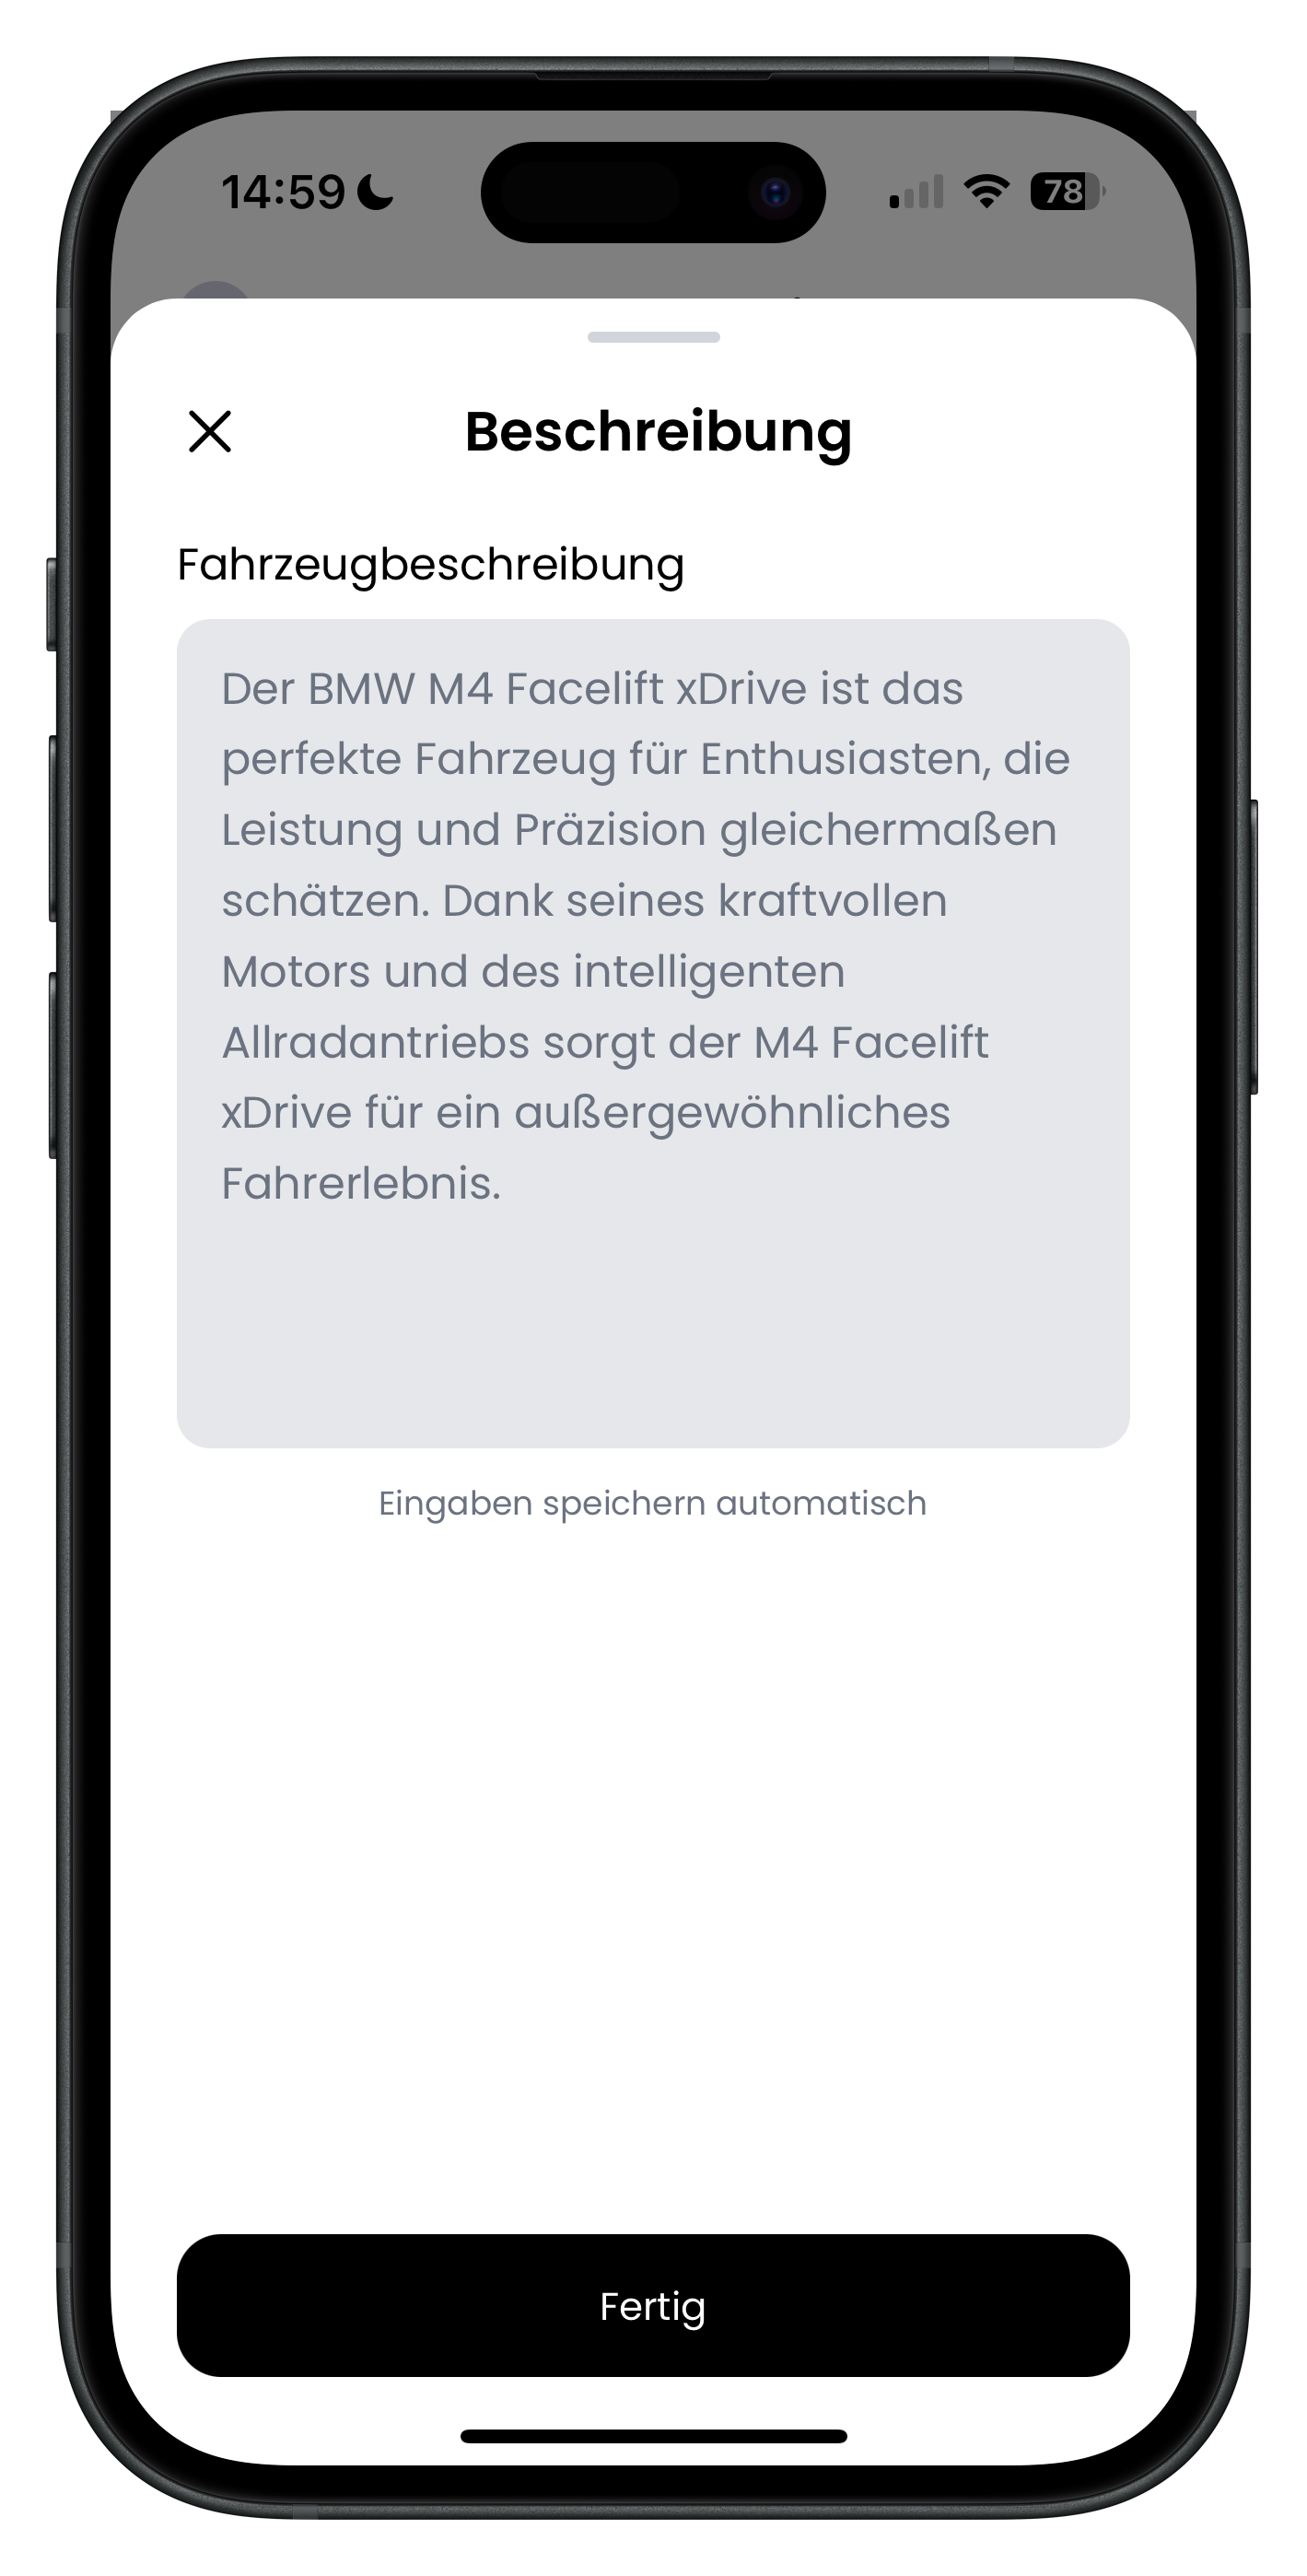
When you tap Description, the Description window opens with the Vehicle description text field. This is the text renters will read on your listing. Write concretely about what makes your car special: the equipment, the sound, the driving feel, any standout extras. Below the field you'll see Changes are saved automatically, so there's nothing extra to do. Then tap the black Done button at the bottom.
- Keep it short and specific — nobody wants to read an essay
- Mention highlights like all-wheel drive, the sound system or special wheels
- The change is saved instantly, even if you just close the window
4
Enter the power output in horsepower
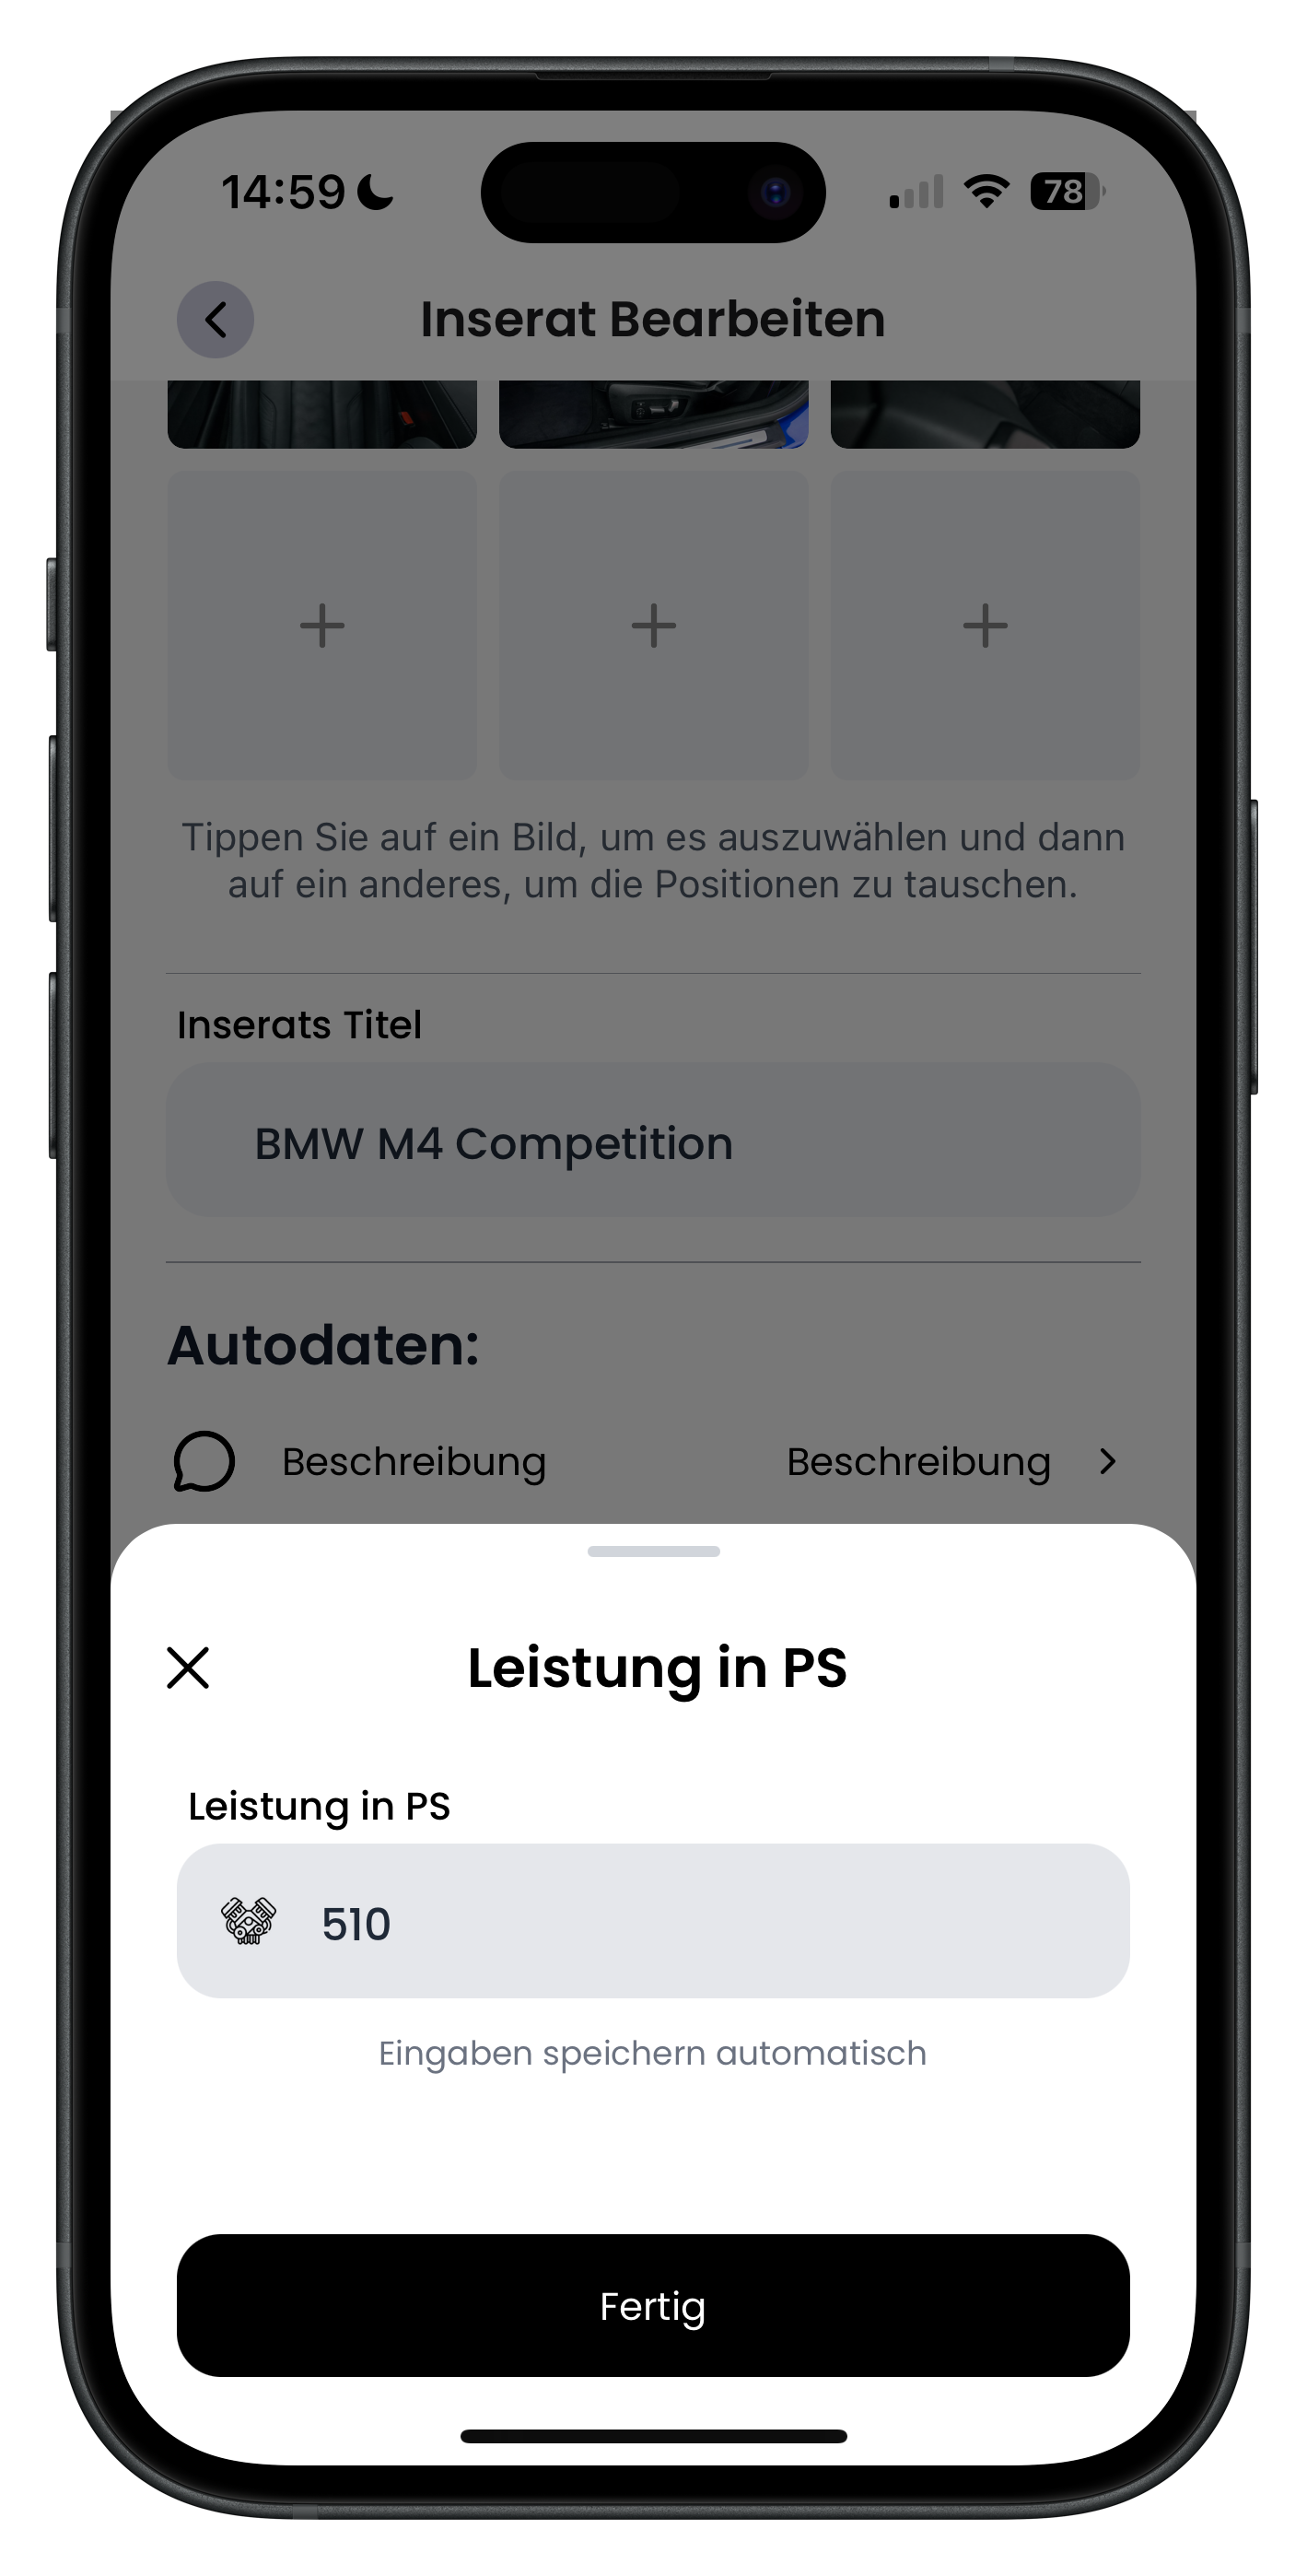
Back in the vehicle data, tap the Power (hp) row. A small window opens with the Power (hp) field showing the current figure — for example 510. Enter your vehicle's actual power output here. This is an important criterion for many renters and appears in the vehicle data section of your listing.
- Enter your model's actual power output — it builds trust
- Here too, your input is saved automatically
- Tap Done after entering the value to return to the overview
5
Enter the 0–100 km/h acceleration time in seconds
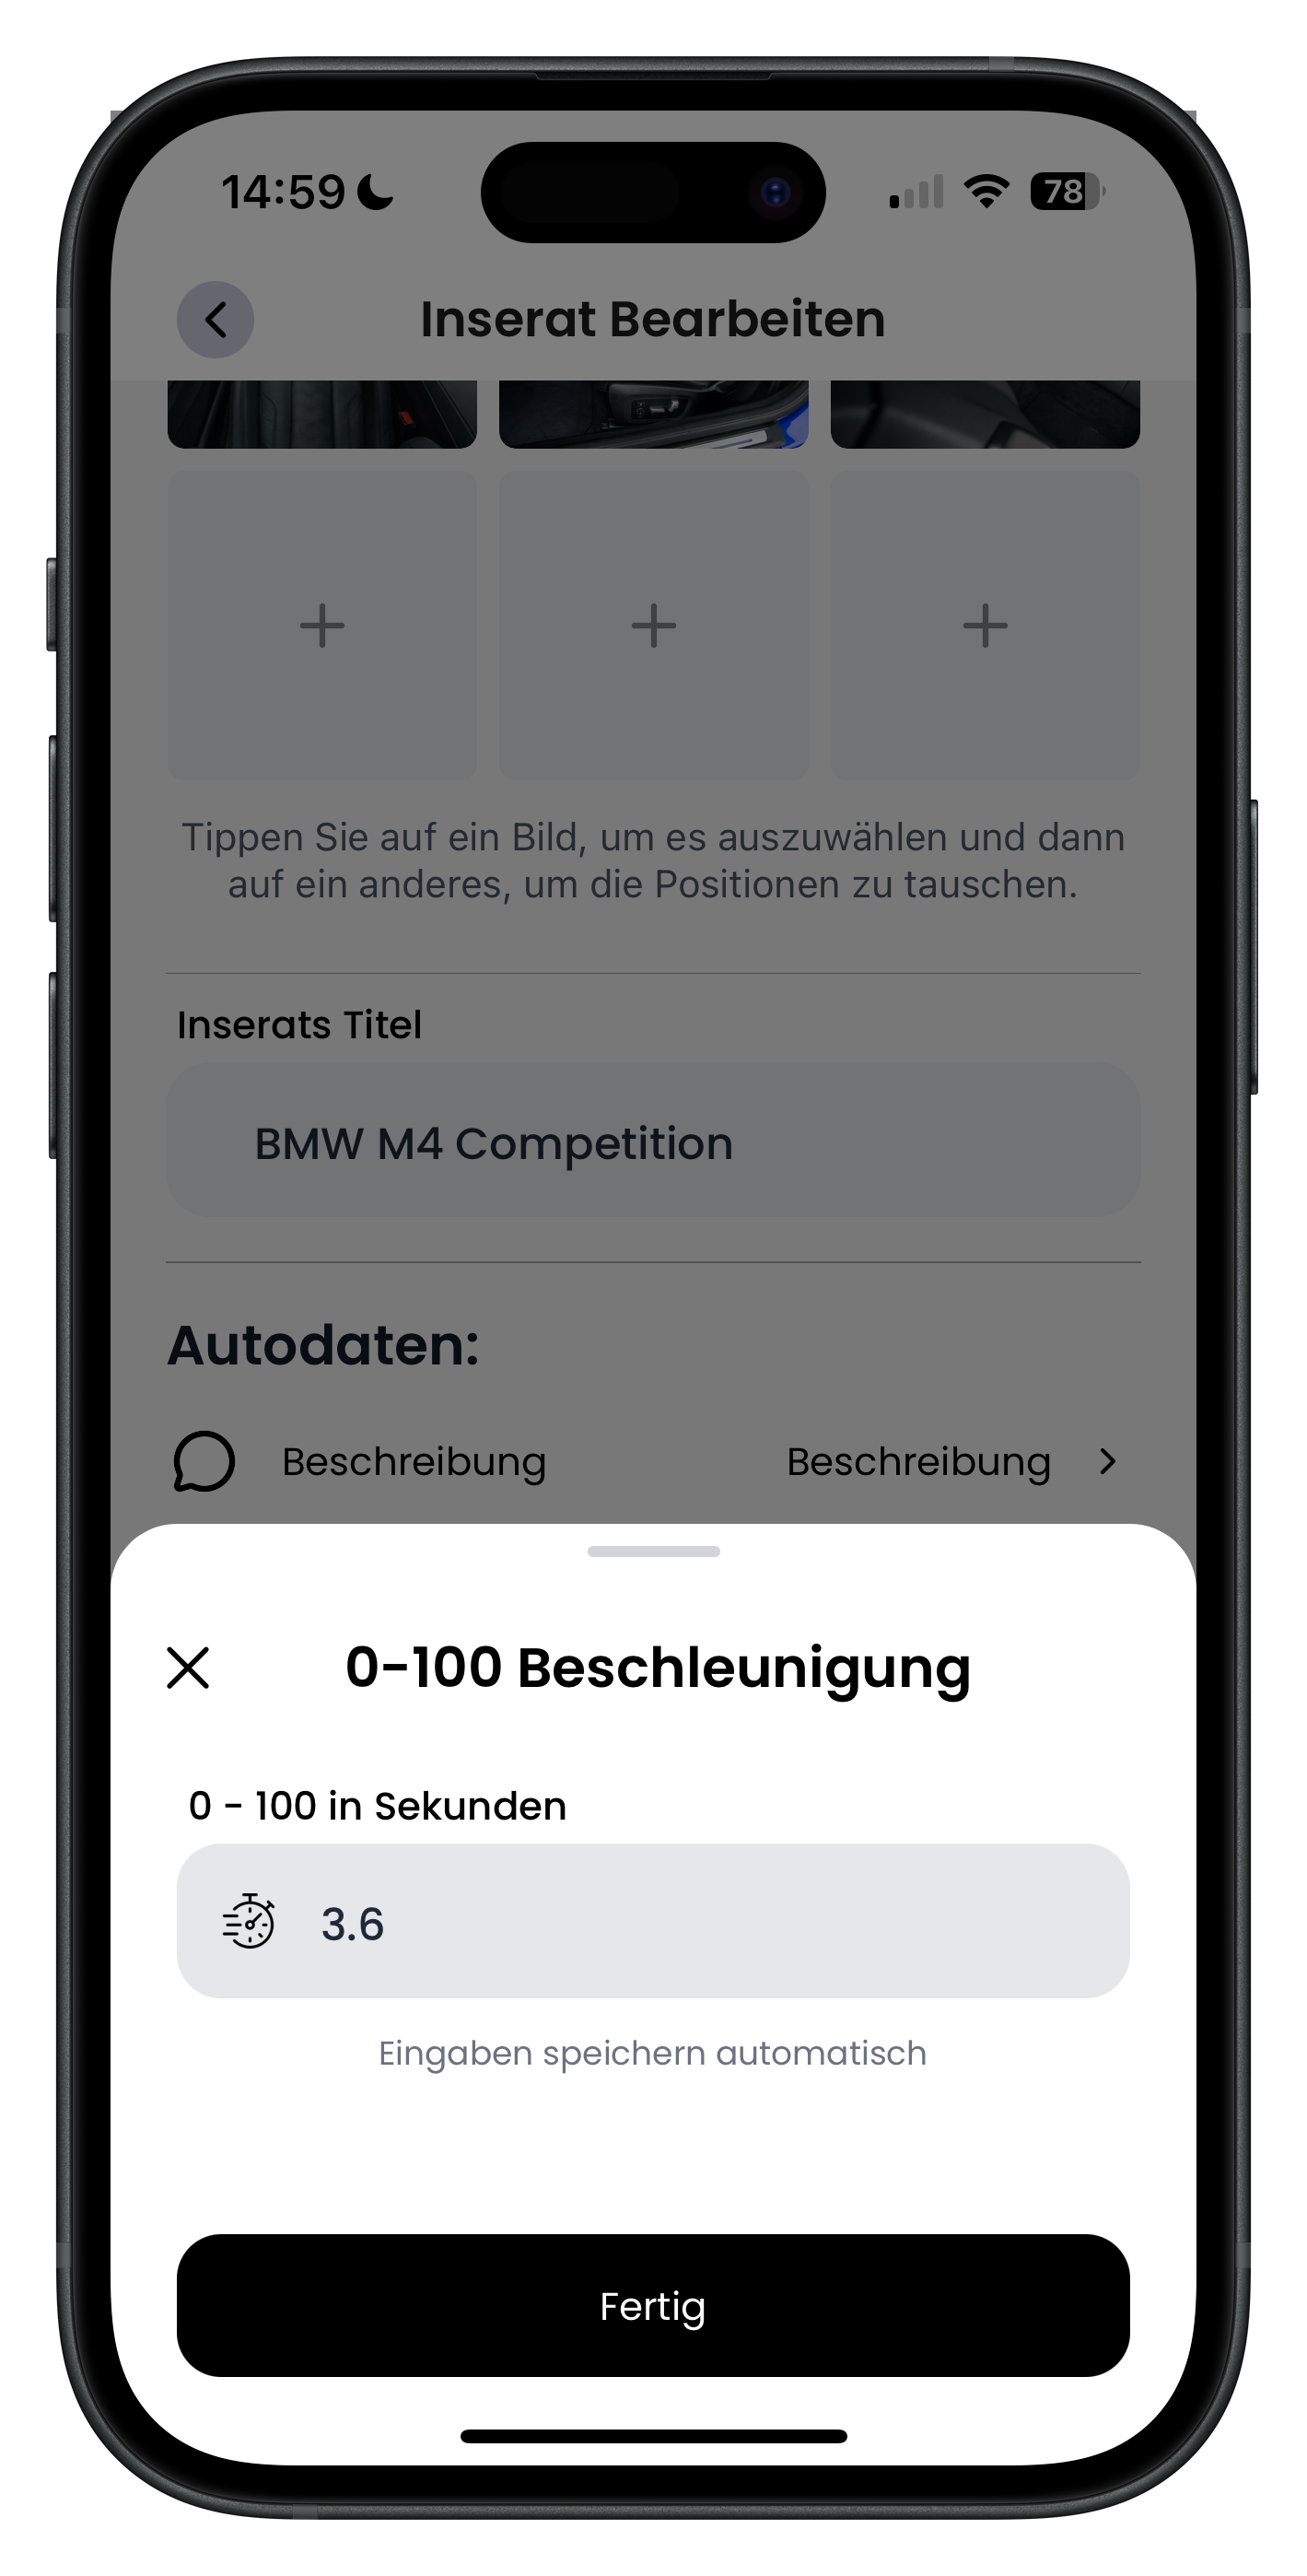
The next row is 0–100 acceleration. In the window, enter the value under 0–100 in seconds — for example 3.6. This is the time your car takes to go from a standstill to 100 km/h. Renters looking at sports cars pay close attention to this figure, so enter it as accurately as your model's spec sheet states.
- Use a full stop as the decimal separator — so 3.6, not 3,6
- The value will appear later in the listing's technical specs
- Close the window with Done
6
Select the engine type
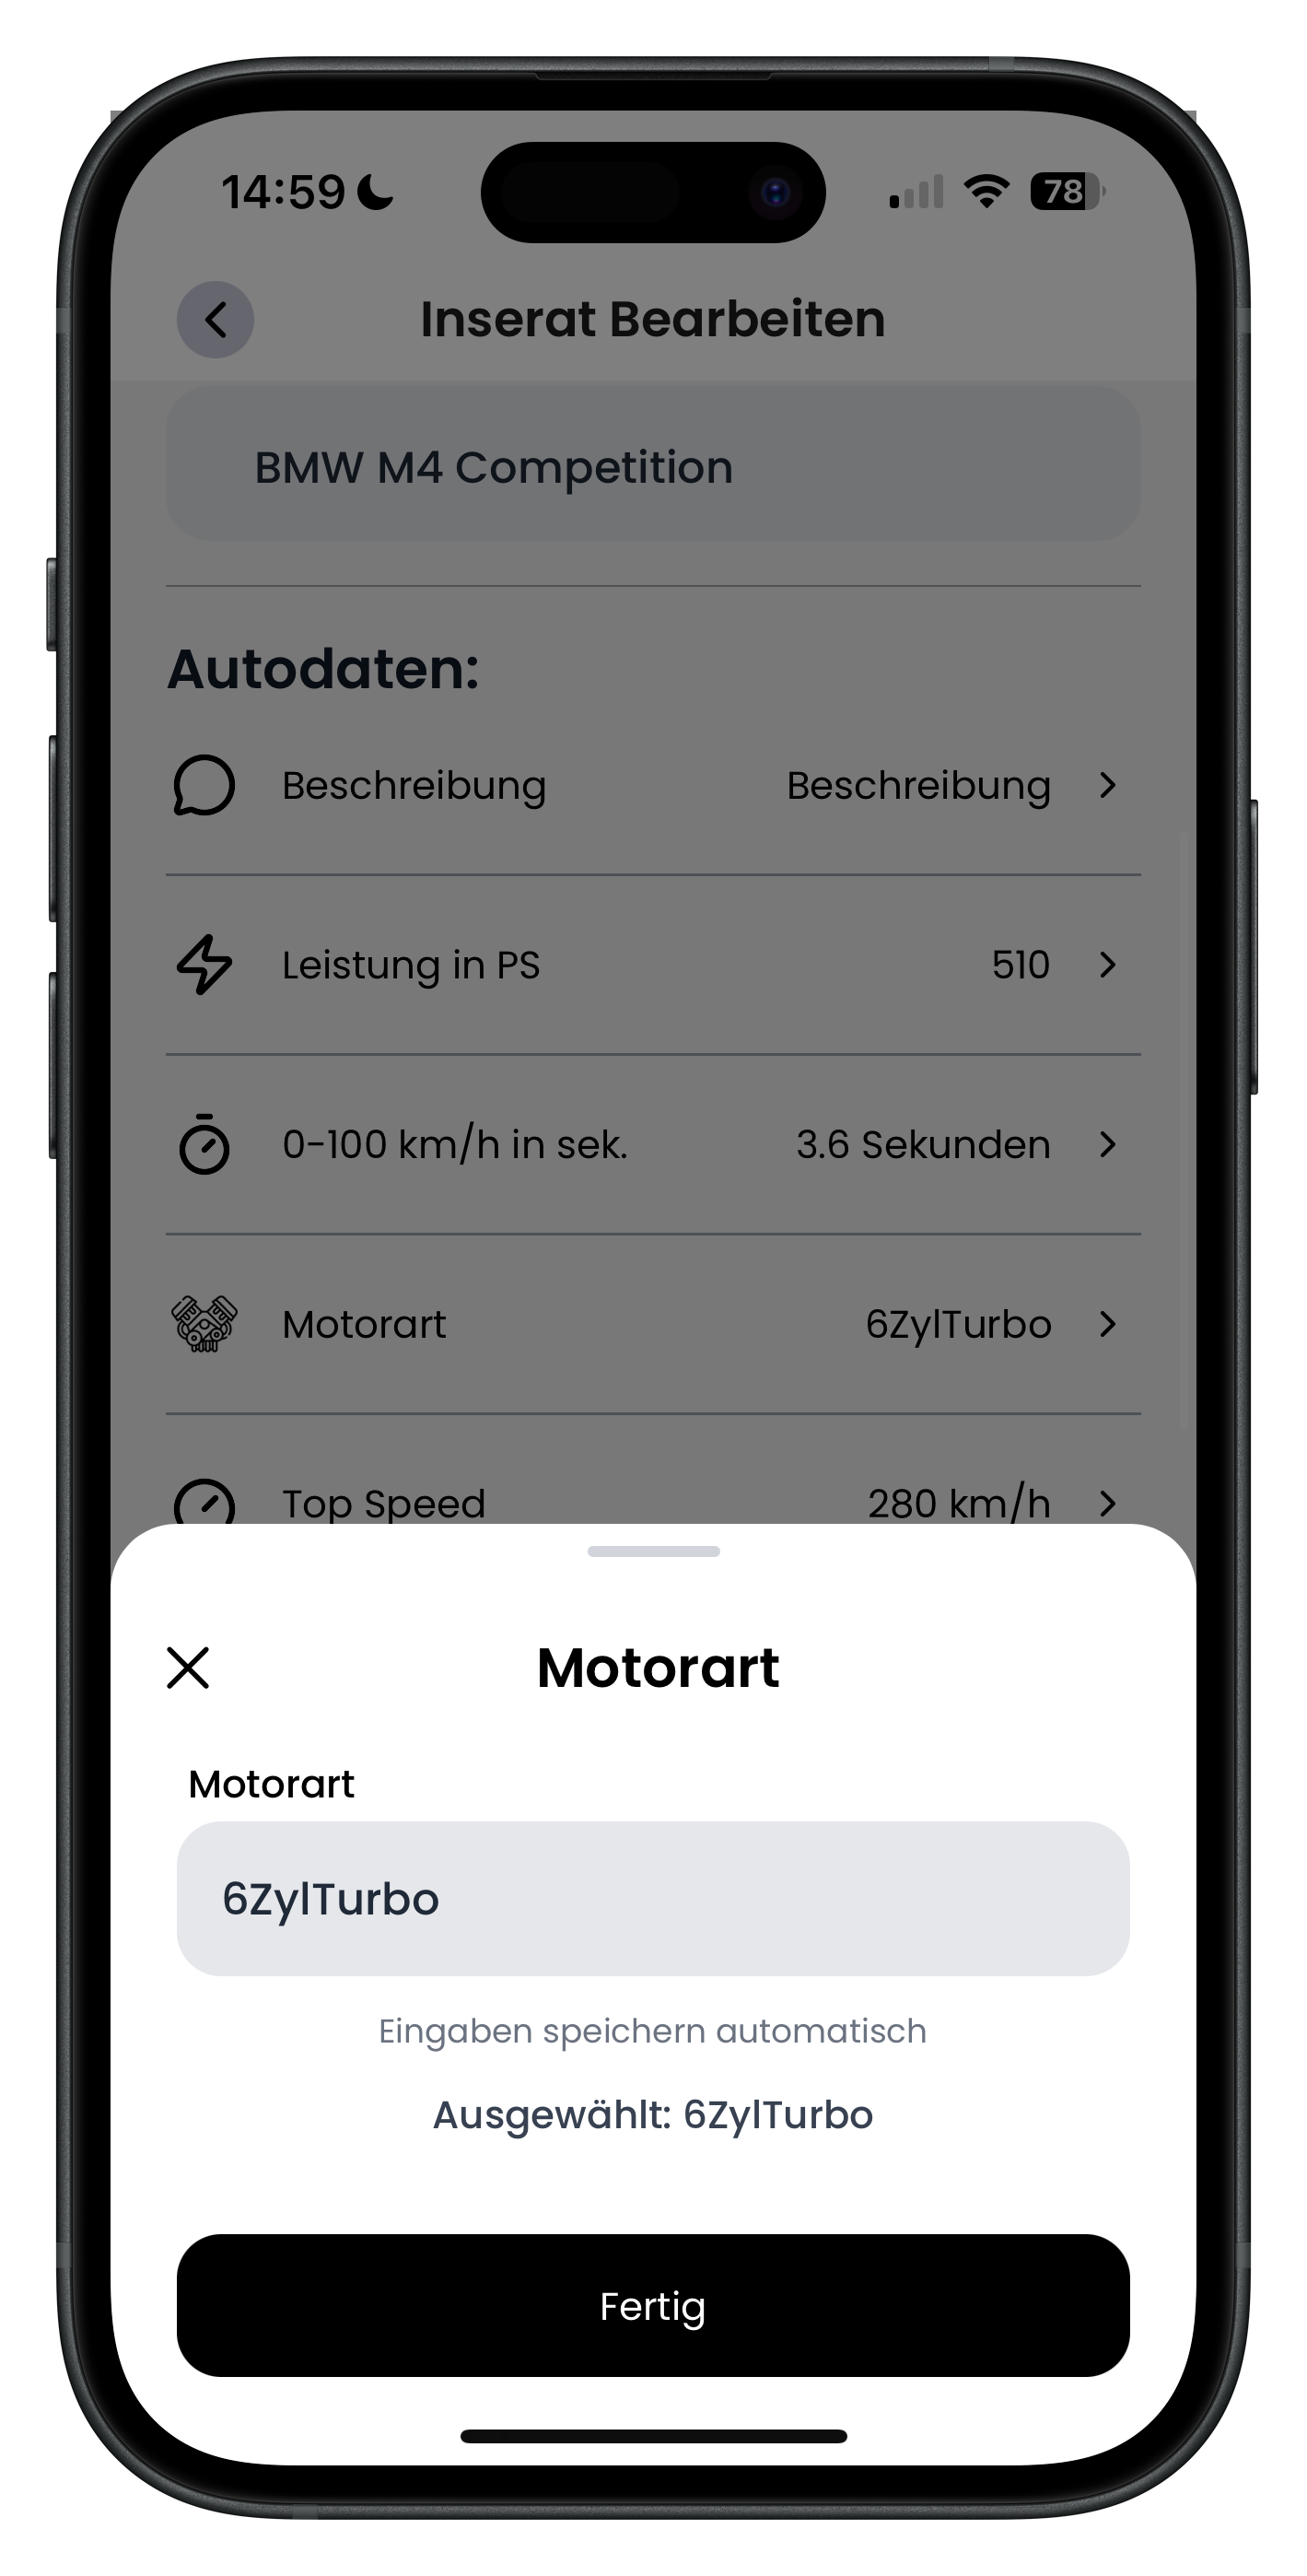
Tap the Engine type row to open a window where you specify your vehicle's engine configuration and forced induction — for example 6ZylTurbo. Below the selection field, the app confirms your choice with Selected: 6ZylTurbo. This field describes how many cylinders your engine has and whether it's turbocharged.
- The app confirms your selection immediately with "Selected: ..."
- Choose the configuration that matches your specific vehicle
- Tap Done to confirm your selection
7
Enter the top speed in km/h
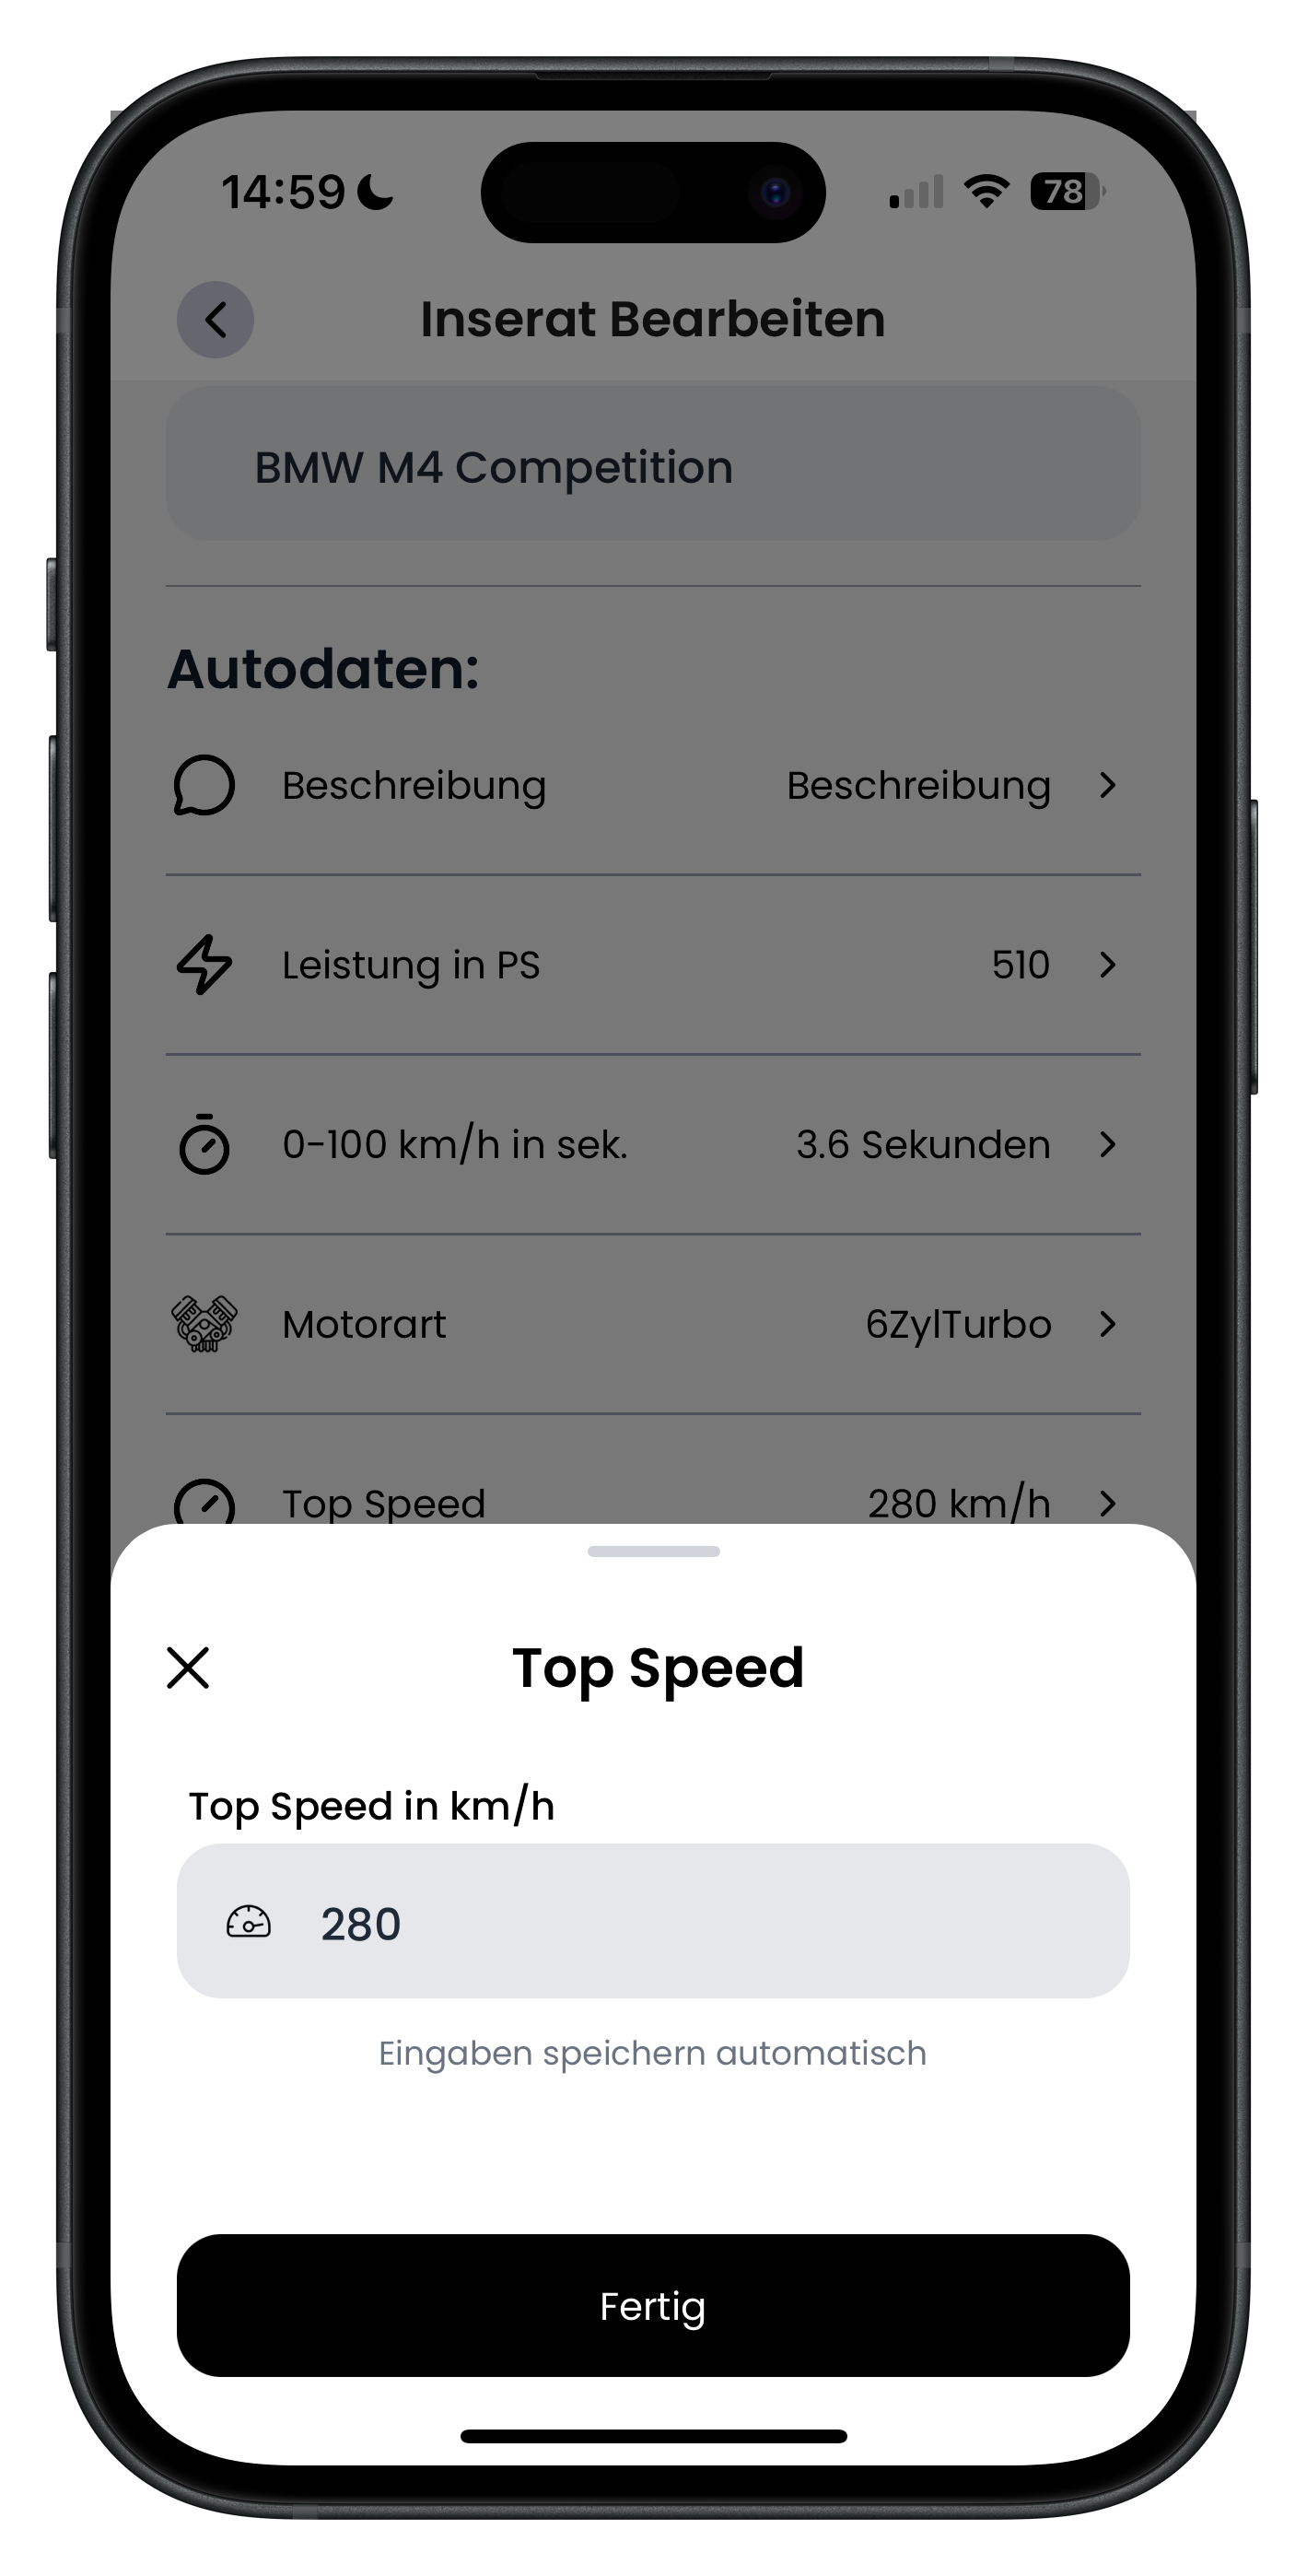
In the Top Speed row you enter your vehicle's maximum speed. The window shows the Top speed in km/h field with the current value — for example 280. Enter the actual top speed your model achieves. This value is also saved automatically.
- Enter the value in km/h without the unit — just the number
- Be realistic and use your vehicle's official manufacturer figure
- Tap Done when you're finished
8
Set the gearbox and drivetrain type
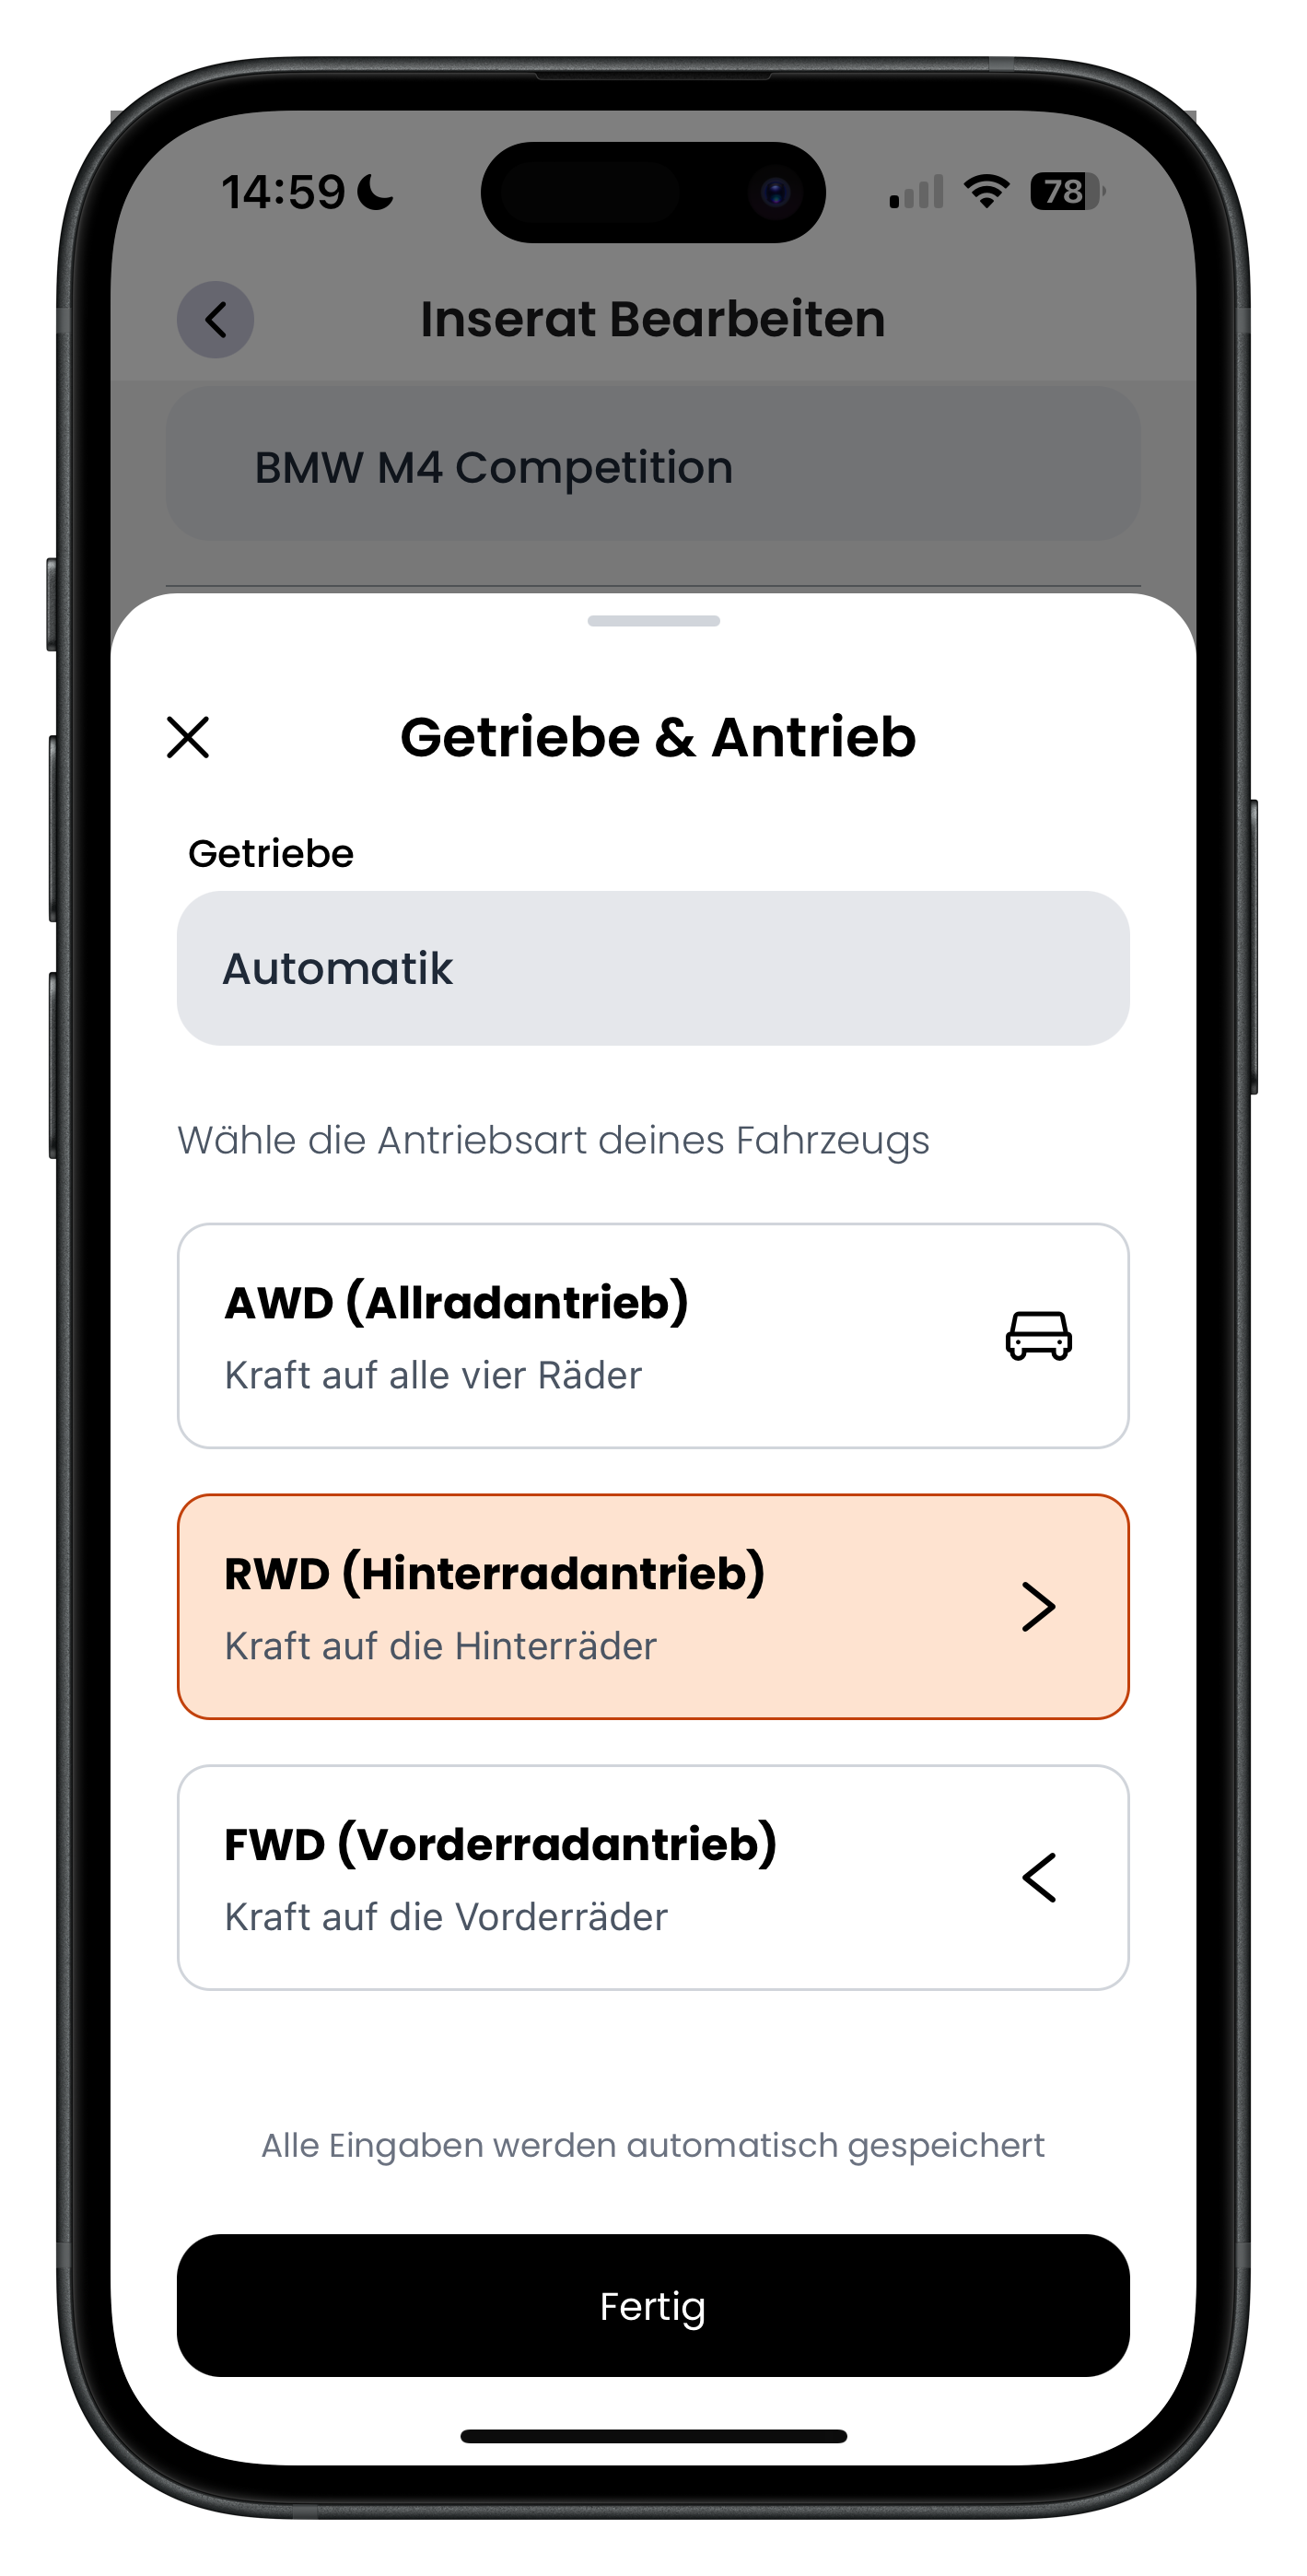
Tap the Gearbox & Drivetrain row to open a window with the Gearbox field, where you choose between Automatic and Manual. Below that you'll see Select your vehicle's drivetrain with three options: AWD (All-wheel drive) for power to all four wheels, RWD (Rear-wheel drive) for power to the rear wheels, and FWD (Front-wheel drive) for power to the front wheels. The active selection is highlighted in orange.
- Choose the gearbox at the top, then the drivetrain below
- The orange card shows your current selection
- All changes are saved automatically
9
Set the fuel type and fuelling policy
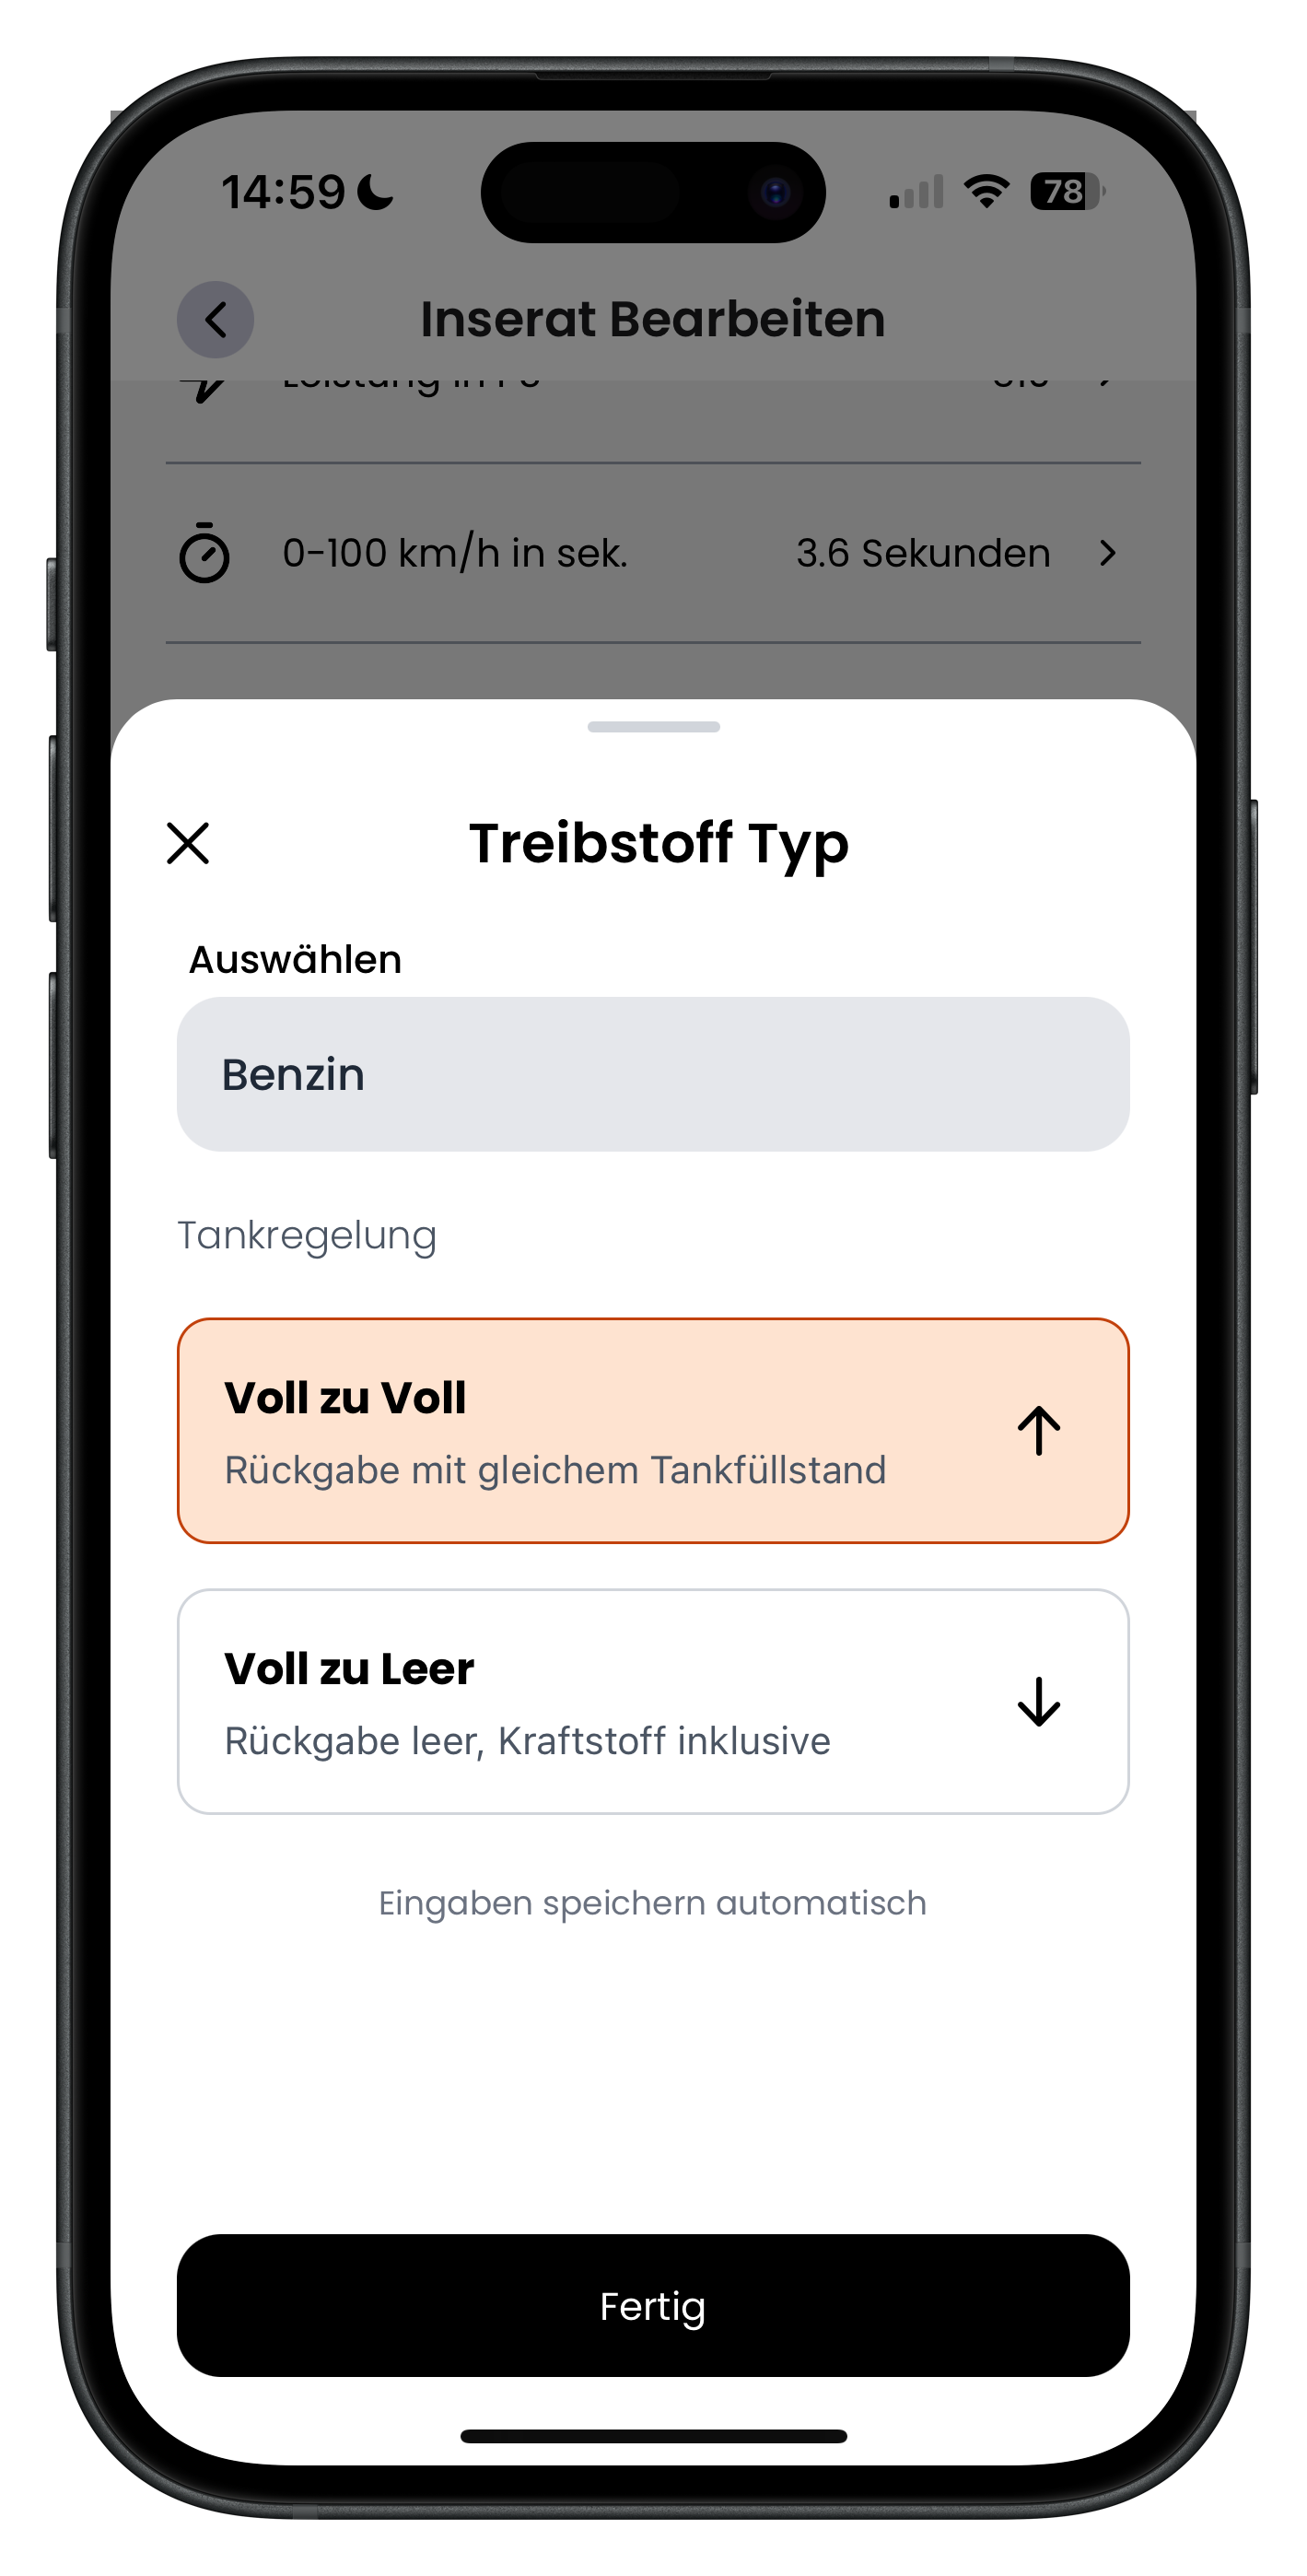
In the Fuel row you specify what your car runs on. Under Select you'll find options such as Petrol, along with Diesel, Electric and Hybrid. Below that, under Fuelling policy, you set how the tank should be returned: Full to Full means the renter returns it with the same fuel level they received, while Full to Empty means the car is returned empty with fuel included in the price. The active option is highlighted in orange.
- First choose the fuel type, then the appropriate fuelling policy
- Full to Full means: the renter returns the car as full as they received it
- Full to Empty means: the fuel cost is already included in the price
10
Select the vehicle type in the overview
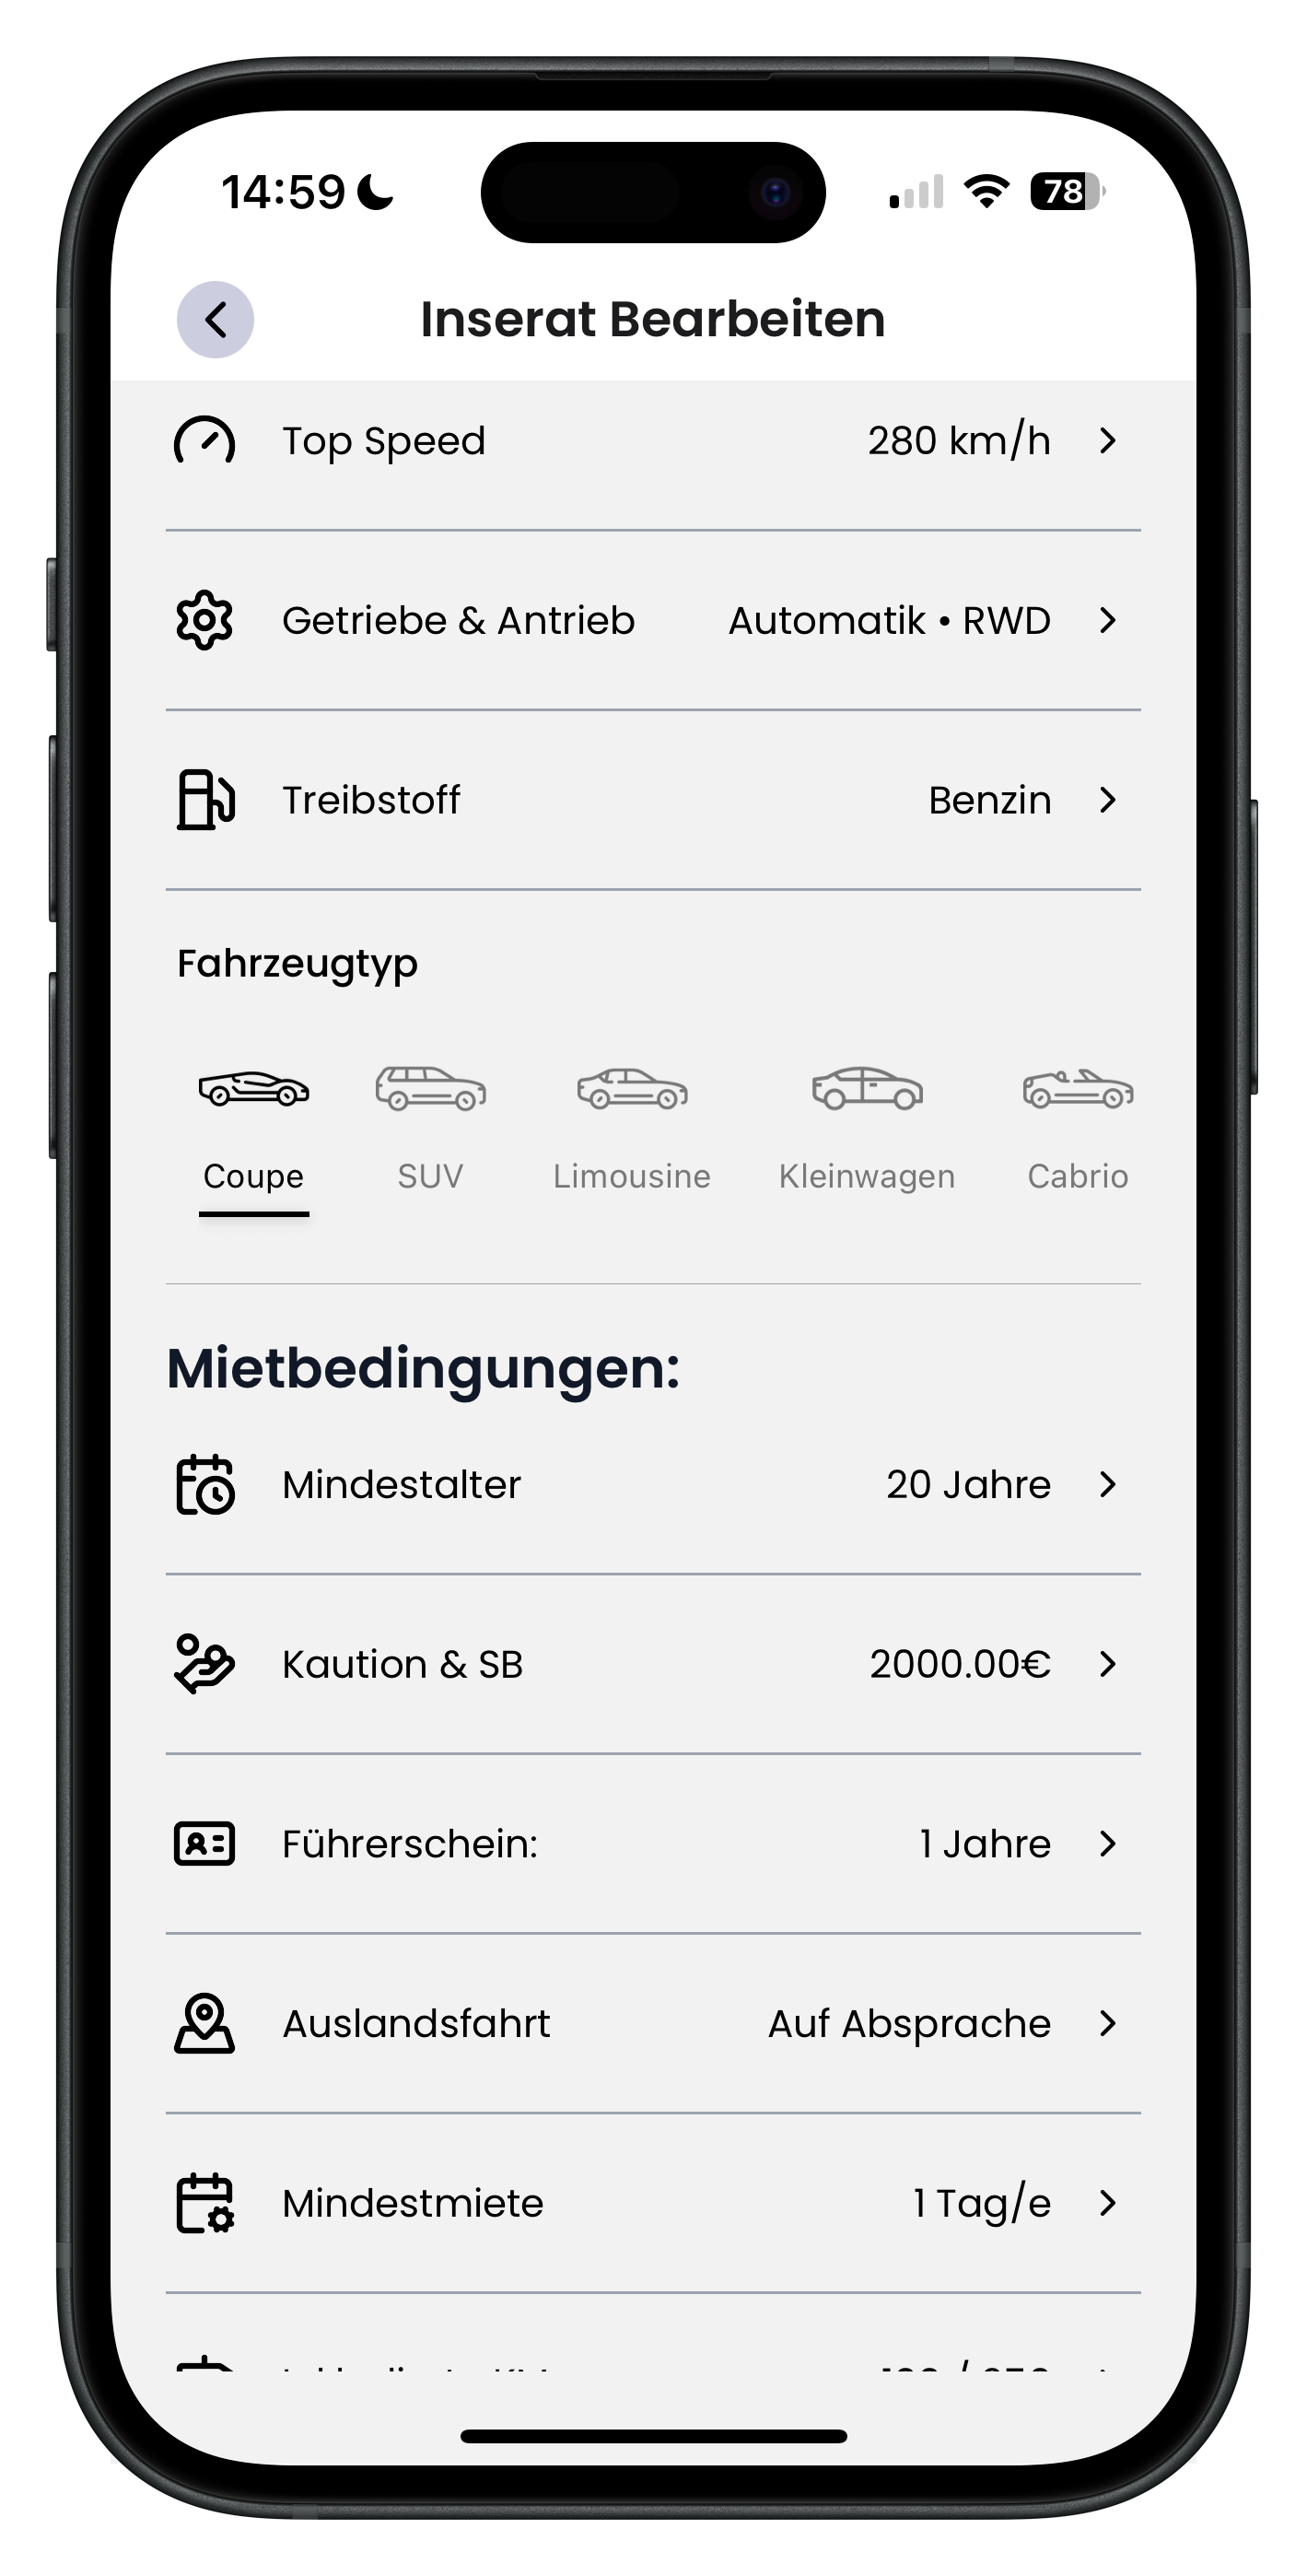
Scroll a little further down the Edit screen until you see the Vehicle type section. There you'll find a row of icons for Coupé, SUV, Saloon, City car and Convertible. Tap the type that matches your car — your selection will be underlined. Just below that, the next section, Rental terms:, begins.
- The selected vehicle type is marked with an underline
- Choosing the right type helps renters find your car using filters
- The rental terms section follows directly below
Setting rental terms
In the Rental terms: section you set the rules under which someone can rent your car. These details matter — they protect you and your vehicle, and ensure you only receive requests from suitable renters.
11
Set the minimum driver age
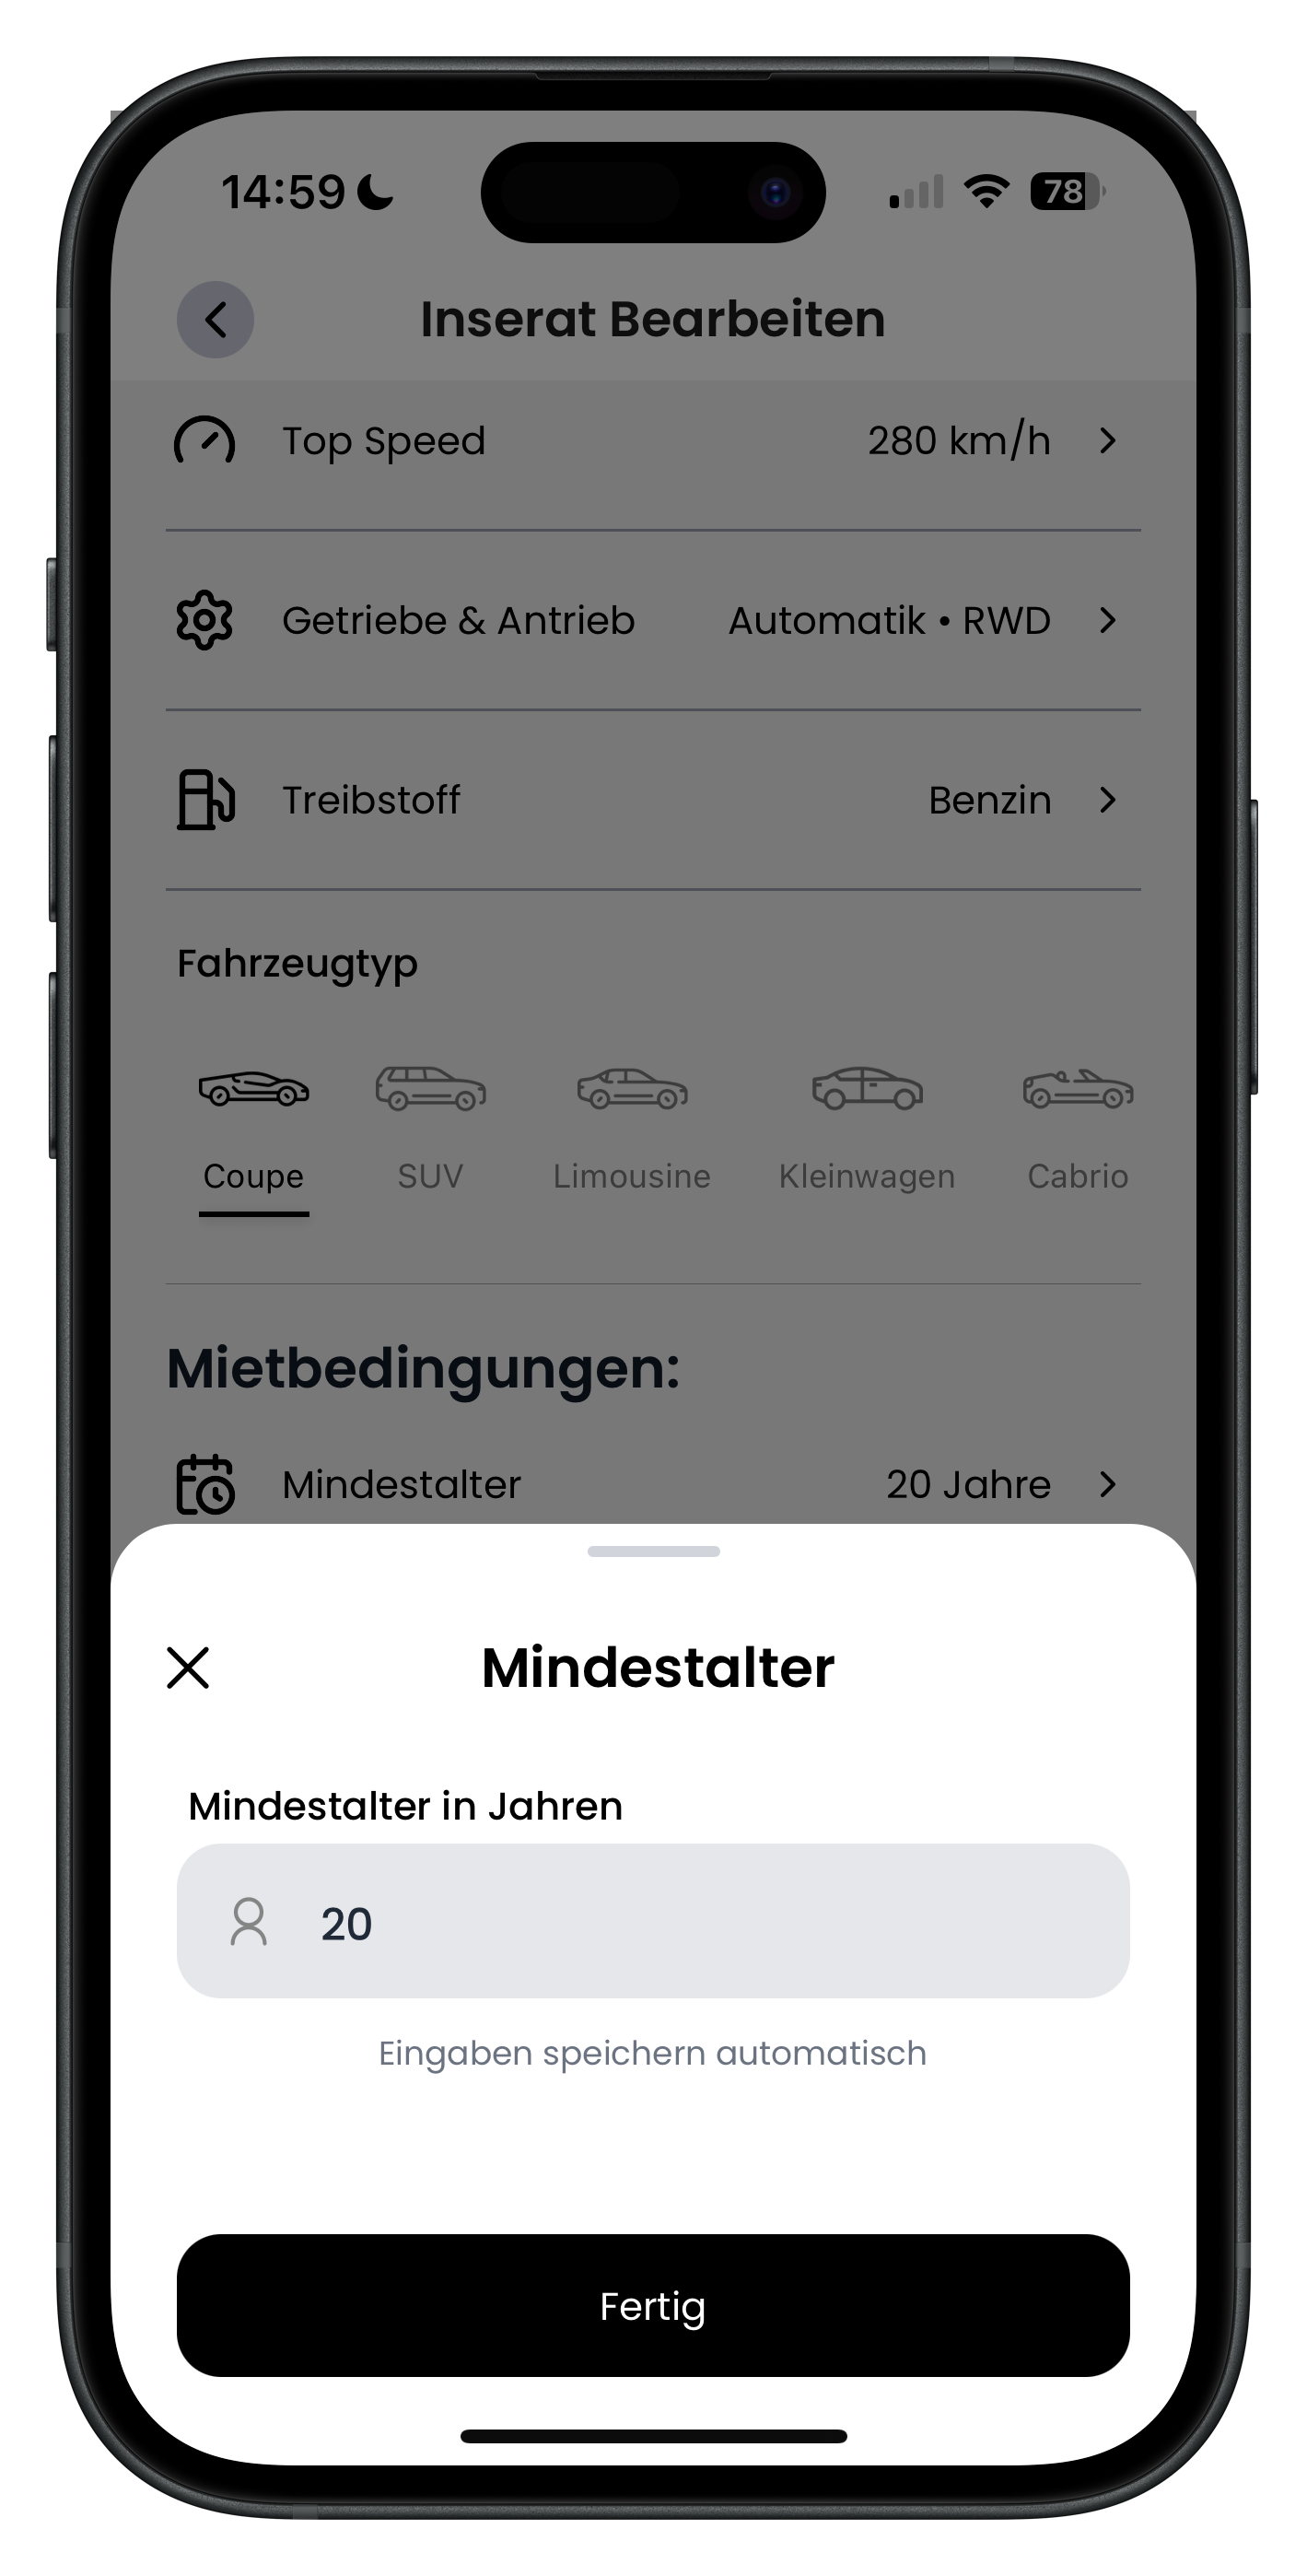
Tap the Minimum age row. In the Minimum age window, enter the value under Minimum age in years — for example 20. This sets the minimum age a renter must be to book your vehicle. Requests from younger people simply won't come through.
- Choose a minimum age you're comfortable with
- Many hosts deliberately set a higher age for more powerful vehicles
- The entry is saved automatically
12
Set the deposit, excess and vehicle as collateral
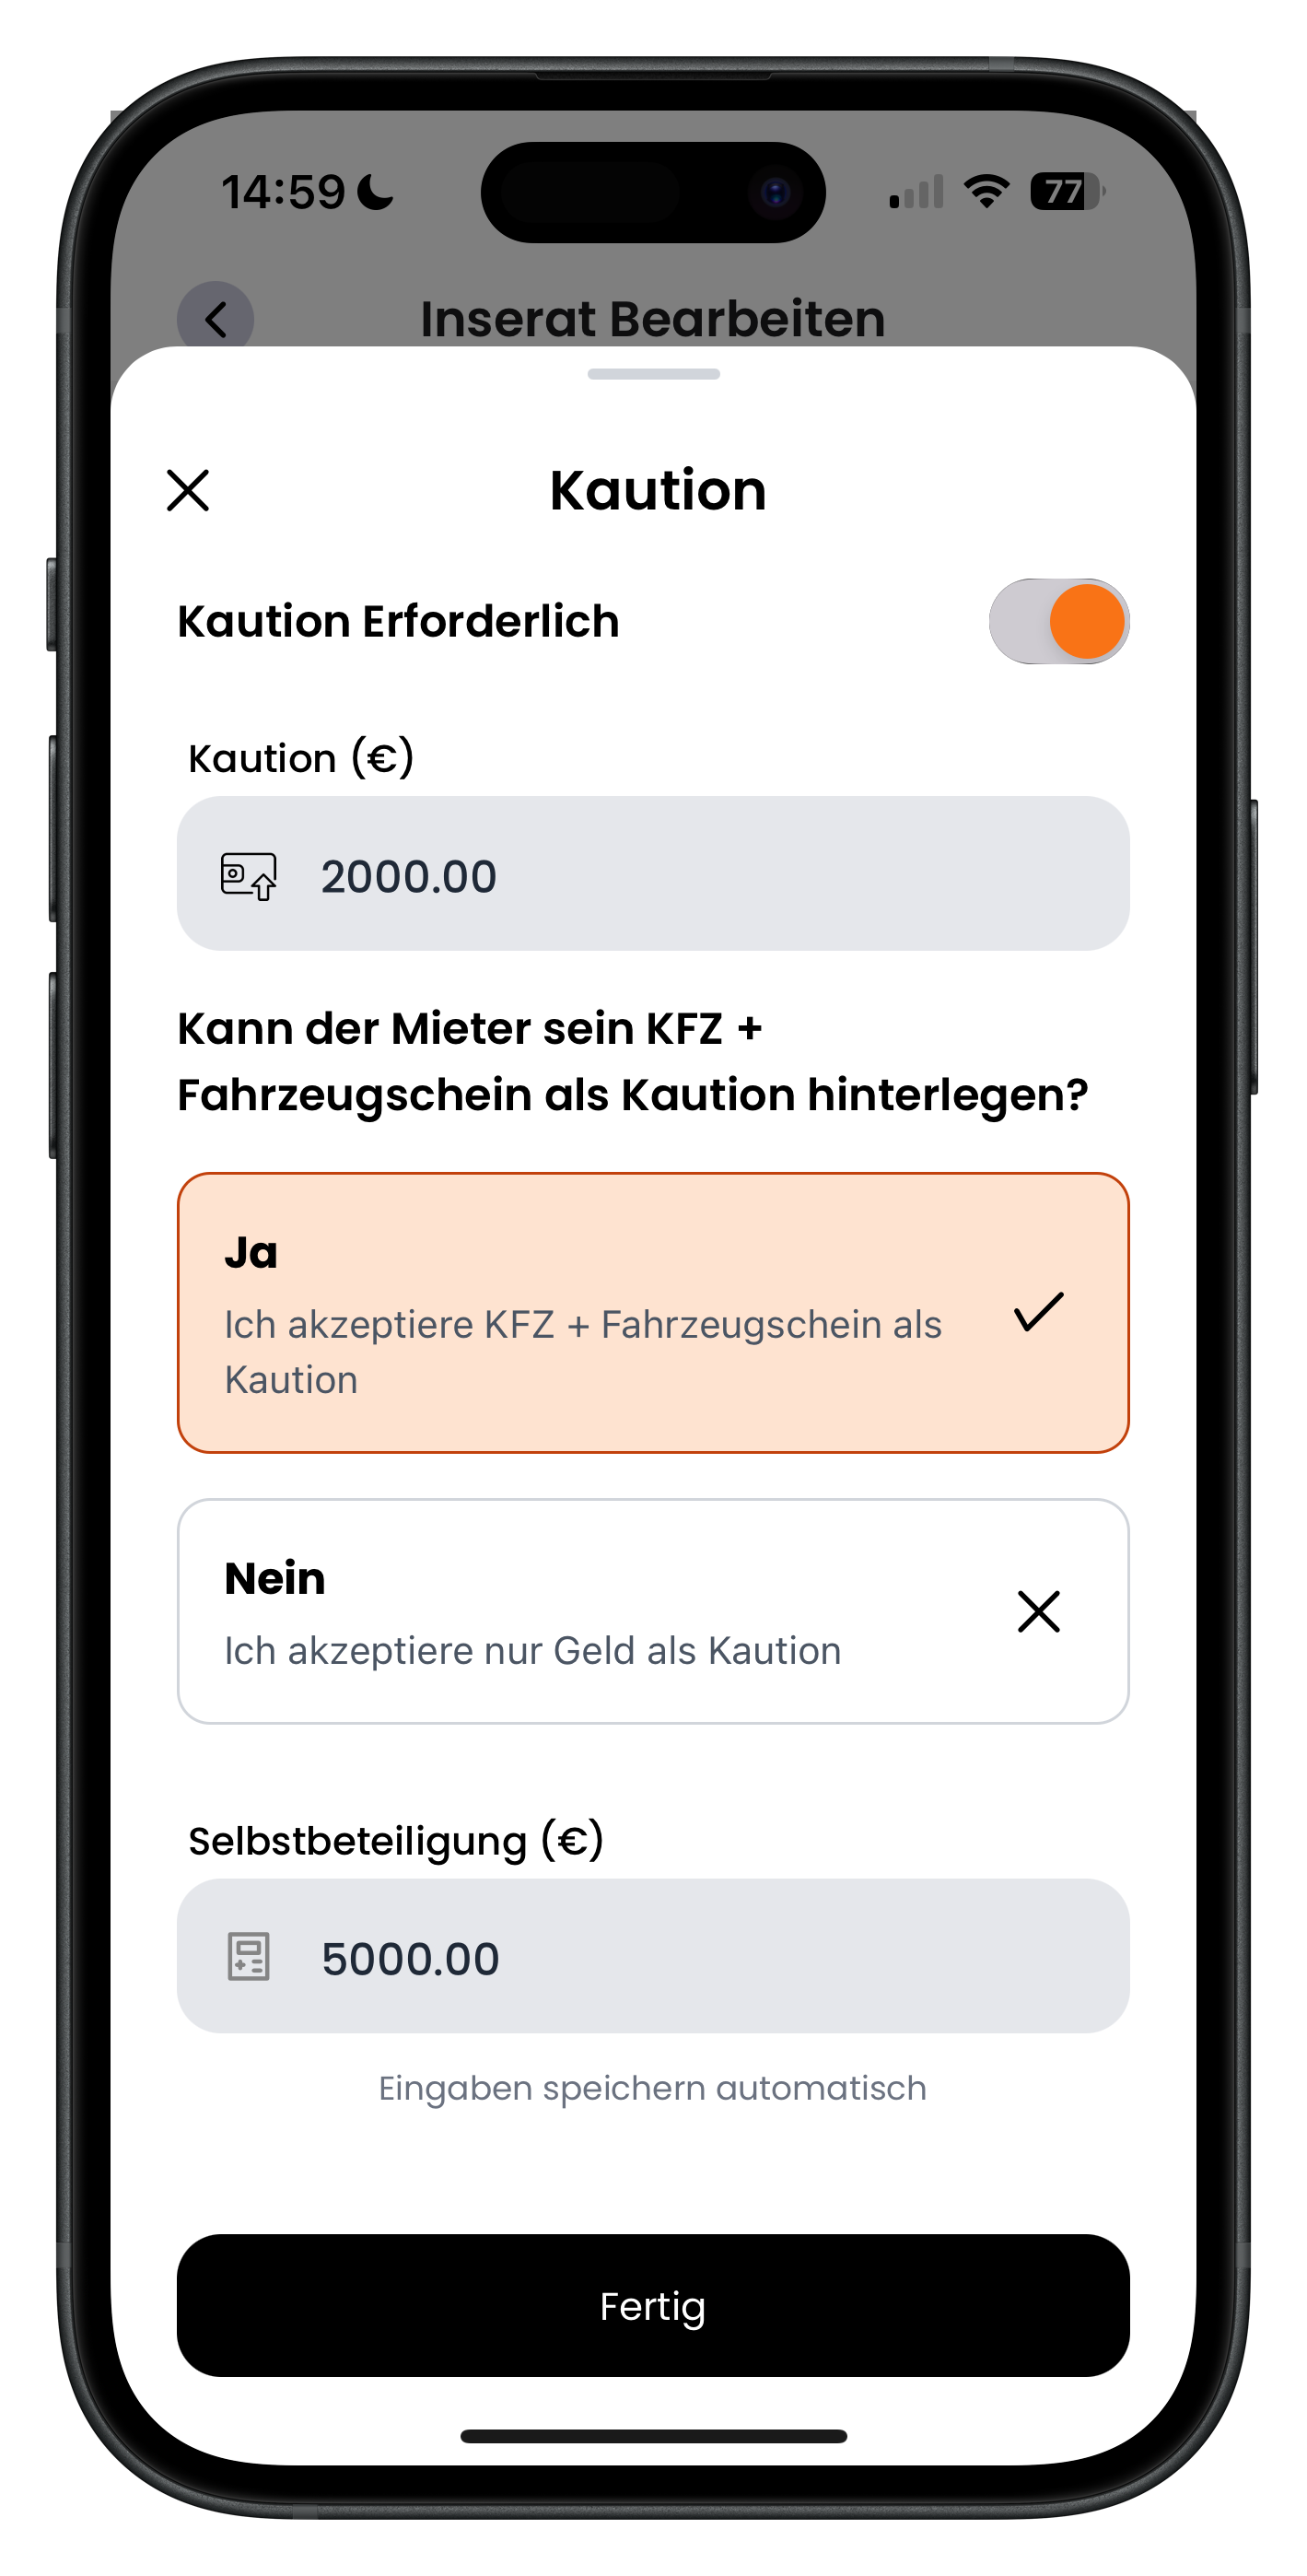
Tap the Deposit & Excess row to open the Deposit window. At the top, activate the Deposit required toggle and enter the amount under Deposit (€) — for example 2000.00. For the question Can the renter use their vehicle and registration document as collateral?, select Yes or No. At the very bottom, enter the maximum excess under Excess (€) — for example 5000.00.
- The deposit is handled in person at handover, not through the app
- The excess is the maximum amount the renter is liable for if damage occurs
- Selecting Yes means you accept a vehicle plus registration document as collateral instead of cash
The renter always pays the deposit in person directly to you at handover — in cash, by card or another method depending on your policy. The excess is separate and sets the maximum amount the renter is liable for if damage occurs. That way renters know exactly where they stand before they book.
13
Set the minimum years of driving licence held
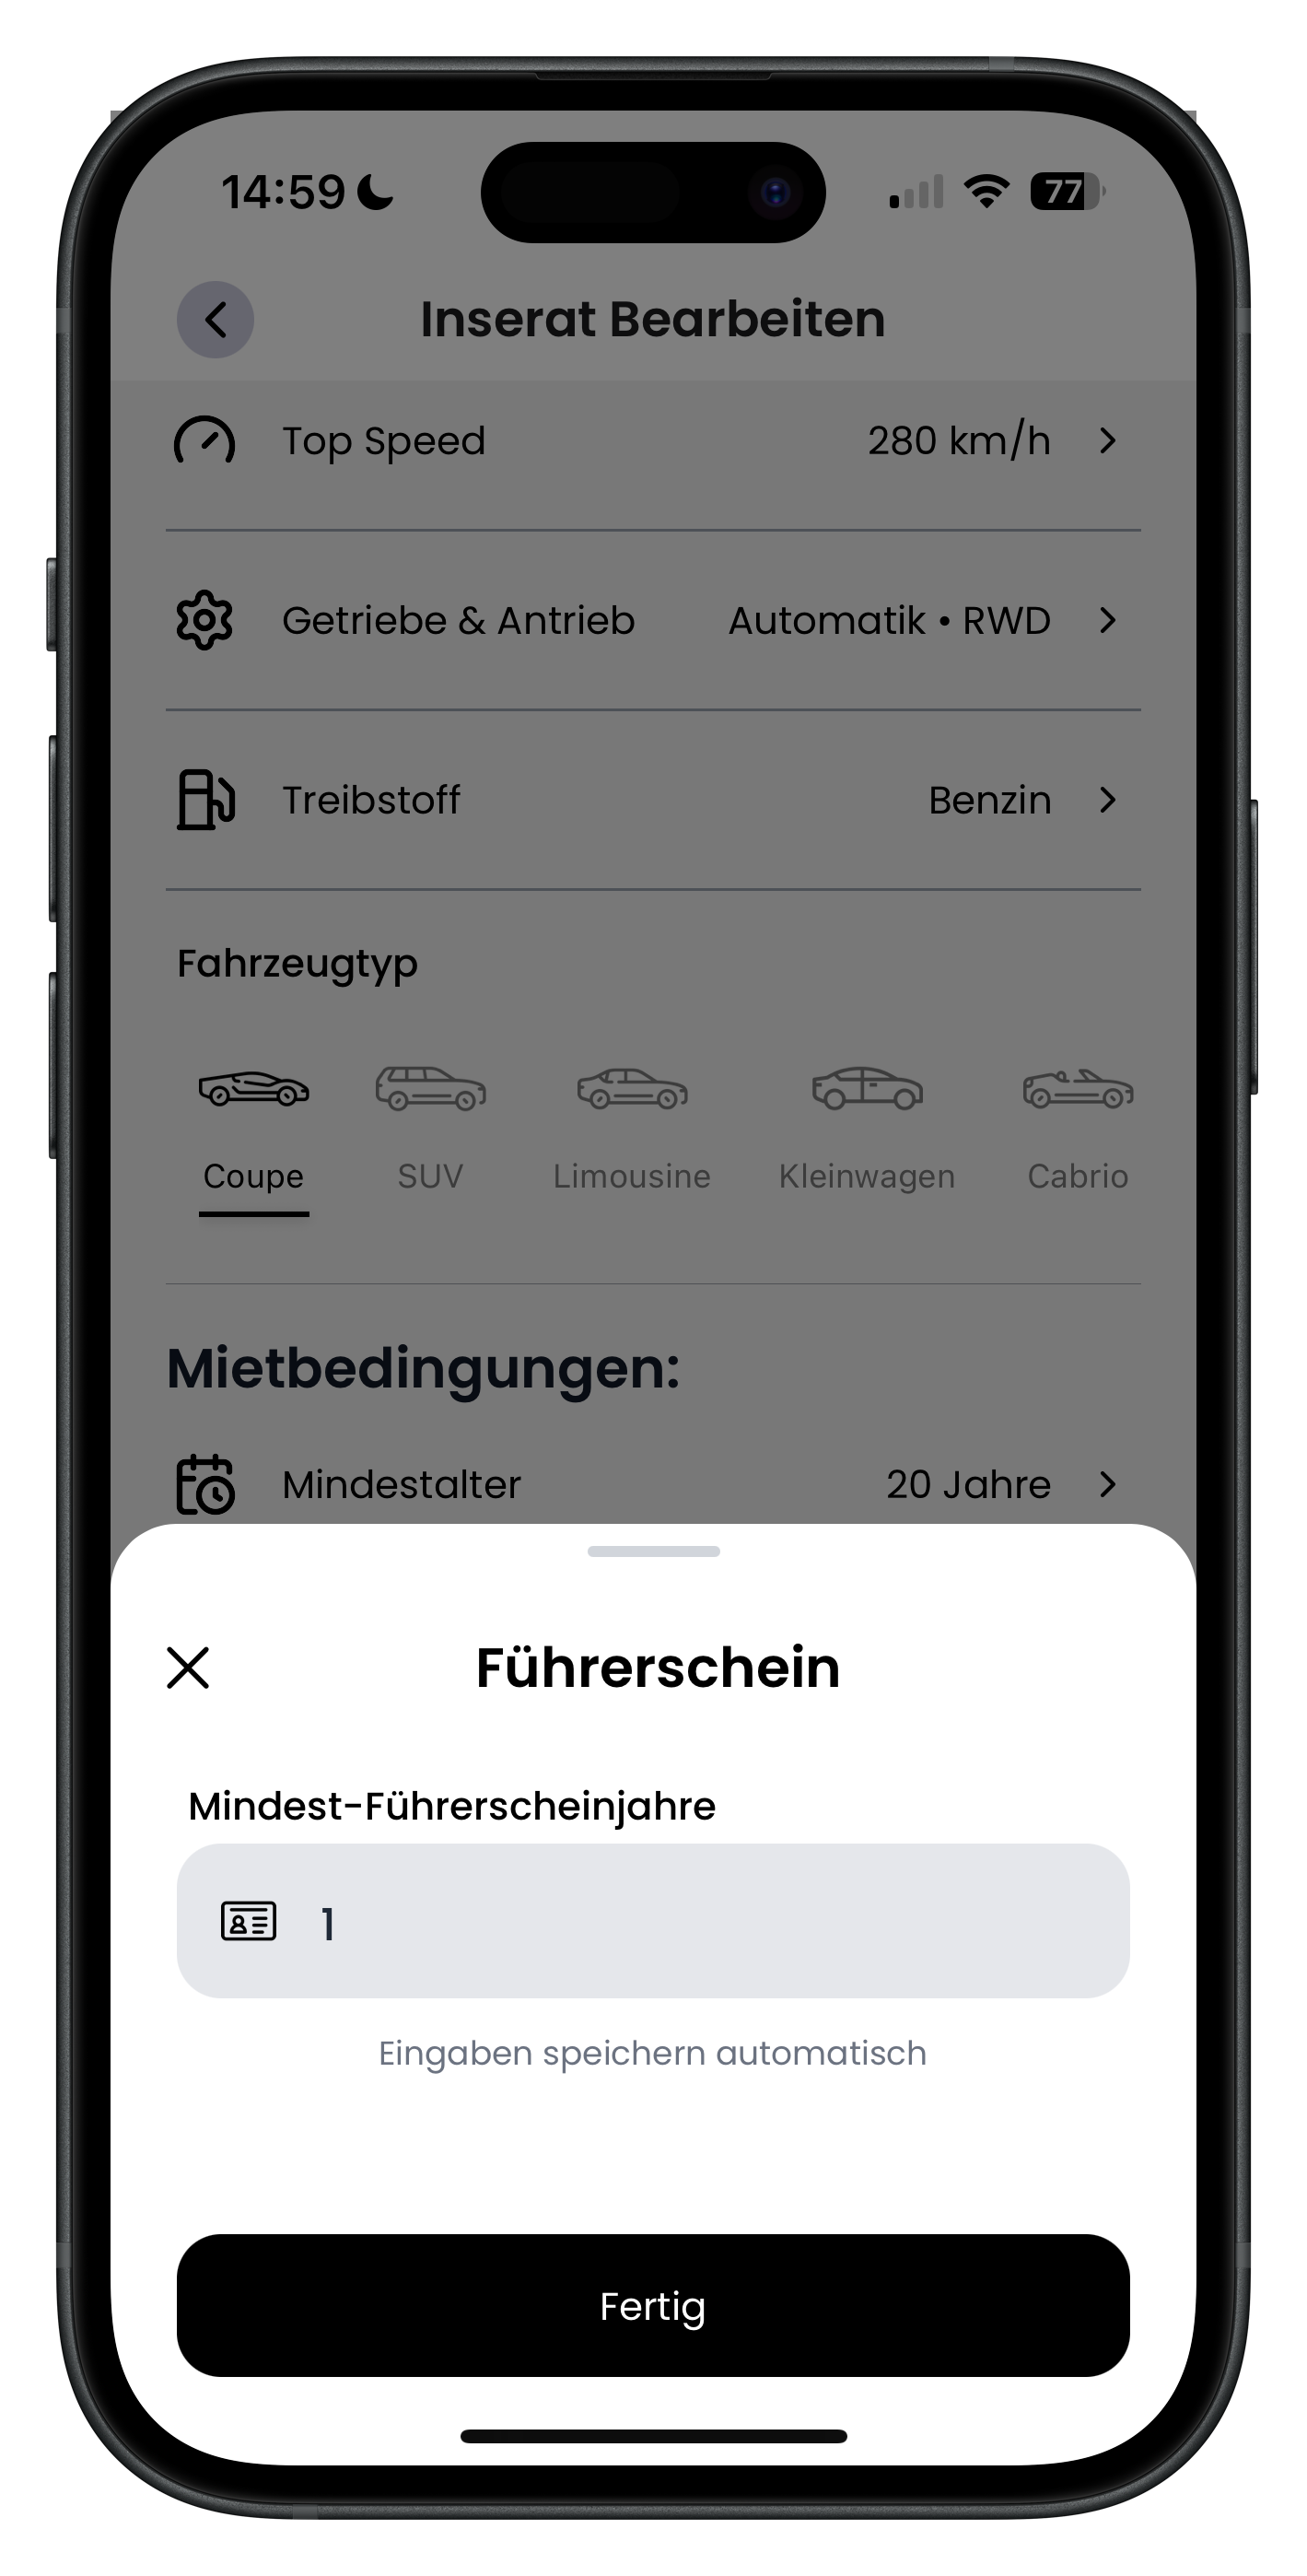
In the Driving licence: row you specify how long a renter must have held their licence. In the Driving licence window, enter the number under Minimum years licence held — for example 1. This ensures only drivers with sufficient experience can book your vehicle.
- For more powerful cars, a longer minimum is worth considering
- The value refers to the number of years since the licence was issued
- The entry is saved automatically
14
Allow or restrict trips abroad
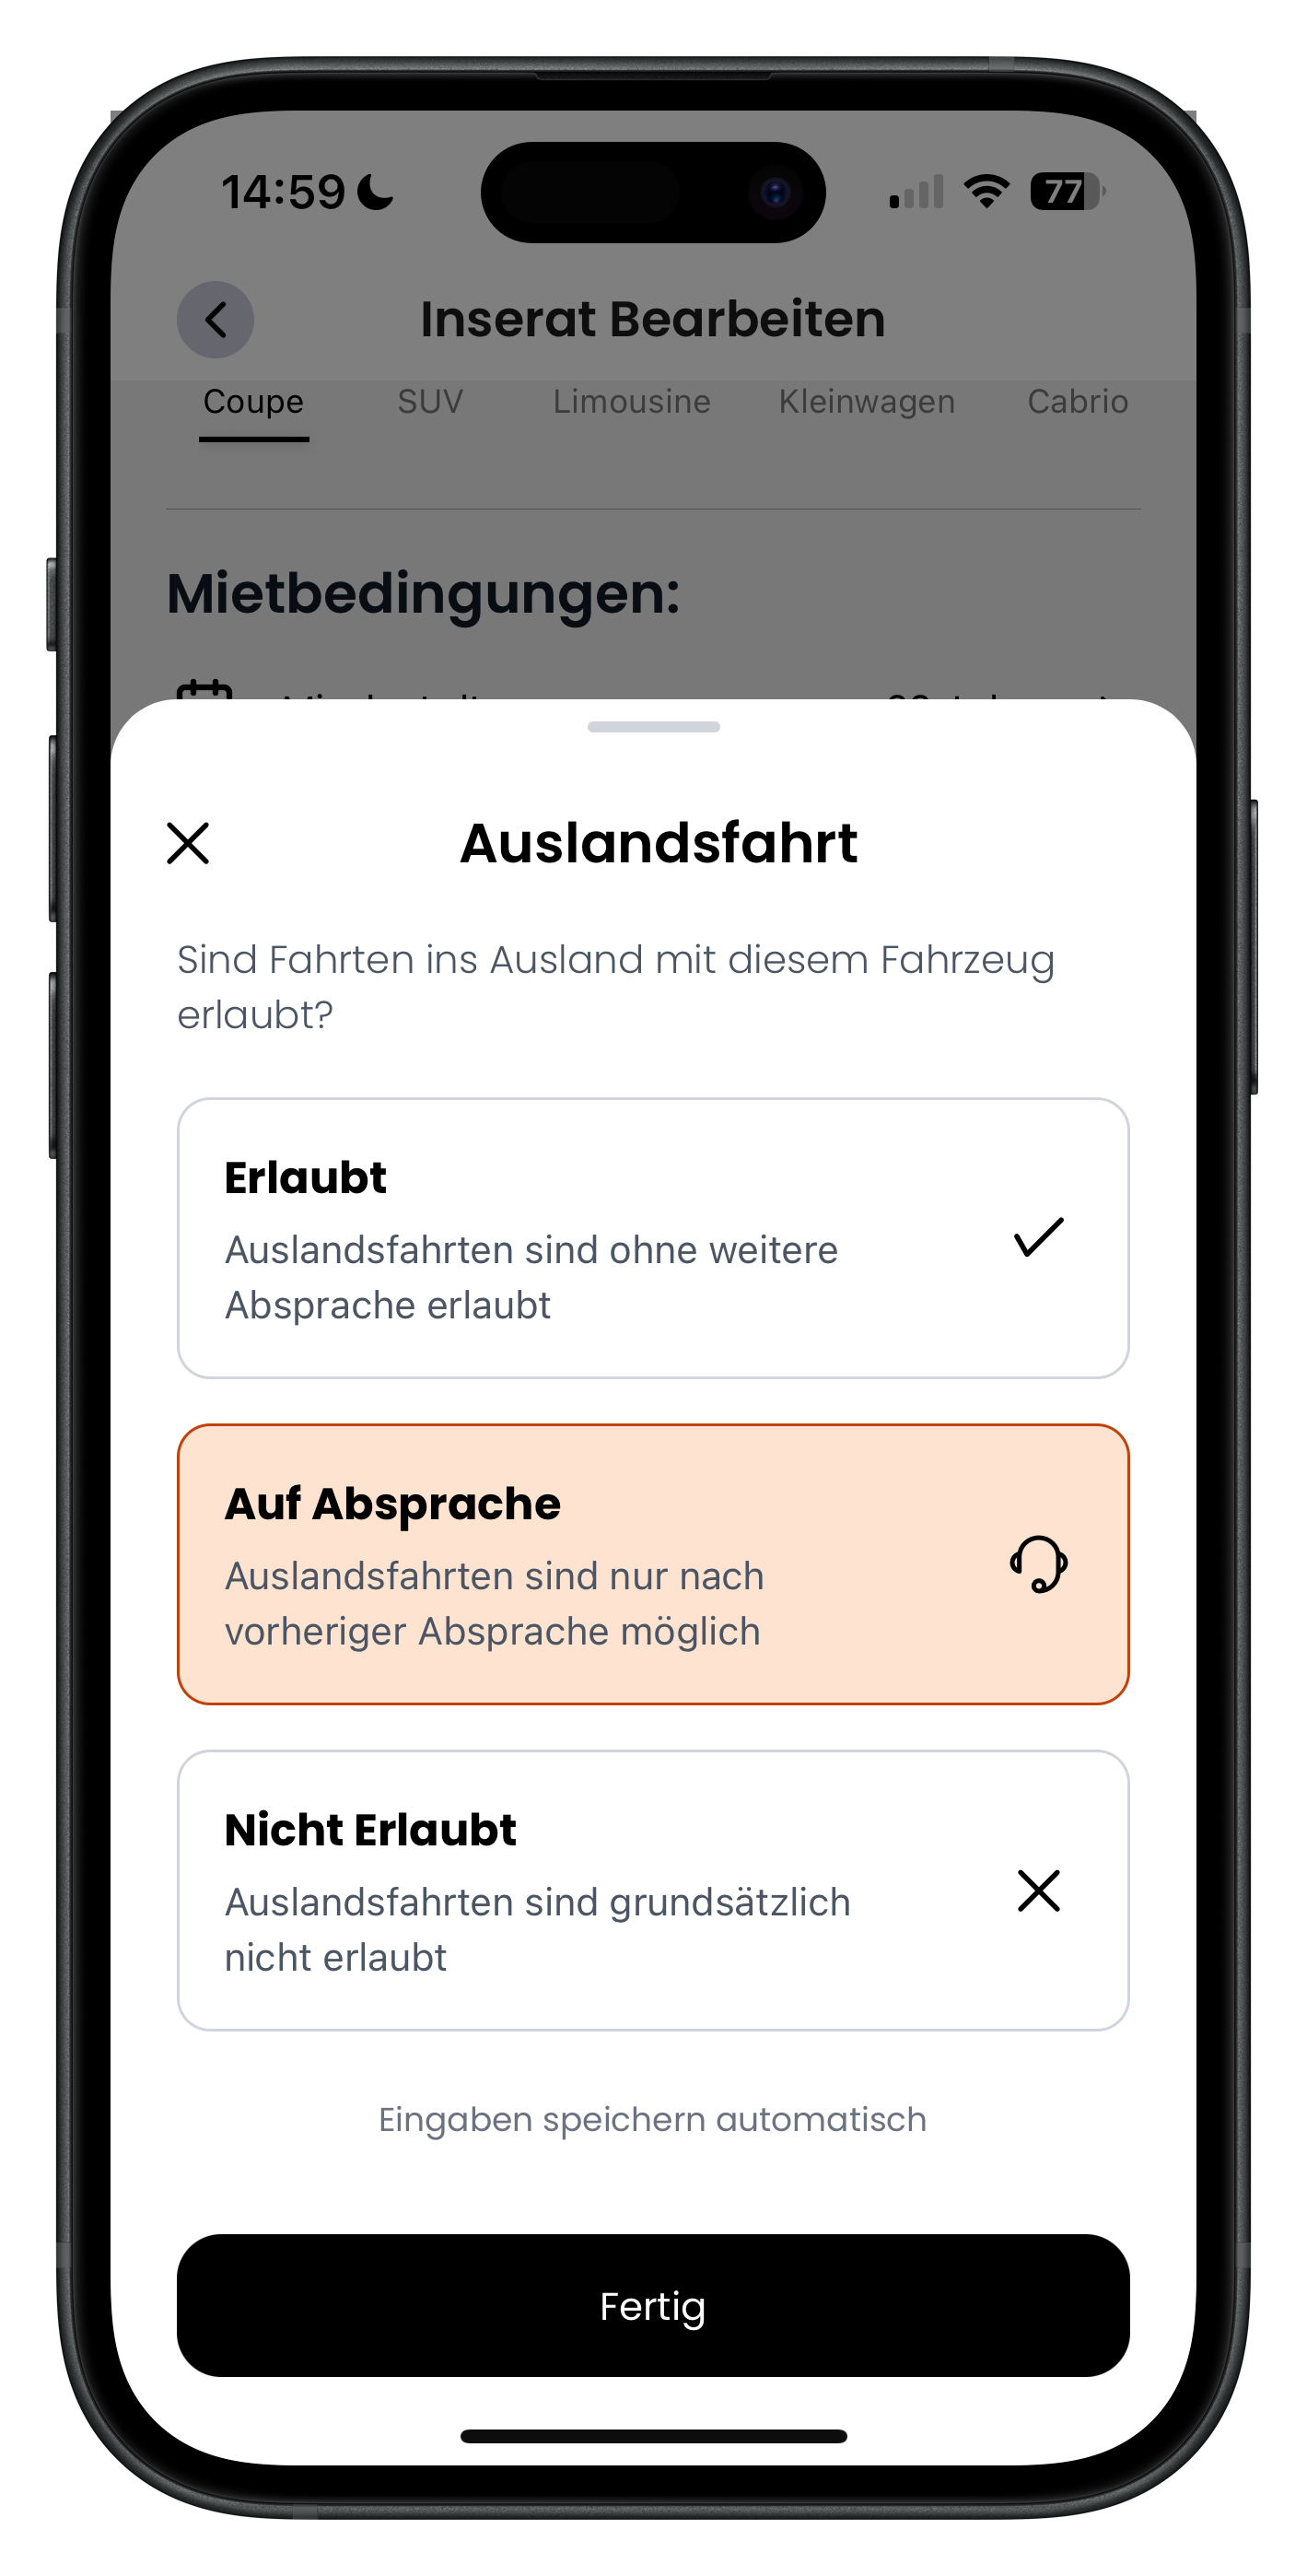
Tap the Trips abroad row to open a window with the question Are trips abroad allowed with this vehicle?. You choose between Allowed (no further agreement needed), By agreement (only after prior arrangement) and Not allowed (not permitted under any circumstances). The active option is highlighted in orange.
- "By agreement" keeps you in control and lets you discuss details in chat
- The selected option is highlighted in colour
- Renters can see this information directly in the listing
15
Set the minimum rental duration in hours or days
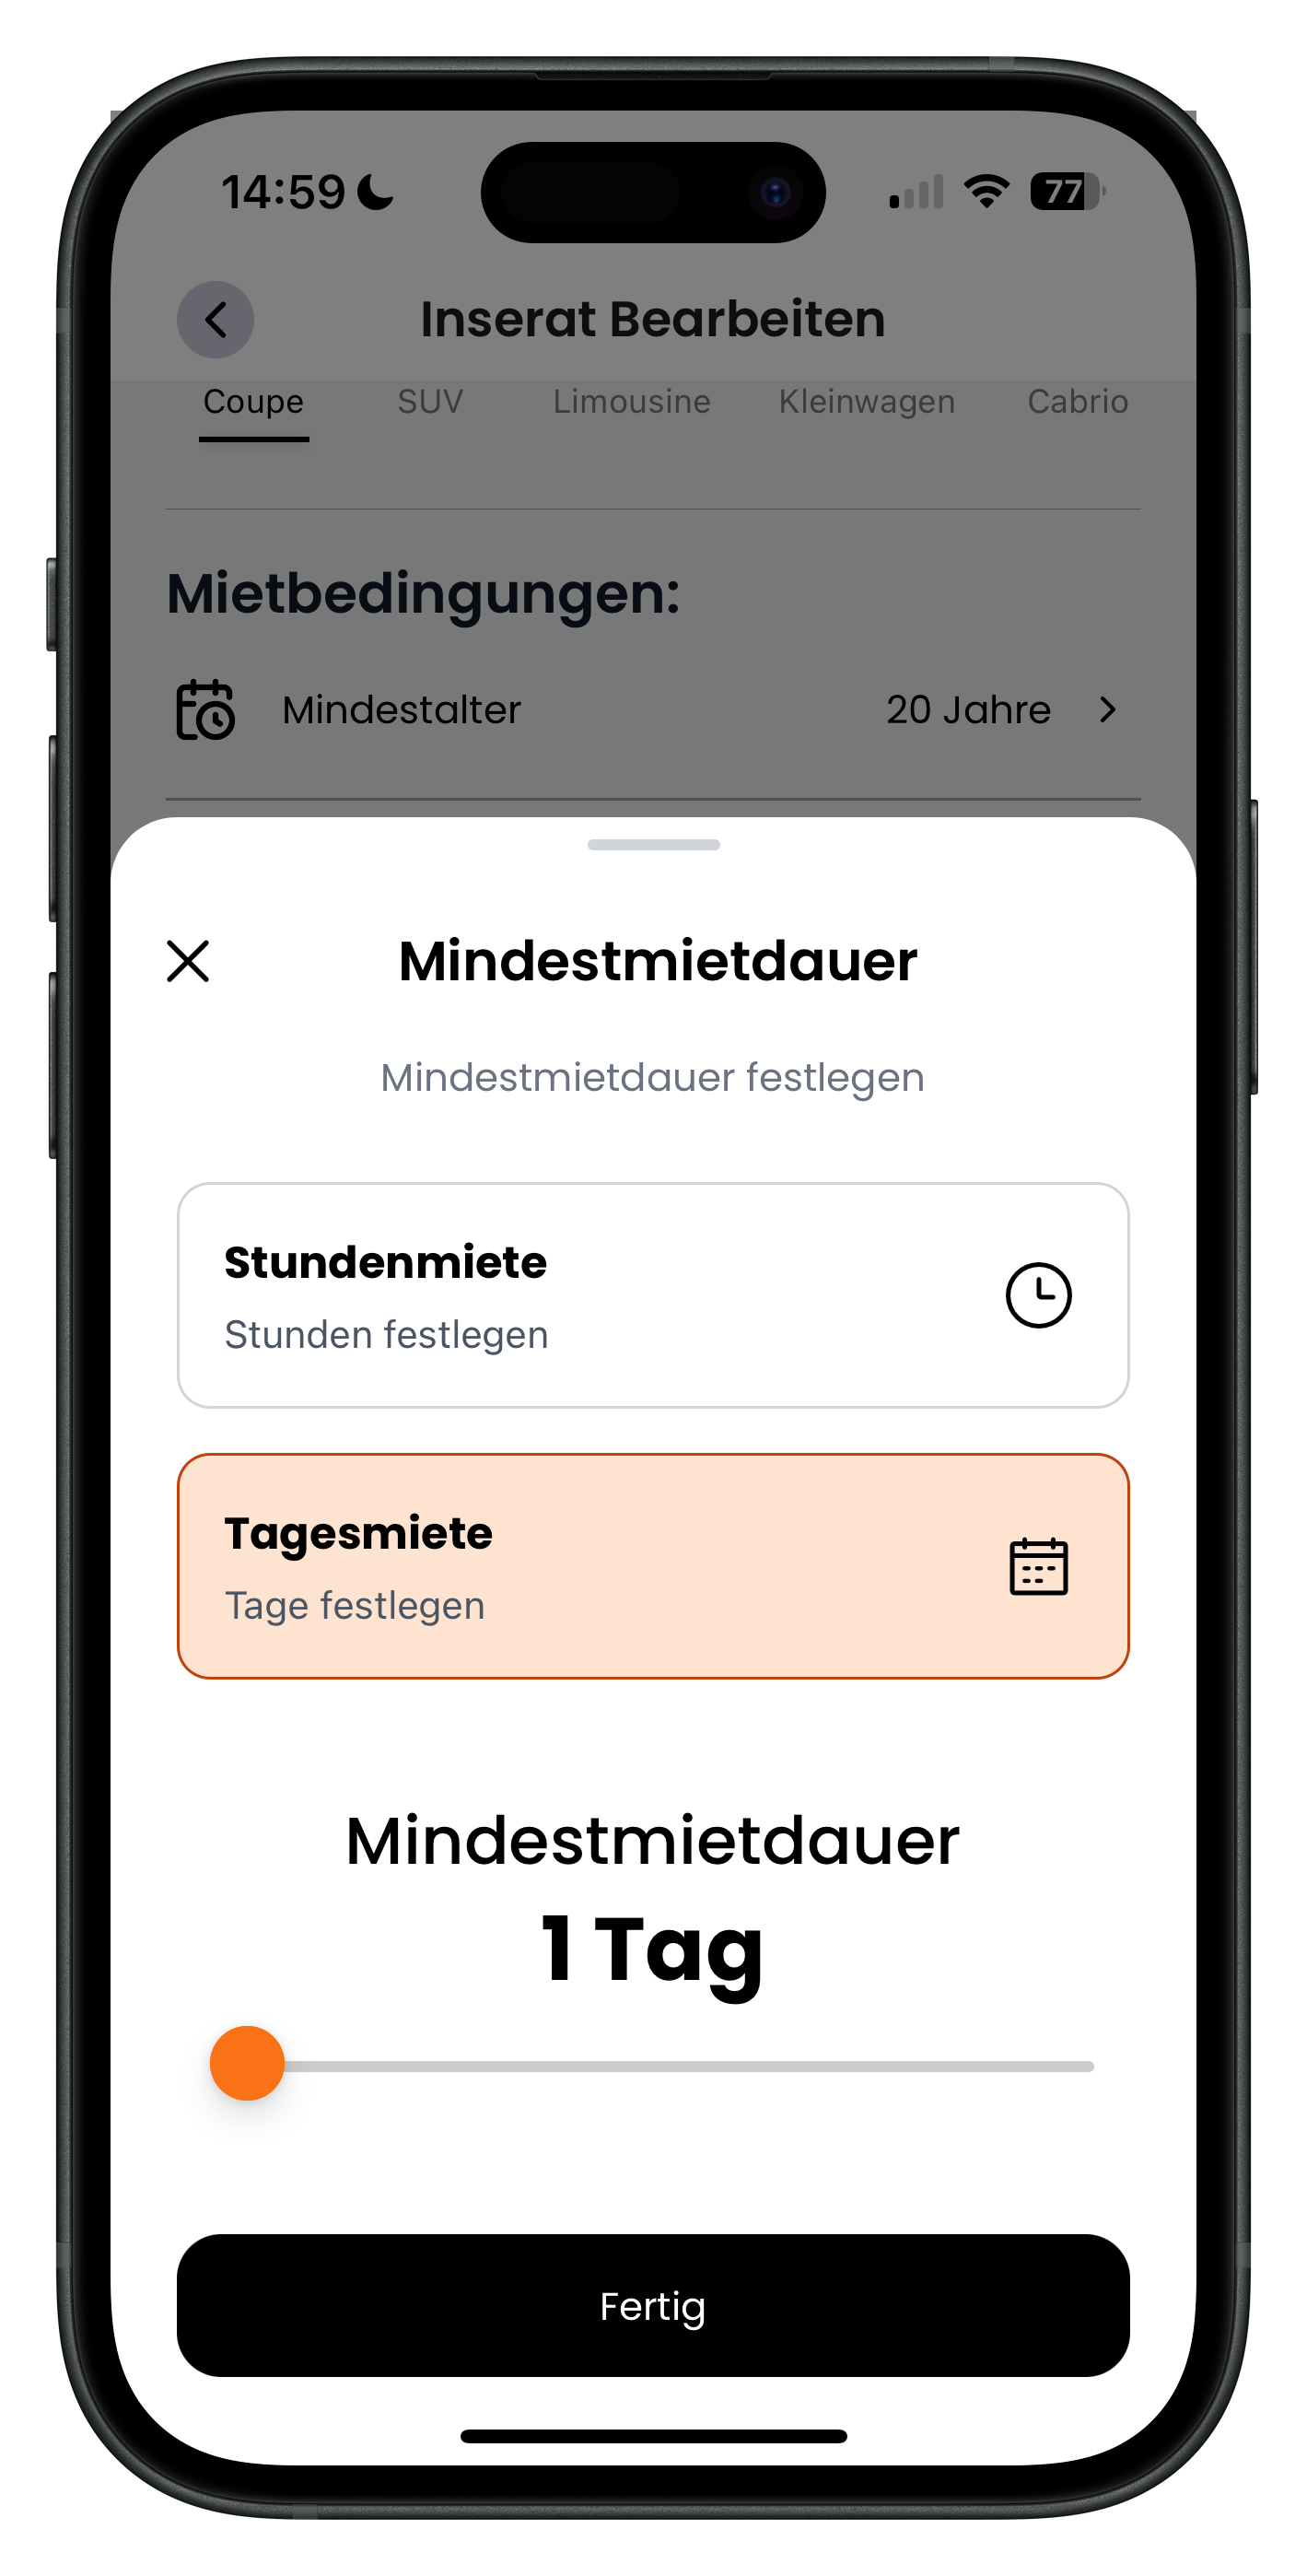
In the Minimum rental row you set how long someone must book for as a minimum. In the Minimum rental duration window, choose between Hourly rental (set a number of hours) and Daily rental (set a number of days). Below that, use the orange slider to set the exact duration — for example 1 day. The active option is highlighted in orange.
- Hourly rental lets you offer short experience bookings too
- The slider shows your chosen minimum duration in large text above the slider control
- Confirm your setting at the bottom with Done
Included mileage and mileage packages
16
Set the included mileage per hour and per day
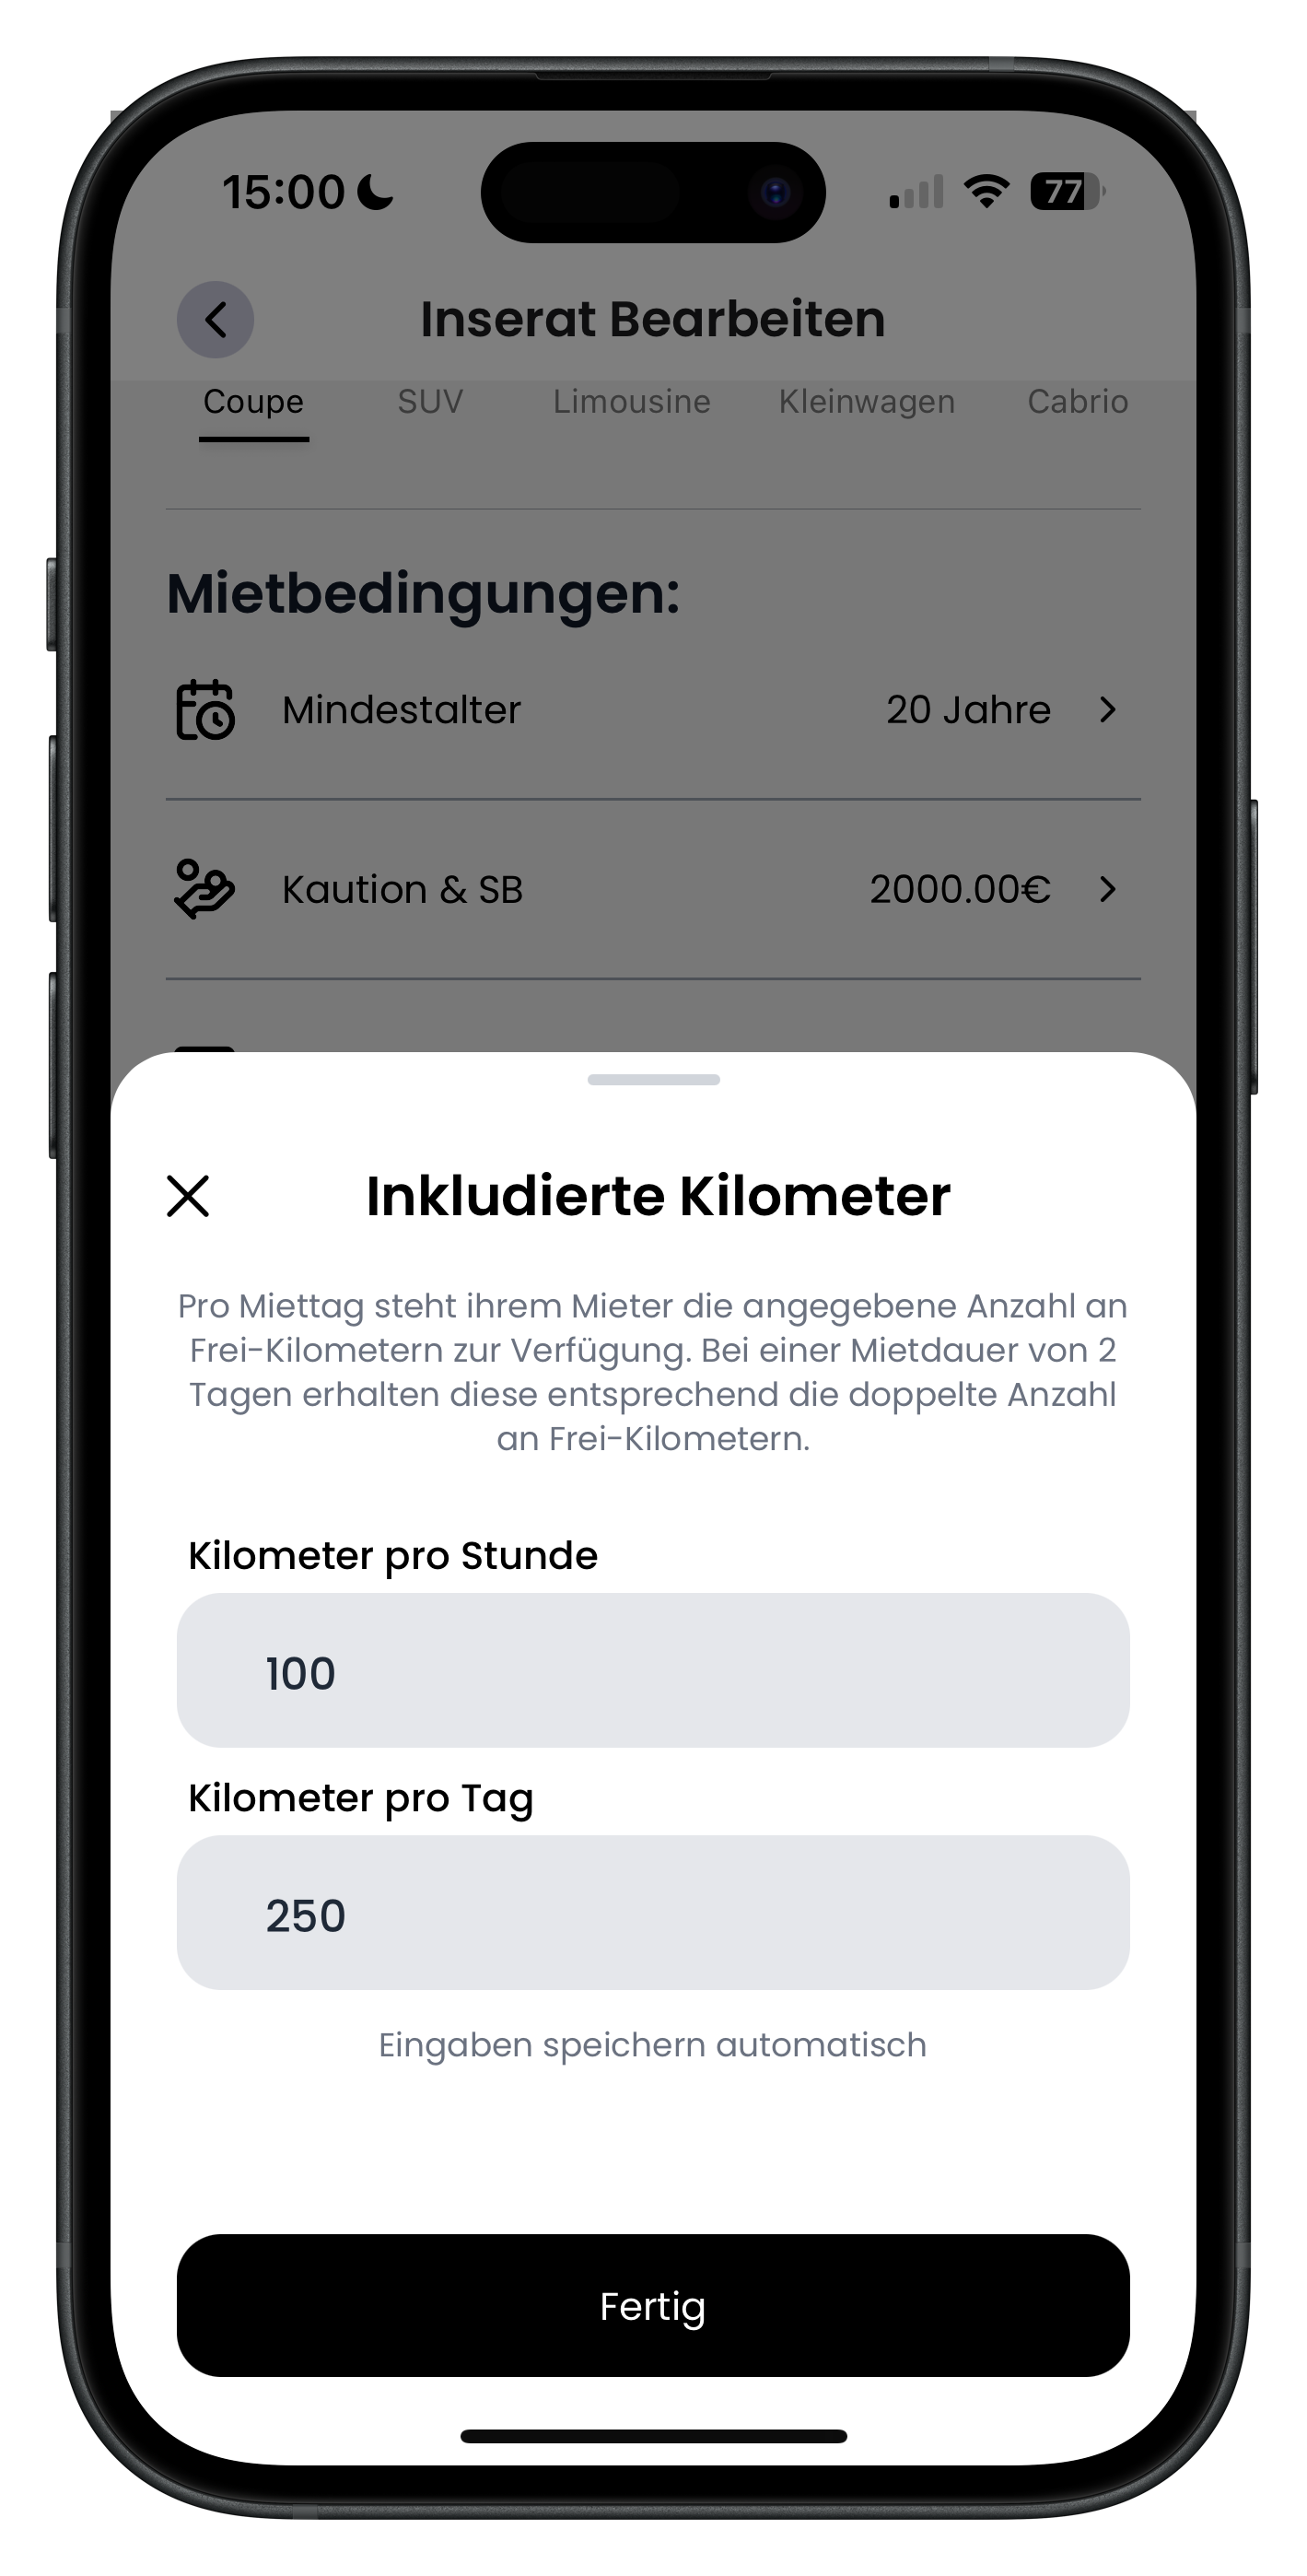
Tap the included mileage row. In the Included mileage window, the app explains: the renter receives the specified number of included kilometres per rental day, with more available proportionally for longer rentals. Enter your included mileage under Kilometres per hour (e.g. 100) and Kilometres per day (e.g. 250). These are scaled up automatically for hourly and multi-day bookings.
- For a two-day booking, the included kilometres double accordingly
- Set your included mileage to cover typical trips
- Renters who want to drive further can add mileage packages
17
Create mileage packages as an upsell
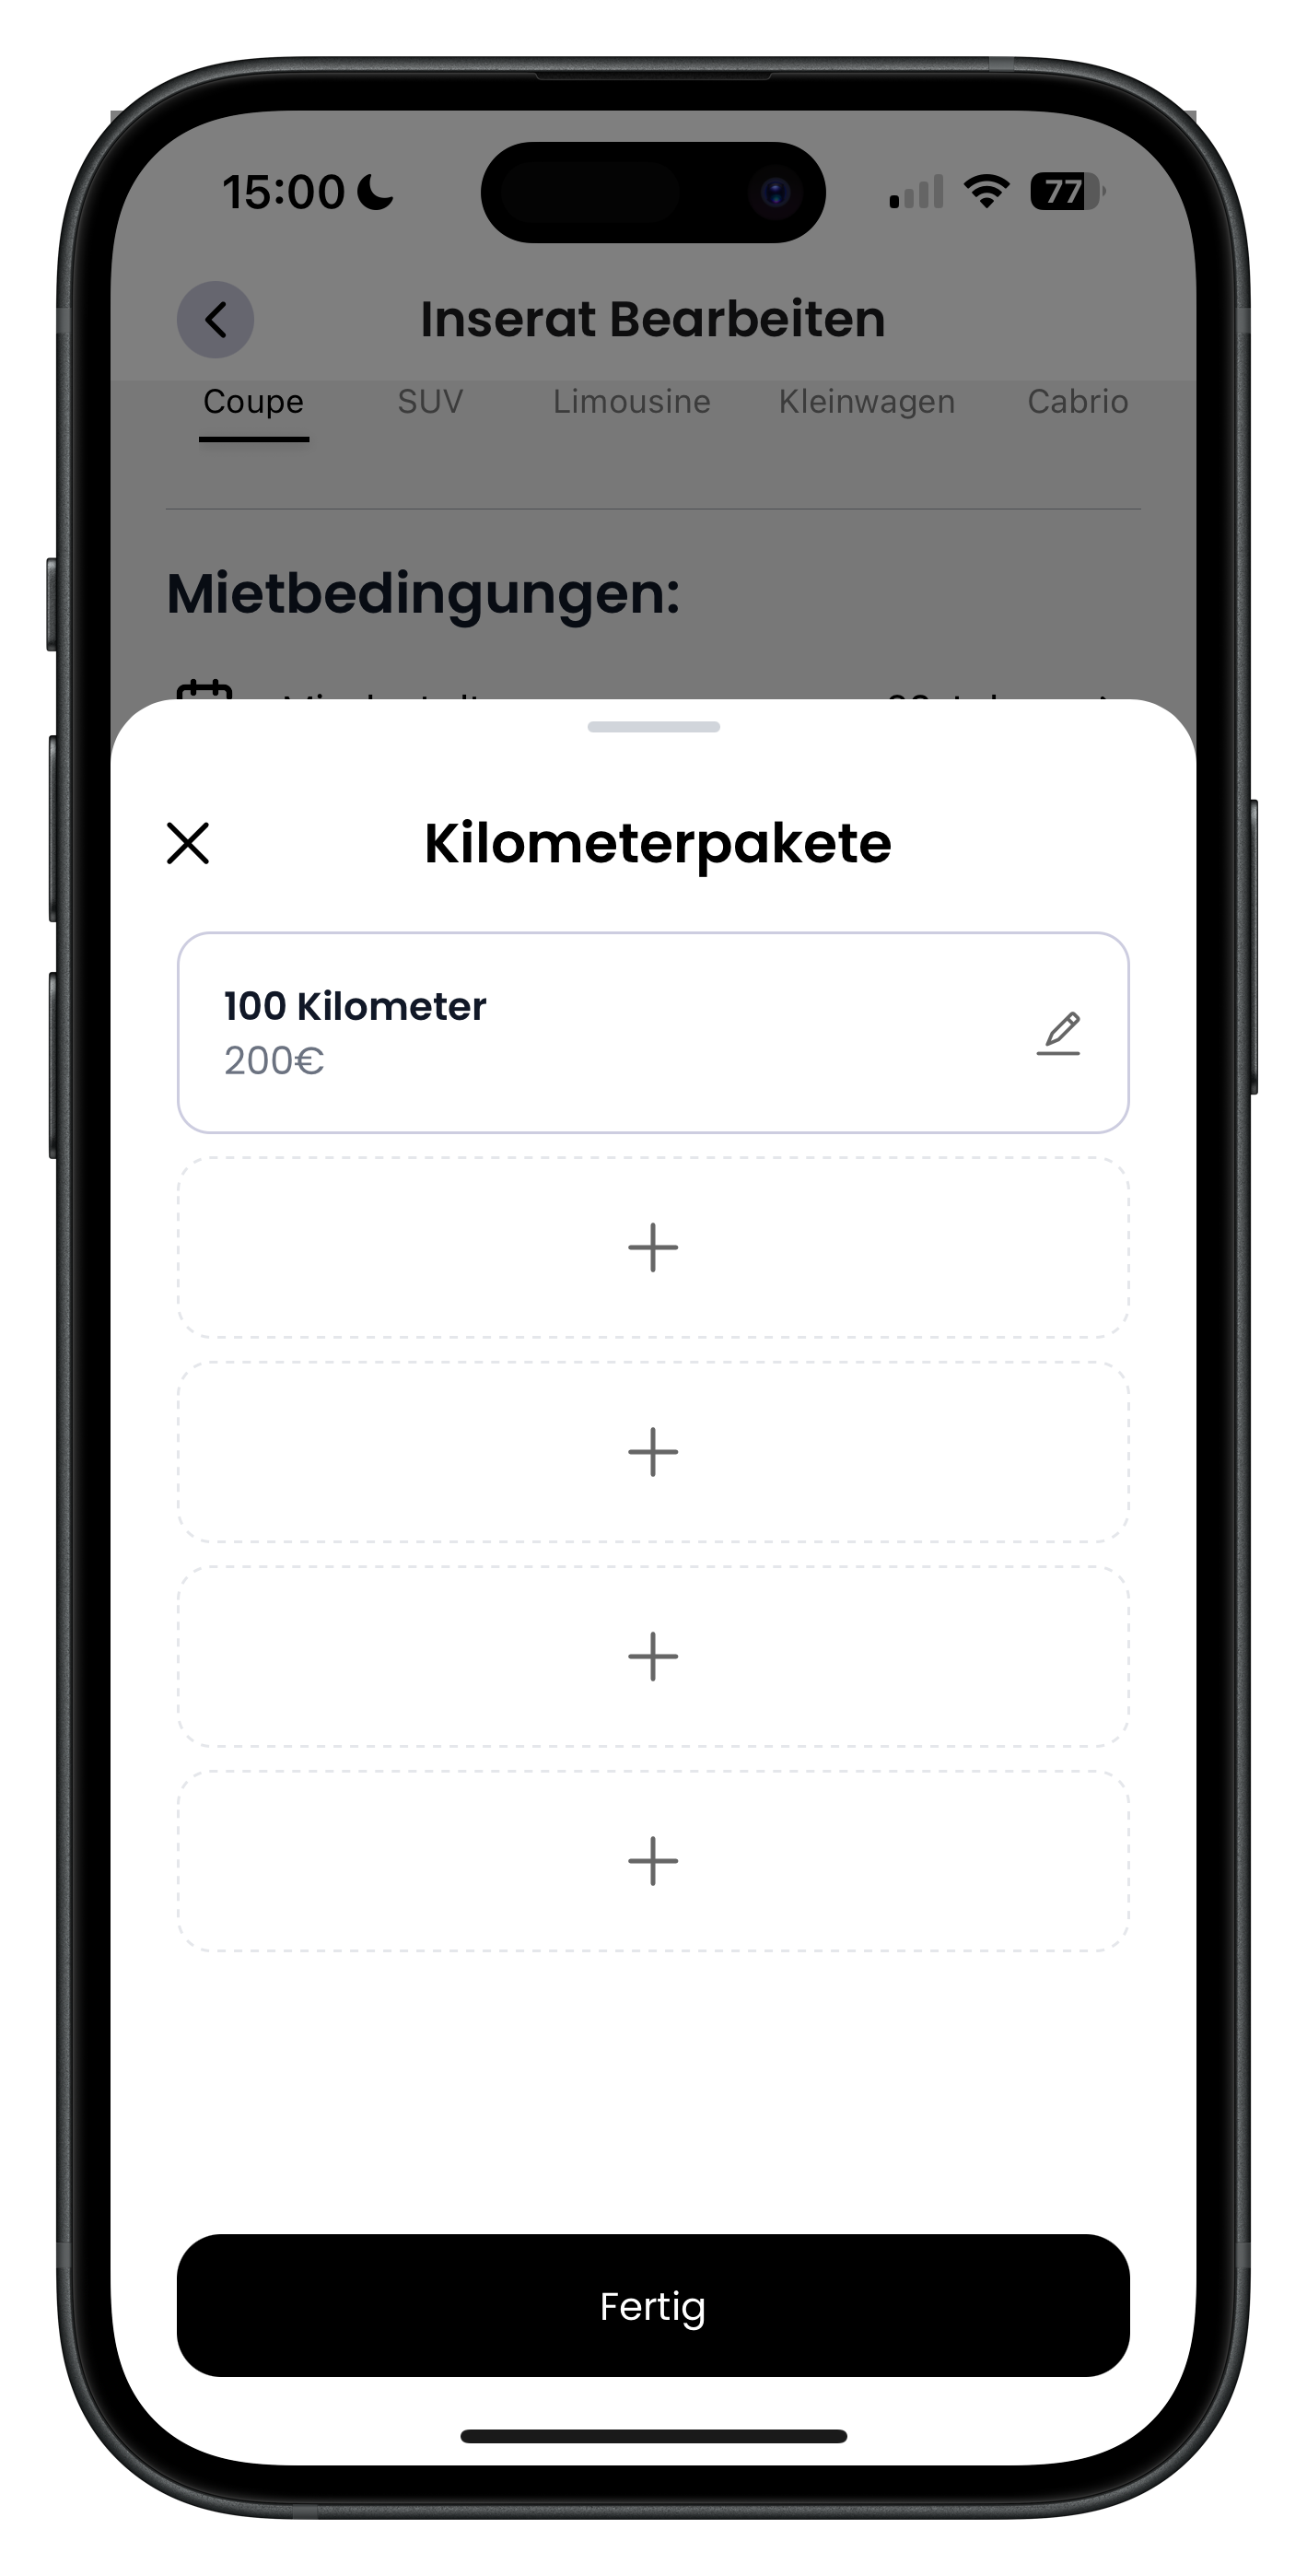
In the Mileage packages window you create additional packages that renters can add to their booking. Packages you've already set up appear as a card showing the kilometres and price — for example 100 kilometres for 200€ — with a small pen icon to edit them. Tap the dashed plus tiles to add further packages. This gives frequent drivers an easy way to buy extra mileage.
- Tap the pen icon to edit an existing package
- The dashed plus tiles represent new, empty package slots
- Offering several packages in different sizes gives your renters more choice
18
Add a new mileage package
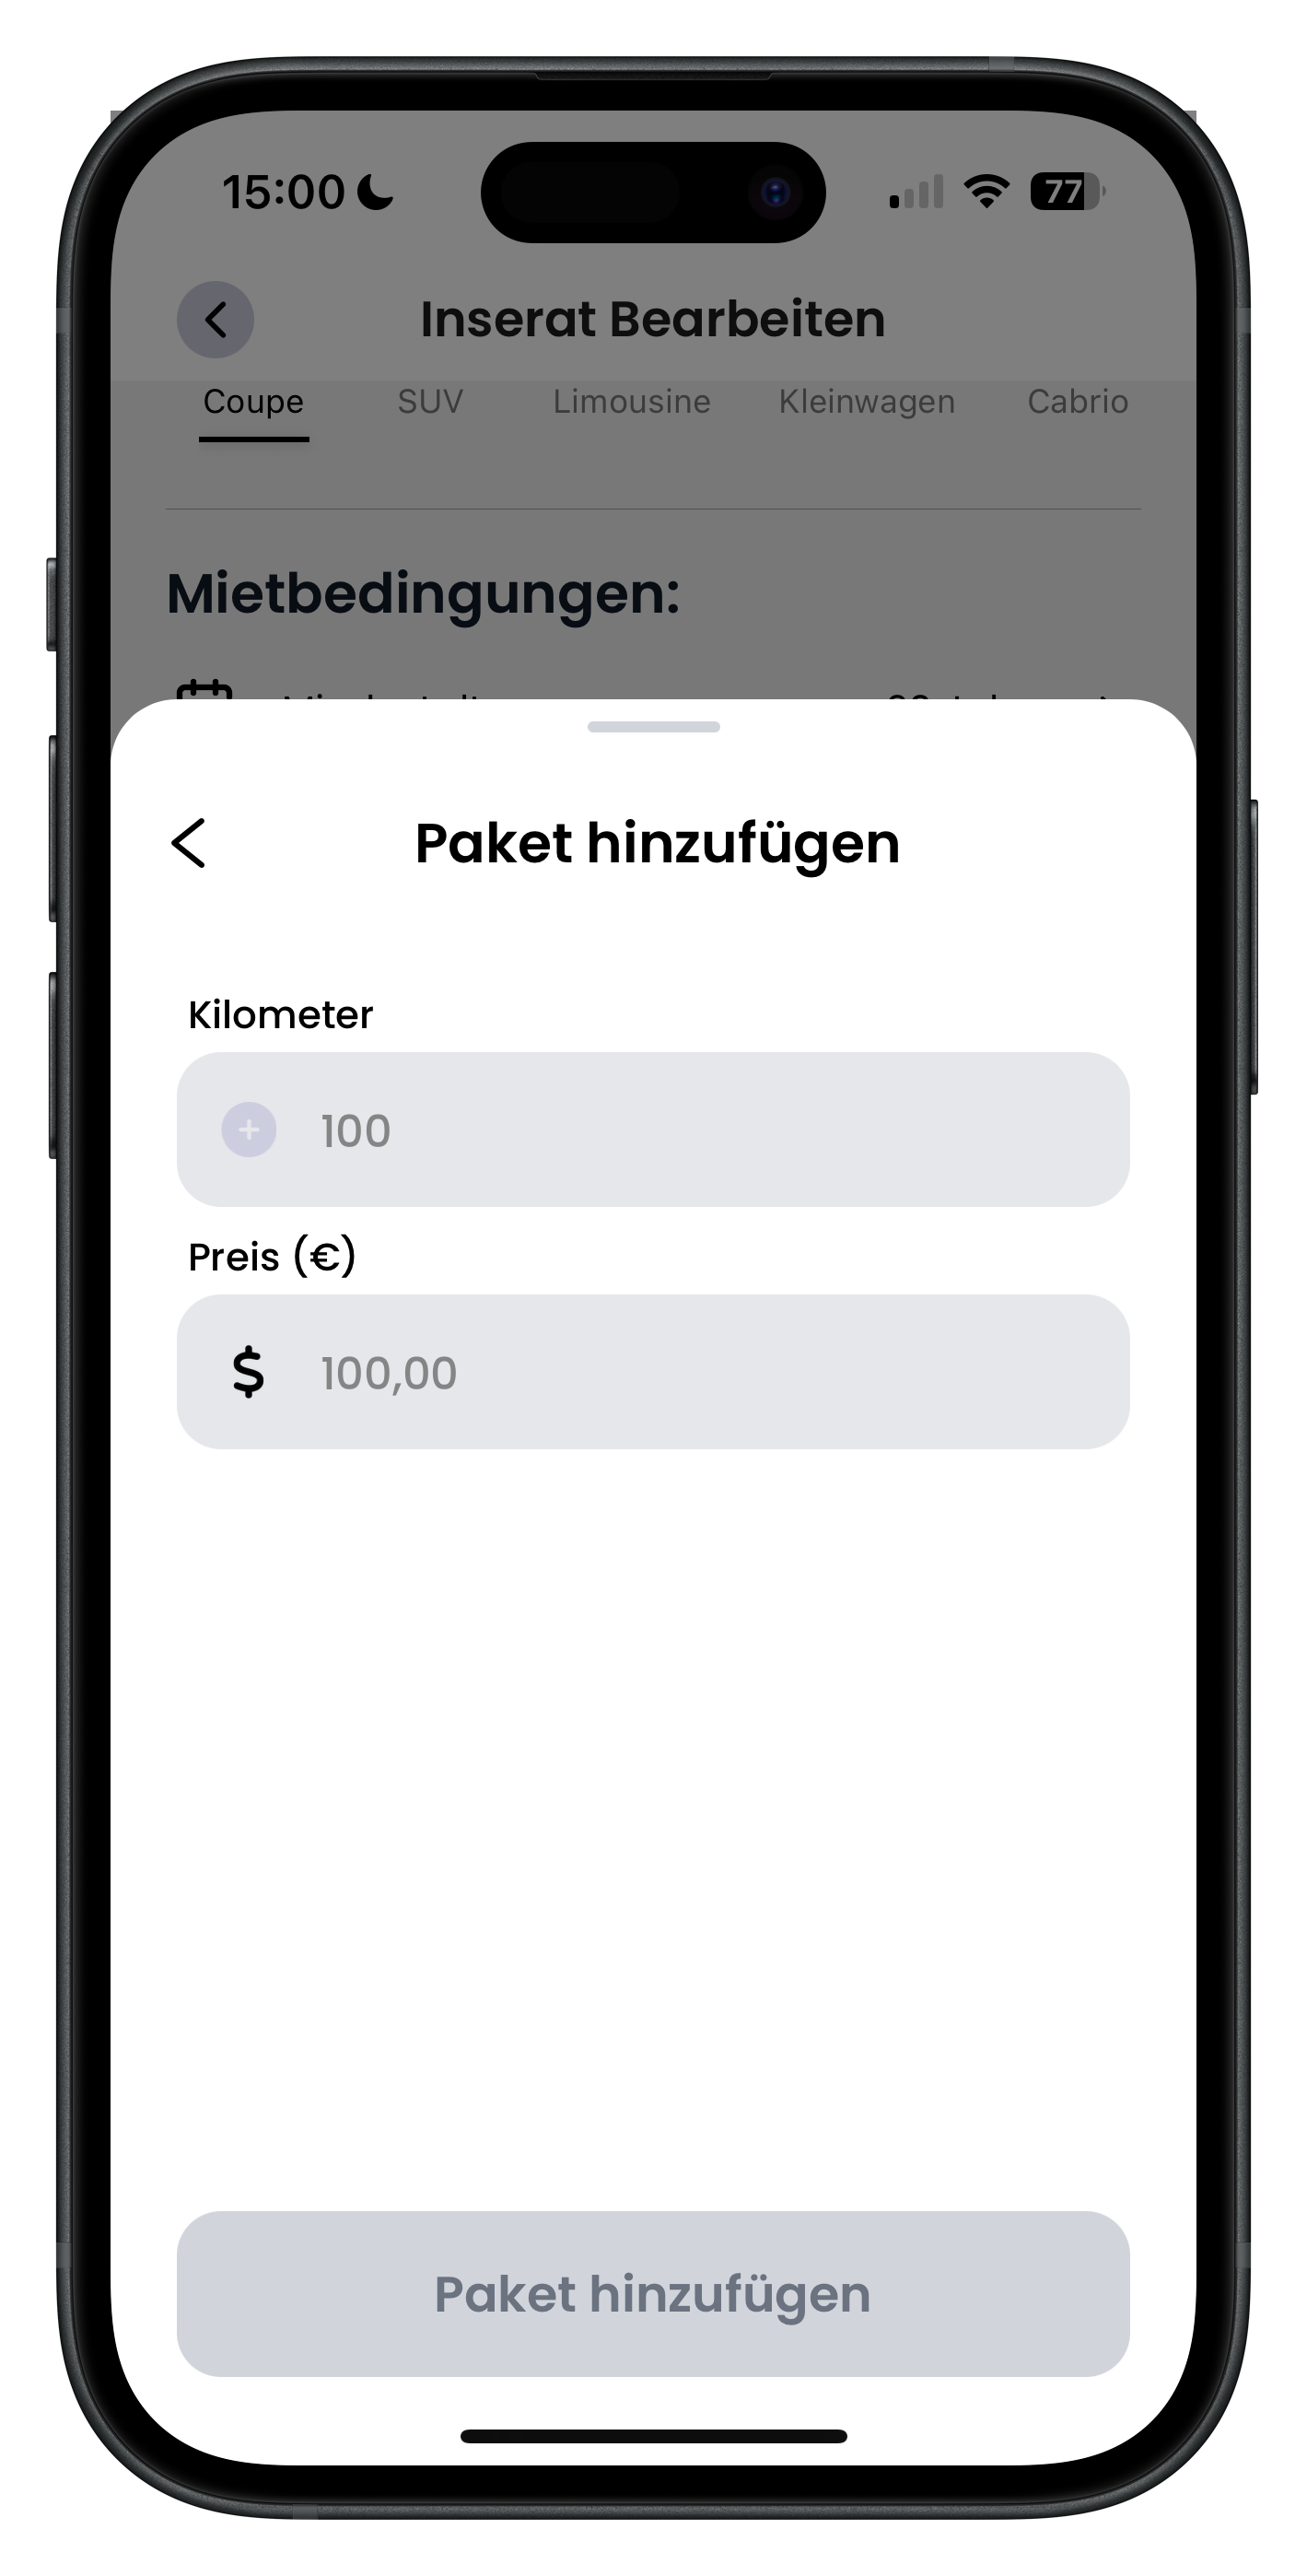
Tap an empty plus tile to open Add package. Here you enter the number of kilometres under Kilometres (e.g. 100) and the package price under Price (€). Confirm at the bottom with the Add package button. The new package will then appear in your list and be available for renters to book.
- Use a round number of kilometres — it looks cleaner to renters
- The price applies to the whole package, not per kilometre
- The package is only saved once you tap "Add package"
19
Allow extra kilometres during the rental
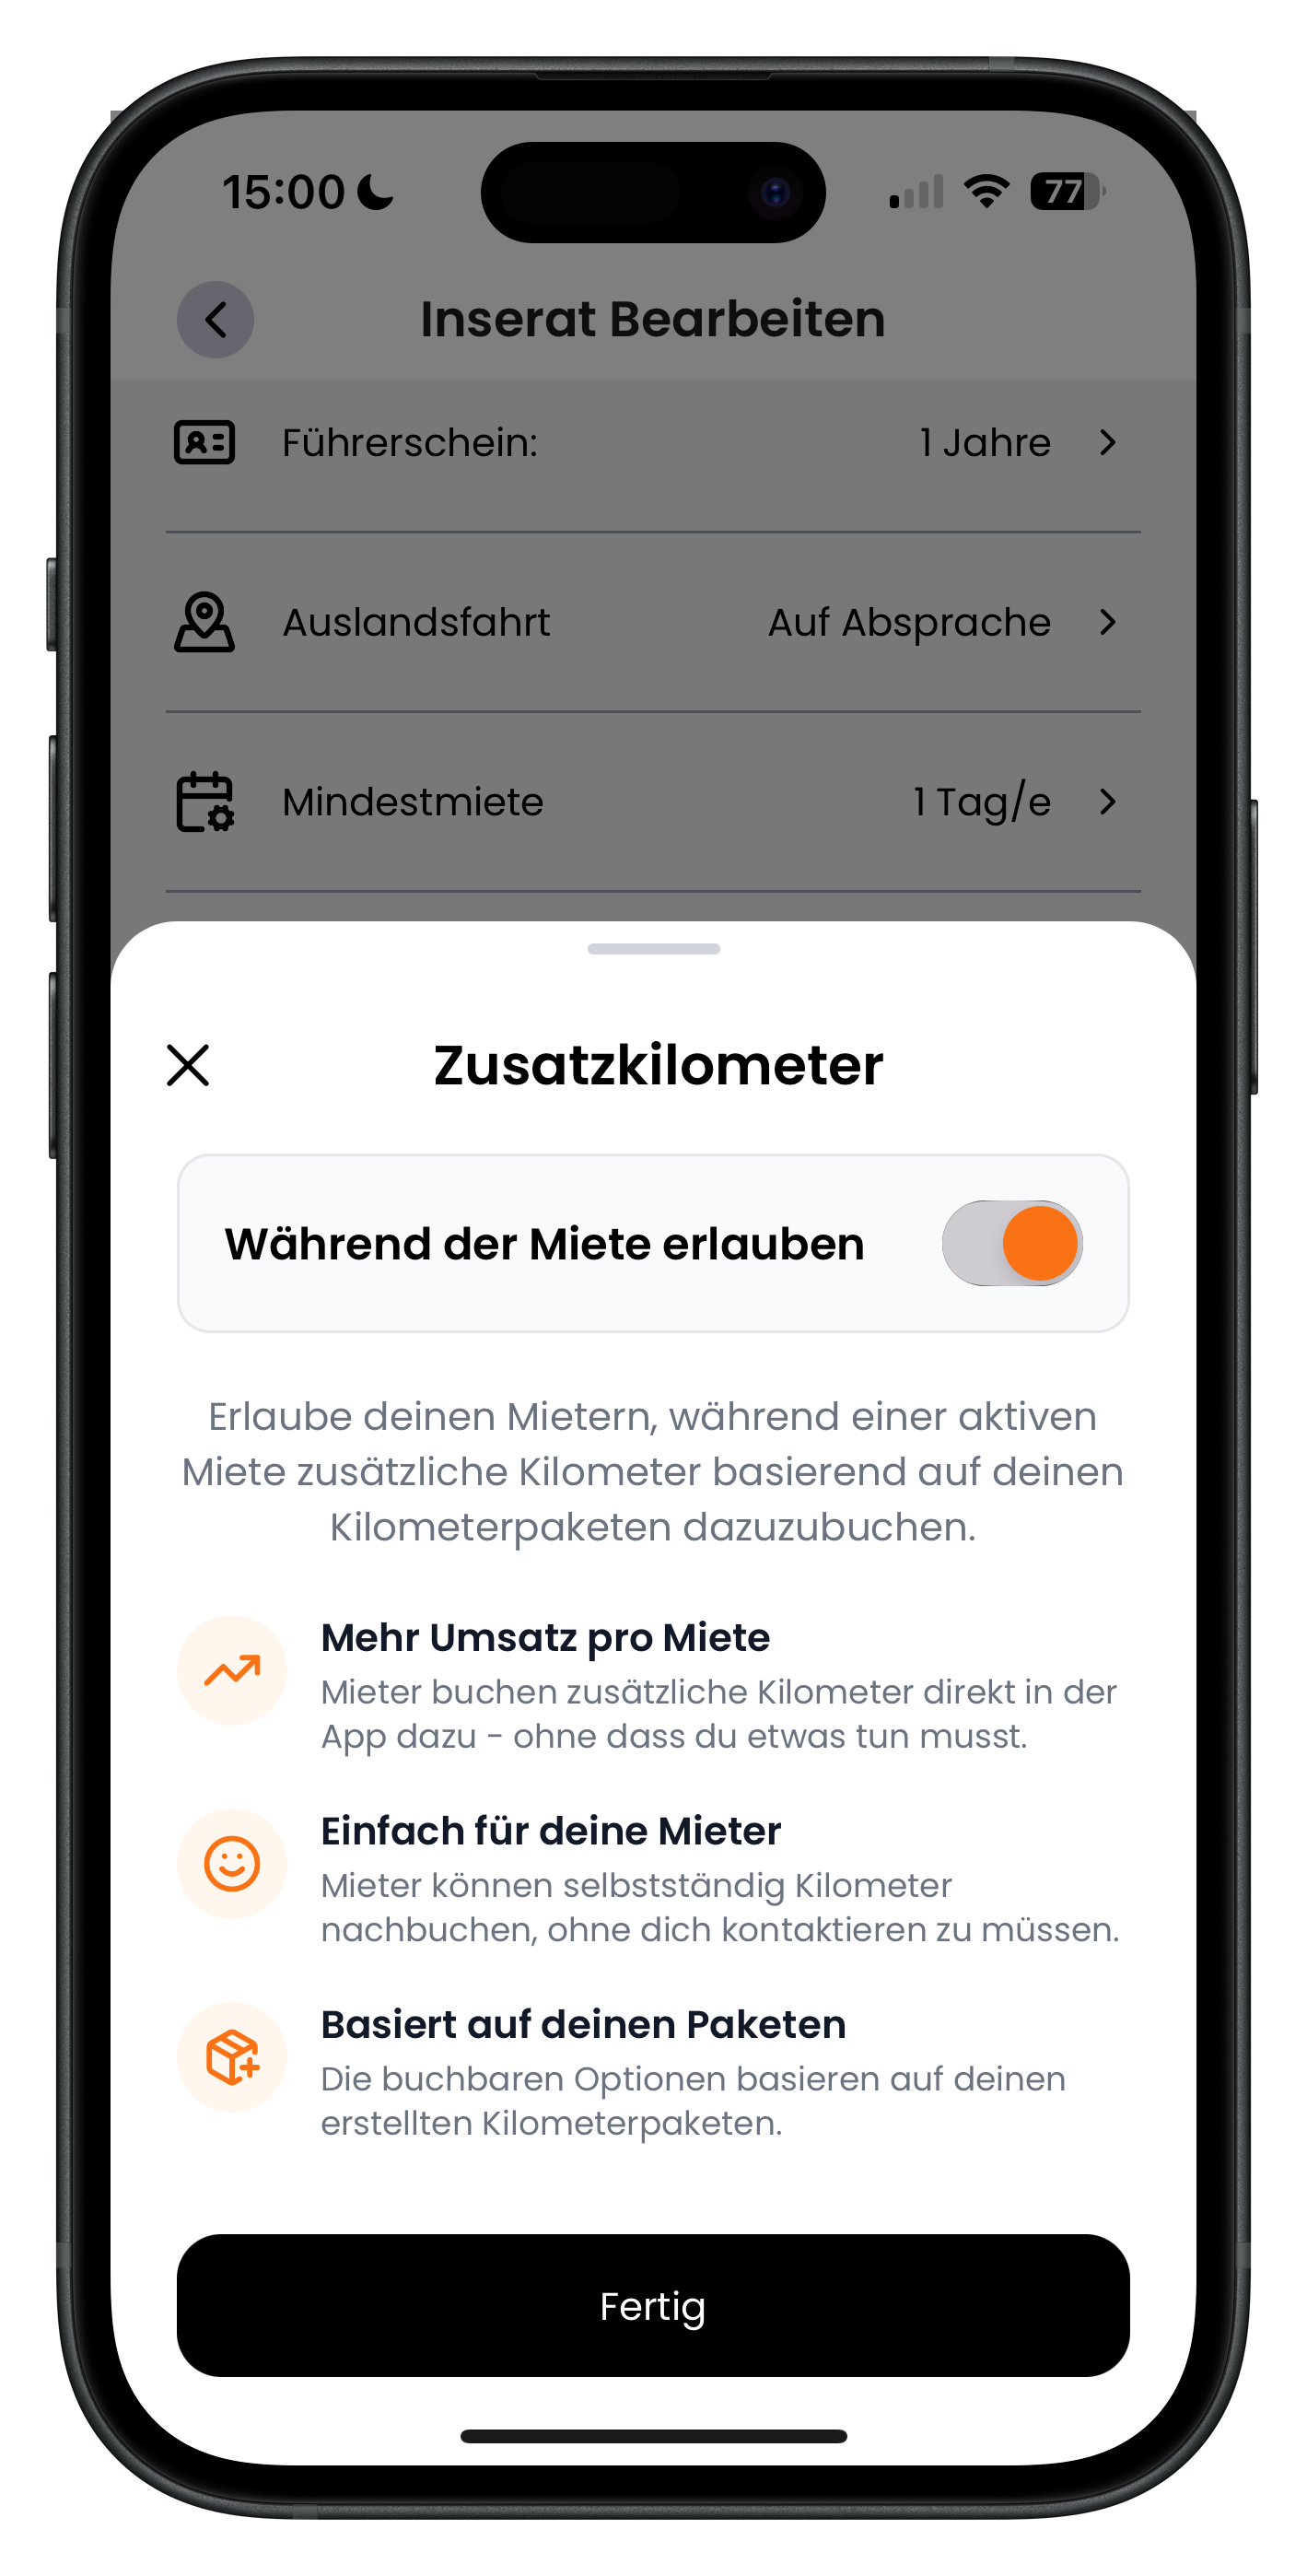
In the Extra kilometres window, activate the Allow during rental toggle to let renters add extra mileage packages during an active booking — paid directly online in the app. The app highlights three benefits: More revenue per rental, Easy for your renters and Based on your packages. The options available to book are based on the mileage packages you've already created.
- When enabled, you earn more without having to do anything
- Renters can add kilometres without needing to contact you
- Only the packages you've set up will be offered
Go ahead and enable extra kilometres. You don't need to do a thing: if a renter notices mid-trip that their included mileage is running low, they can easily add more in the app — and you earn extra revenue in the process.
Pricing, calendar colour and pick-up
20
Choose a calendar colour for this listing
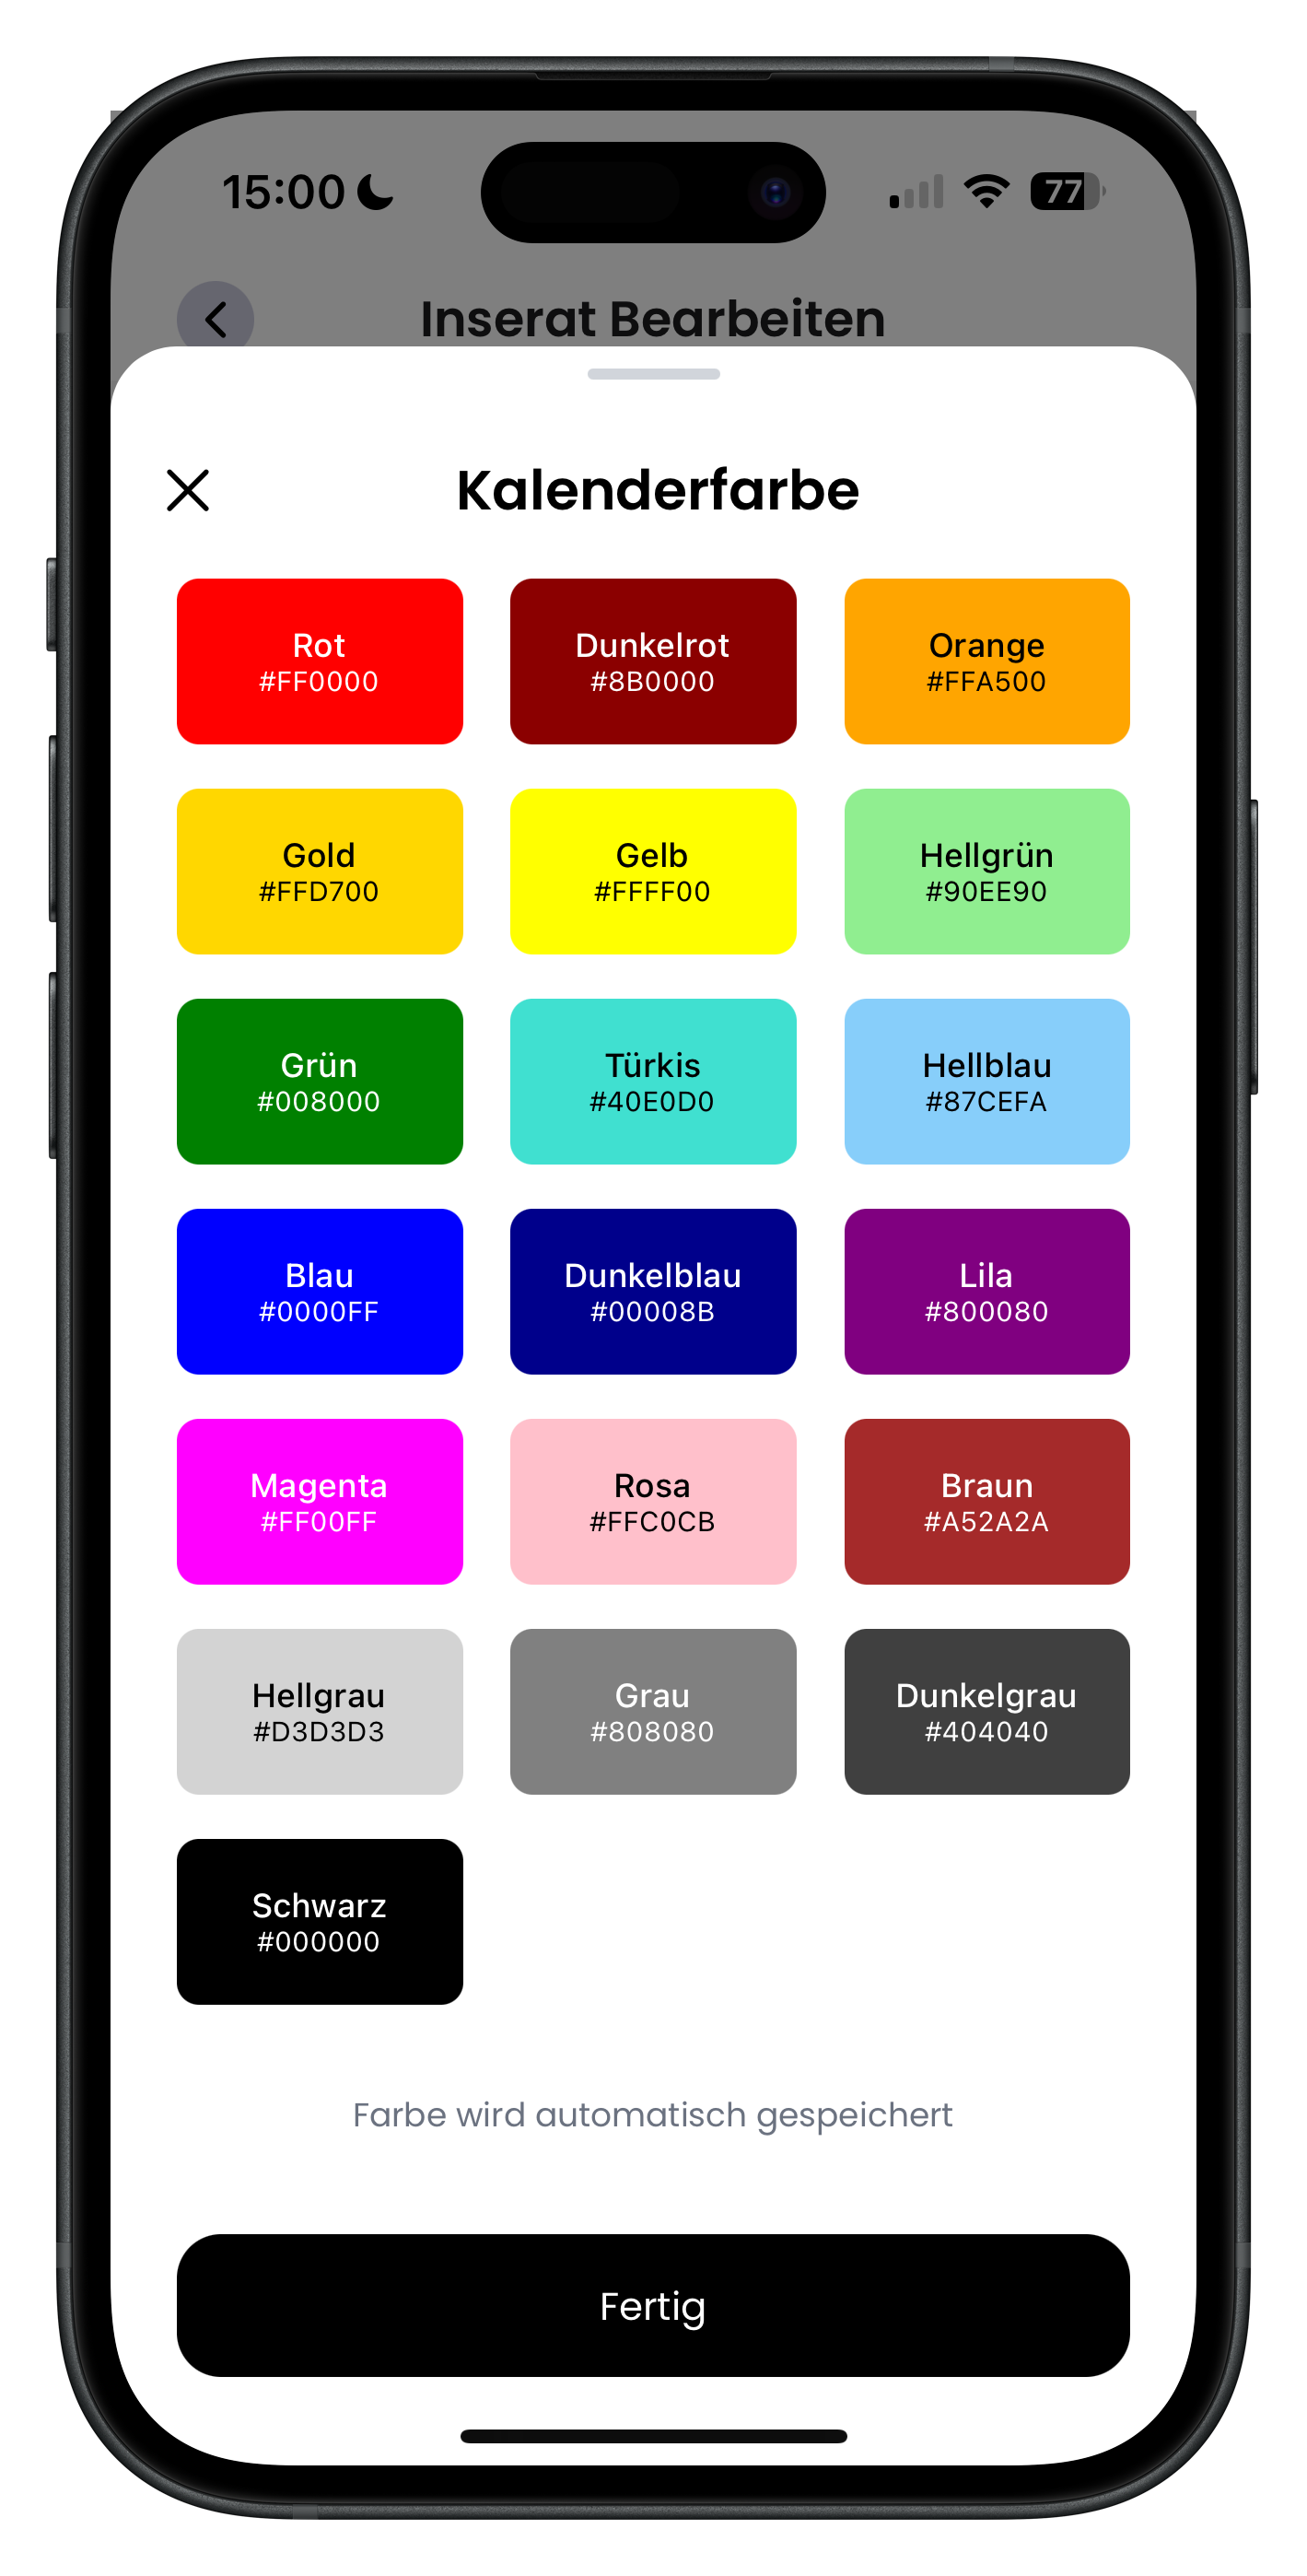
Tap the calendar colour row to open the Calendar colour window. Here you choose from a palette of colours such as Red, Orange, Green, Blue or Purple, each with its matching colour code. This colour represents this specific vehicle in the Drivable calendar. If you have multiple cars, it lets you see at a glance which booking belongs to which vehicle.
- Give each vehicle its own colour — it'll save you a lot of searching later
- The colour is saved automatically as soon as you tap it
- In the calendar you can then identify bookings at a glance
21
Set pricing for weekdays, weekends and monthly
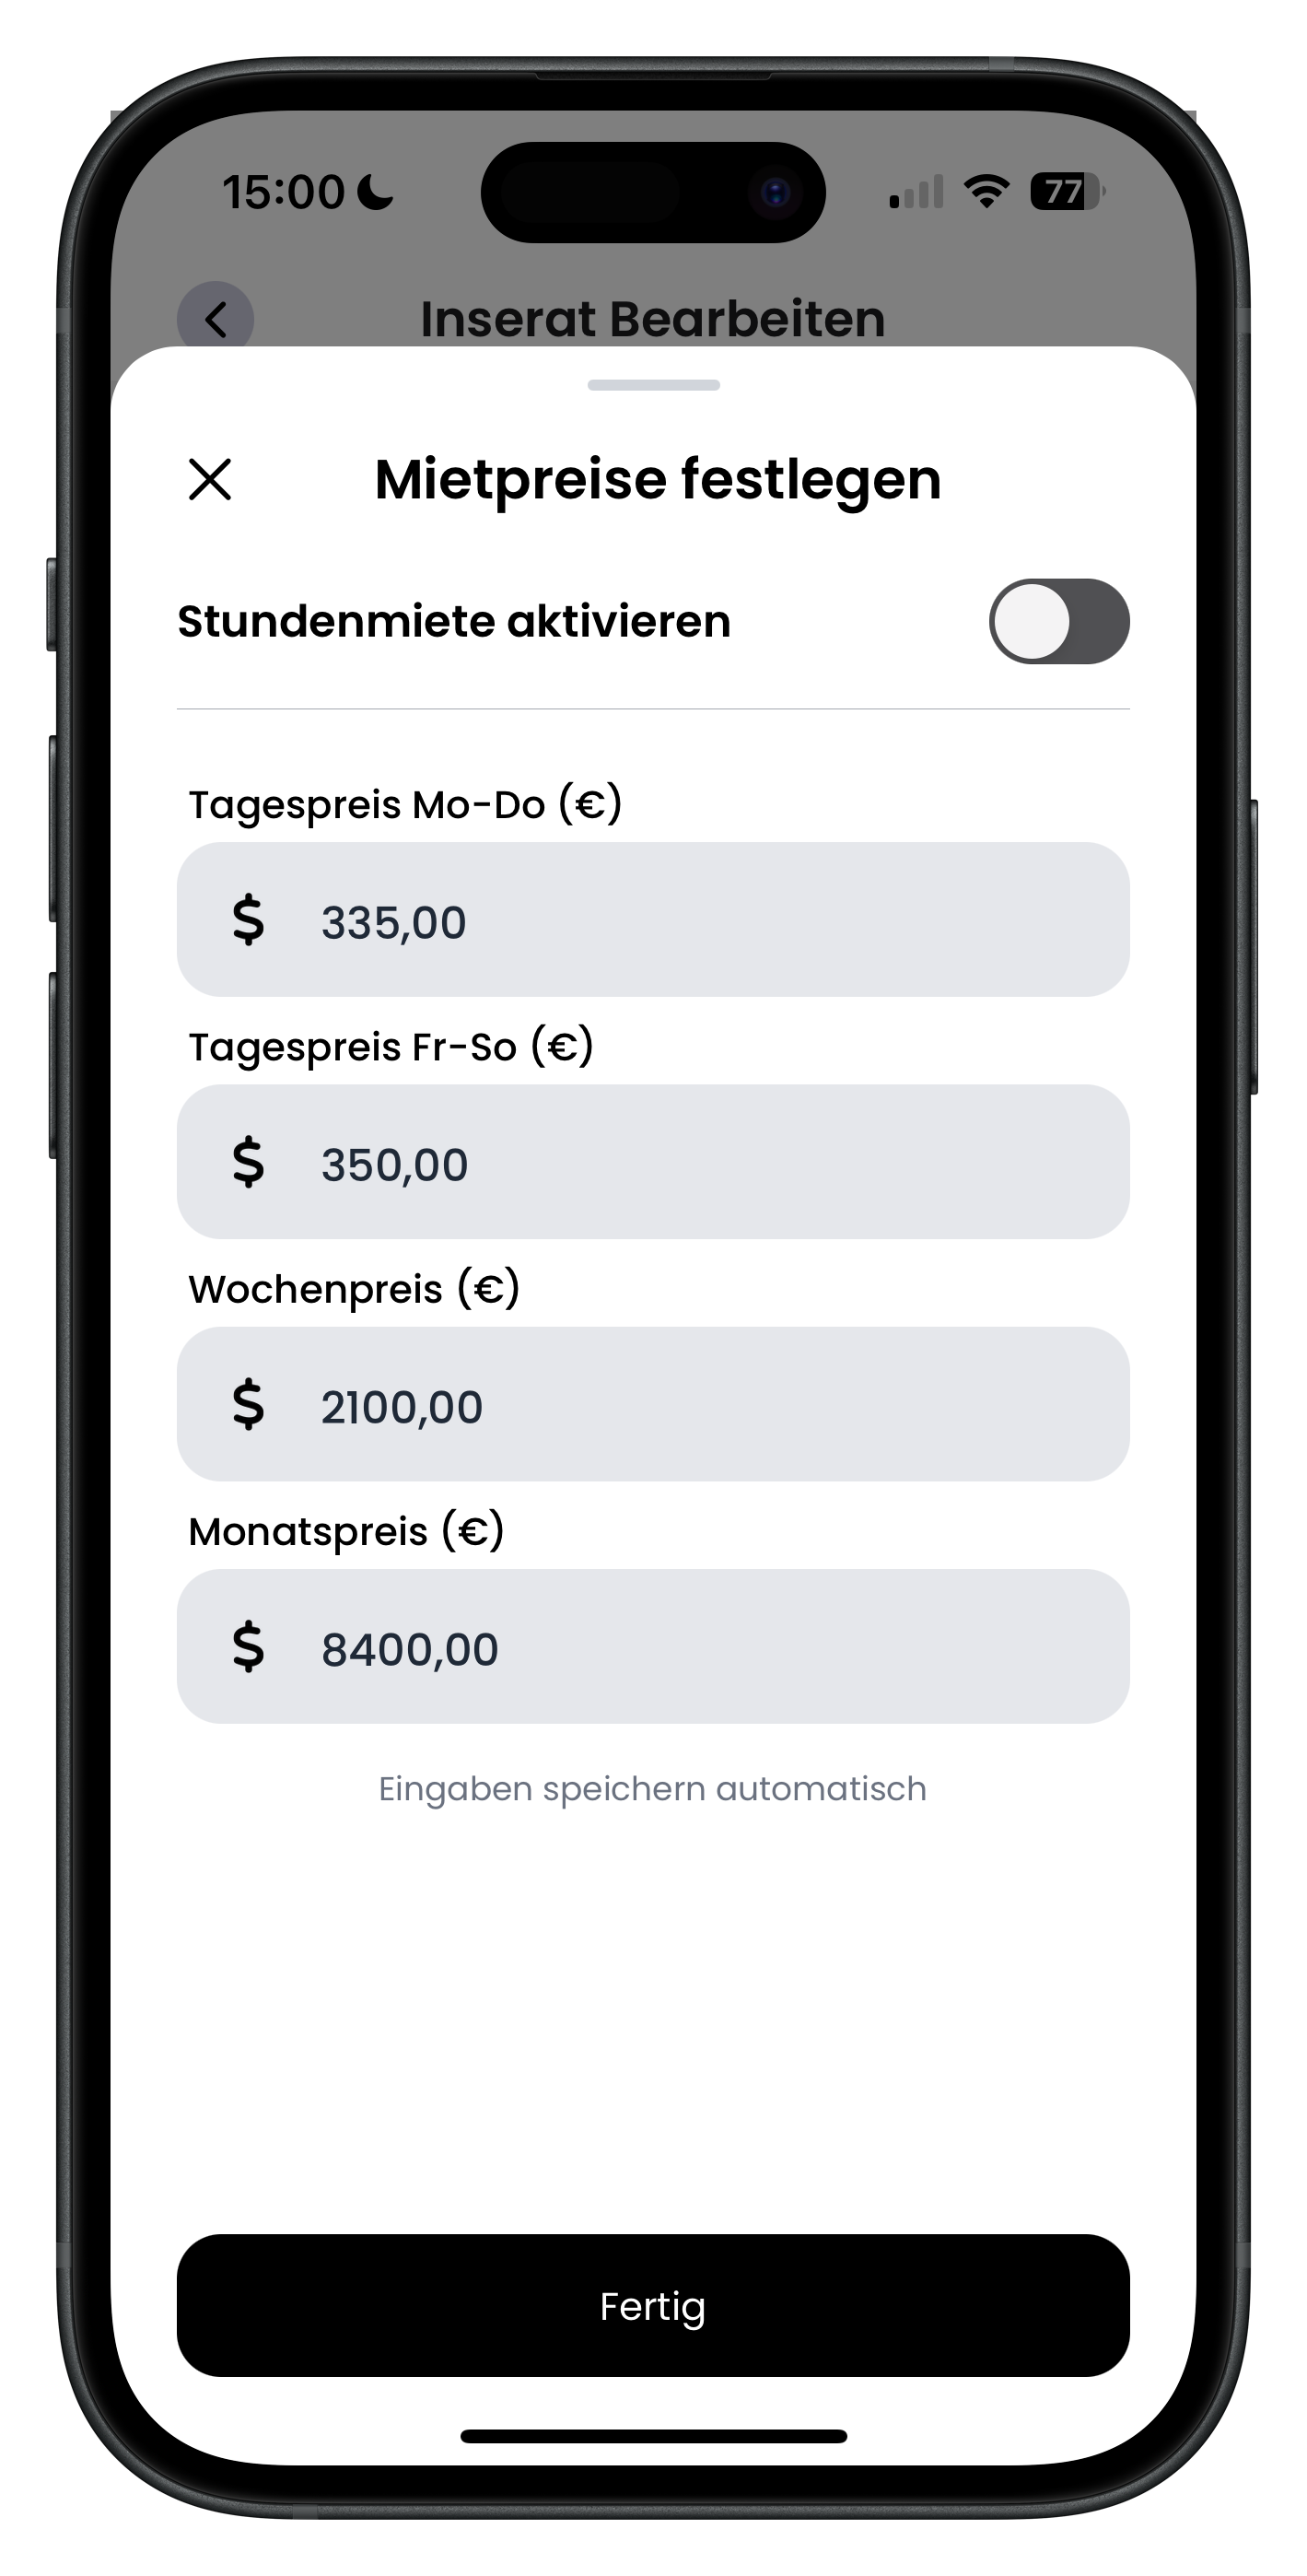
In the pricing section you set what your vehicle costs to rent. You enter separate prices for weekdays, weekends and per month. This lets you charge more on popular days like Friday to Sunday and offer an attractive monthly rate for longer rentals. These prices form the basis of what the renter pays through the platform.
- Higher weekend prices are standard — that's when demand is highest
- A competitive monthly price makes your car appealing for long-term rentals too
- Payments are accepted via all major credit cards, Apple Pay, Google Pay and Klarna
If you want to run limited-time promotions or discounts, you don't do that here — use the discounts feature instead. You can read how it works in Create and manage discount promotions.
22
Change the vehicle's pick-up location
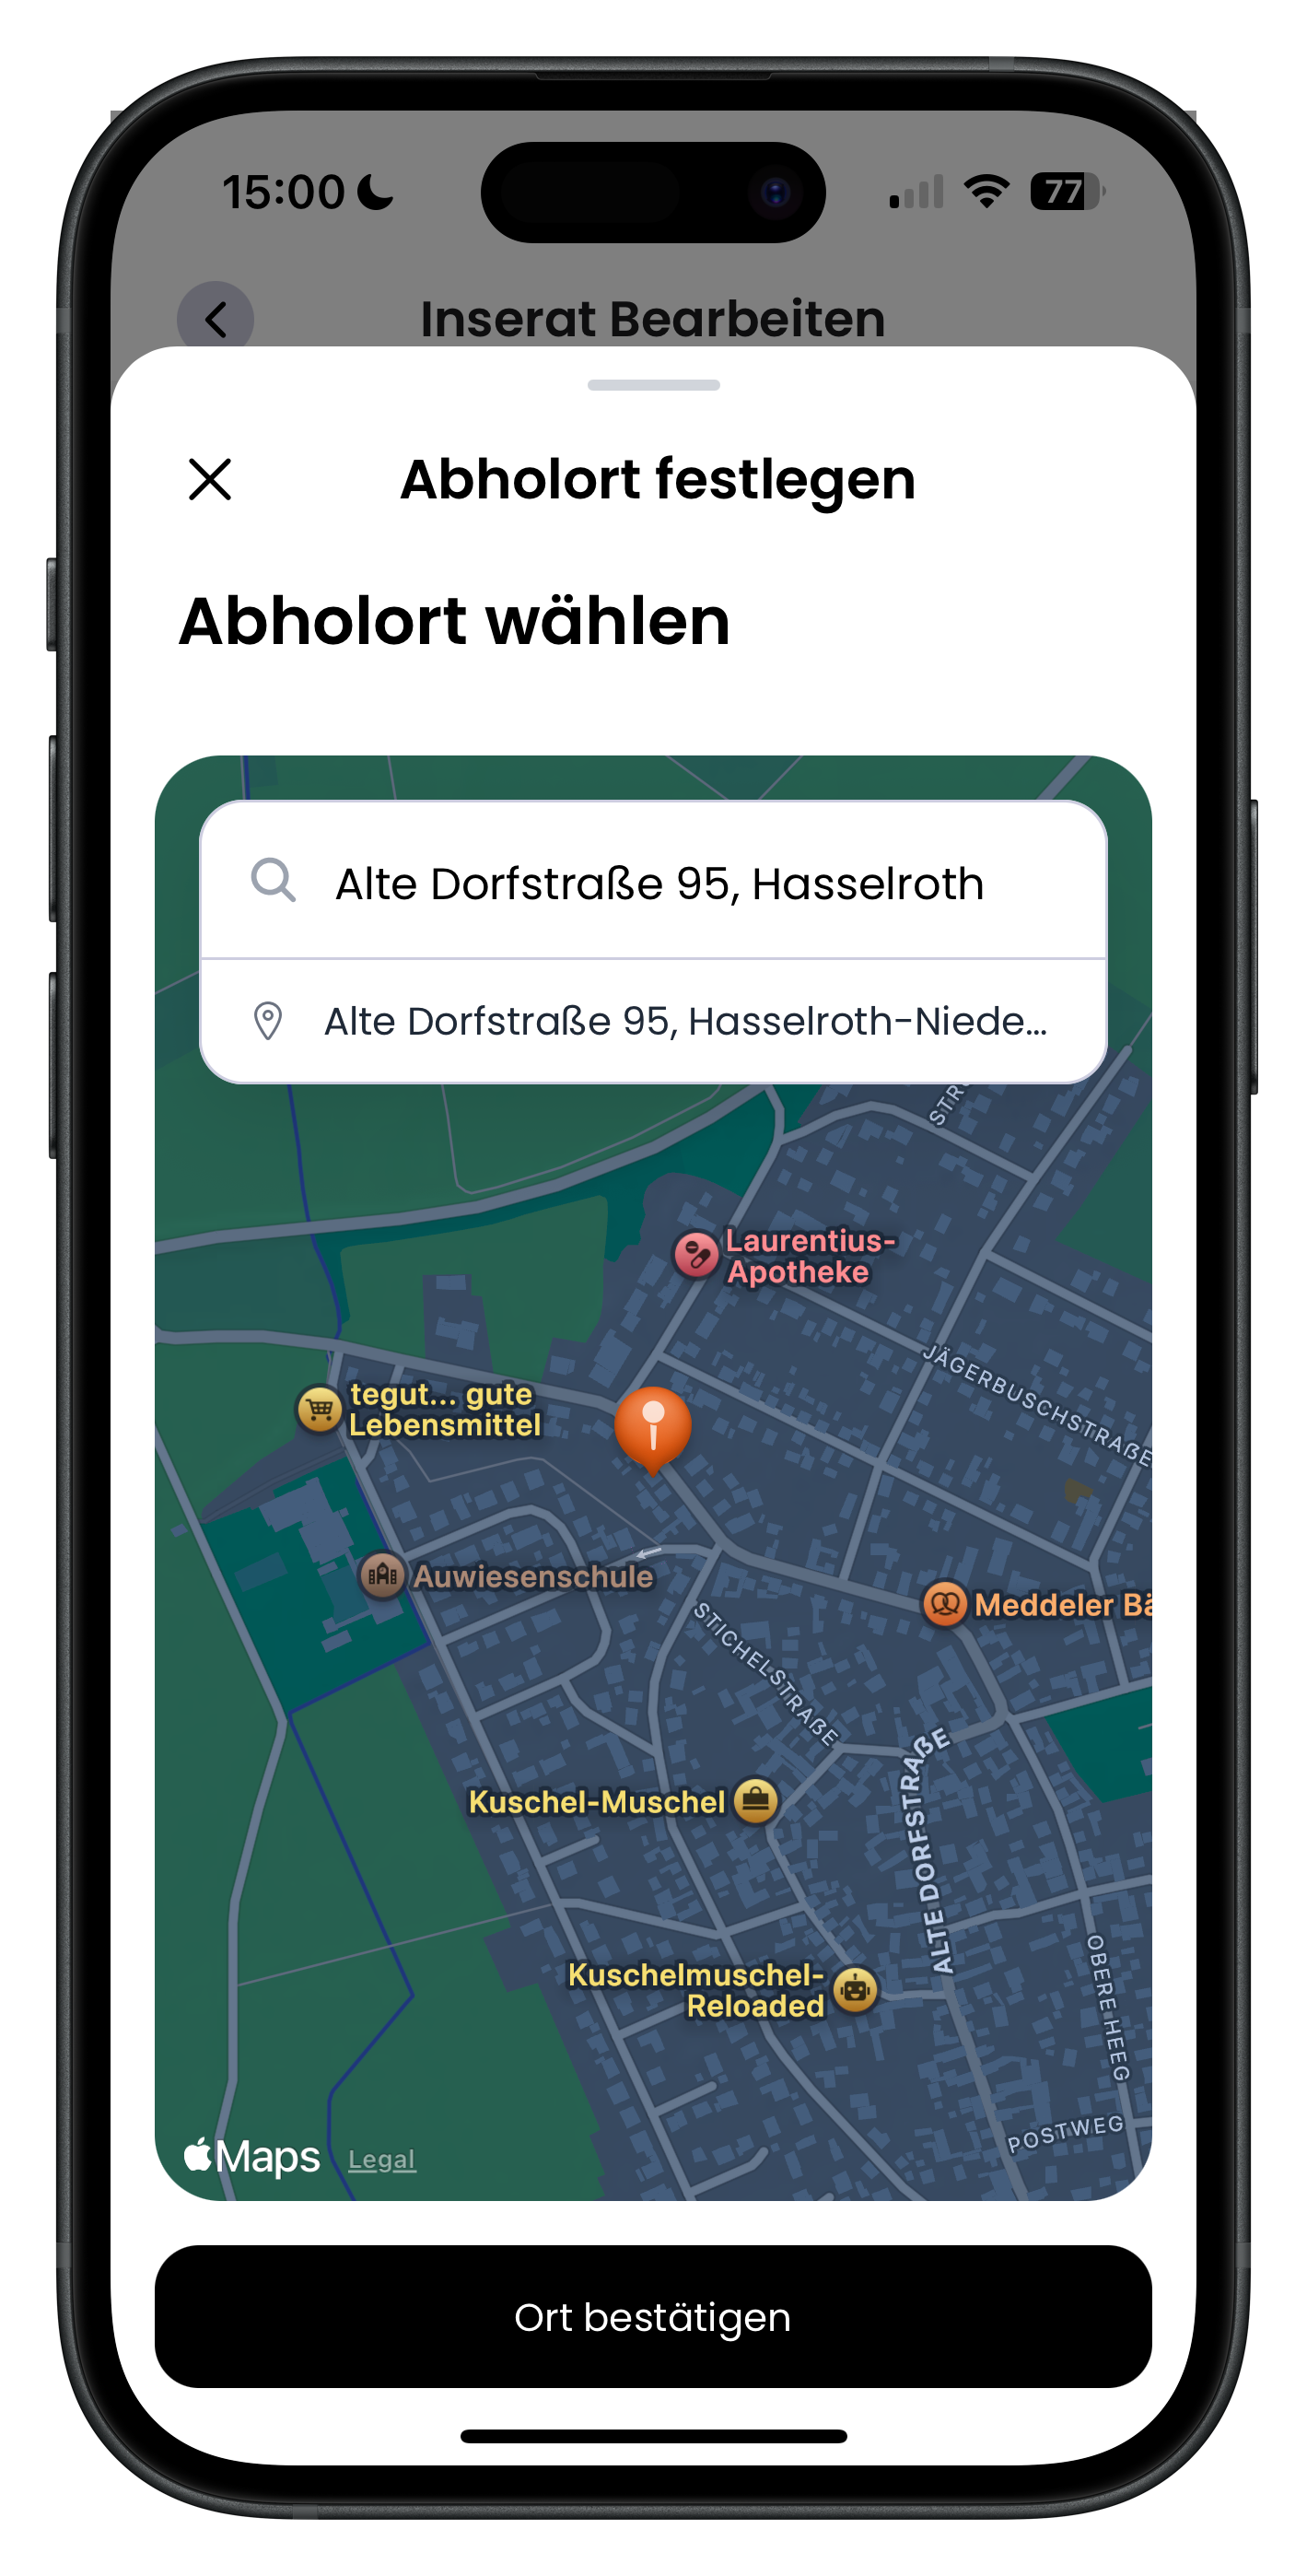
Here you update your car's pick-up location. Enter the address where the renter will collect the vehicle. Important: the exact address is only shown to the renter after successful payment — once in the app and once by email. Before that, renters can only see the approximate area. This keeps your precise location details private until the booking is confirmed.
- The exact address is only revealed to the renter after they've paid
- The pick-up location is communicated both in the app and by email
- Make sure the address is correct so the handover goes smoothly
23
Set delivery terms and price per kilometre
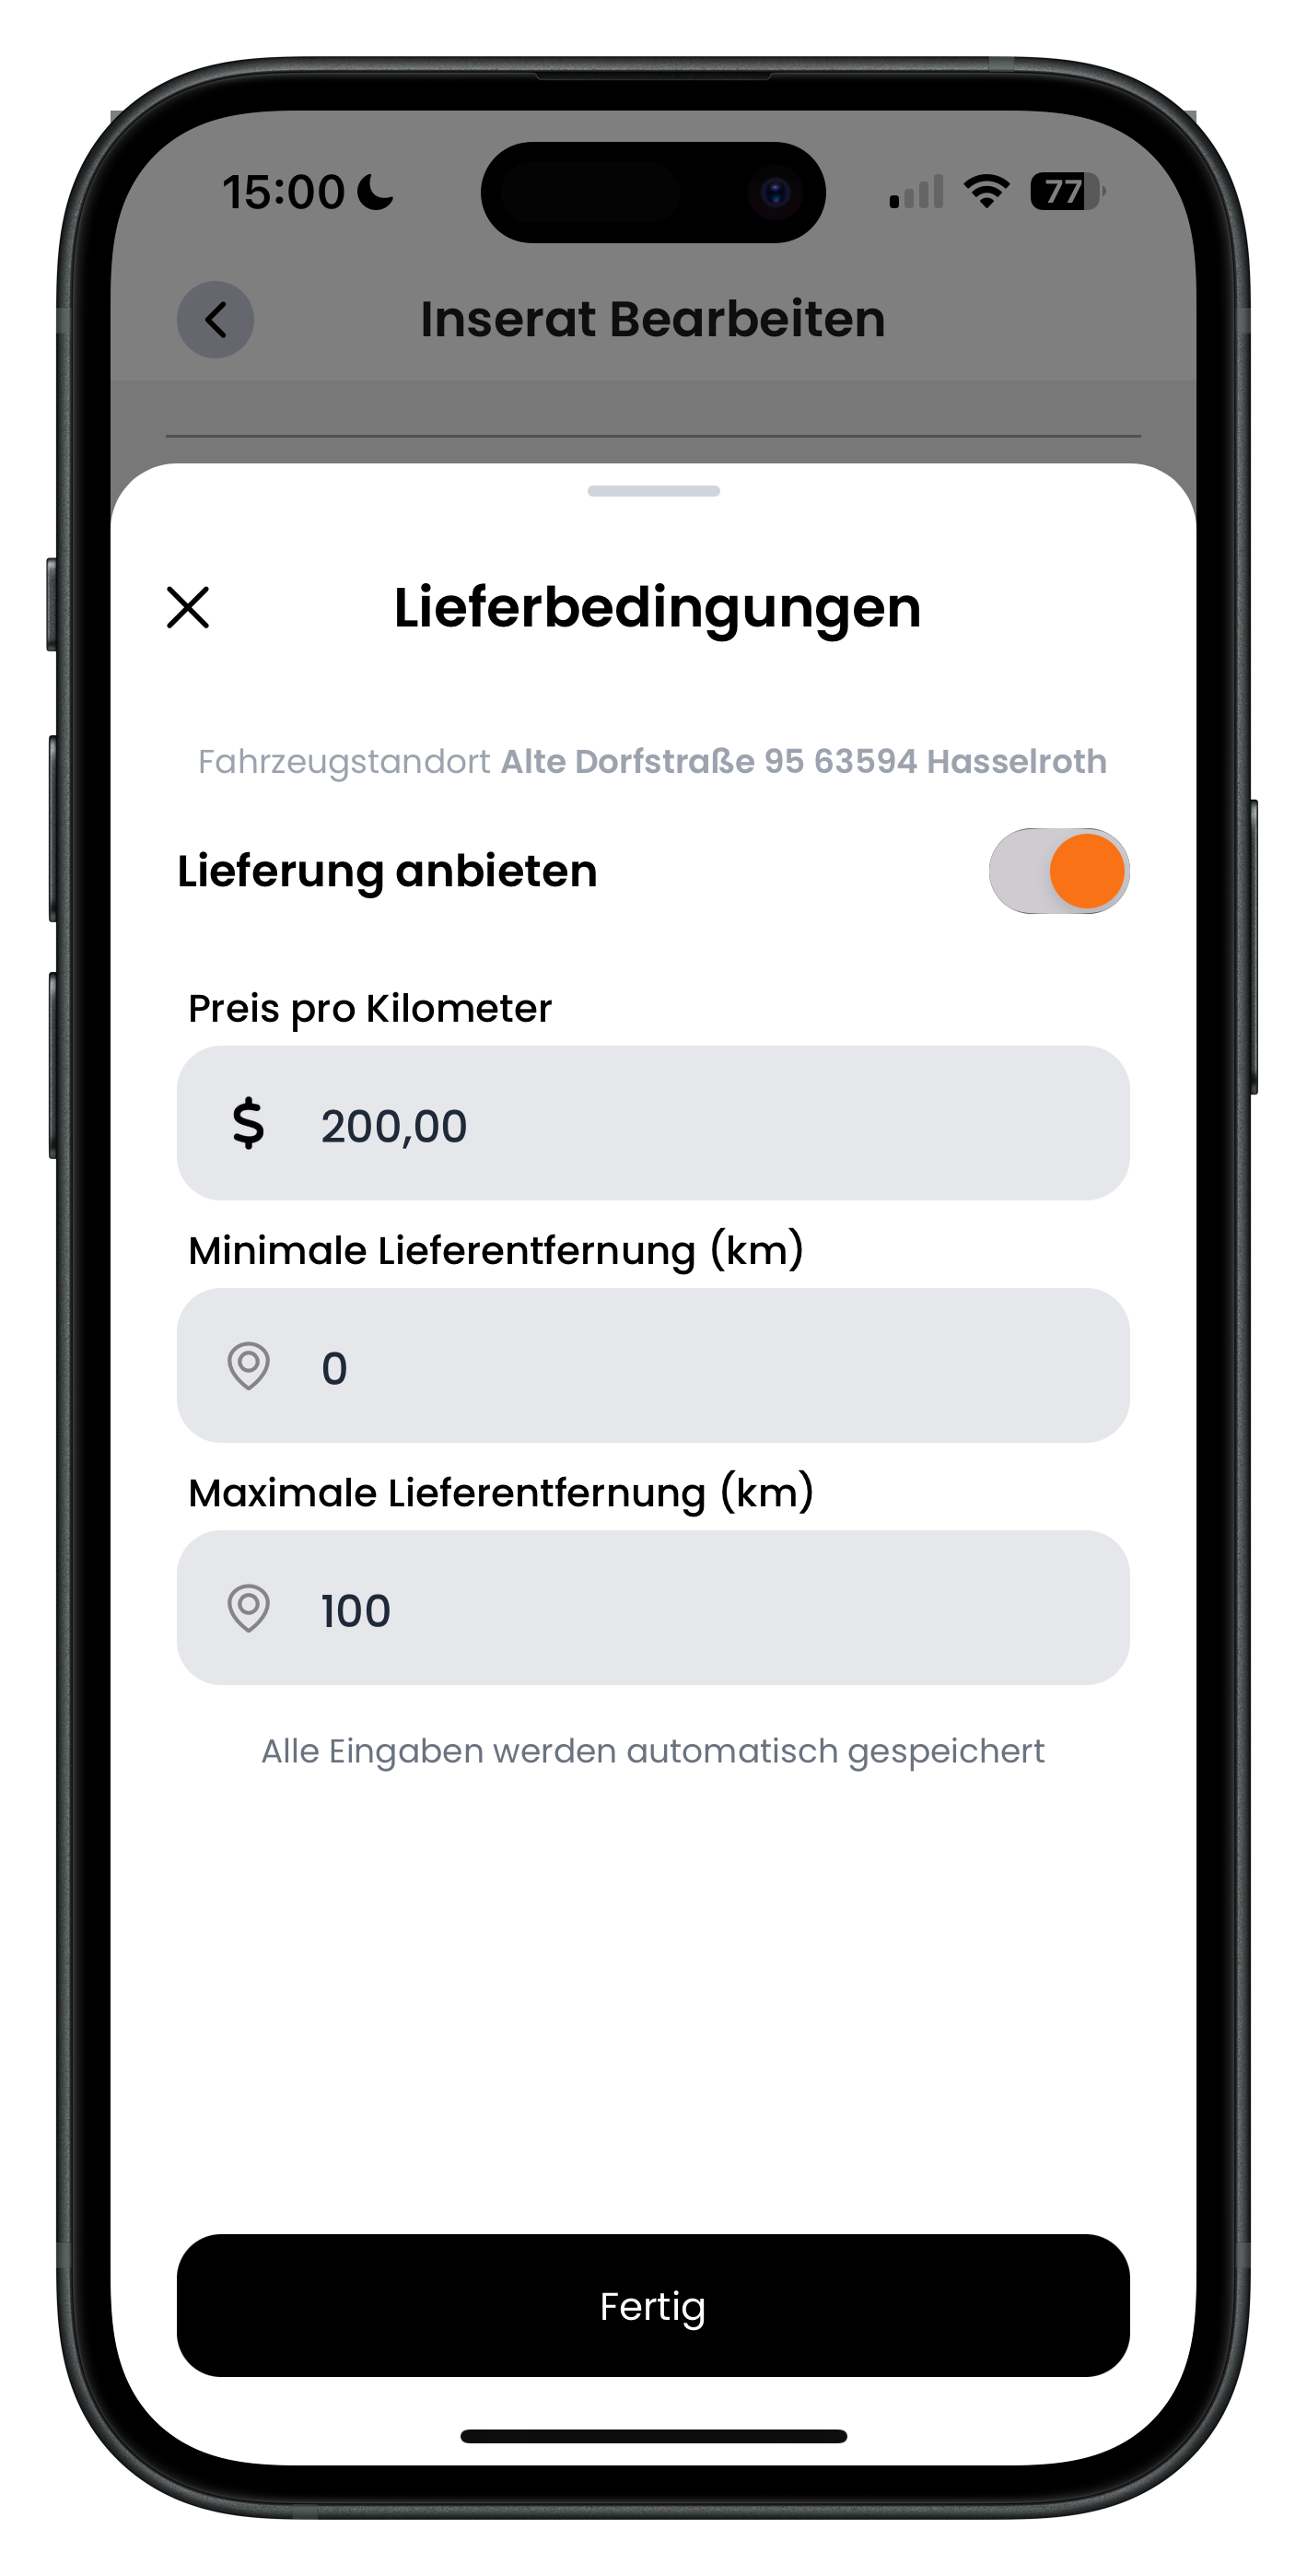
In the Delivery terms section you configure whether you deliver your vehicle to the renter and how far you're willing to go. You set the maximum delivery range and the price per kilometre charged for delivery. This lets you serve renters who can't come to you — and earn extra in the process.
- Set the maximum distance you're willing to deliver
- The price per kilometre covers your effort for the delivery
- Offering delivery can give your listing a real edge over others
Cancellation policy and extras
24
Set the cancellation policy
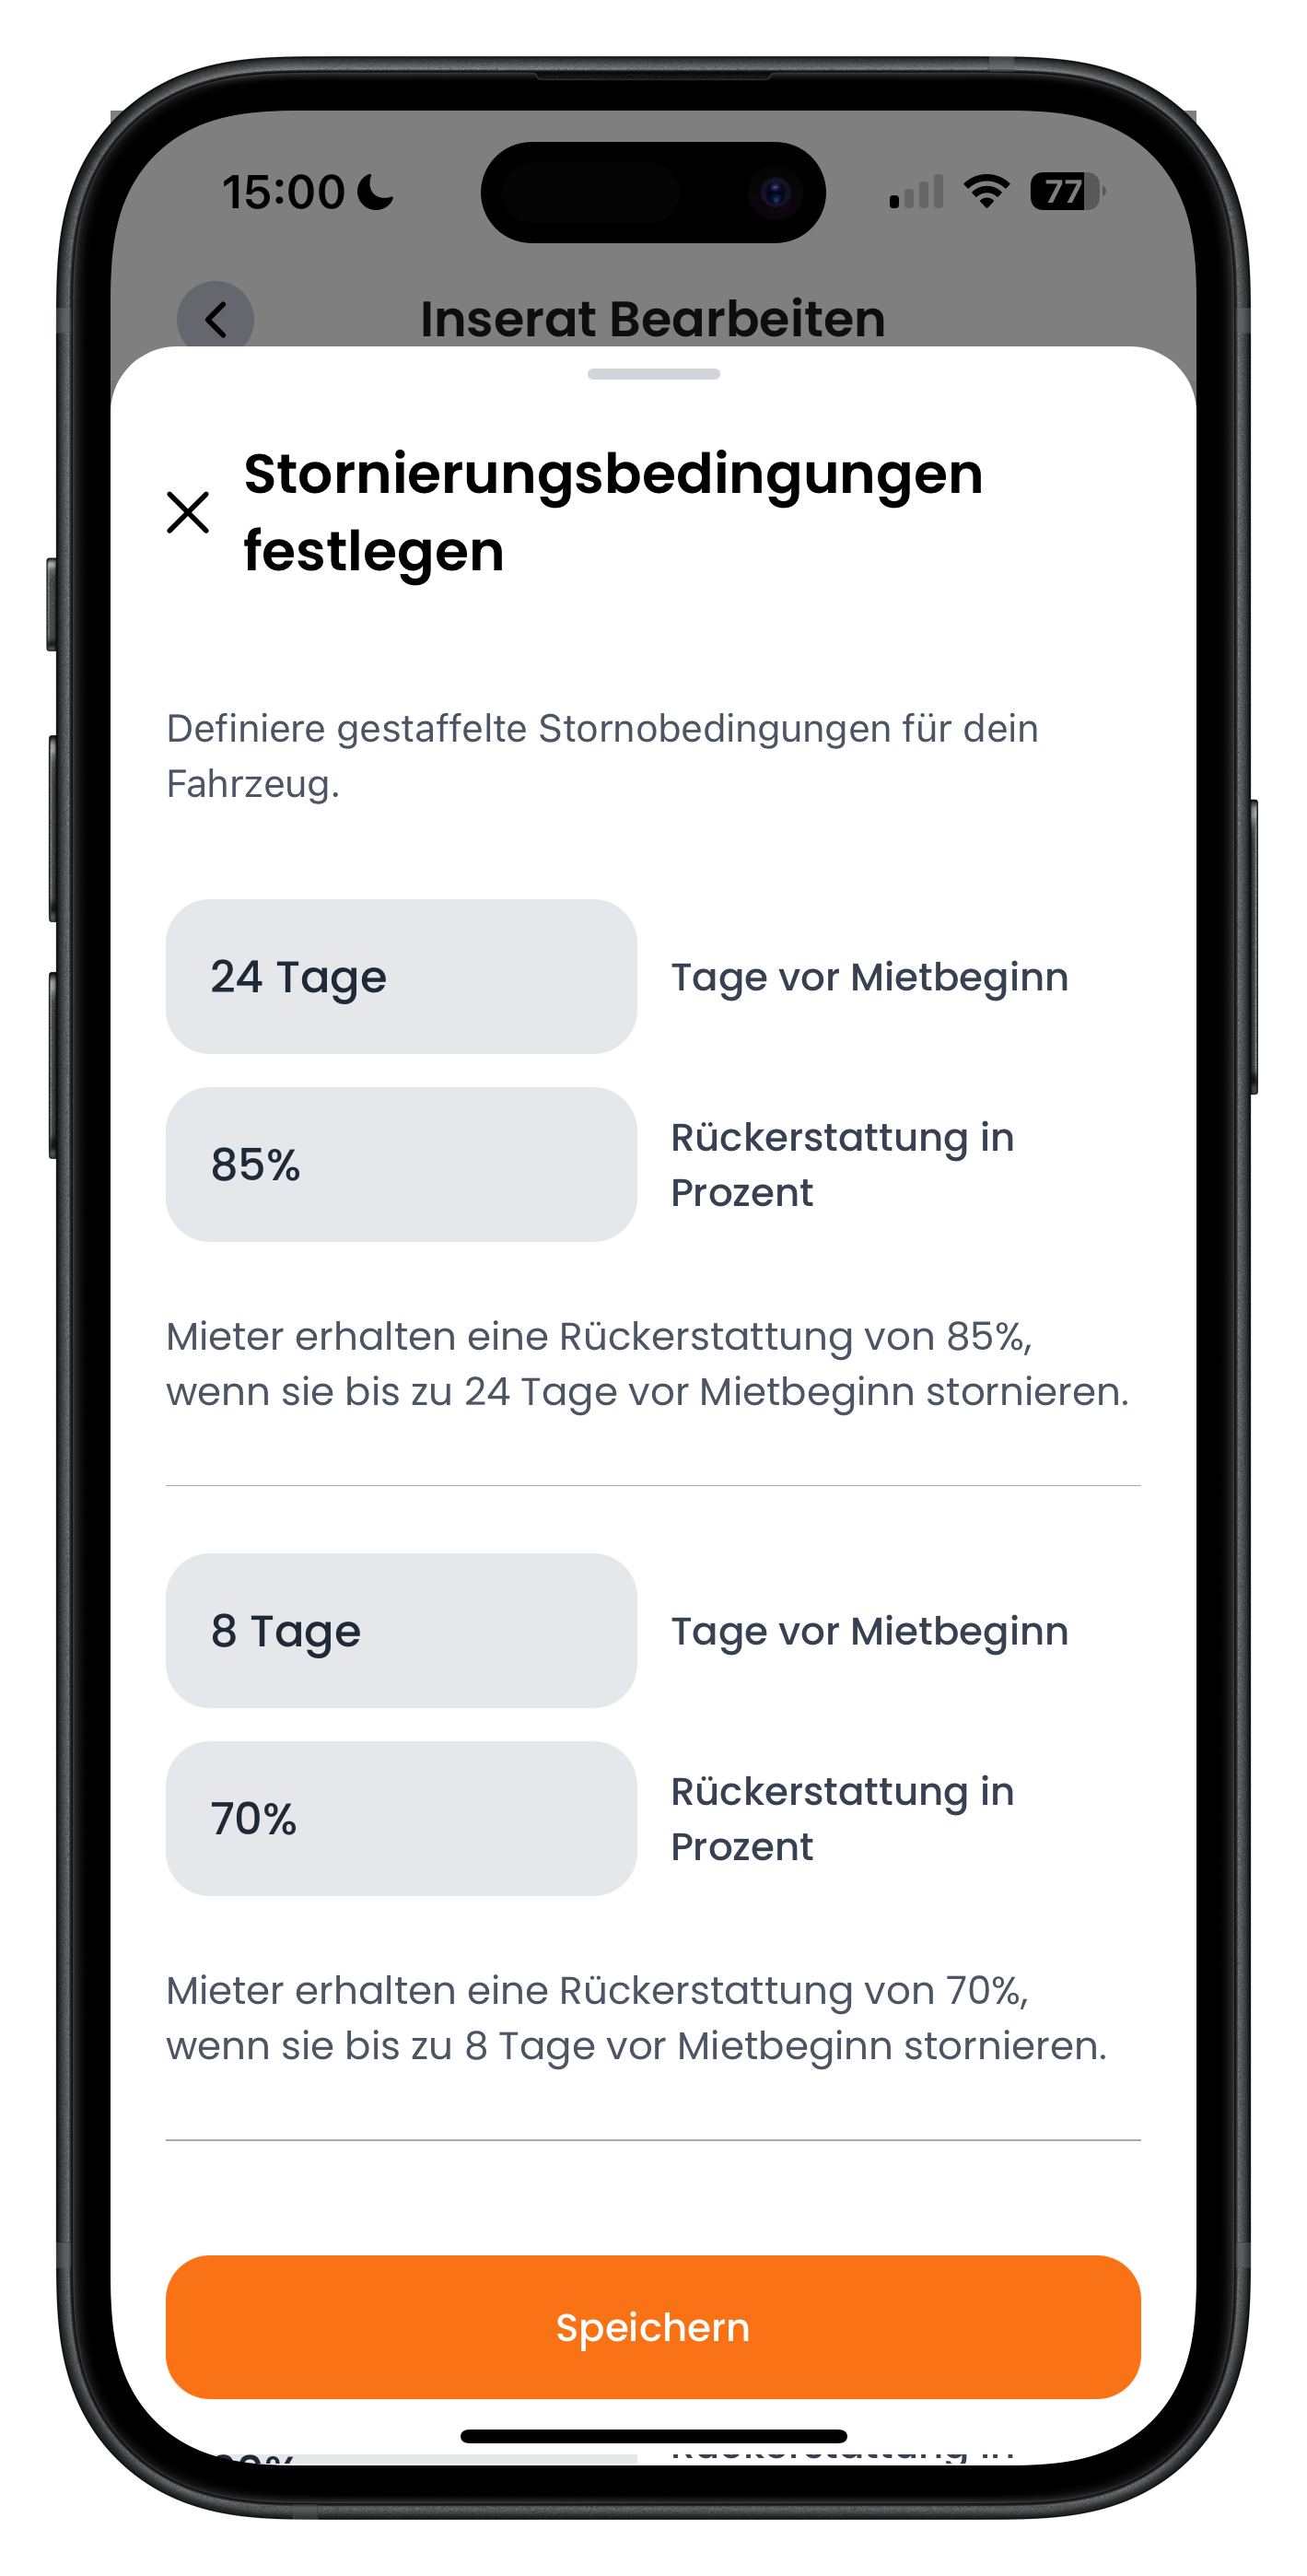
In the Cancellation policy section you define what happens if a renter cancels a confirmed booking. You set time windows before the rental start and the percentage you receive as a host for a cancellation within each window. The closer the cancellation is to the start date, the higher that percentage typically is. This protects you if someone drops out at short notice.
- Early cancellations are usually more favourable for the renter
- The later the cancellation, the higher your share
- Clear terms create fairness and planning certainty for both sides
25
Offer additional extras and upsells
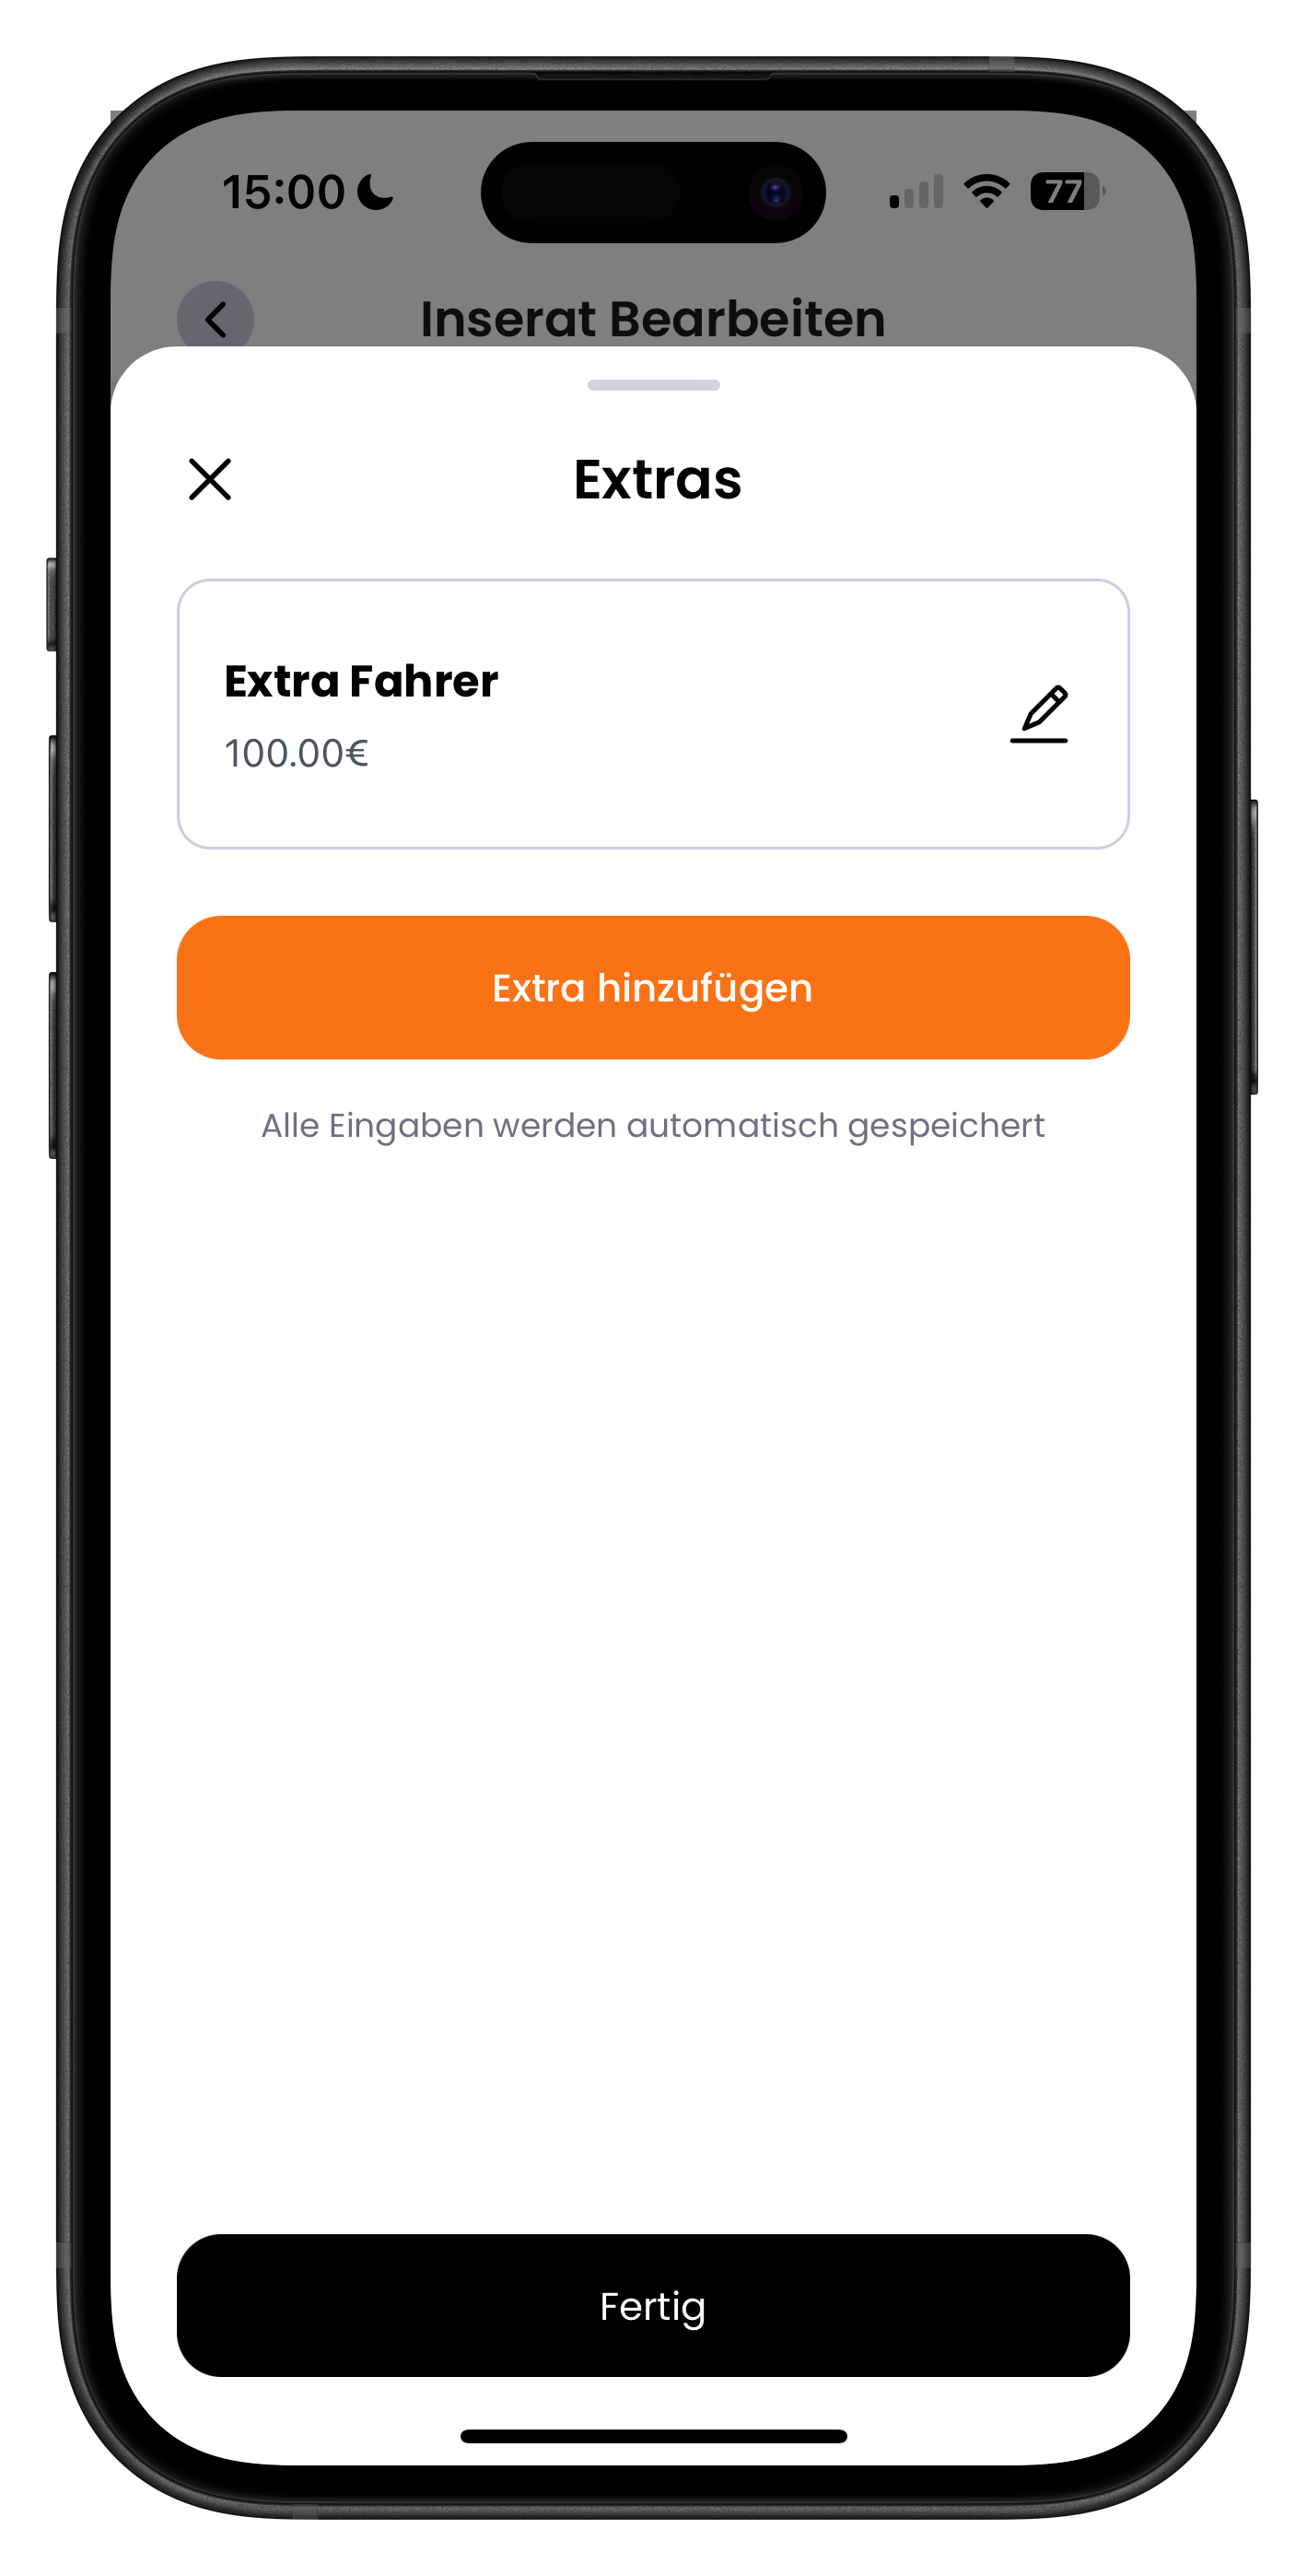
Right at the end you add additional extras that renters can optionally add to their booking. These could include drinks, a vehicle clean, an additional driver or a phone holder. Each extra has its own price. This gives your renters a better experience and helps you earn more from every booking.
- Typical extras include cleaning, an additional driver, drinks or a phone holder
- You can price each extra individually
- Well-chosen extras boost your revenue per rental without any extra effort
All your changes are saved automatically. As soon as you leave the Edit screen, the updated information is live in your listing and visible to renters.
Next steps
Your listing is now fully up to date. If you want to temporarily take a vehicle off the market without losing all your data, take a look at Archive and restore a listing. And if you'd like to add another car, Create a listing – List your vehicle will walk you through it.
Frequently asked questions

Drivable Team
Help & Support
Das Drivable Team erklärt dir Schritt für Schritt, wie du die Plattform und App nutzen kannst.
21. Juni 2026
War dieser Artikel hilfreich?