Create a listing – List your vehicle on Drivable
Here you'll find a step-by-step guide to adding a vehicle to your garage as a host. From vehicle details, photos, location, prices and deposit to cancellation terms and extras. By the end, your car will be live and open to booking requests.
A great listing is your most important sales tool. It decides whether a renter requests your car or scrolls straight past. Drivable walks you through the entire process in clearly defined steps, so you don't need to memorise anything. You can let the Drivable AI fill in most fields automatically, or type everything in yourself. We'll walk through every screen here so you end up with a complete, polished listing.
- Vehicle details: type, make, year, fuel and engine specs
- Photos & location: upload your gallery and set the pick-up point
- Delivery: whether you offer delivery and how far you'll go
- Prices & mileage: daily, weekend, weekly and monthly rates plus included mileage
- Deposit & conditions: deposit, minimum age, fuel policy and more
- Description, cancellation & extras: title, text, tiered cancellation rules and add-ons
You'll need a verified host account to get started. Find out how to set one up and what to expect in the host area in the article The Host Dashboard: An Overview.
Getting started
1
Open your garage and add a vehicle
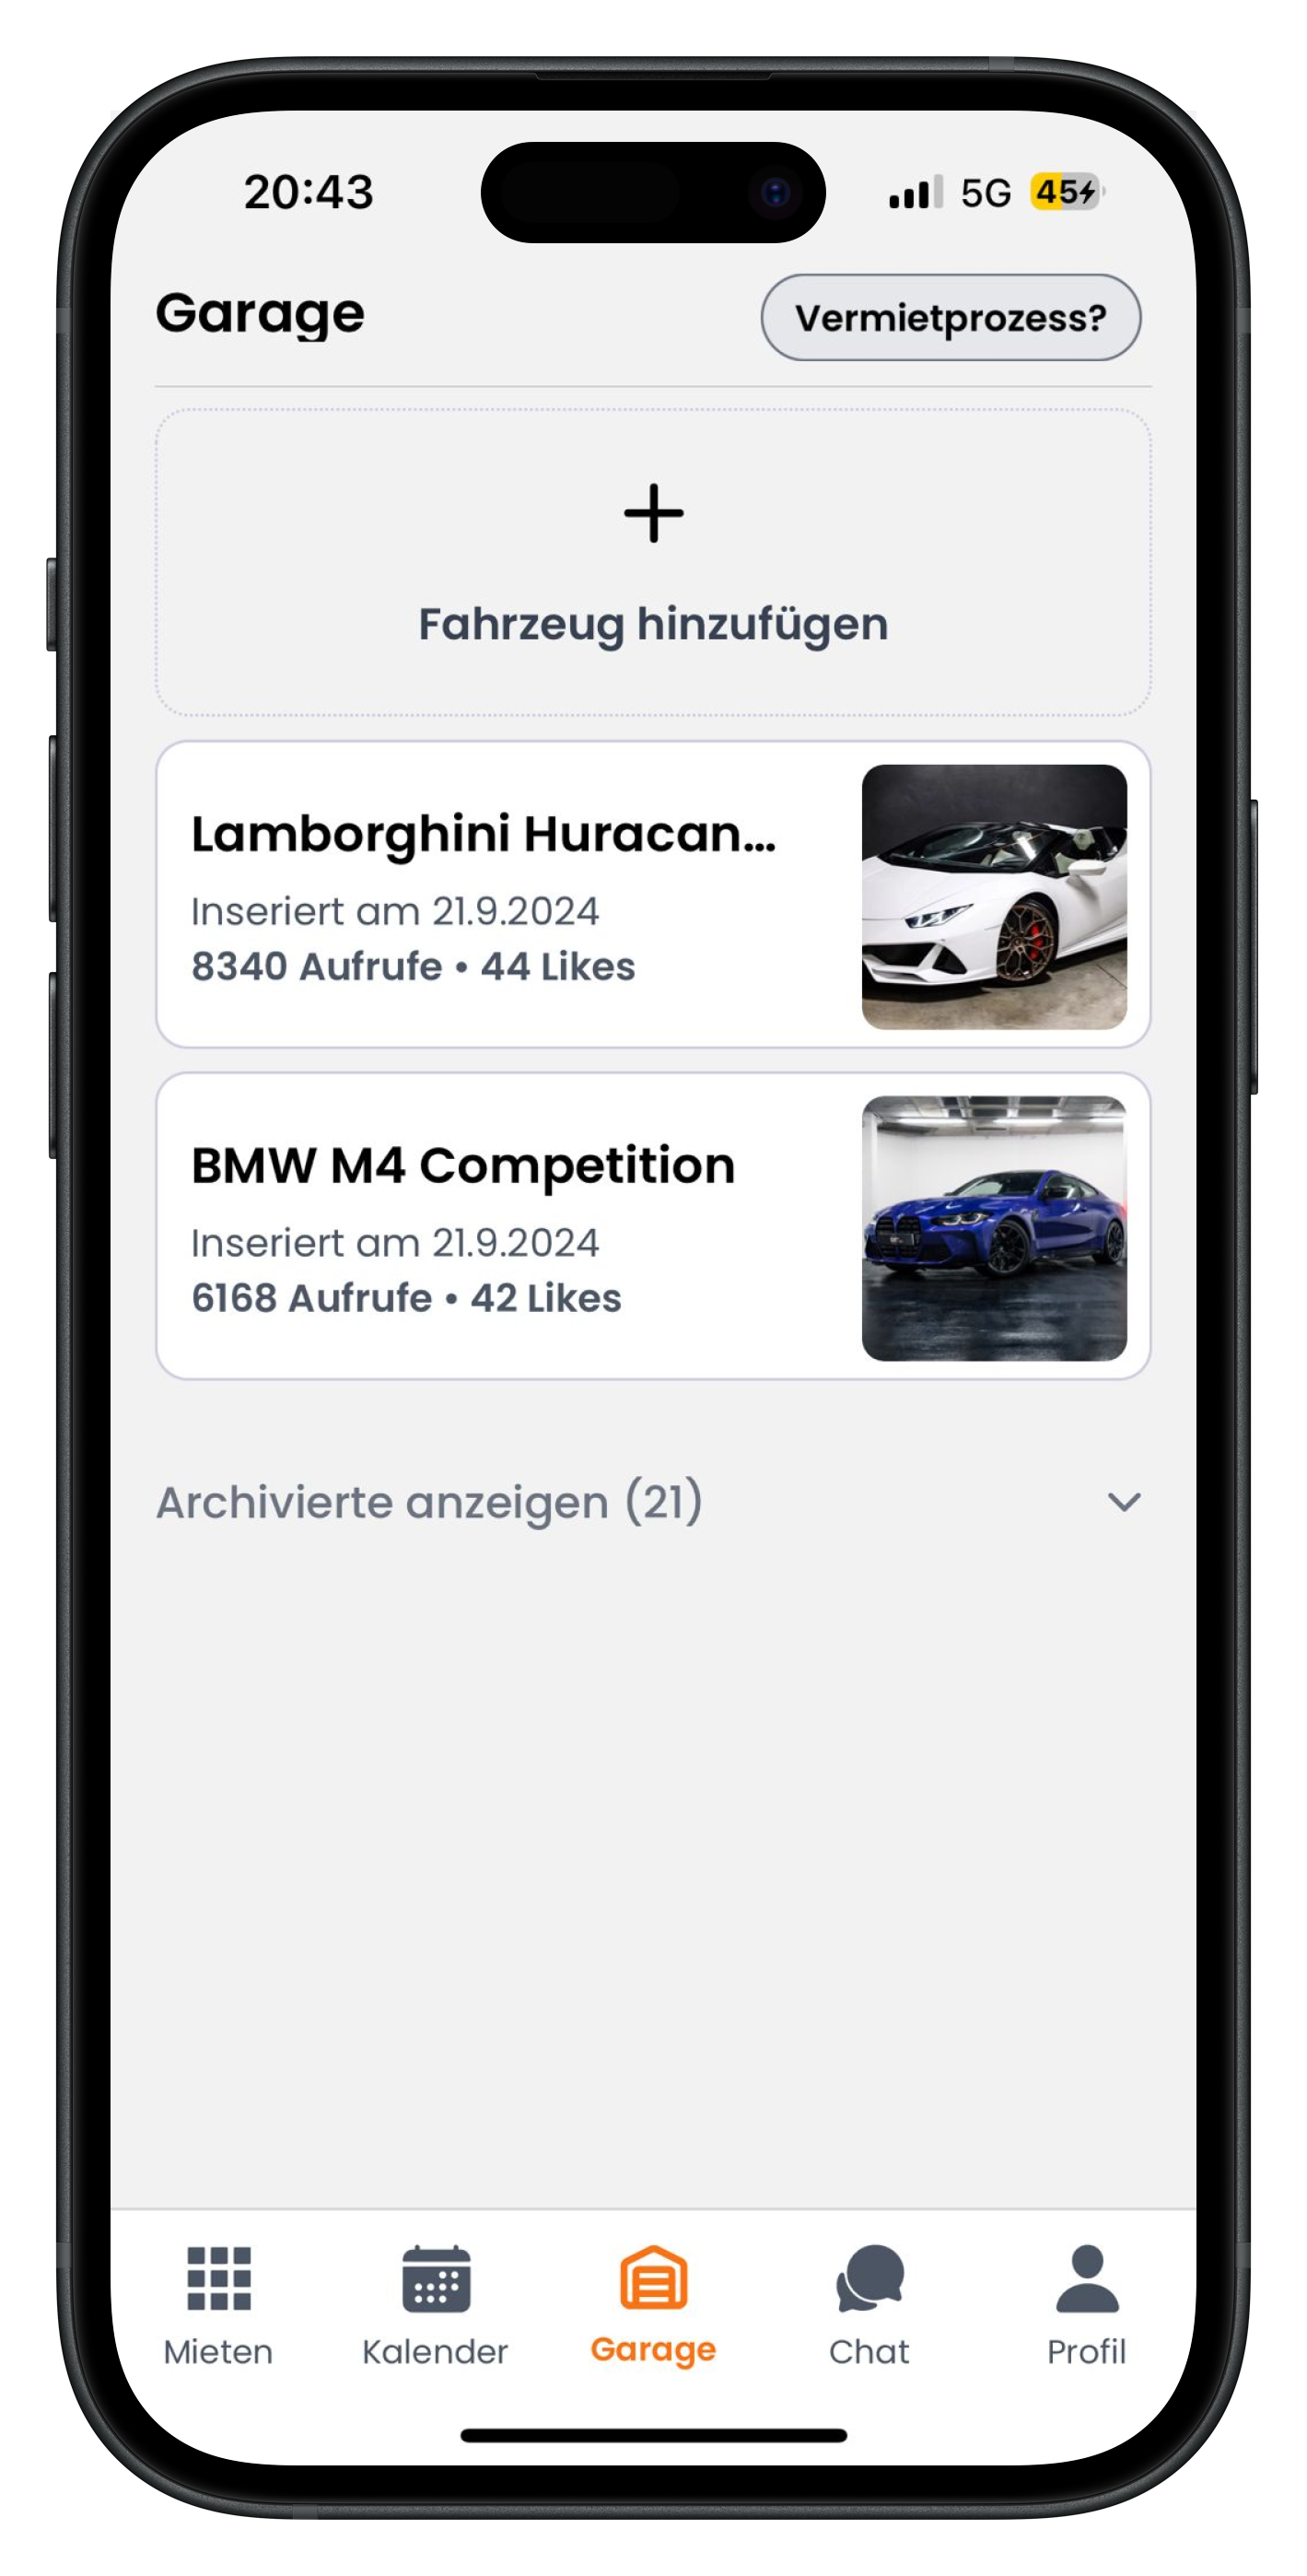
Switch to host mode and tap Garage in the bottom navigation. Here you can see all your listed vehicles along with their views and likes — for example a Lamborghini Huracán or a BMW M4 Competition. At the top you'll see a dashed box with a large plus sign labelled Add vehicle. Tap it to start a new listing.
- The Garage is your central overview of all your vehicles
- Use Show archived to find paused or old listings
- The Rental process? button in the top right gives you a quick overview of how it works
2
Choose how to list: scan, describe or enter manually
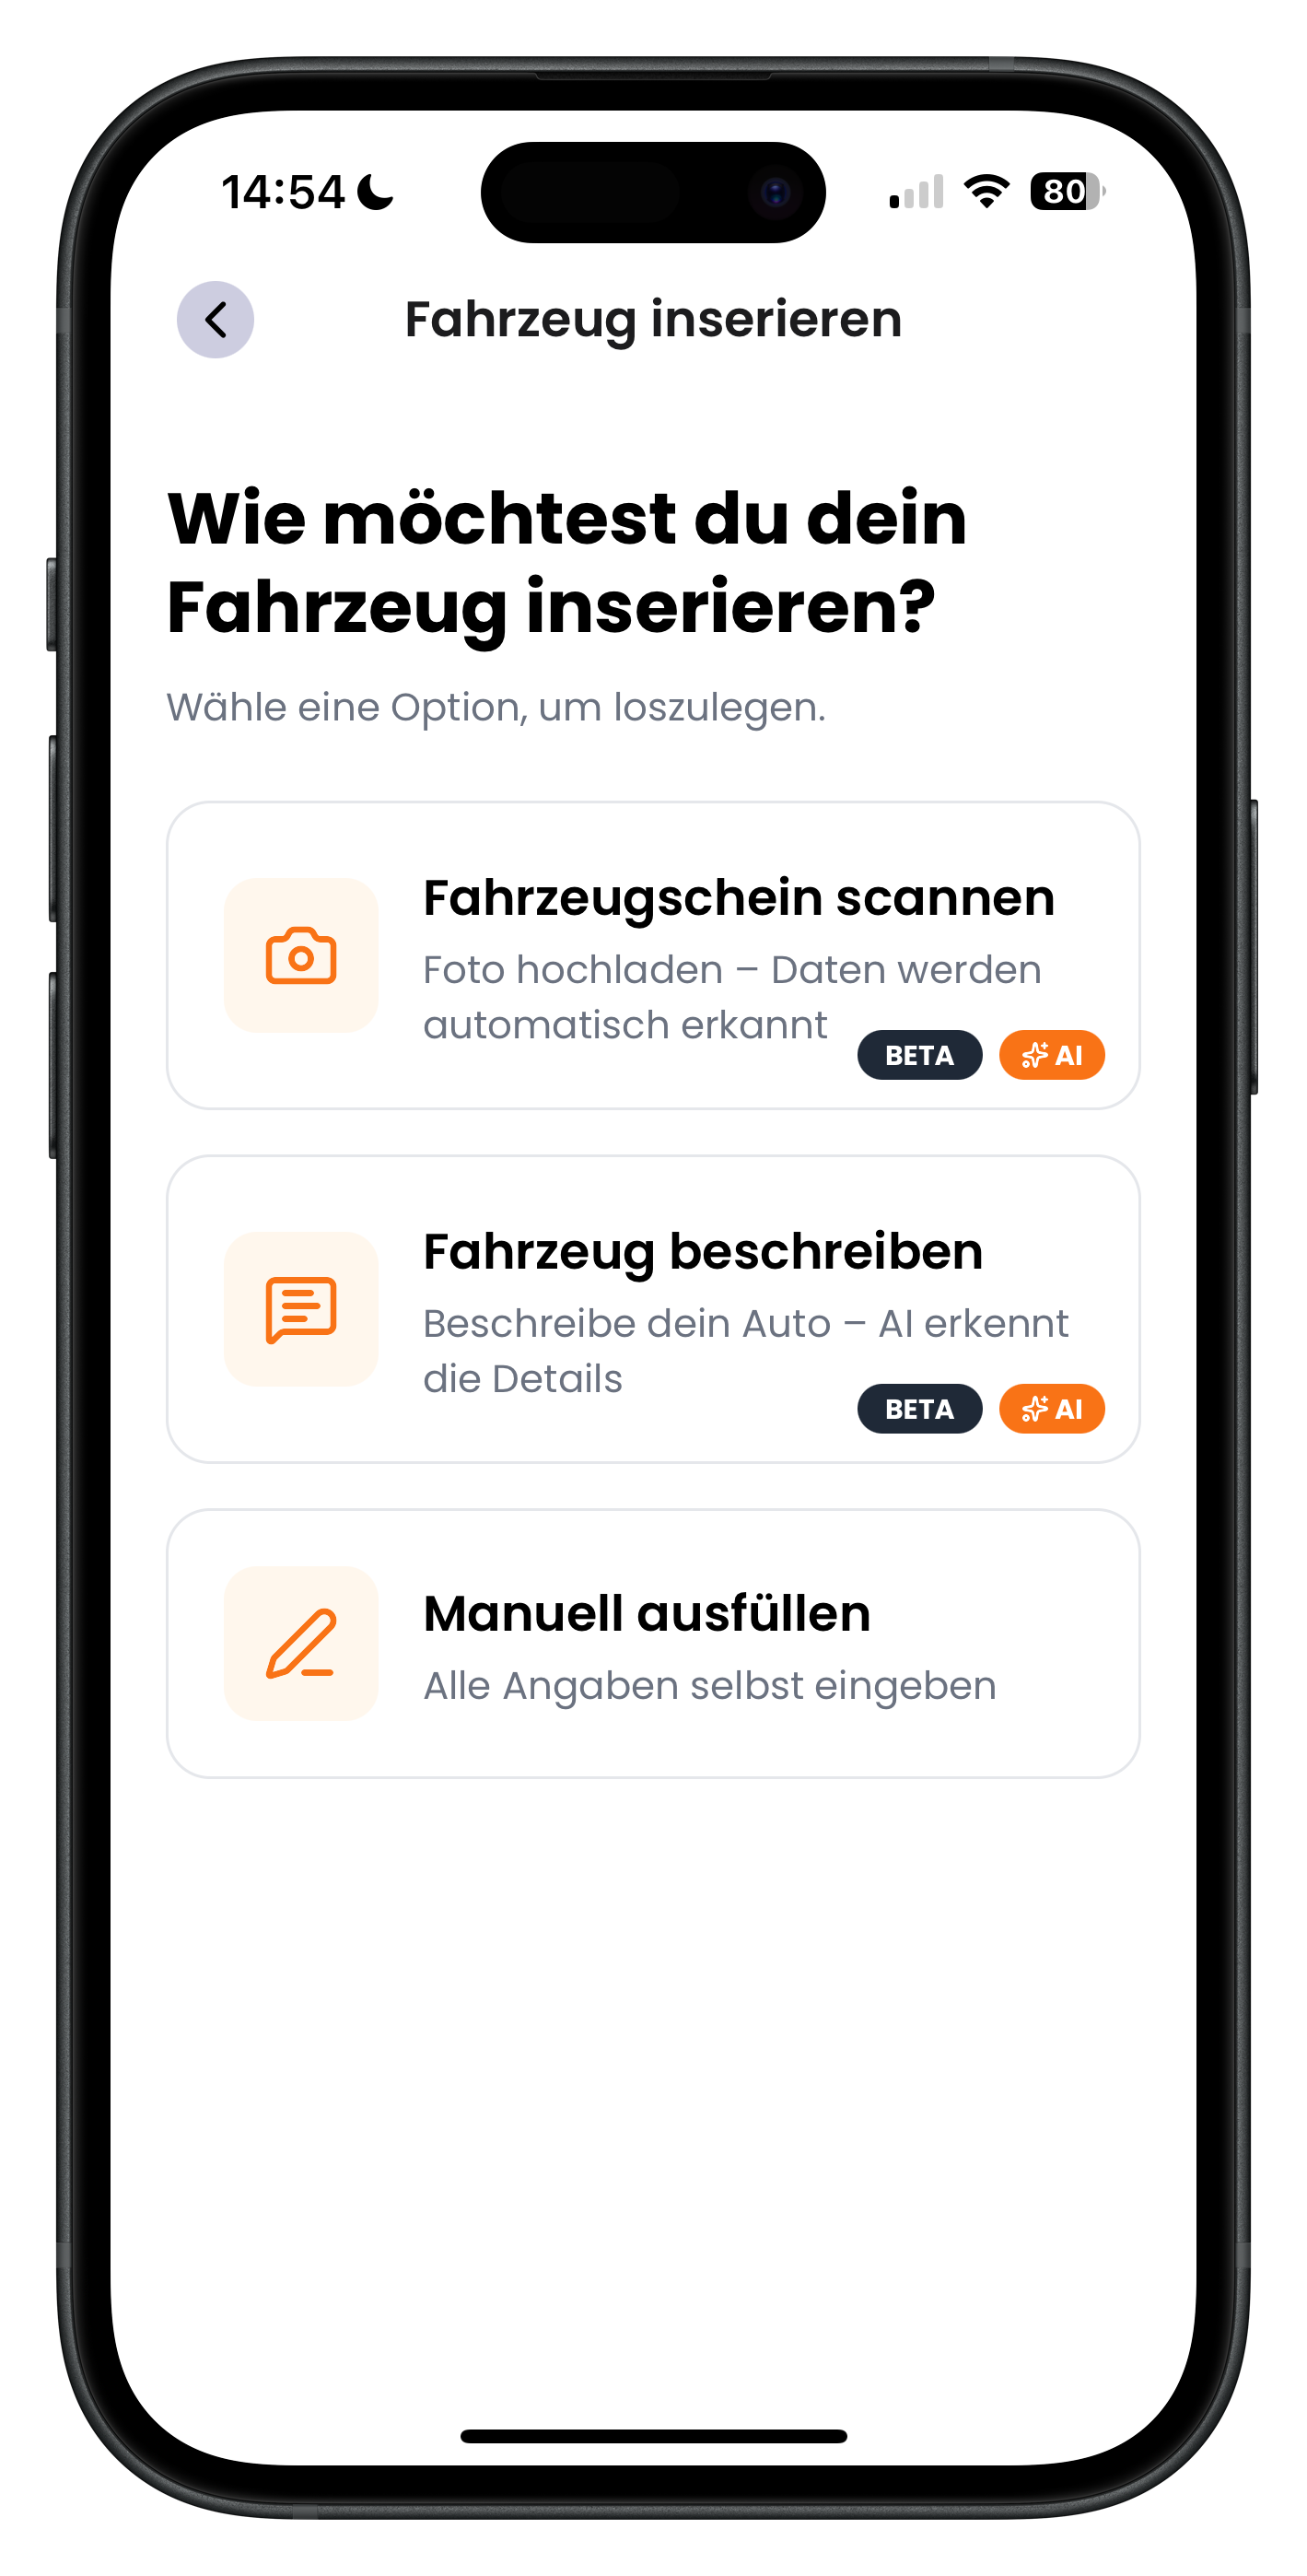
Drivable now asks how you'd like to create your listing. You have three options: Scan registration document (upload a photo and the details are recognised automatically), Describe your vehicle (type a description and the AI picks out the details) or Enter manually (fill in every field yourself). The first two options are marked as BETA with AI and save you a lot of typing. We'll follow the registration document scan route here — after that, the steps are identical for all three methods.
- Scan and Describe both use the Drivable AI for faster listing creation
- Enter manually simply means you type in each field yourself
- Whichever method you choose, you can edit any recognised detail afterwards
3
Scan the registration document within the frame
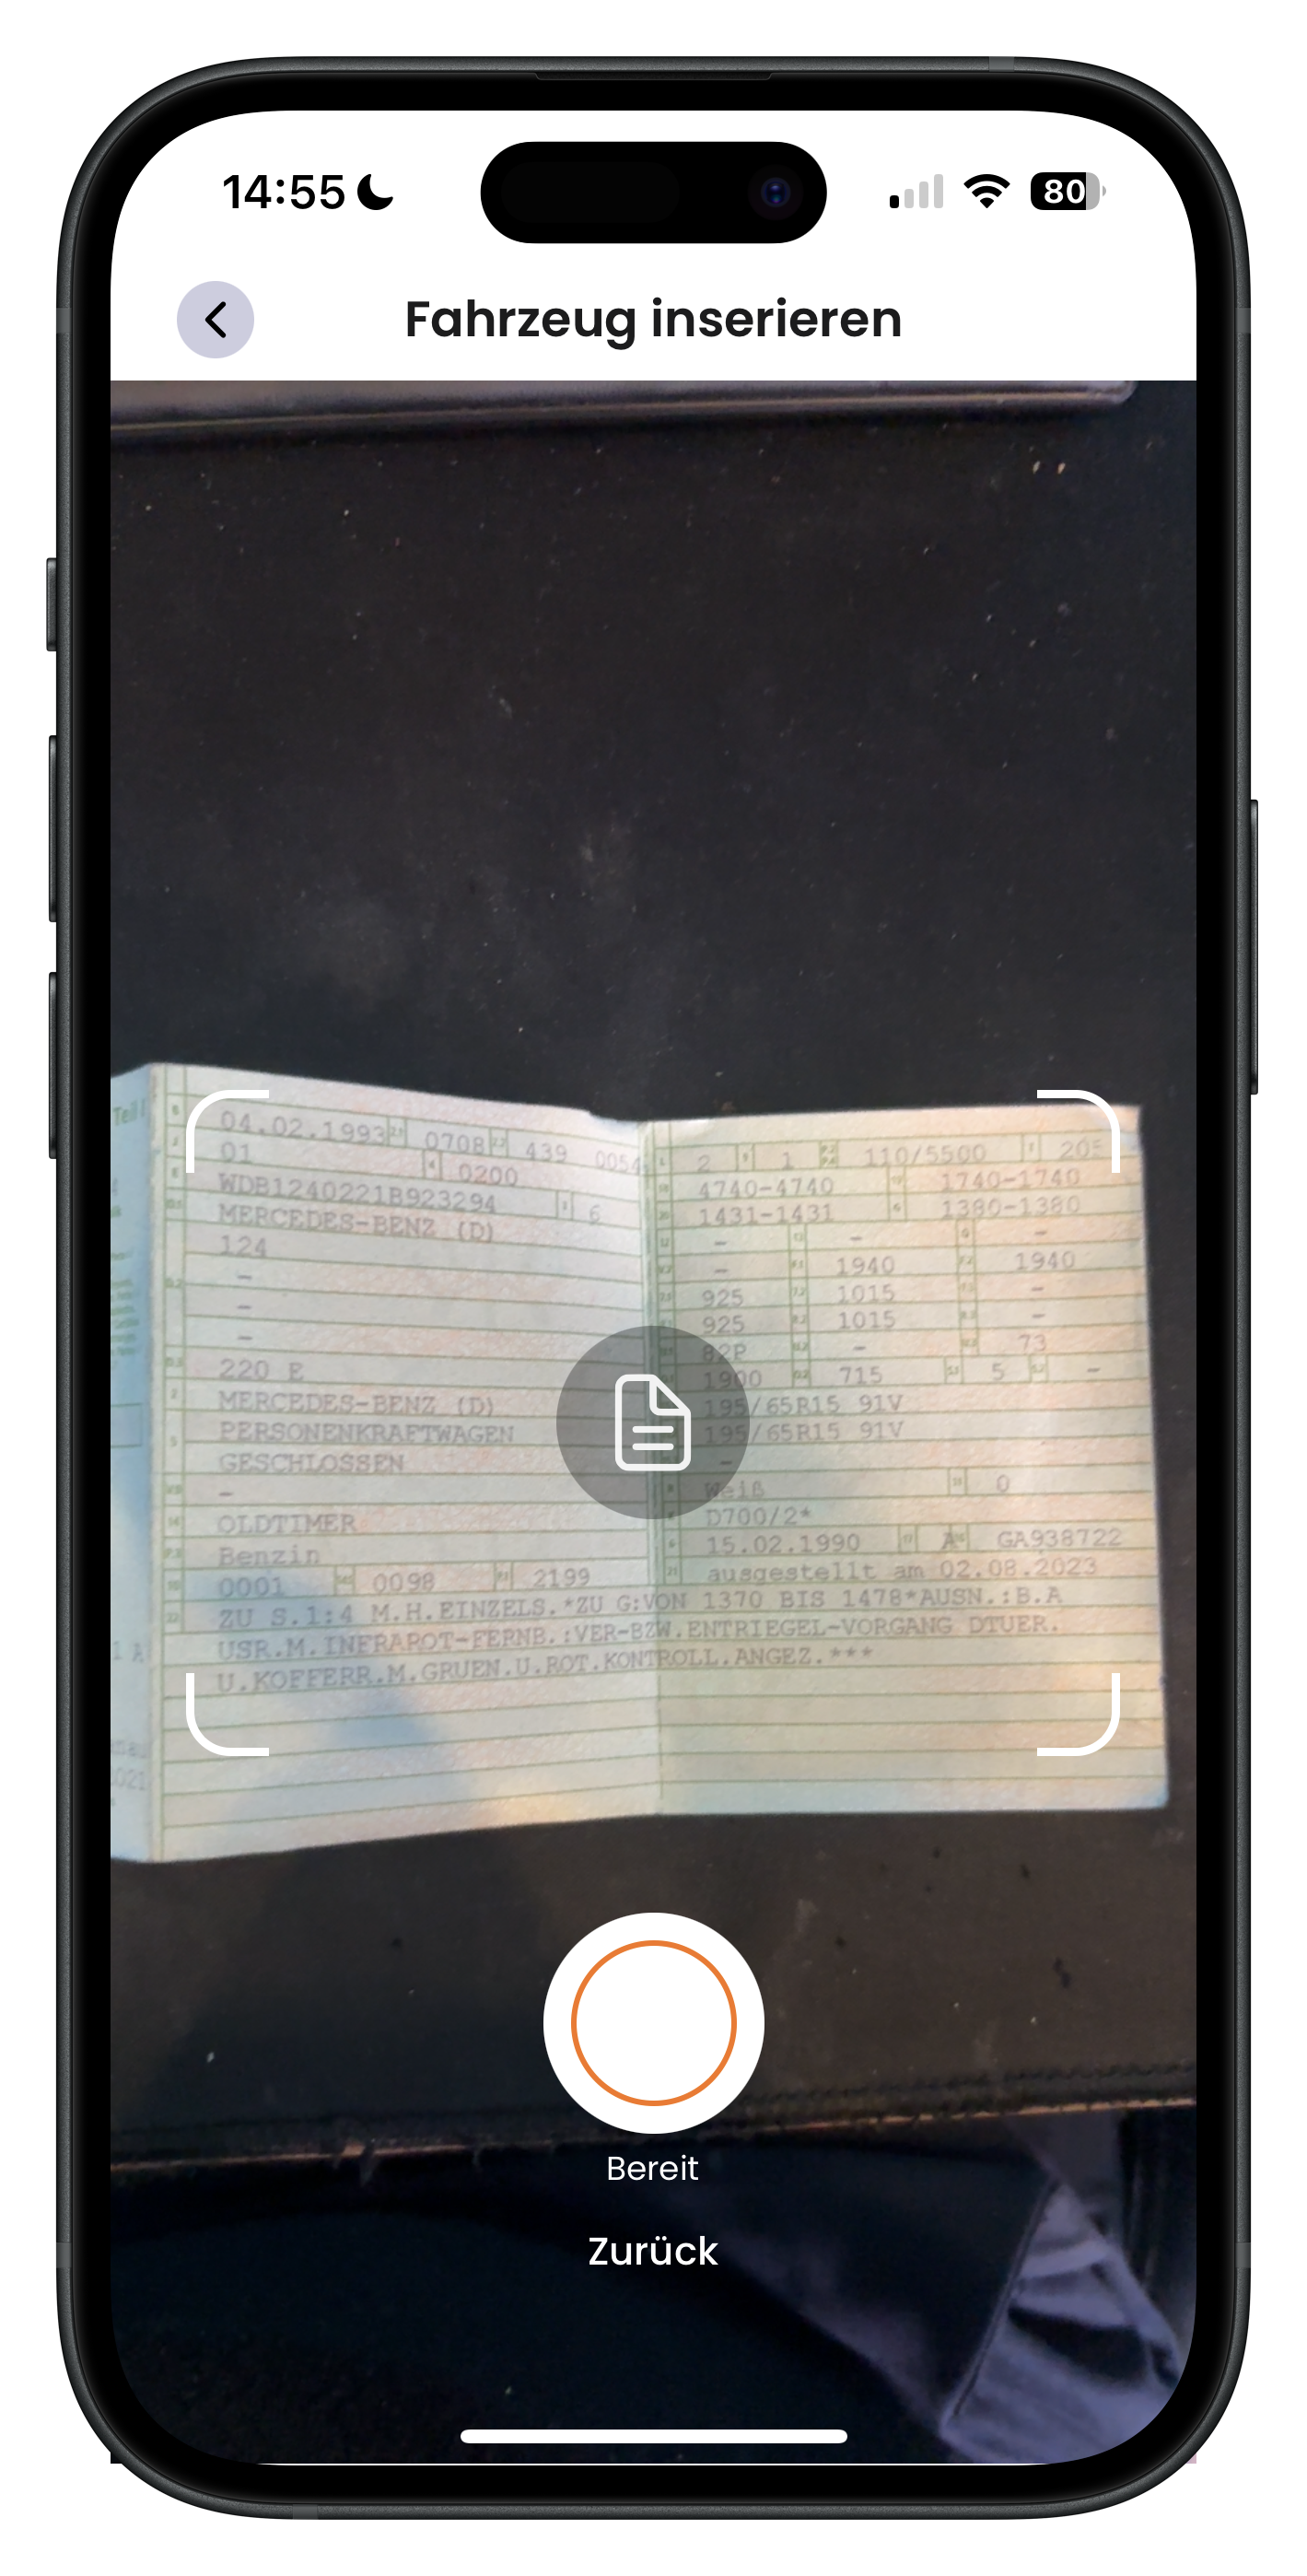
If you chose Scan, the camera opens. In the centre you'll see a scan frame with a document icon. Place your registration document flat and align it within the frame. The status Ready and an orange-outlined shutter button appear at the bottom. Tap the shutter once the document is clearly visible. Tap Back at any time to exit.
- Make sure the lighting is good so the AI can read every line
- Keep the document flat and avoid reflections
- The frame helps you align the document straight
4
Review and confirm the recognised details
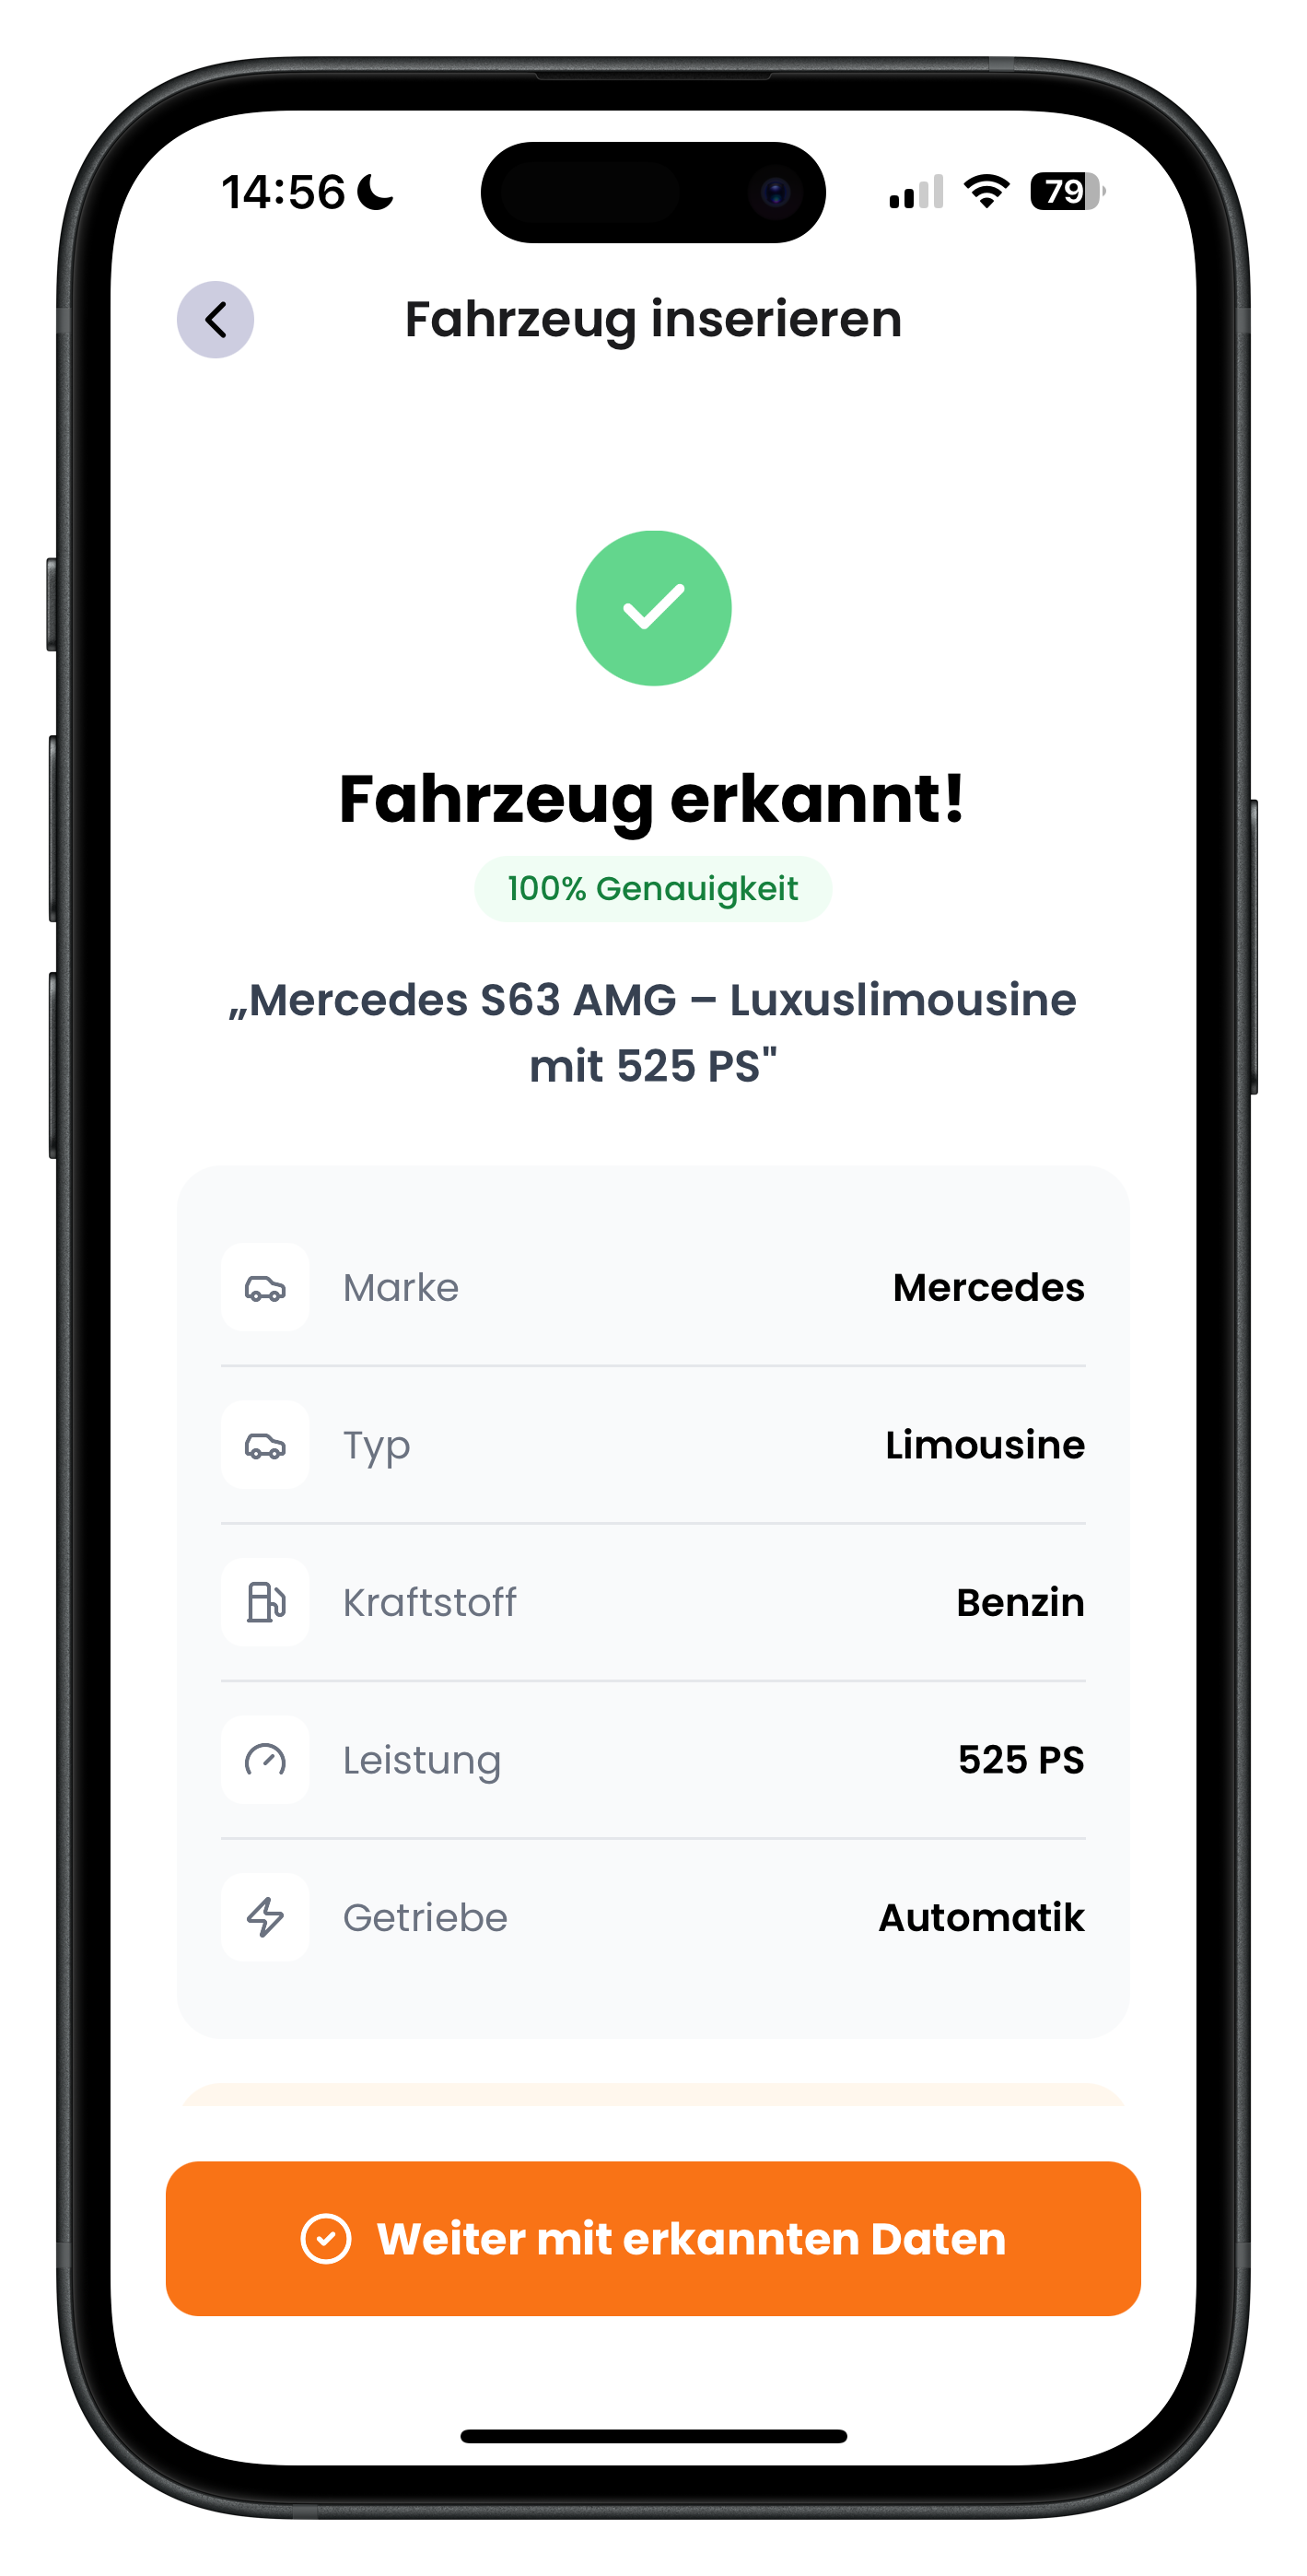
After the scan, the AI shows you what it recognised. A green tick and Vehicle identified! confirm the match — in the example with 100% accuracy for a Mercedes S63 AMG. Below that, the recognised values are listed: make, type, fuel, power and transmission. Have a quick check that everything looks right, then tap the orange Continue with recognised details button at the bottom.
- The accuracy score tells you how confident the AI is in its recognition
- If anything is wrong, you can correct it in the next steps
- If you're entering manually, there's no confirmation screen — you just start typing
Setting your vehicle details
From here on it's all about the details. If you scanned or described your vehicle, the fields are already pre-filled and you just need to check them. If you're entering manually, you'll type in each value yourself. The next screens cover type, make, year, fuel and engine data.
5
Choose the vehicle type and body style
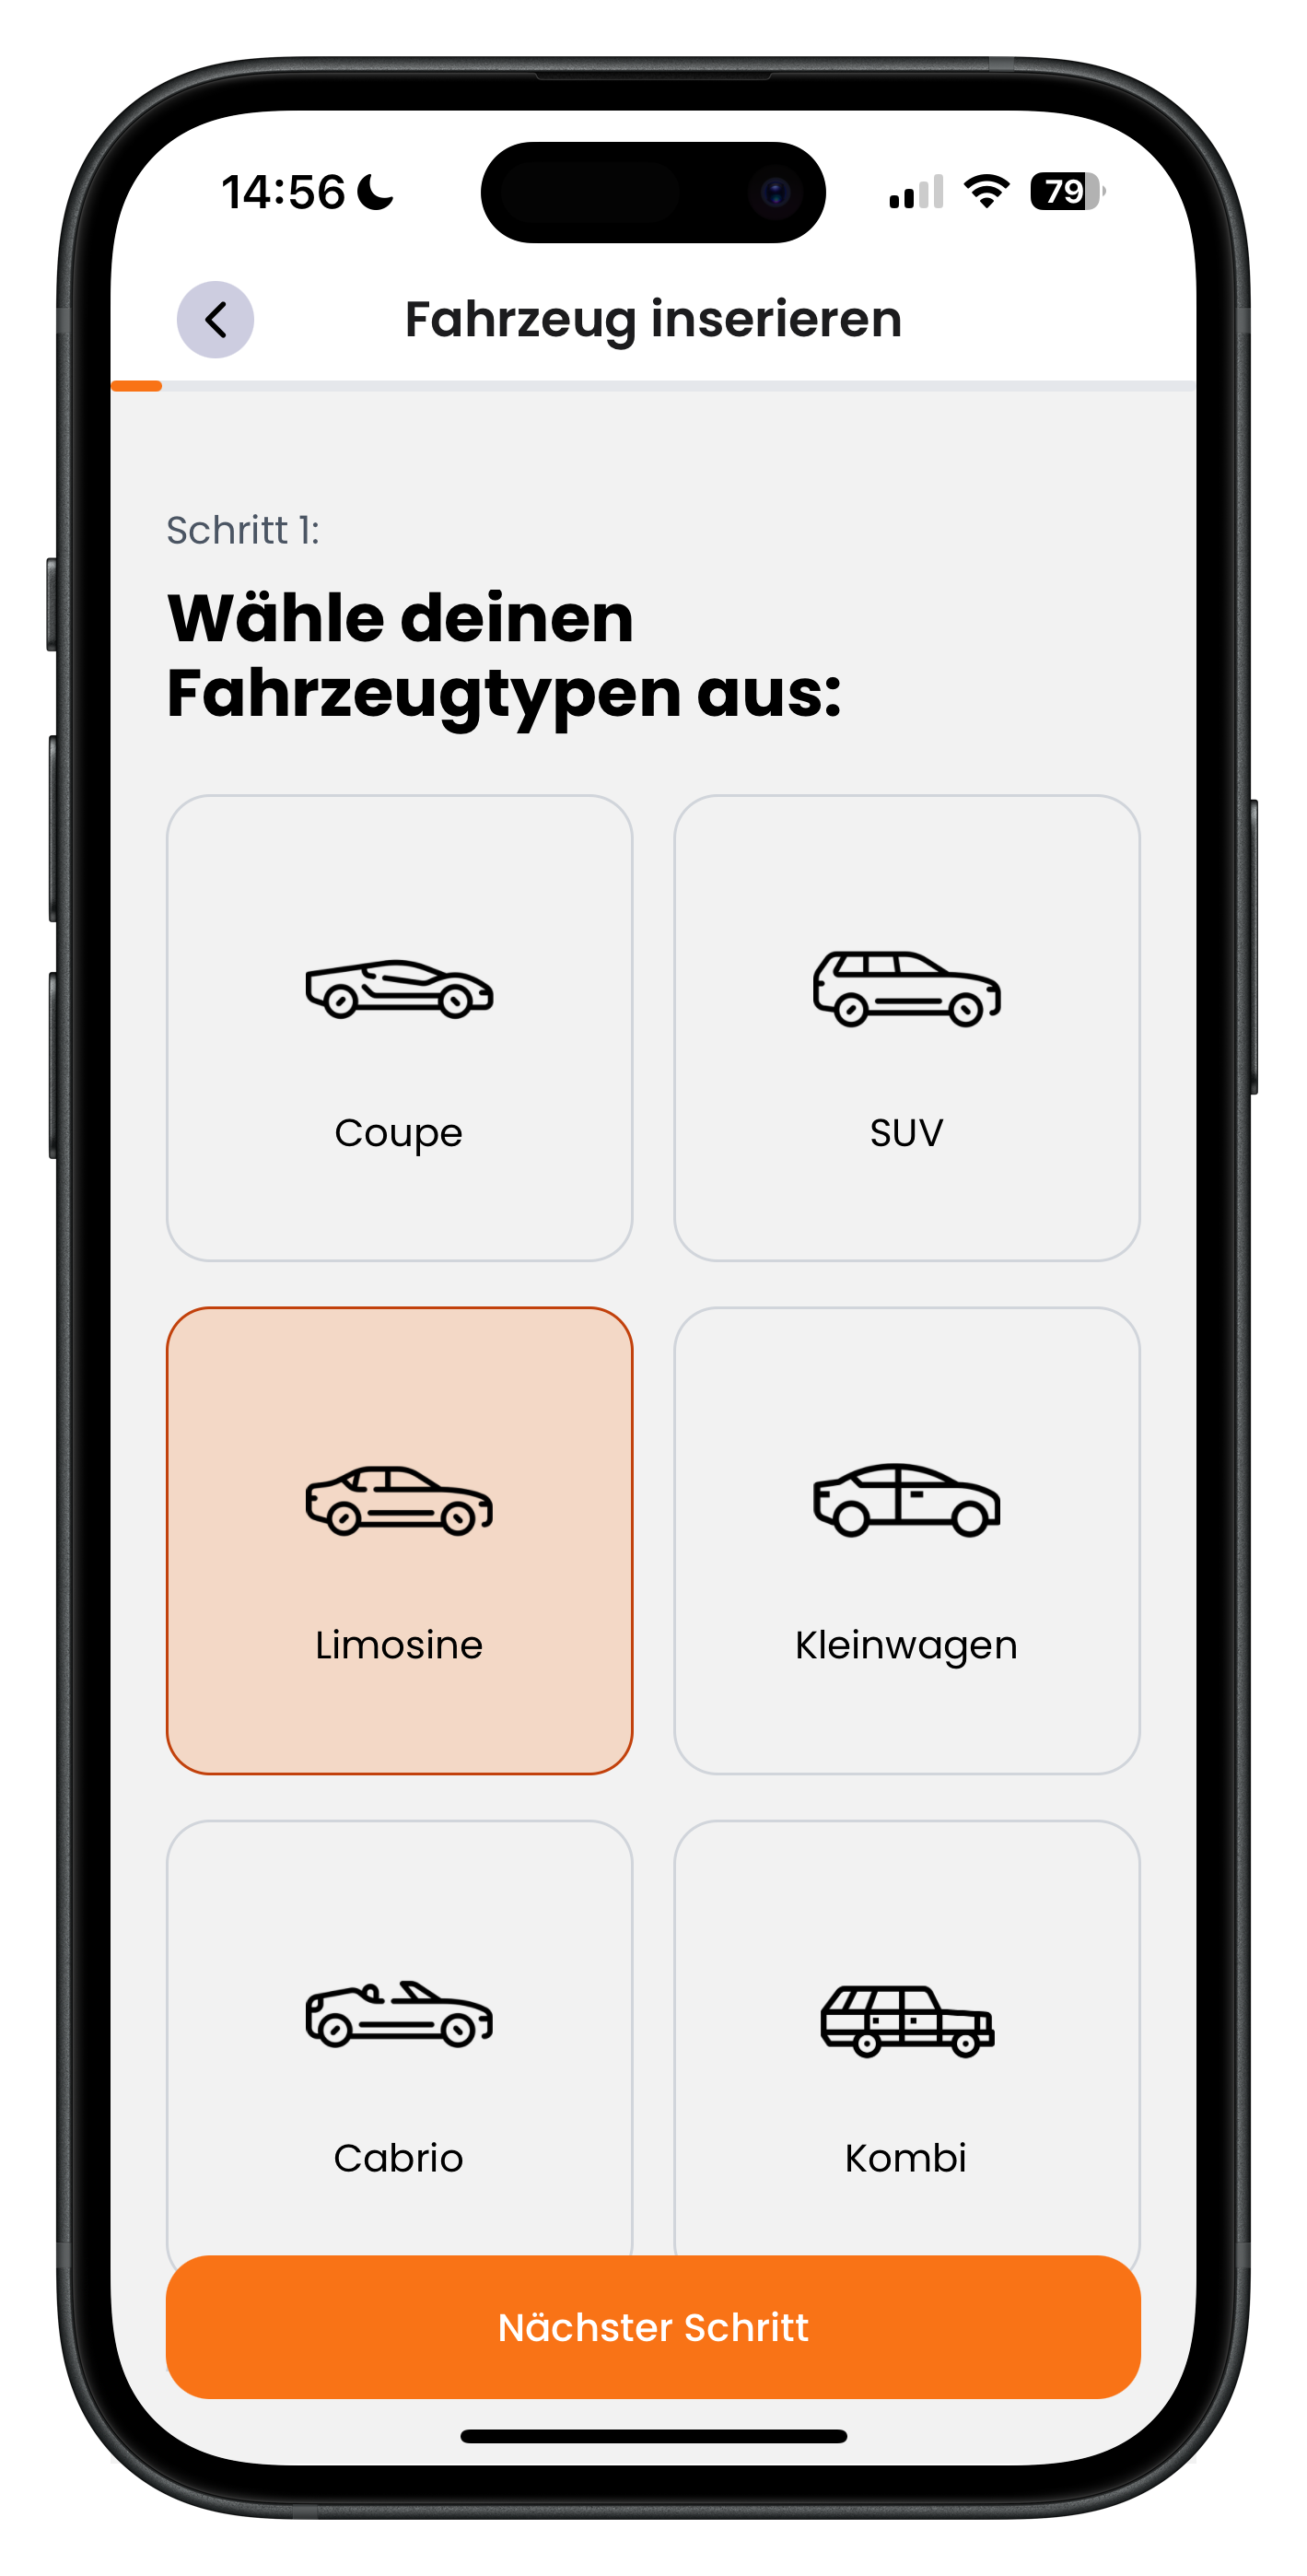
In the Choose your vehicle type step, tap the body style that fits your car. The options are Coupé, SUV, Saloon, City car, Convertible and Estate, each with a small icon. The selected tile is highlighted in orange — in the example, Saloon is selected. Then tap Next step at the bottom.
- Choose the type that best matches your car
- For a sports car, Coupé or Convertible usually fits best
- The active tile is shown by the orange highlight
6
Enter the make and year
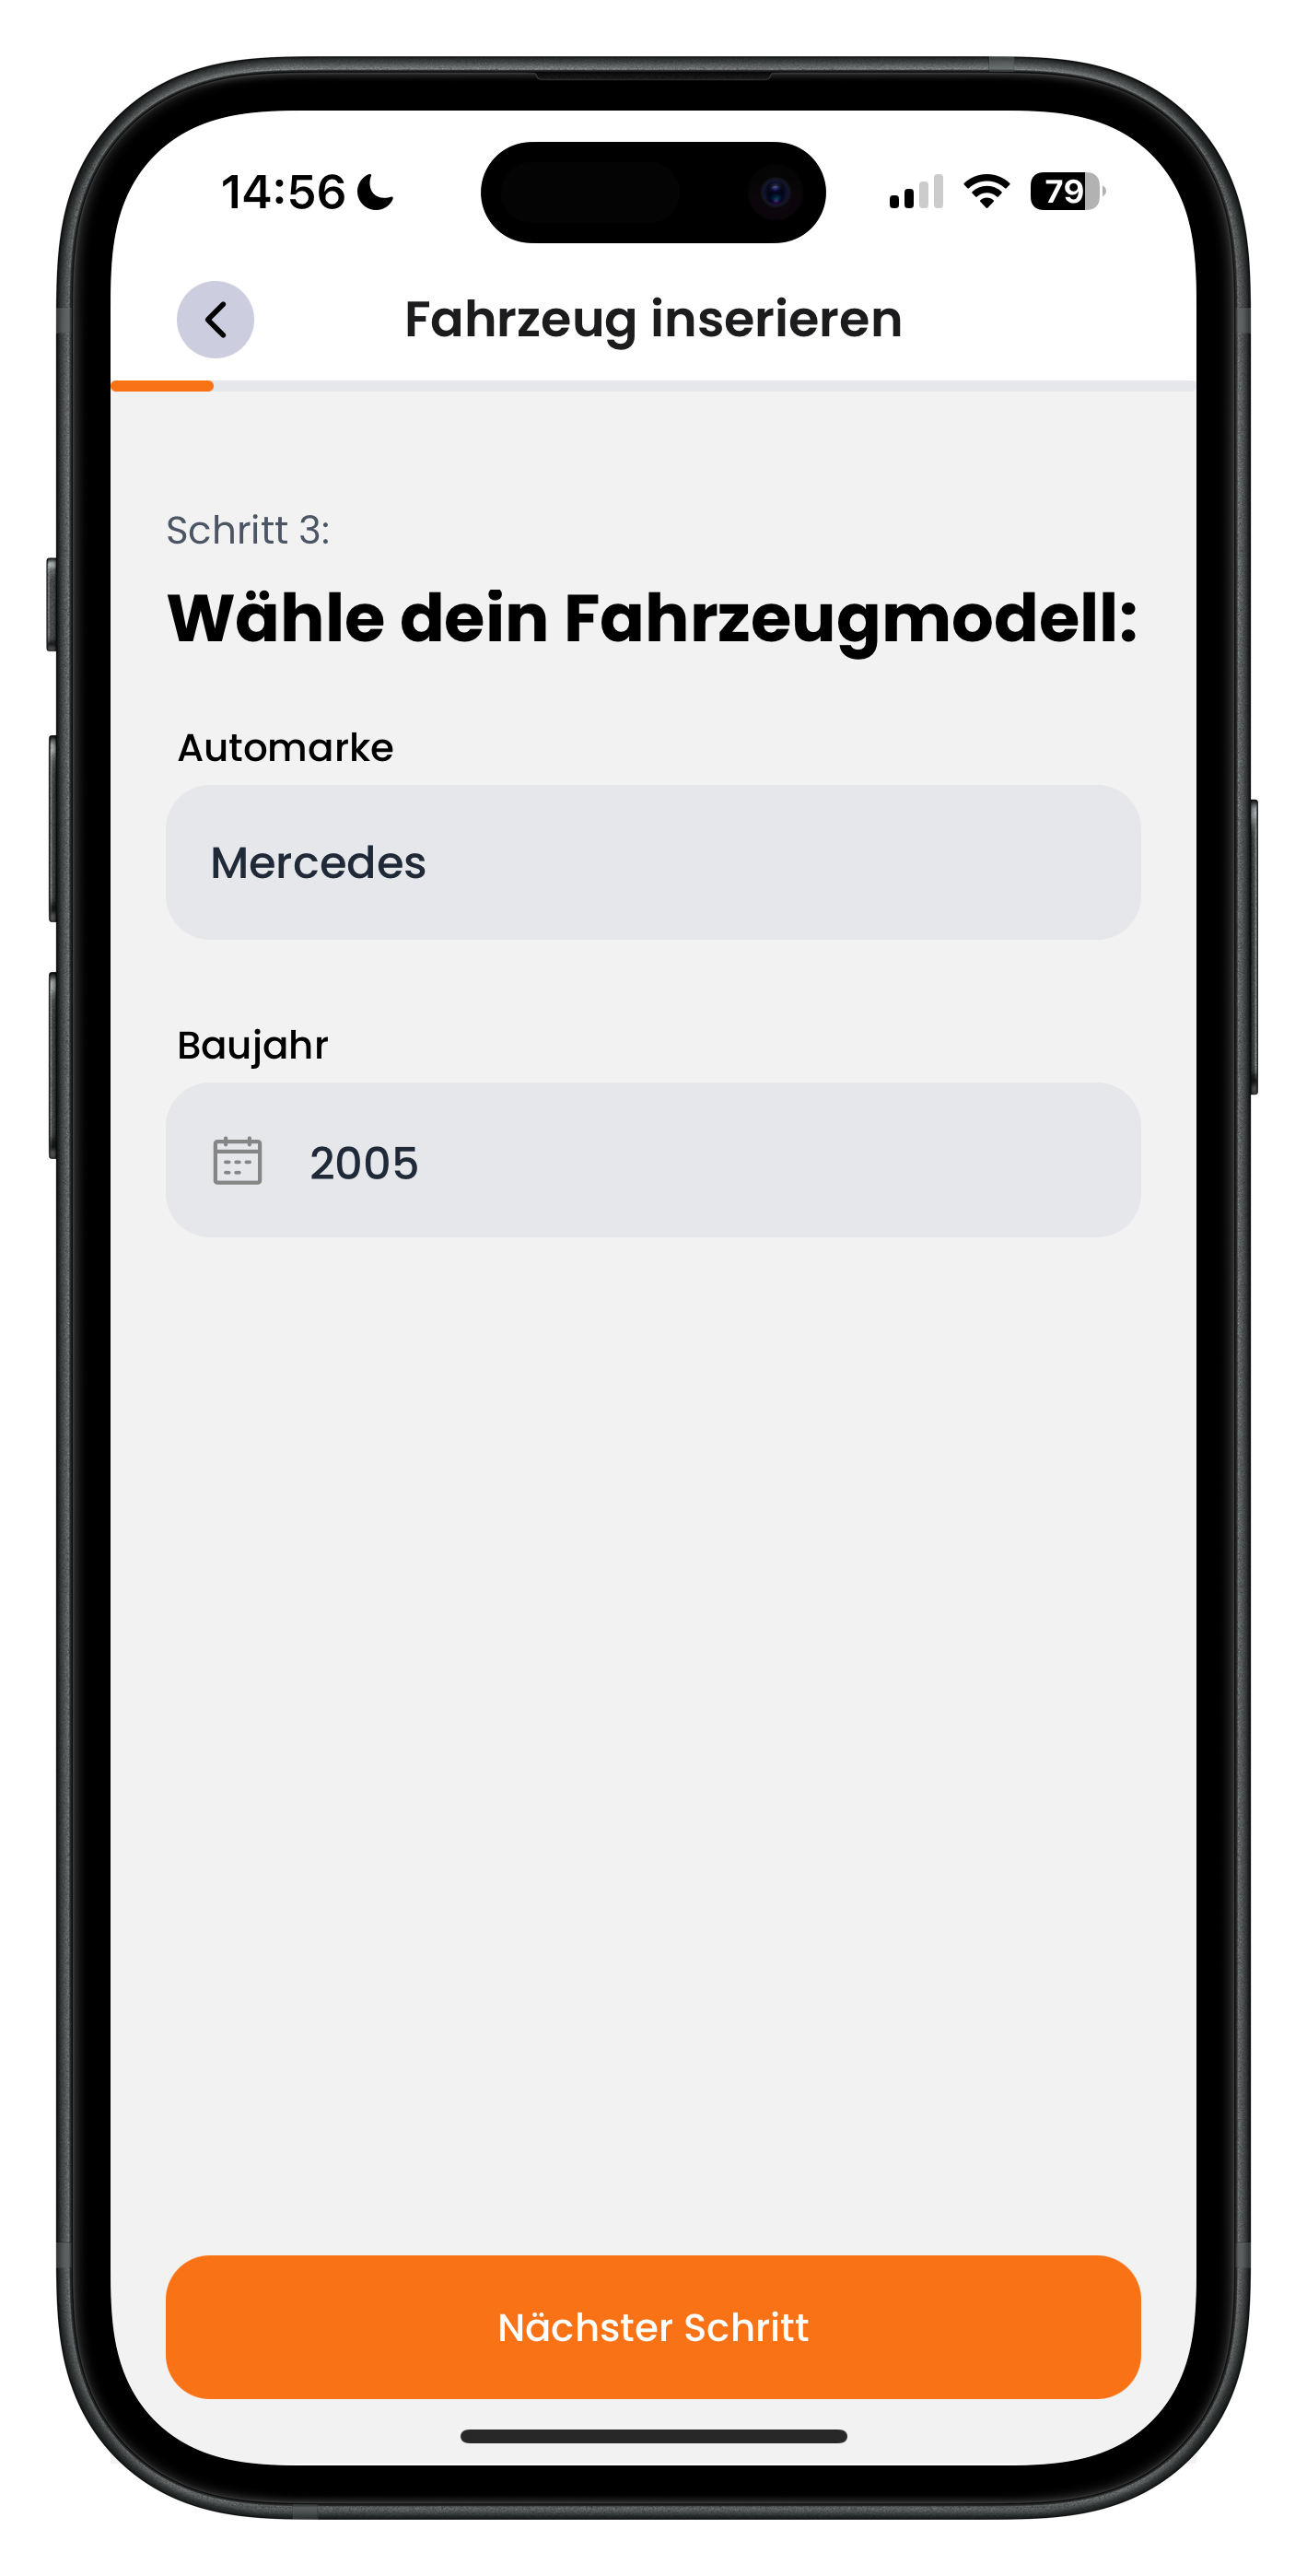
Under Choose your vehicle model you set the make and year. The Make field shows Mercedes in the example, and the Year field shows a value like 2005, which you set using a date picker. If you scanned, both fields are already filled in. Check the values and tap Next step.
- The year affects how renters perceive the car and what price you can charge
- If you're entering manually, you type the make in yourself
- An accurate year builds trust with renters
7
Set the fuel type
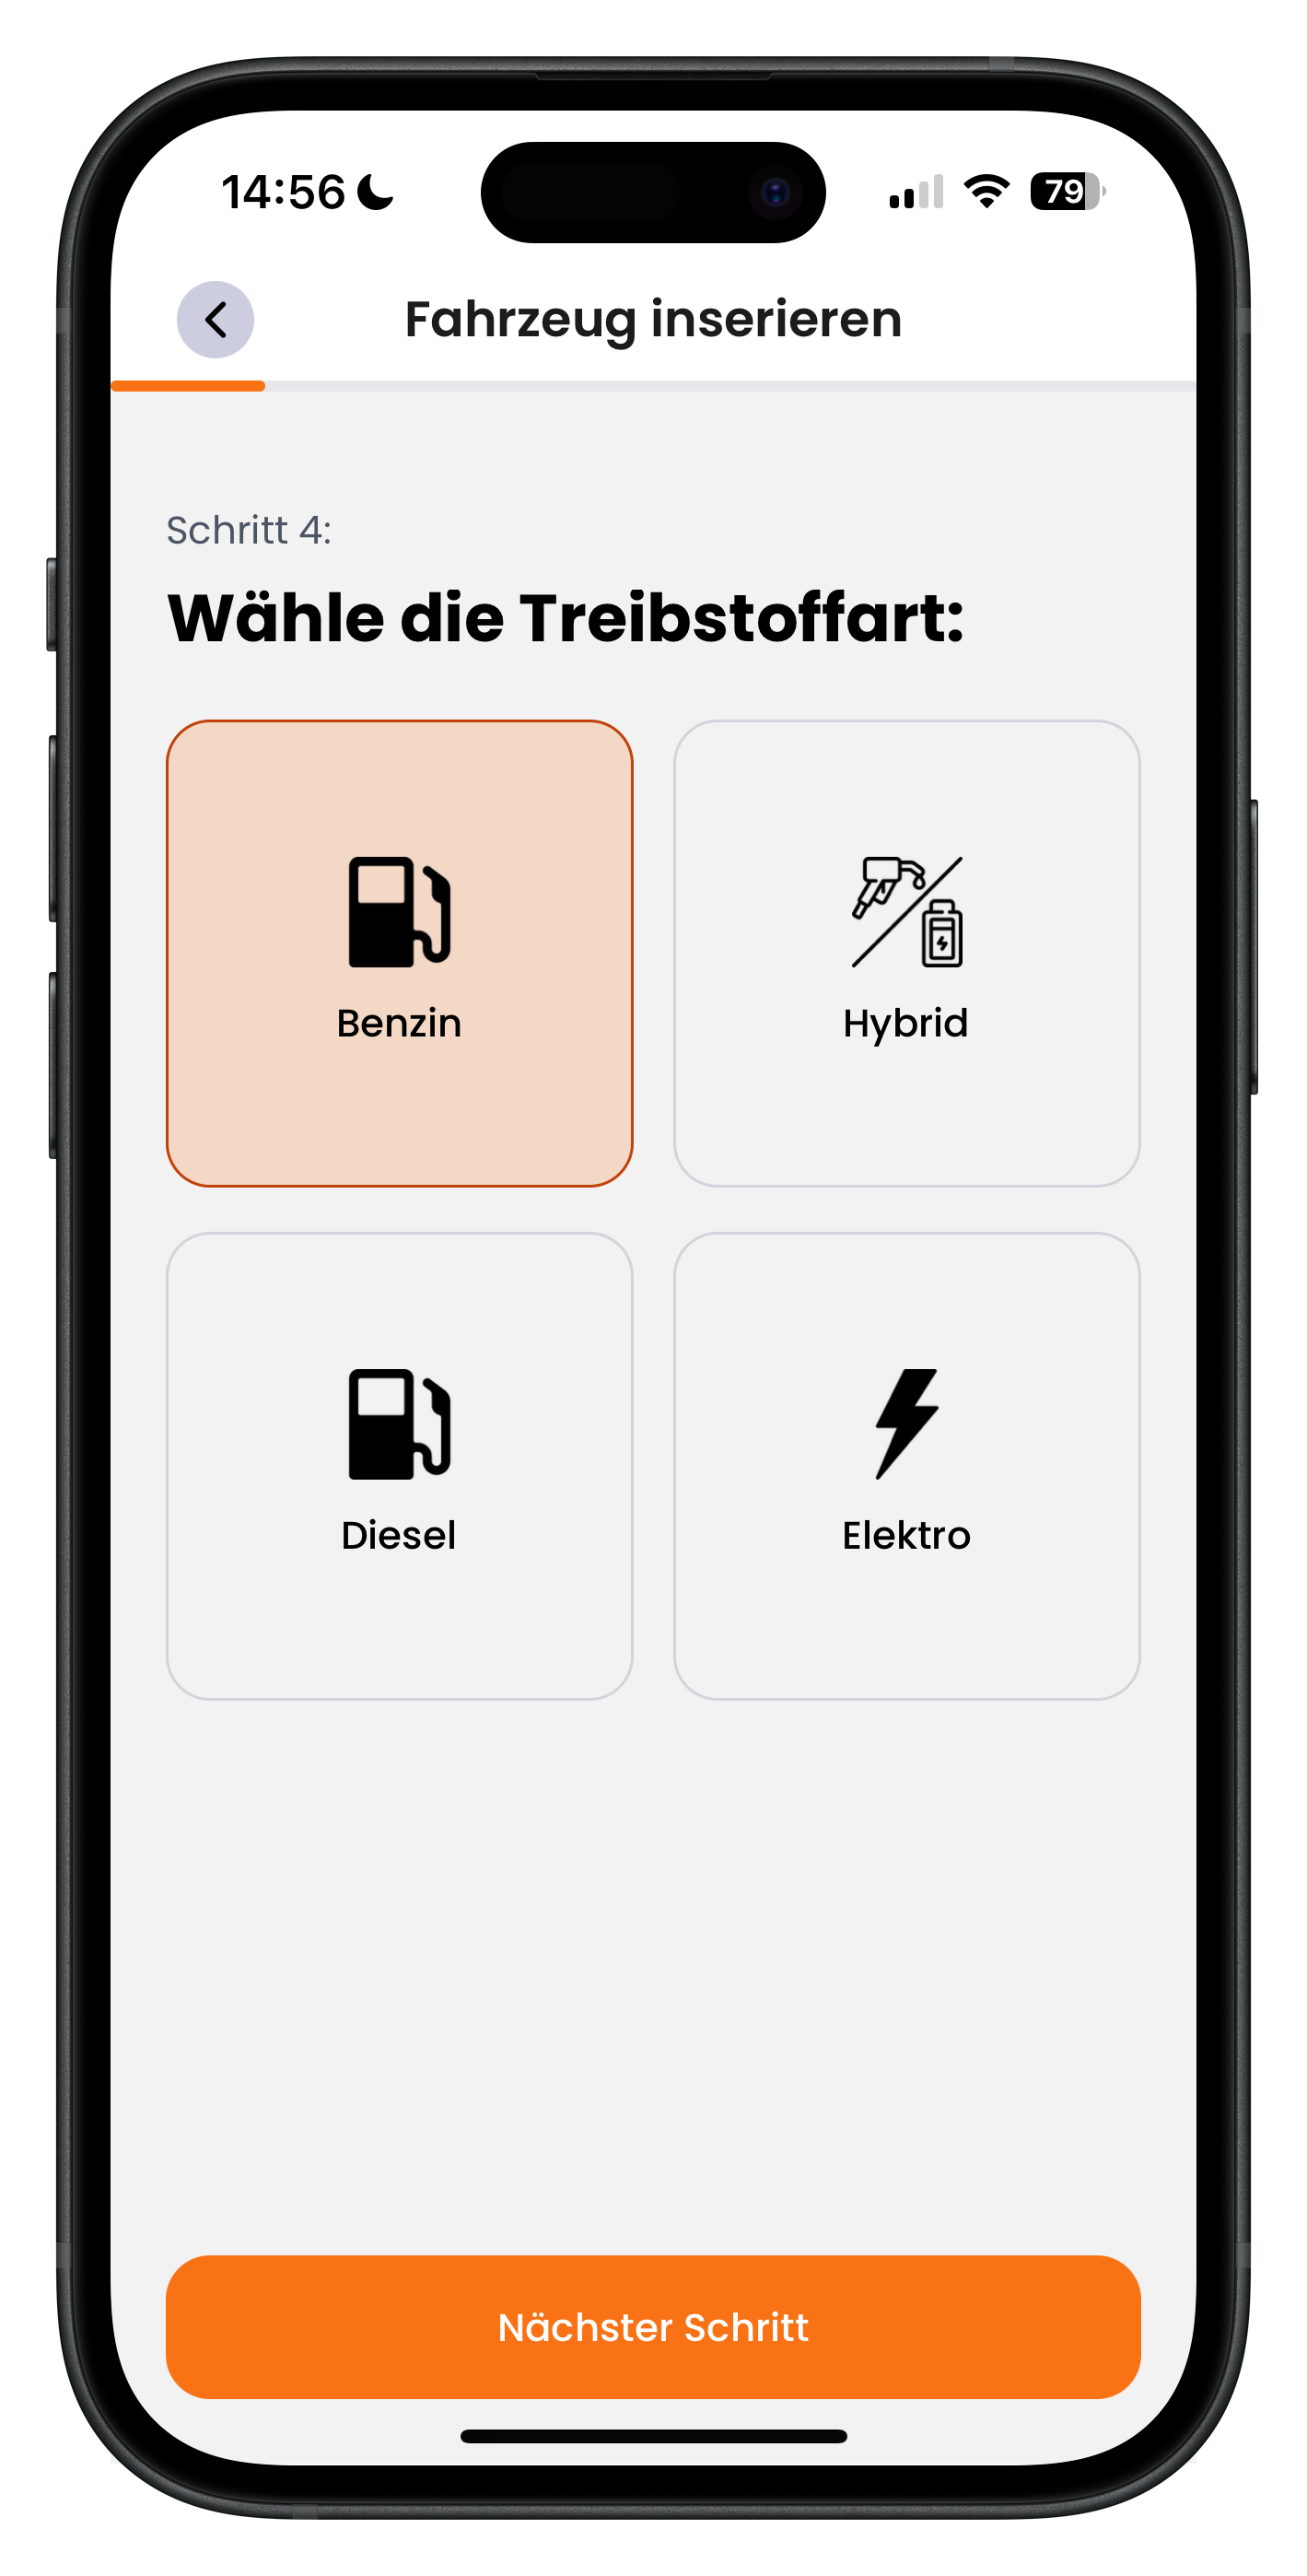
Now choose what your car runs on under Choose the fuel type. There are four tiles: Petrol, Hybrid, Diesel and Electric, each with an icon. Tap the right one — it turns orange — then go to Next step.
- The fuel type appears later in the vehicle details
- Electric is shown with a lightning bolt icon
- The active selection is highlighted in orange
8
Enter engine data and performance figures
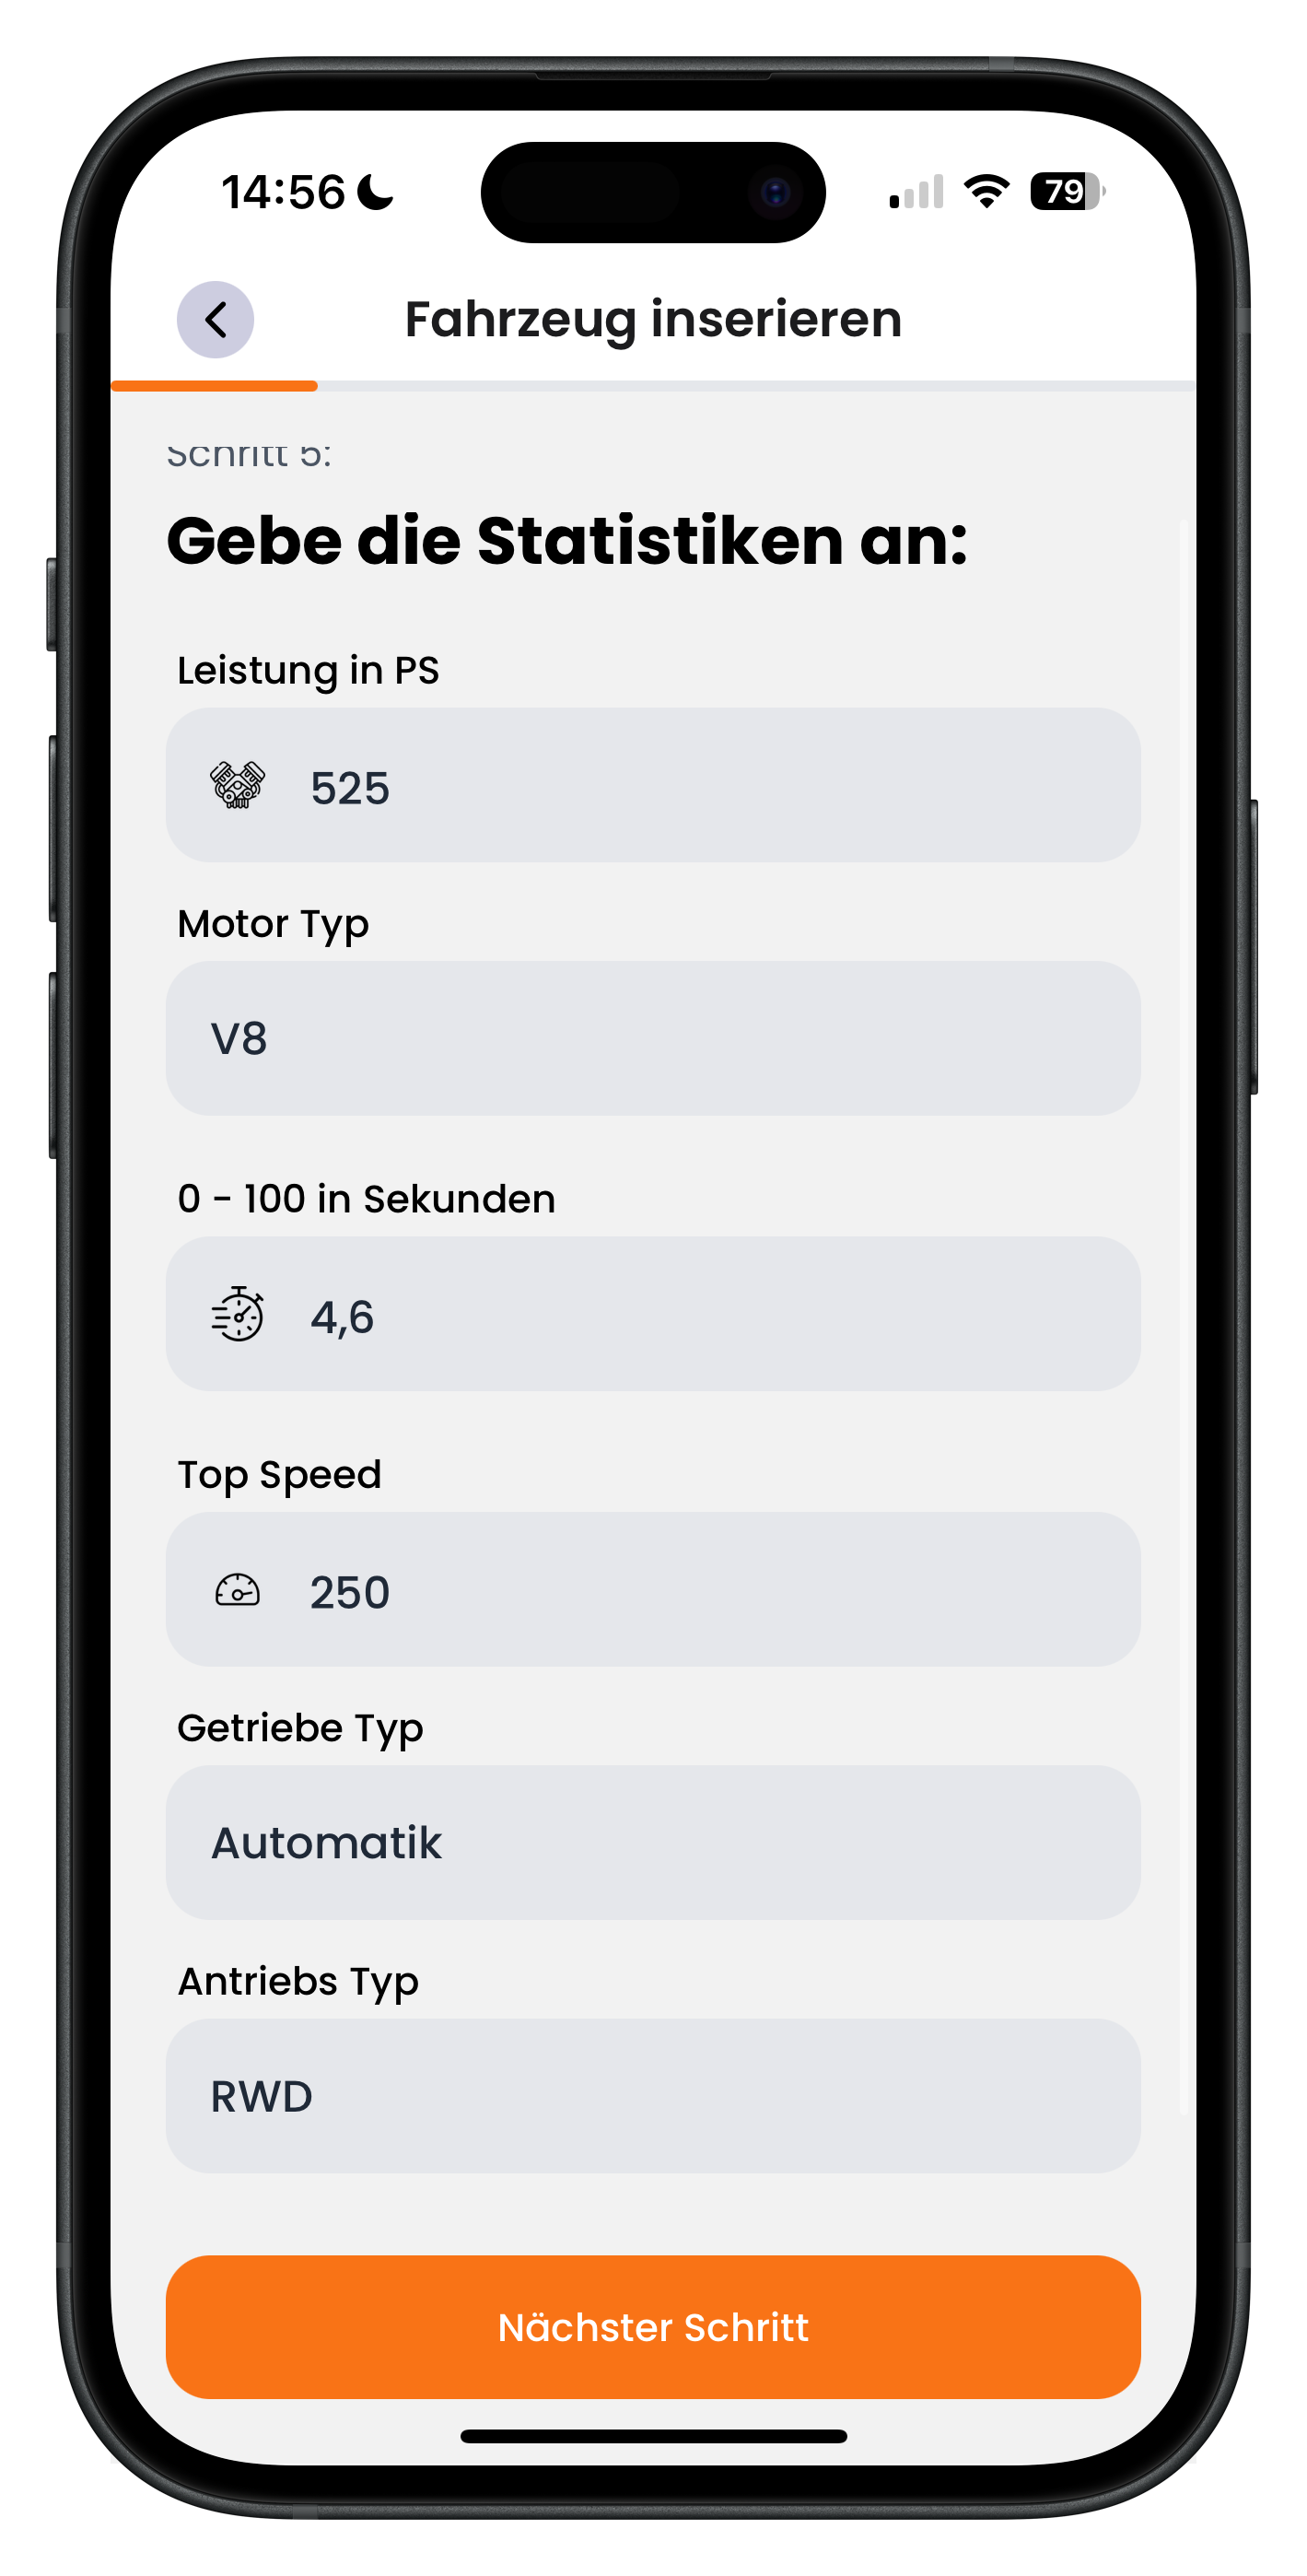
Under Enter the stats you fill in the technical details. You'll be asked for Power in hp (525 in the example), Engine type (for example V8, V6, Turbo, Supercharger or V10), 0–100 in seconds (around 4.6), Top speed in km/h (for example 250), Transmission type (Manual or Automatic) and Drive type (AWD, RWD or FWD). These are exactly the specs that sports car enthusiasts care about. Then tap Next step.
- Accurate performance data makes your listing more attractive to enthusiasts
- Engine type, top speed and 0–100 are strong selling points
- For drive type, you can choose AWD (all-wheel), RWD (rear-wheel) or FWD (front-wheel)
The more complete and accurate your technical details are, the fewer questions you'll get in chat. Better to enter it properly once than to keep filling in gaps later.
Photos & location
9
Upload vehicle photos and arrange their order
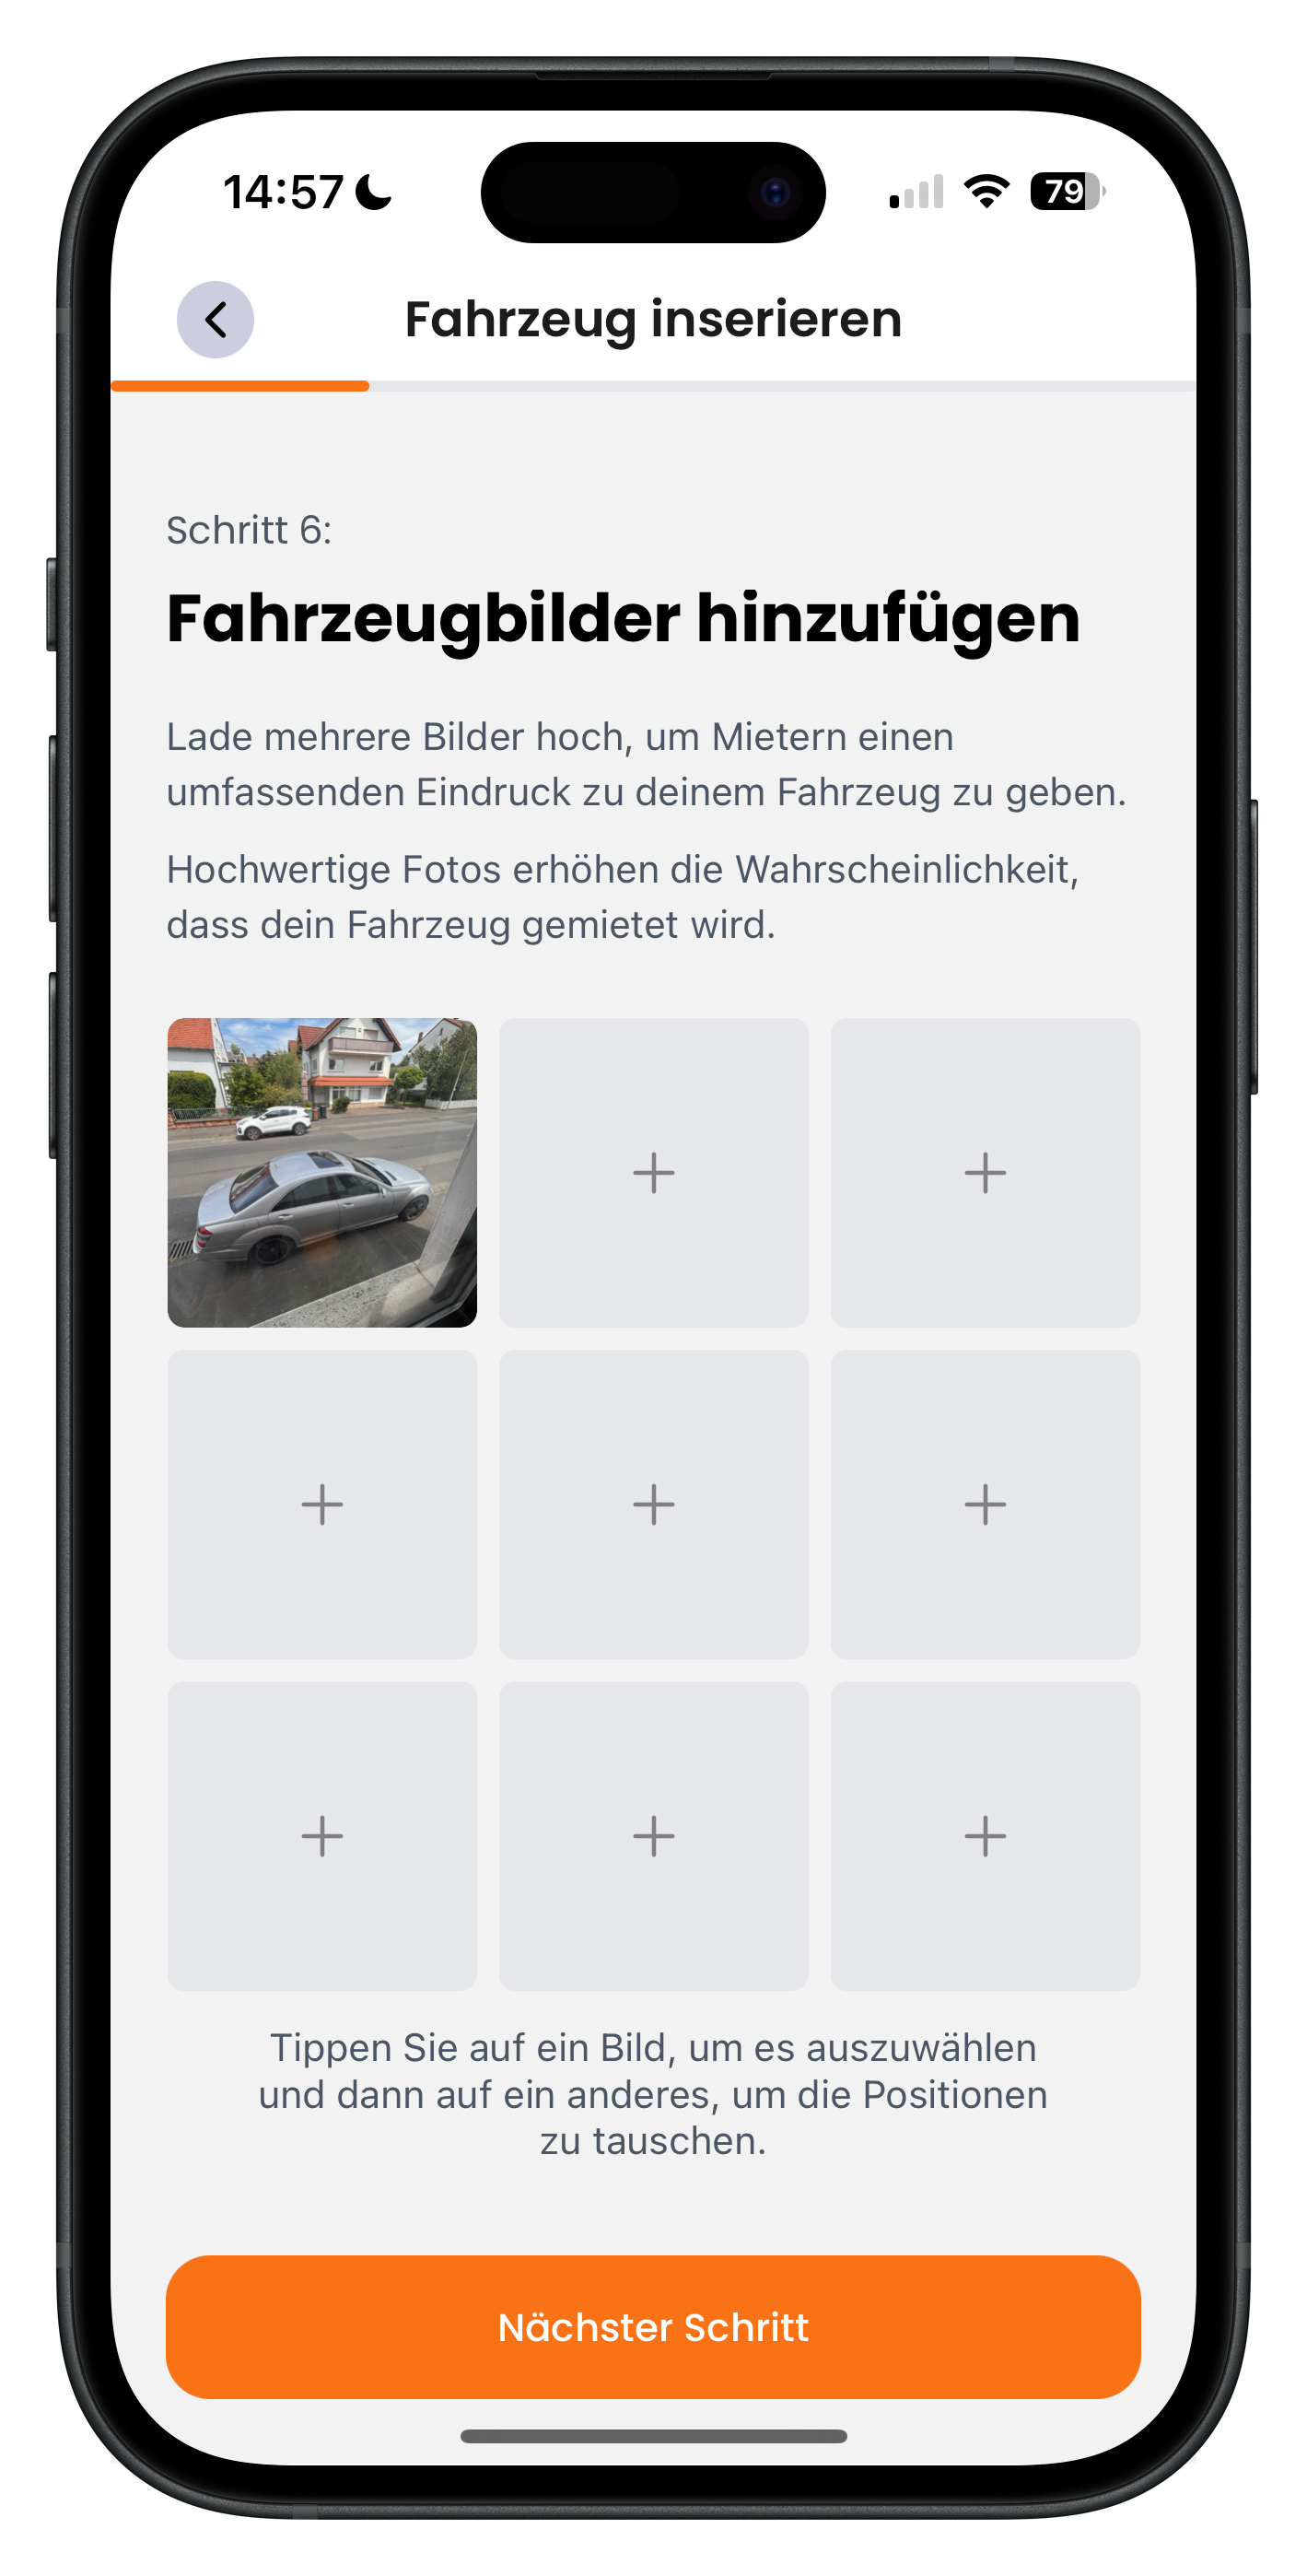
Under Add vehicle photos you can upload up to nine images from your gallery. You'll see a grid of fields with a plus icon — the first slot is already filled. Tap an empty field to add a photo. To change the order, tap one photo then tap another to swap their positions, as the on-screen tip explains. The first photo is your cover image and the most important one.
- High-quality photos increase the chances of your car being booked
- Put your best photo in position one — it's your cover image
- Clean, well-lit shots in daylight from the front, side and interior work best
10
Set the vehicle pick-up location
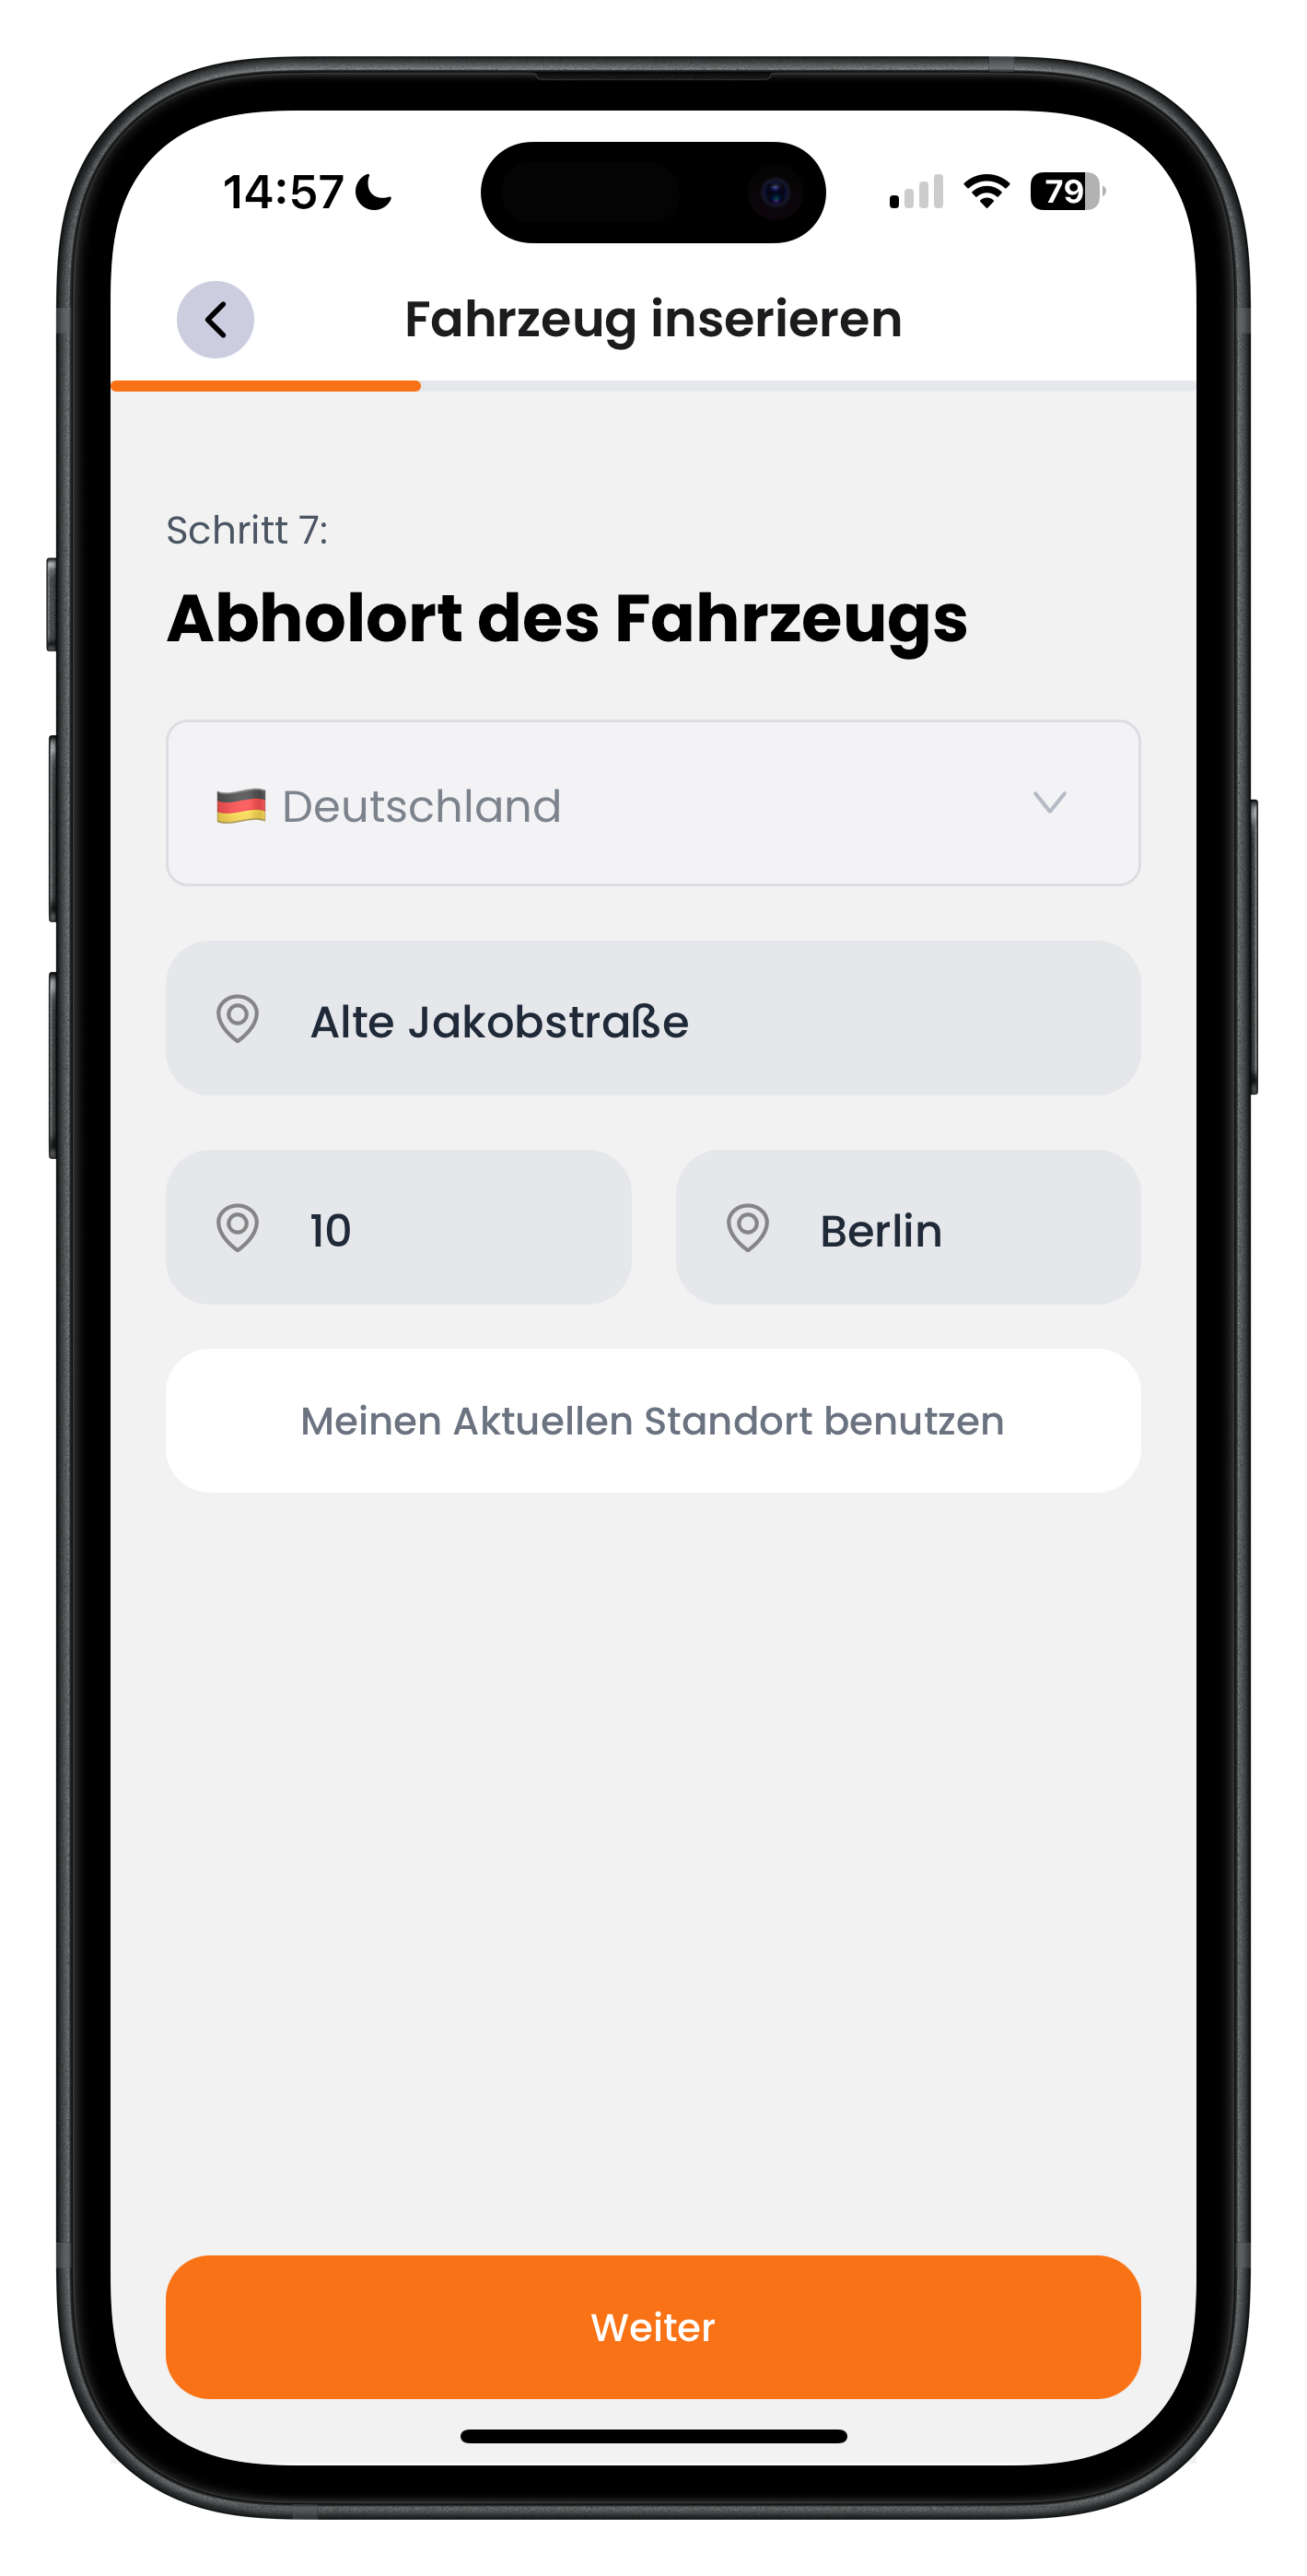
In the Vehicle pick-up location step you specify where renters will collect the car. You can type in the country, street, house number and city — in the example: Germany, Alte Jakobstraße 10, Berlin. It's quicker to tap Use my current location, which fills in your position automatically. Confirm the address and tap Continue at the bottom.
- The pick-up location is also the reference point for the delivery radius
- The renter only sees the exact address once the booking is confirmed
- Check the automatically detected address before you continue
Vehicle delivery
Delivery is optional. If you offer it, renters can add it when booking, and you'll reach more people who can't come to you themselves. If you choose No, renters always collect the car in person at the pick-up location.
11
Offer delivery or not
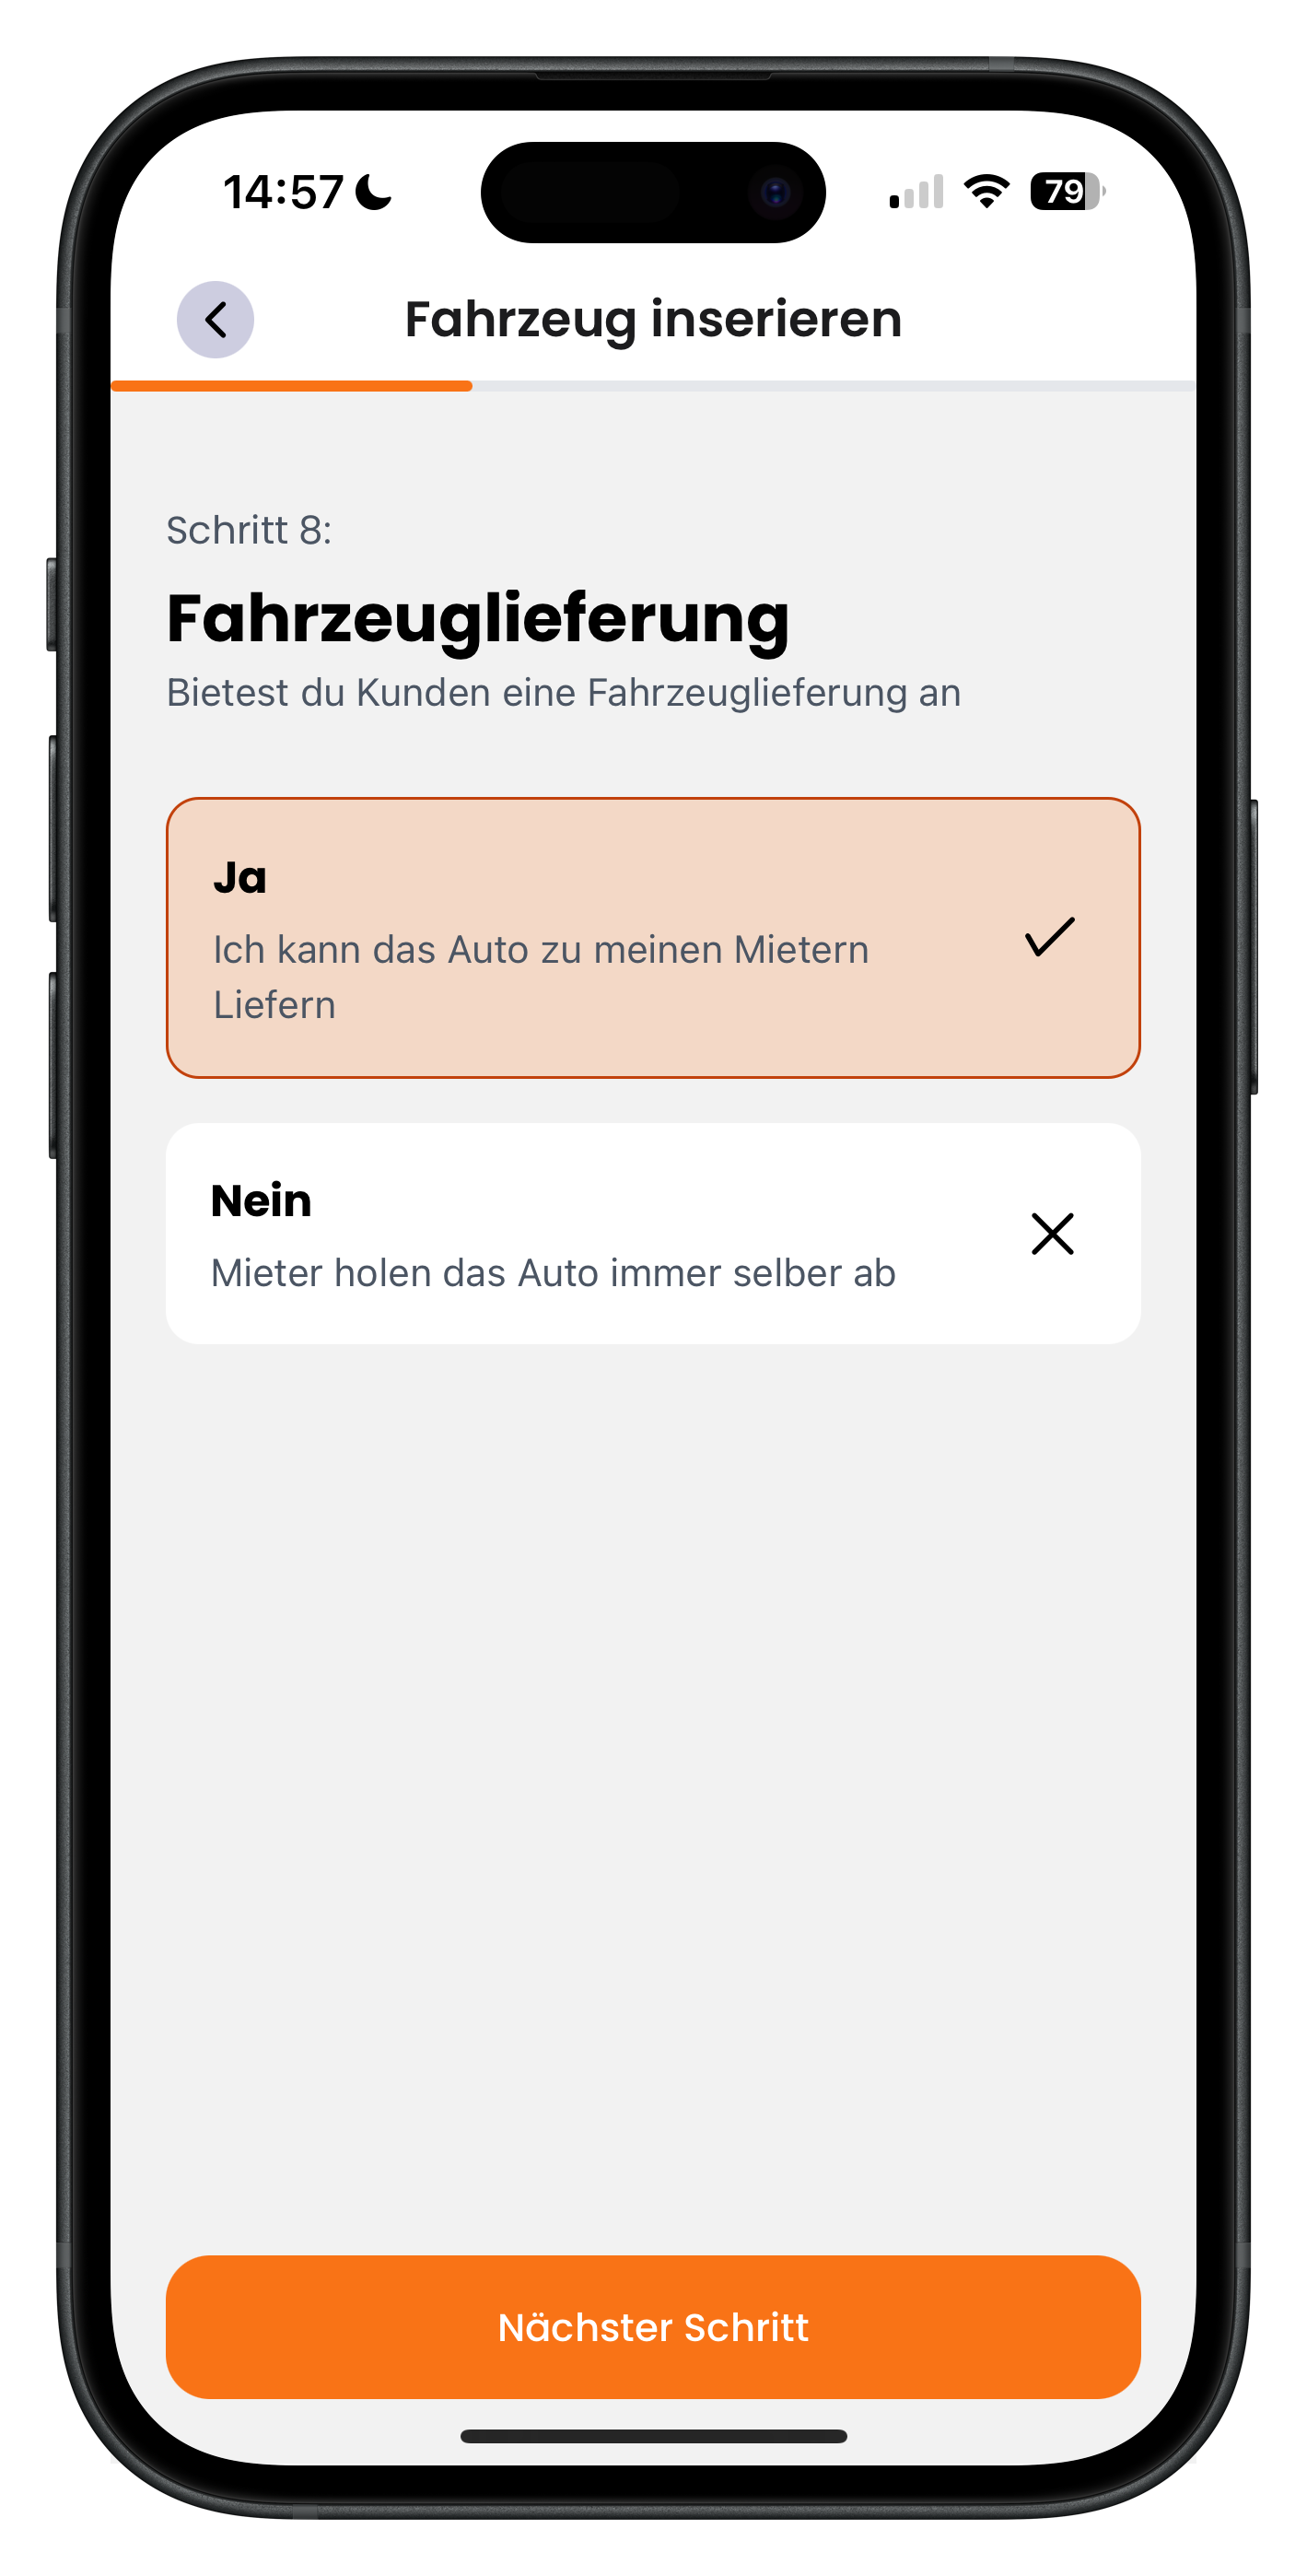
Under Vehicle delivery you decide whether you'll deliver the car to your renters. Choose Yes (I can deliver the car to my renters) or No (Renters always collect the car themselves). The active option is highlighted in orange — Yes is selected in the example. Then tap Next step. The next two delivery screens only appear if you choose Yes.
- Offering delivery can give you a real edge over other listings
- The renter chooses whether to add delivery when they book
- Choosing No skips the next distance and price screens
12
Set the minimum and maximum delivery distance
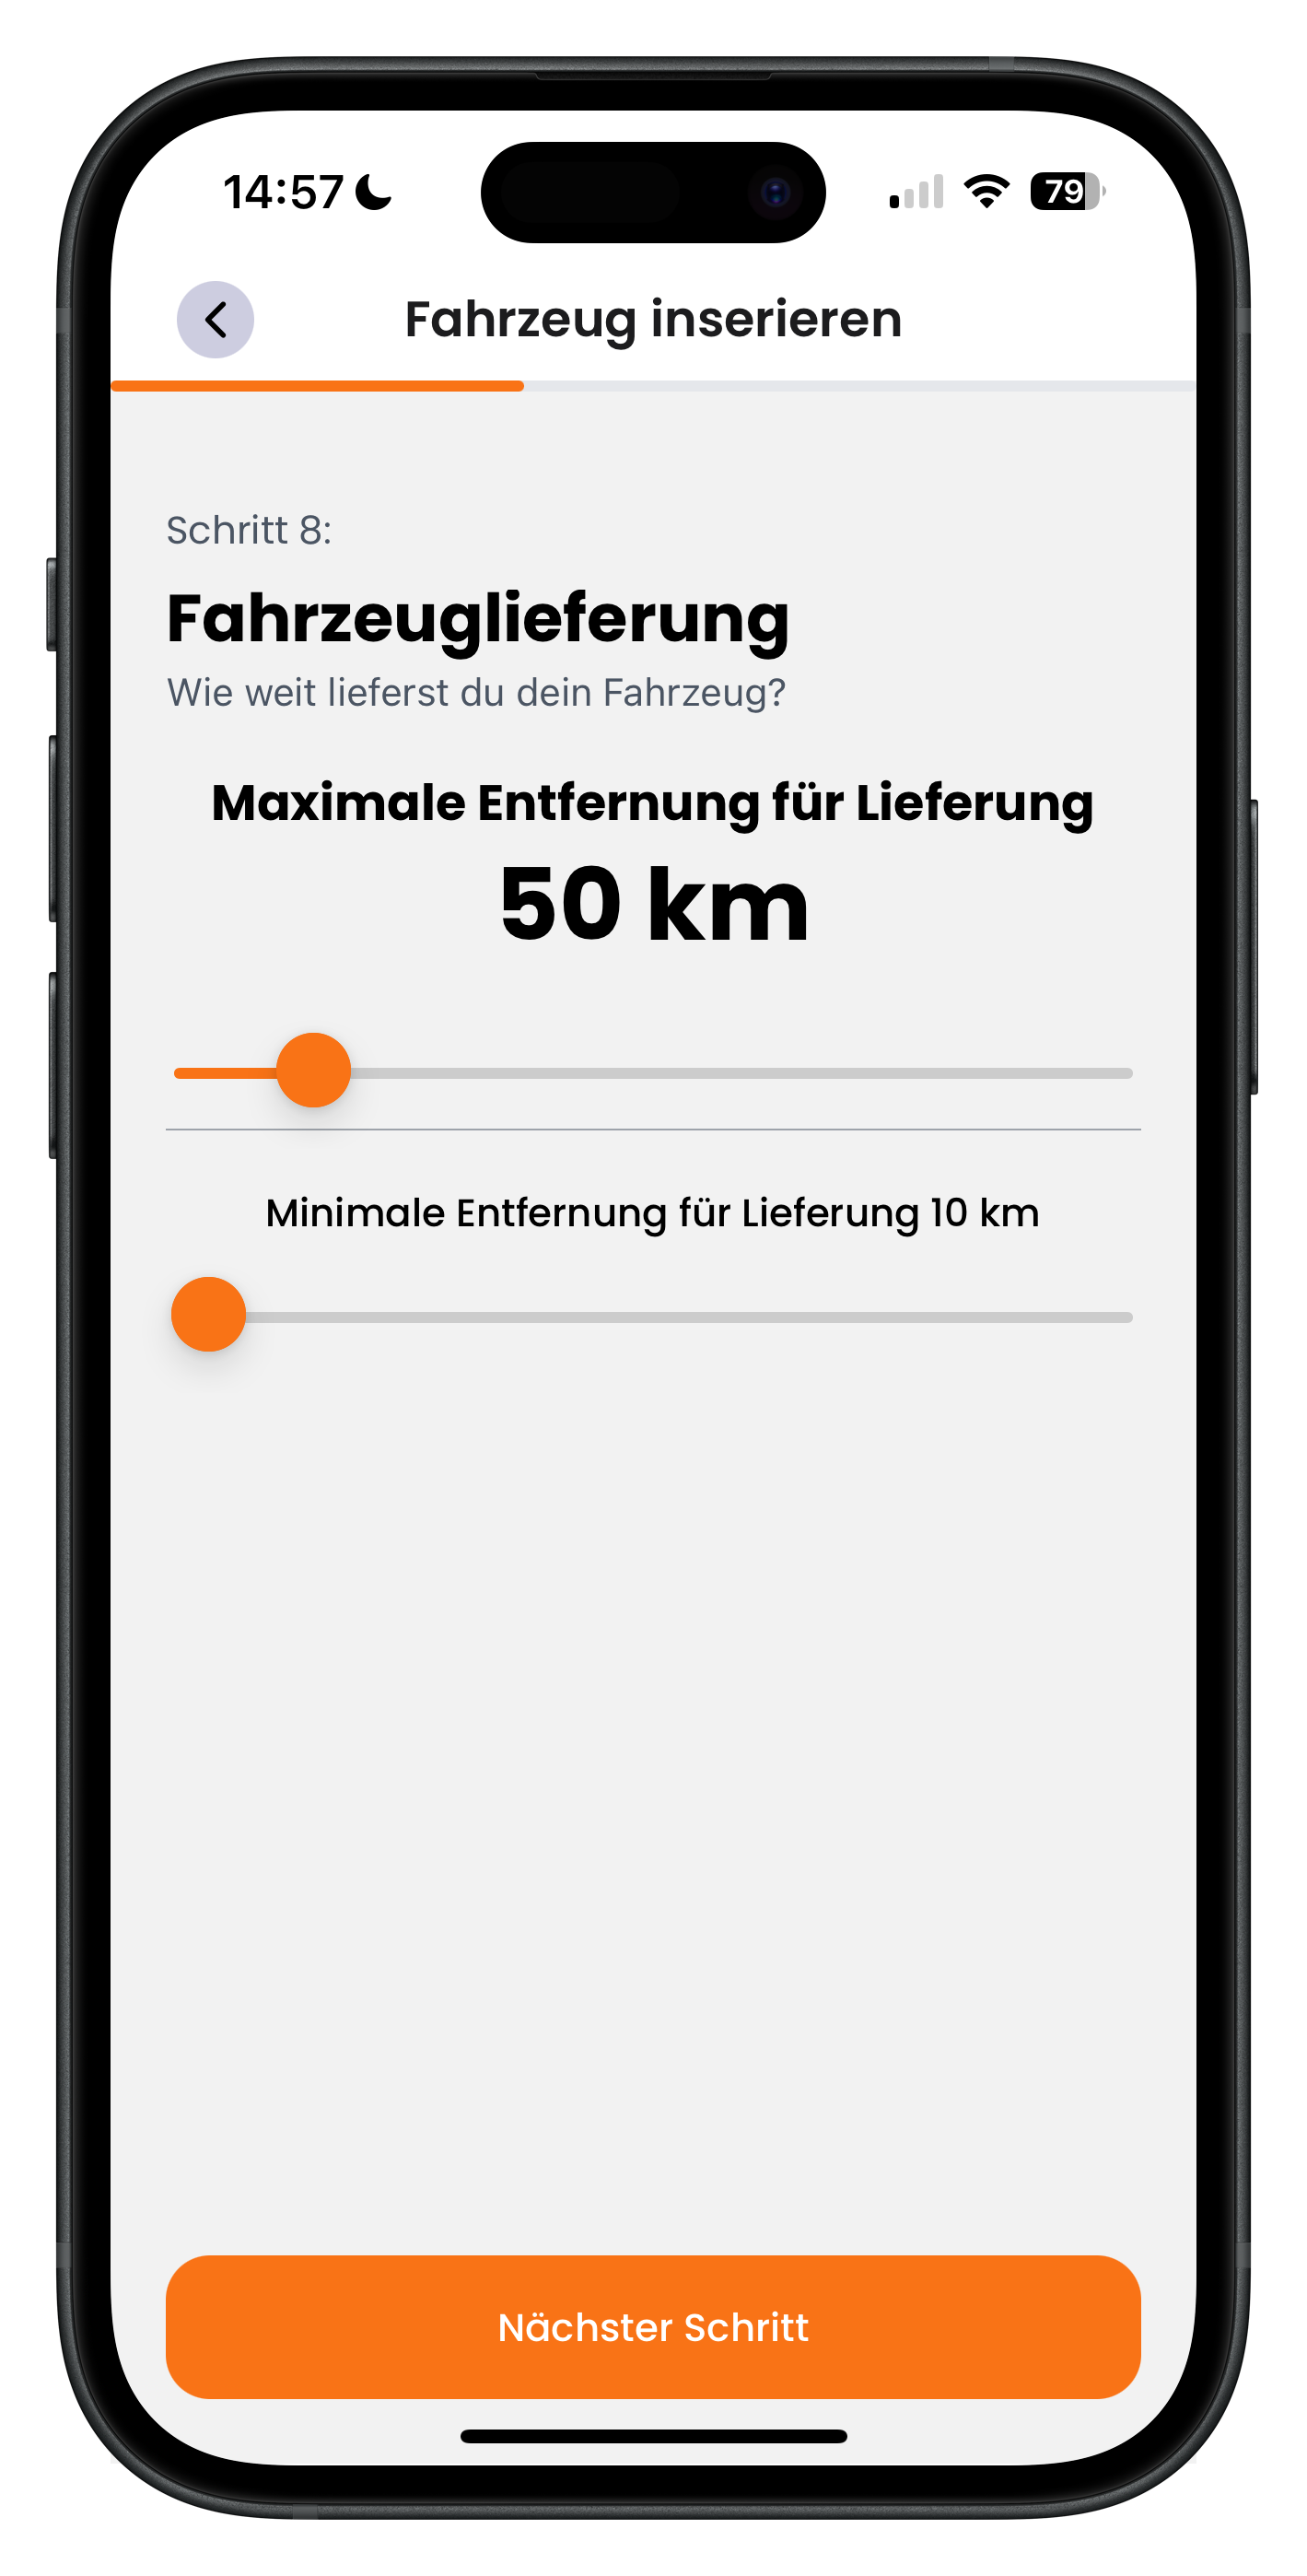
Here you define how far you'll deliver your vehicle. Use the upper slider to set the Maximum delivery distance — 50 km in the example. Use the lower slider to set the Minimum delivery distance — for example 10 km. The distances are as the crow flies, i.e. the radius around your pick-up location. Then tap Next step.
- The values are straight-line distances from your pick-up location, not driving distance
- A larger maximum distance brings more potential enquiries
- The minimum distance lets you control from what point delivery is worth it for you
13
Set the price per kilometre for delivery
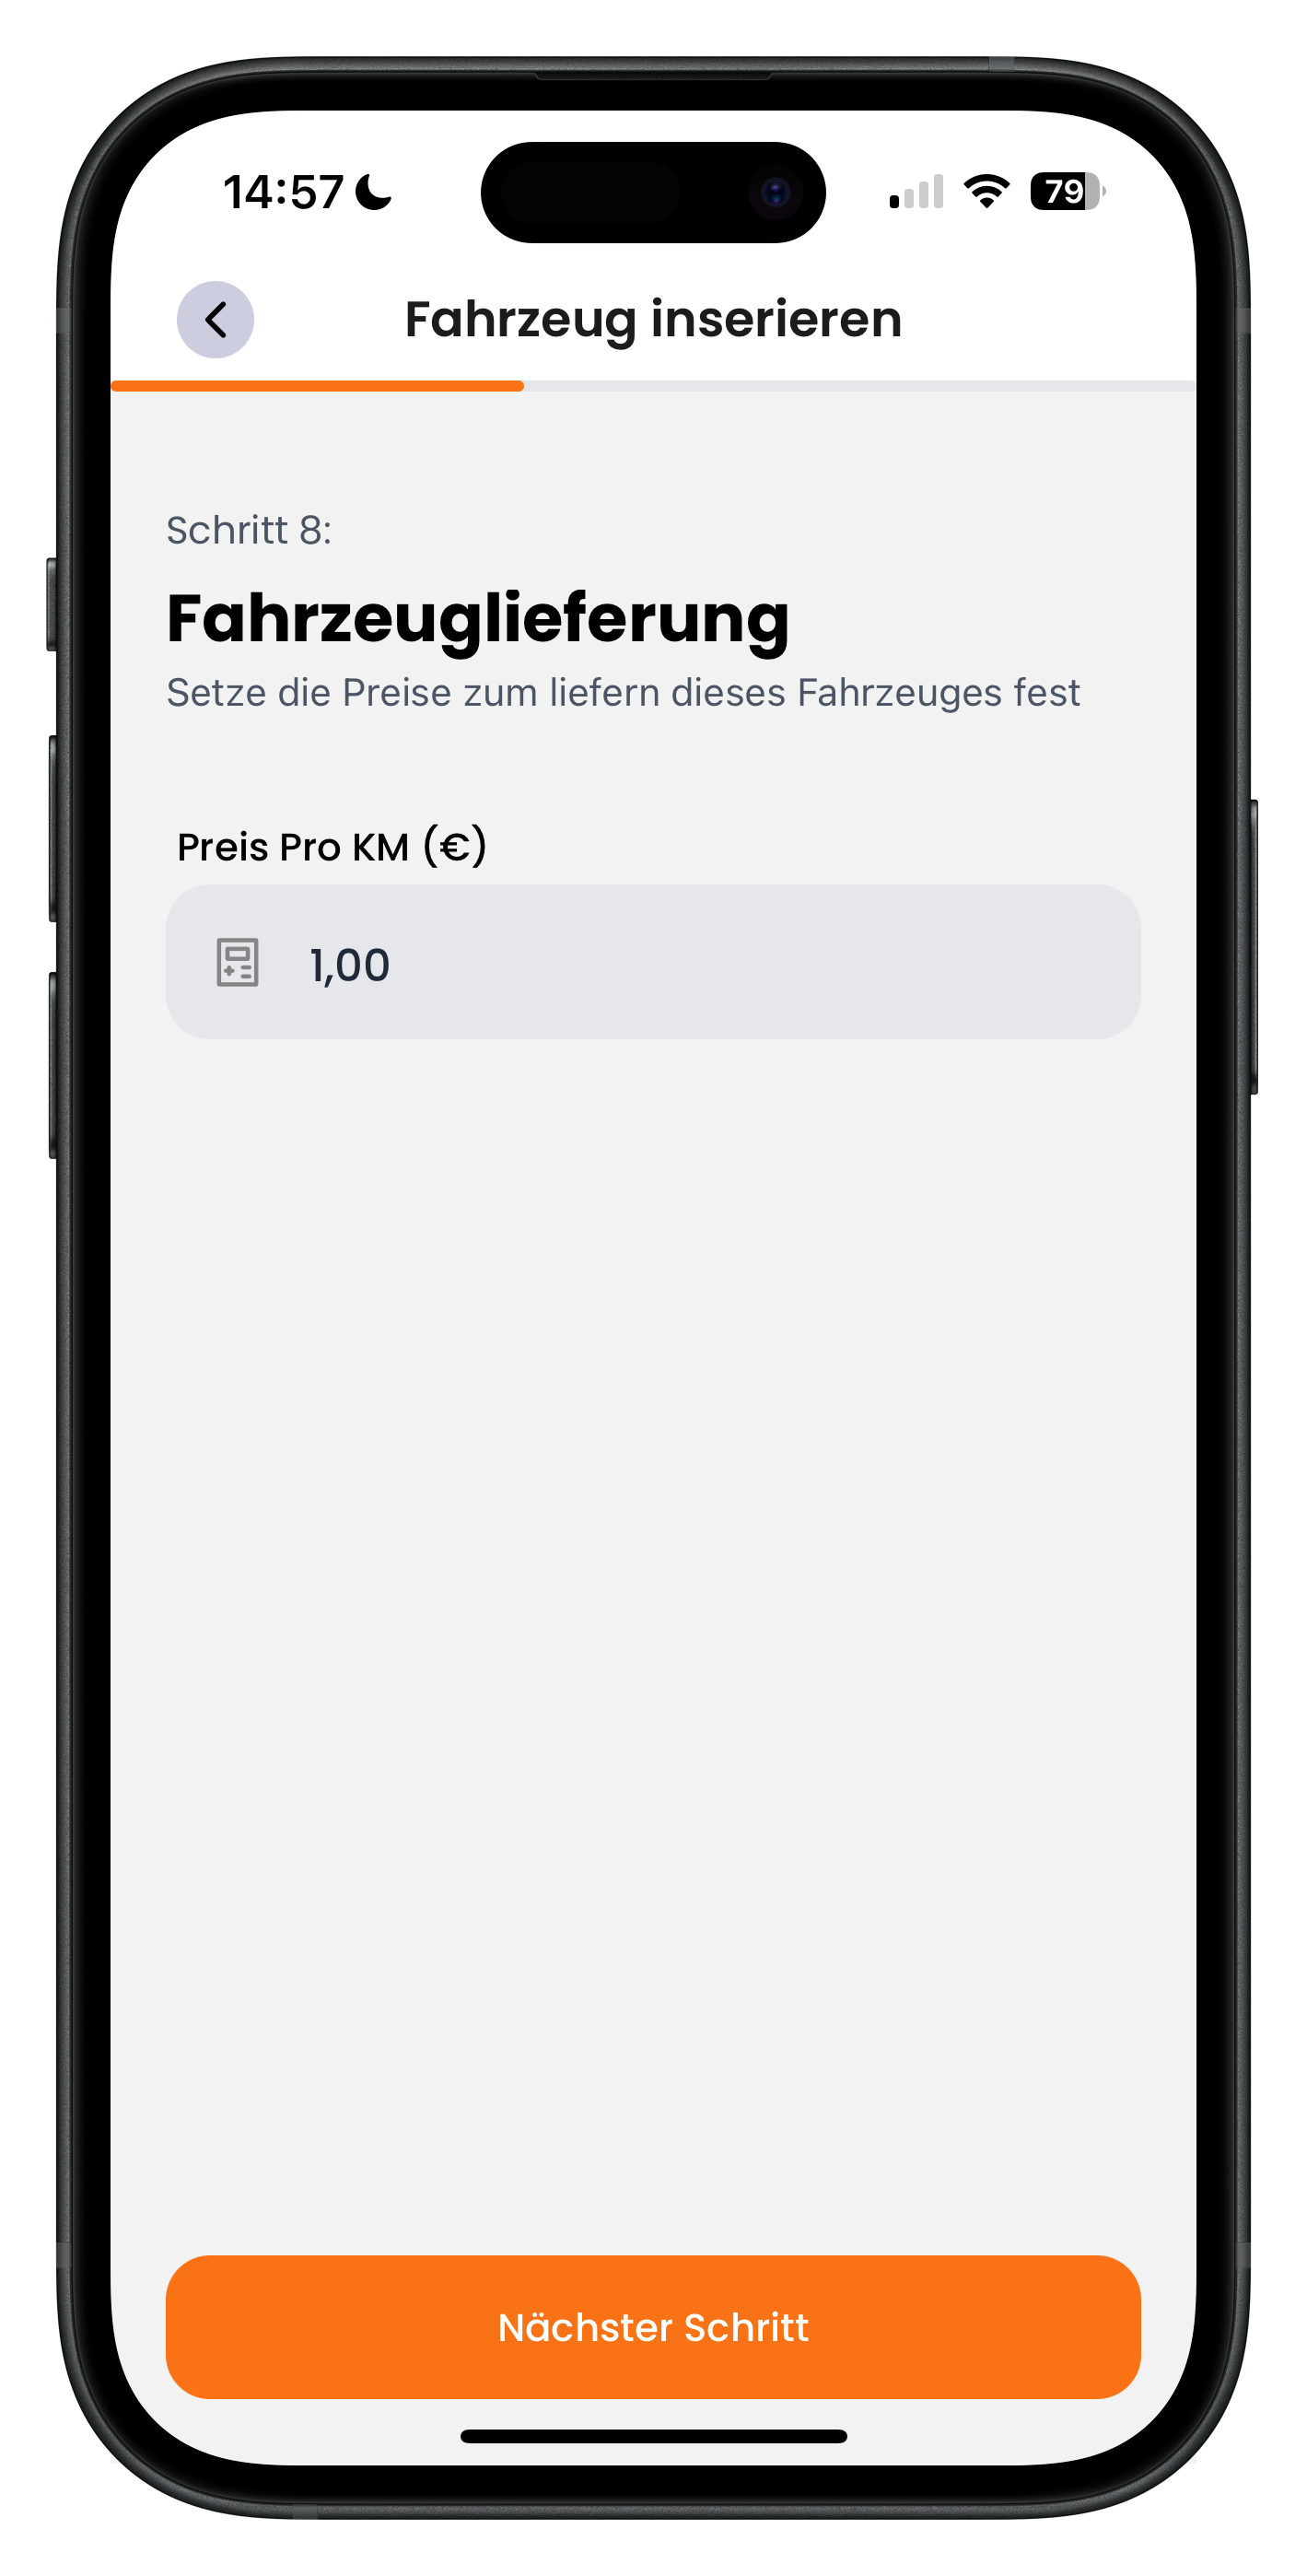
Now you set what delivery costs. In the Price per km field in euros, enter the amount you charge per kilometre — 1,00 in the example. The delivery fee is then calculated automatically based on the distance. Then tap Next step.
- The per-kilometre rate is multiplied by the delivery distance
- Factor in fuel, time and the return journey when setting your price
- A fair delivery price increases the chance of the option being booked
Prices & mileage
Now comes the part that determines how well your car performs: pricing. Drivable calculates dynamically based on the booking length — you enter daily, weekend, weekly and monthly rates and the system automatically picks the right rate for the renter's requested duration.
14
Rental rates for day, weekend, week and month
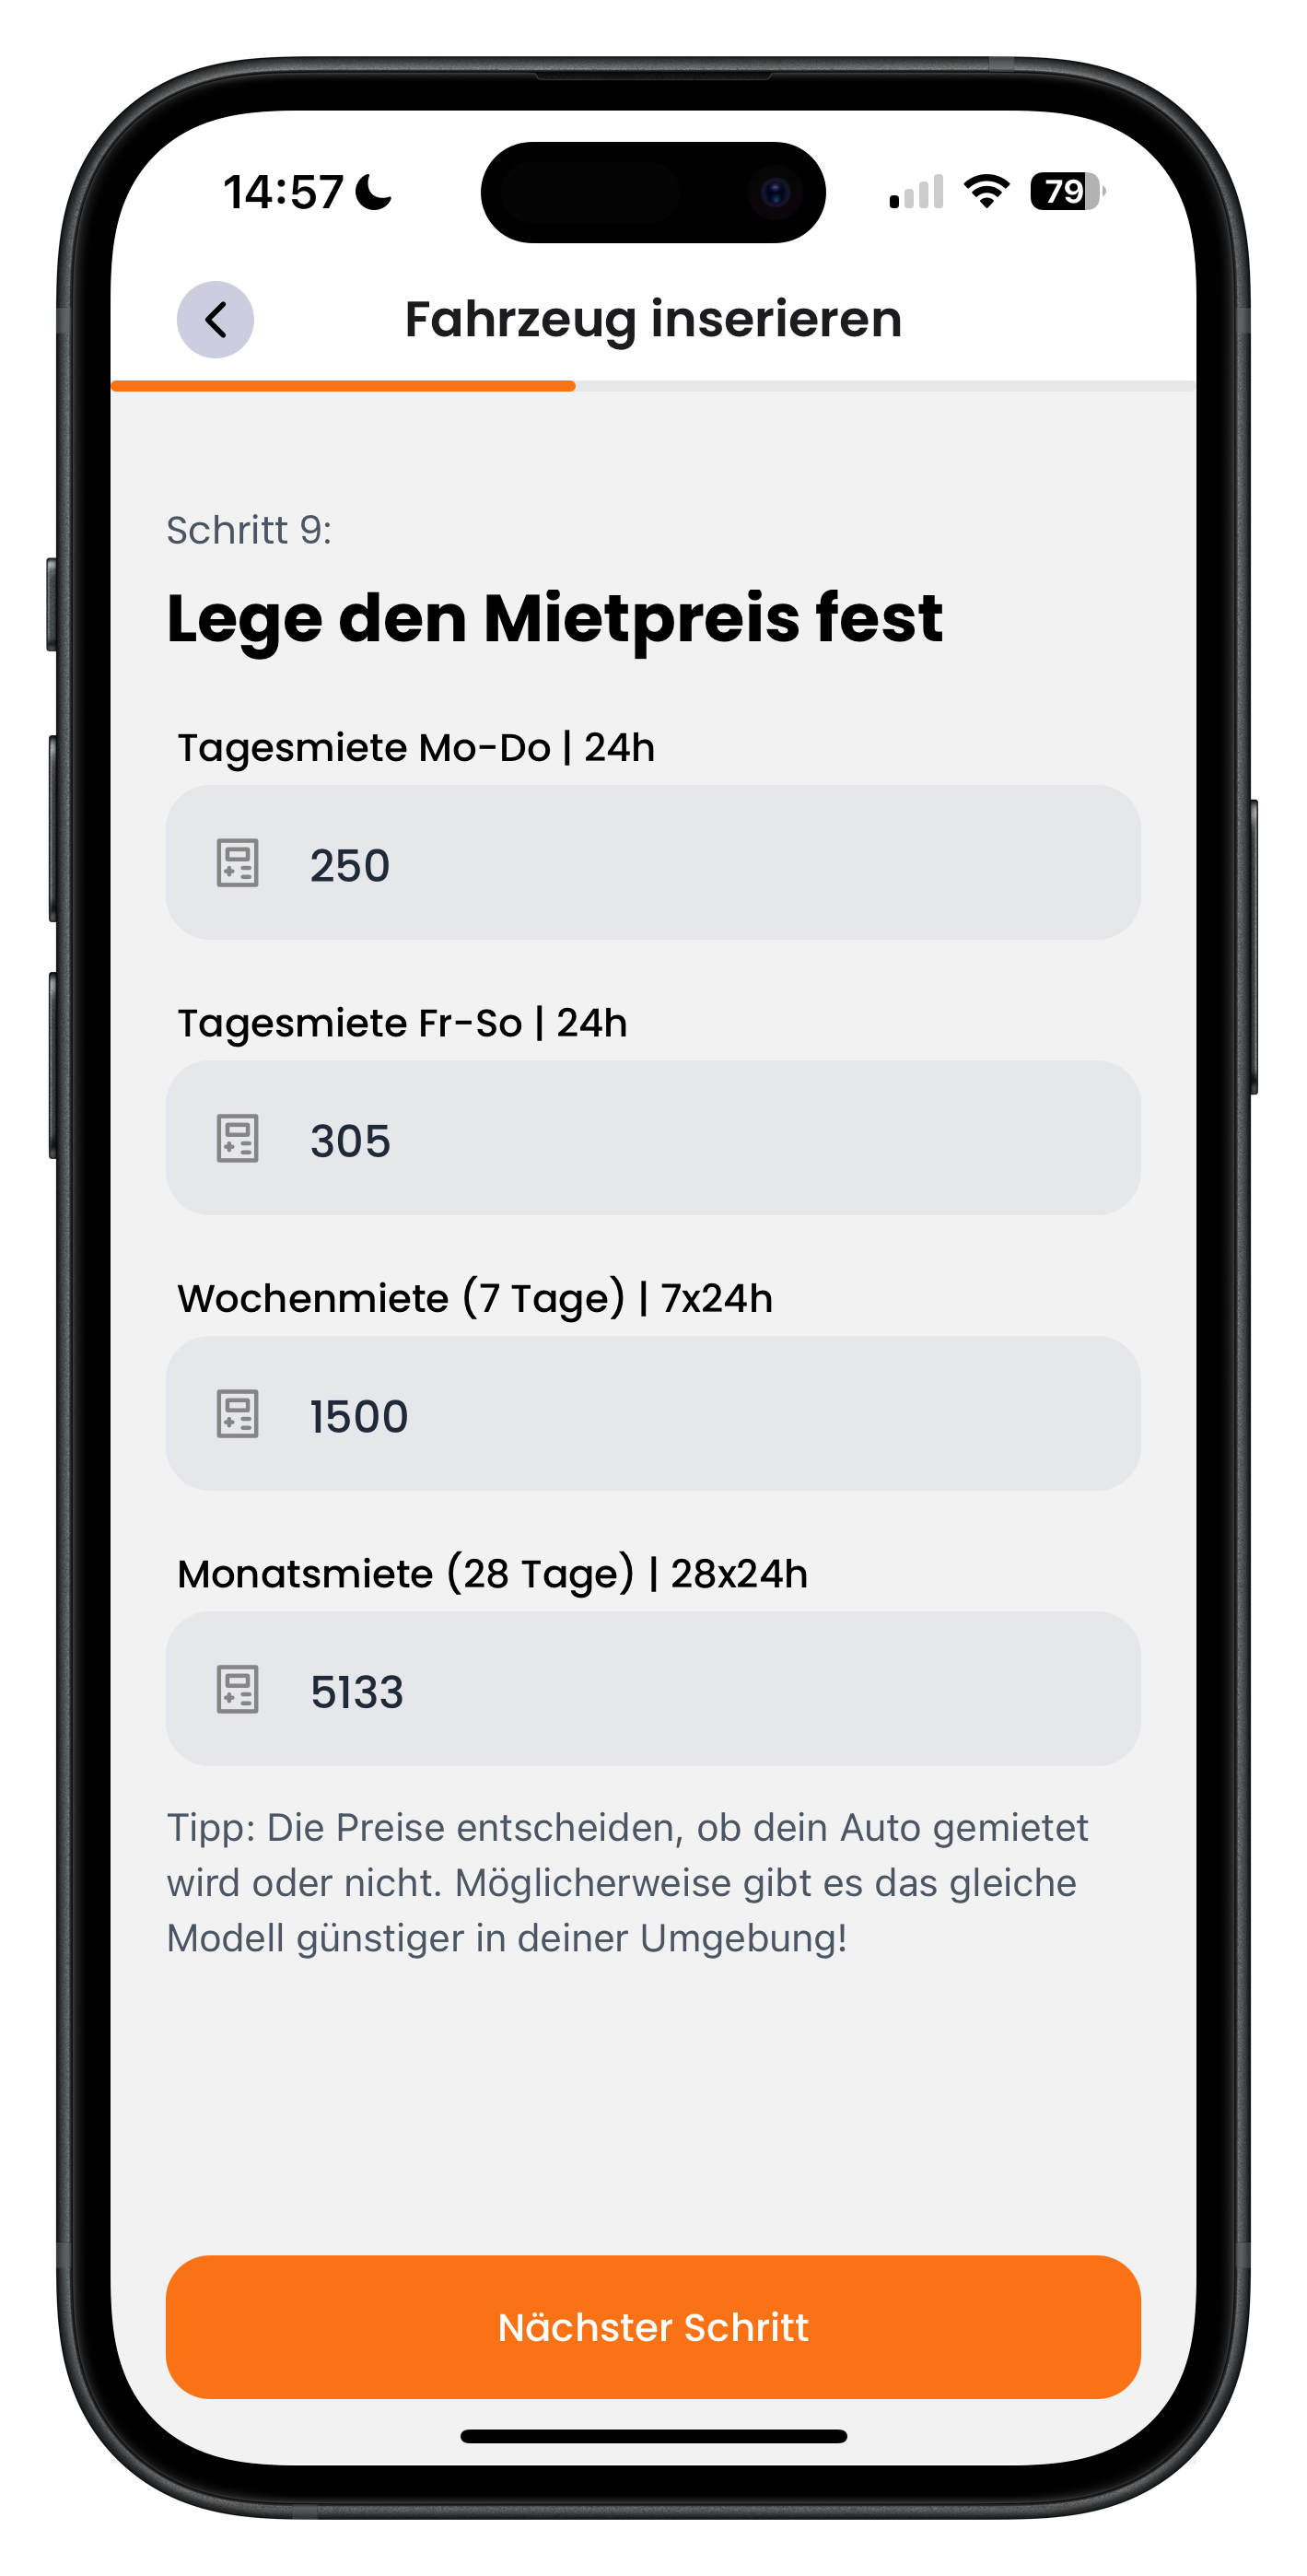
Under Set the rental rate you enter four prices: Daily rate Mon–Thu per 24 hours (250 in the example), Daily rate Fri–Sun per 24 hours (305), Weekly rate for 7 × 24 hours (1500) and Monthly rate for 28 days (5133). Based on the requested duration, Drivable calculates the best matching price. Then tap Next step.
- Weekend rates are usually higher than weekday rates
- Weekly and monthly rates act as a volume discount for longer rentals
- The on-screen tip reminds you: your prices determine whether your car gets booked
15
Offer hourly rentals: yes or no
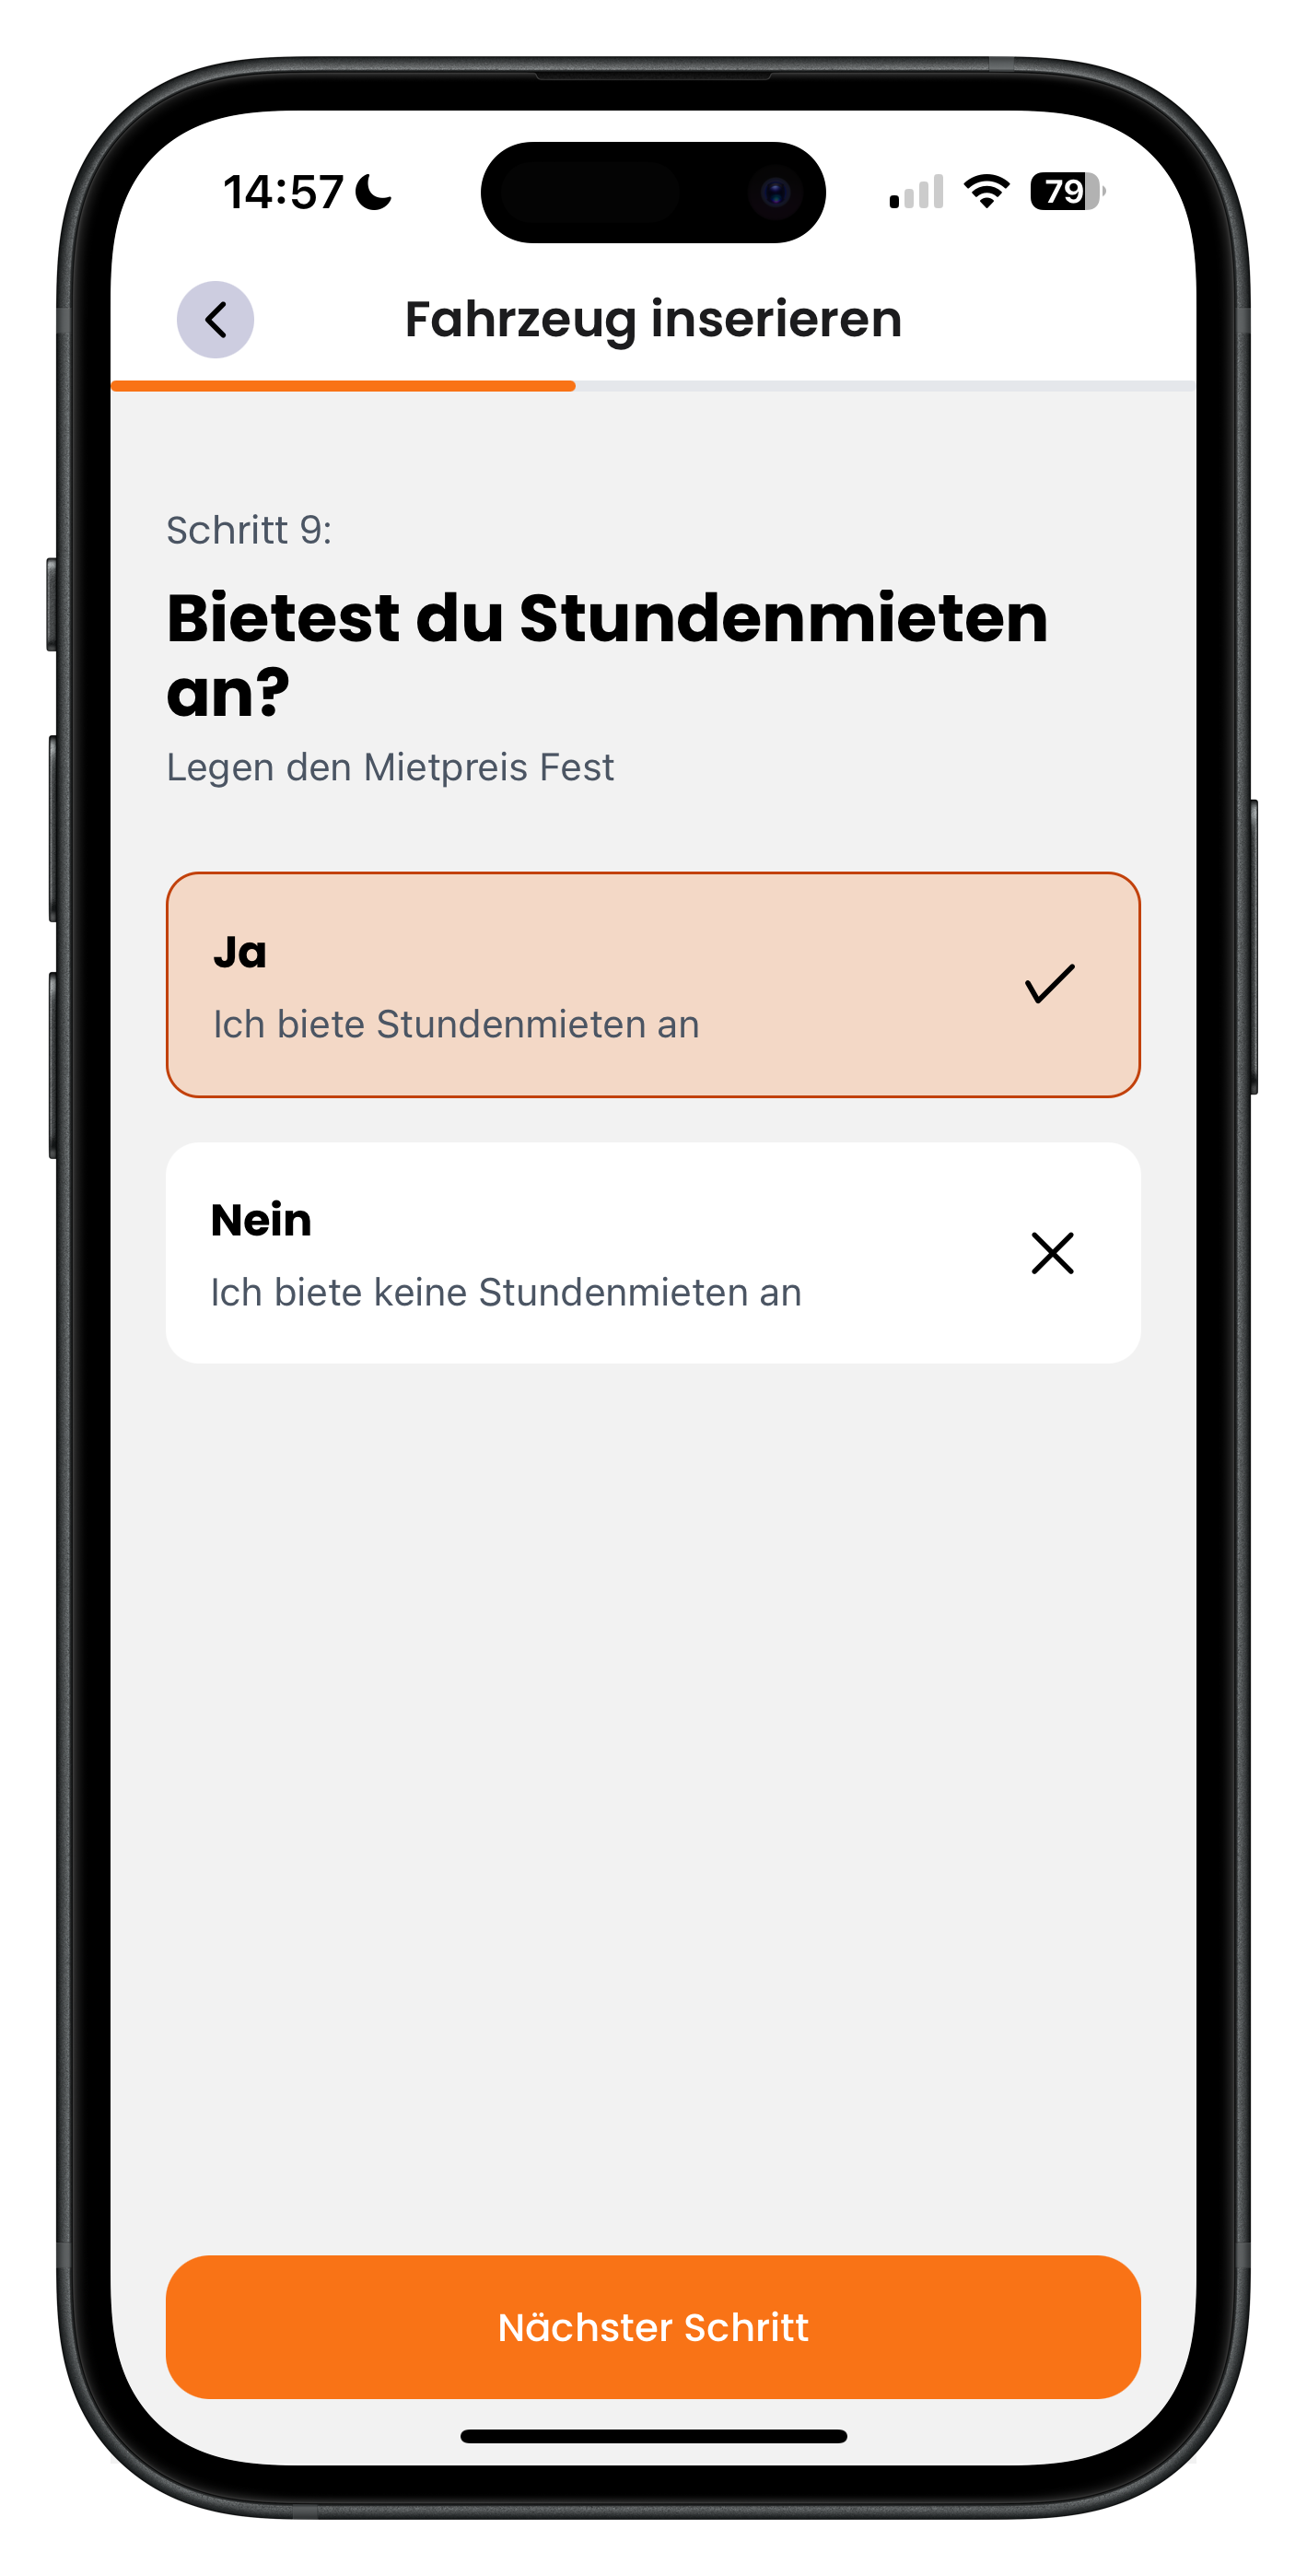
Drivable now asks: Do you offer hourly rentals? Choose Yes (I offer hourly rentals) or No (I don't offer hourly rentals). The active option is highlighted in orange. The next screen — where you set the hourly rate — only appears if you choose Yes. Then tap Next step.
- Hourly rentals work well for short experiences or photo shoots
- Choosing No skips the hourly rate entry screen
- You can change this setting at any time by editing the listing
16
Set the hourly rental rate
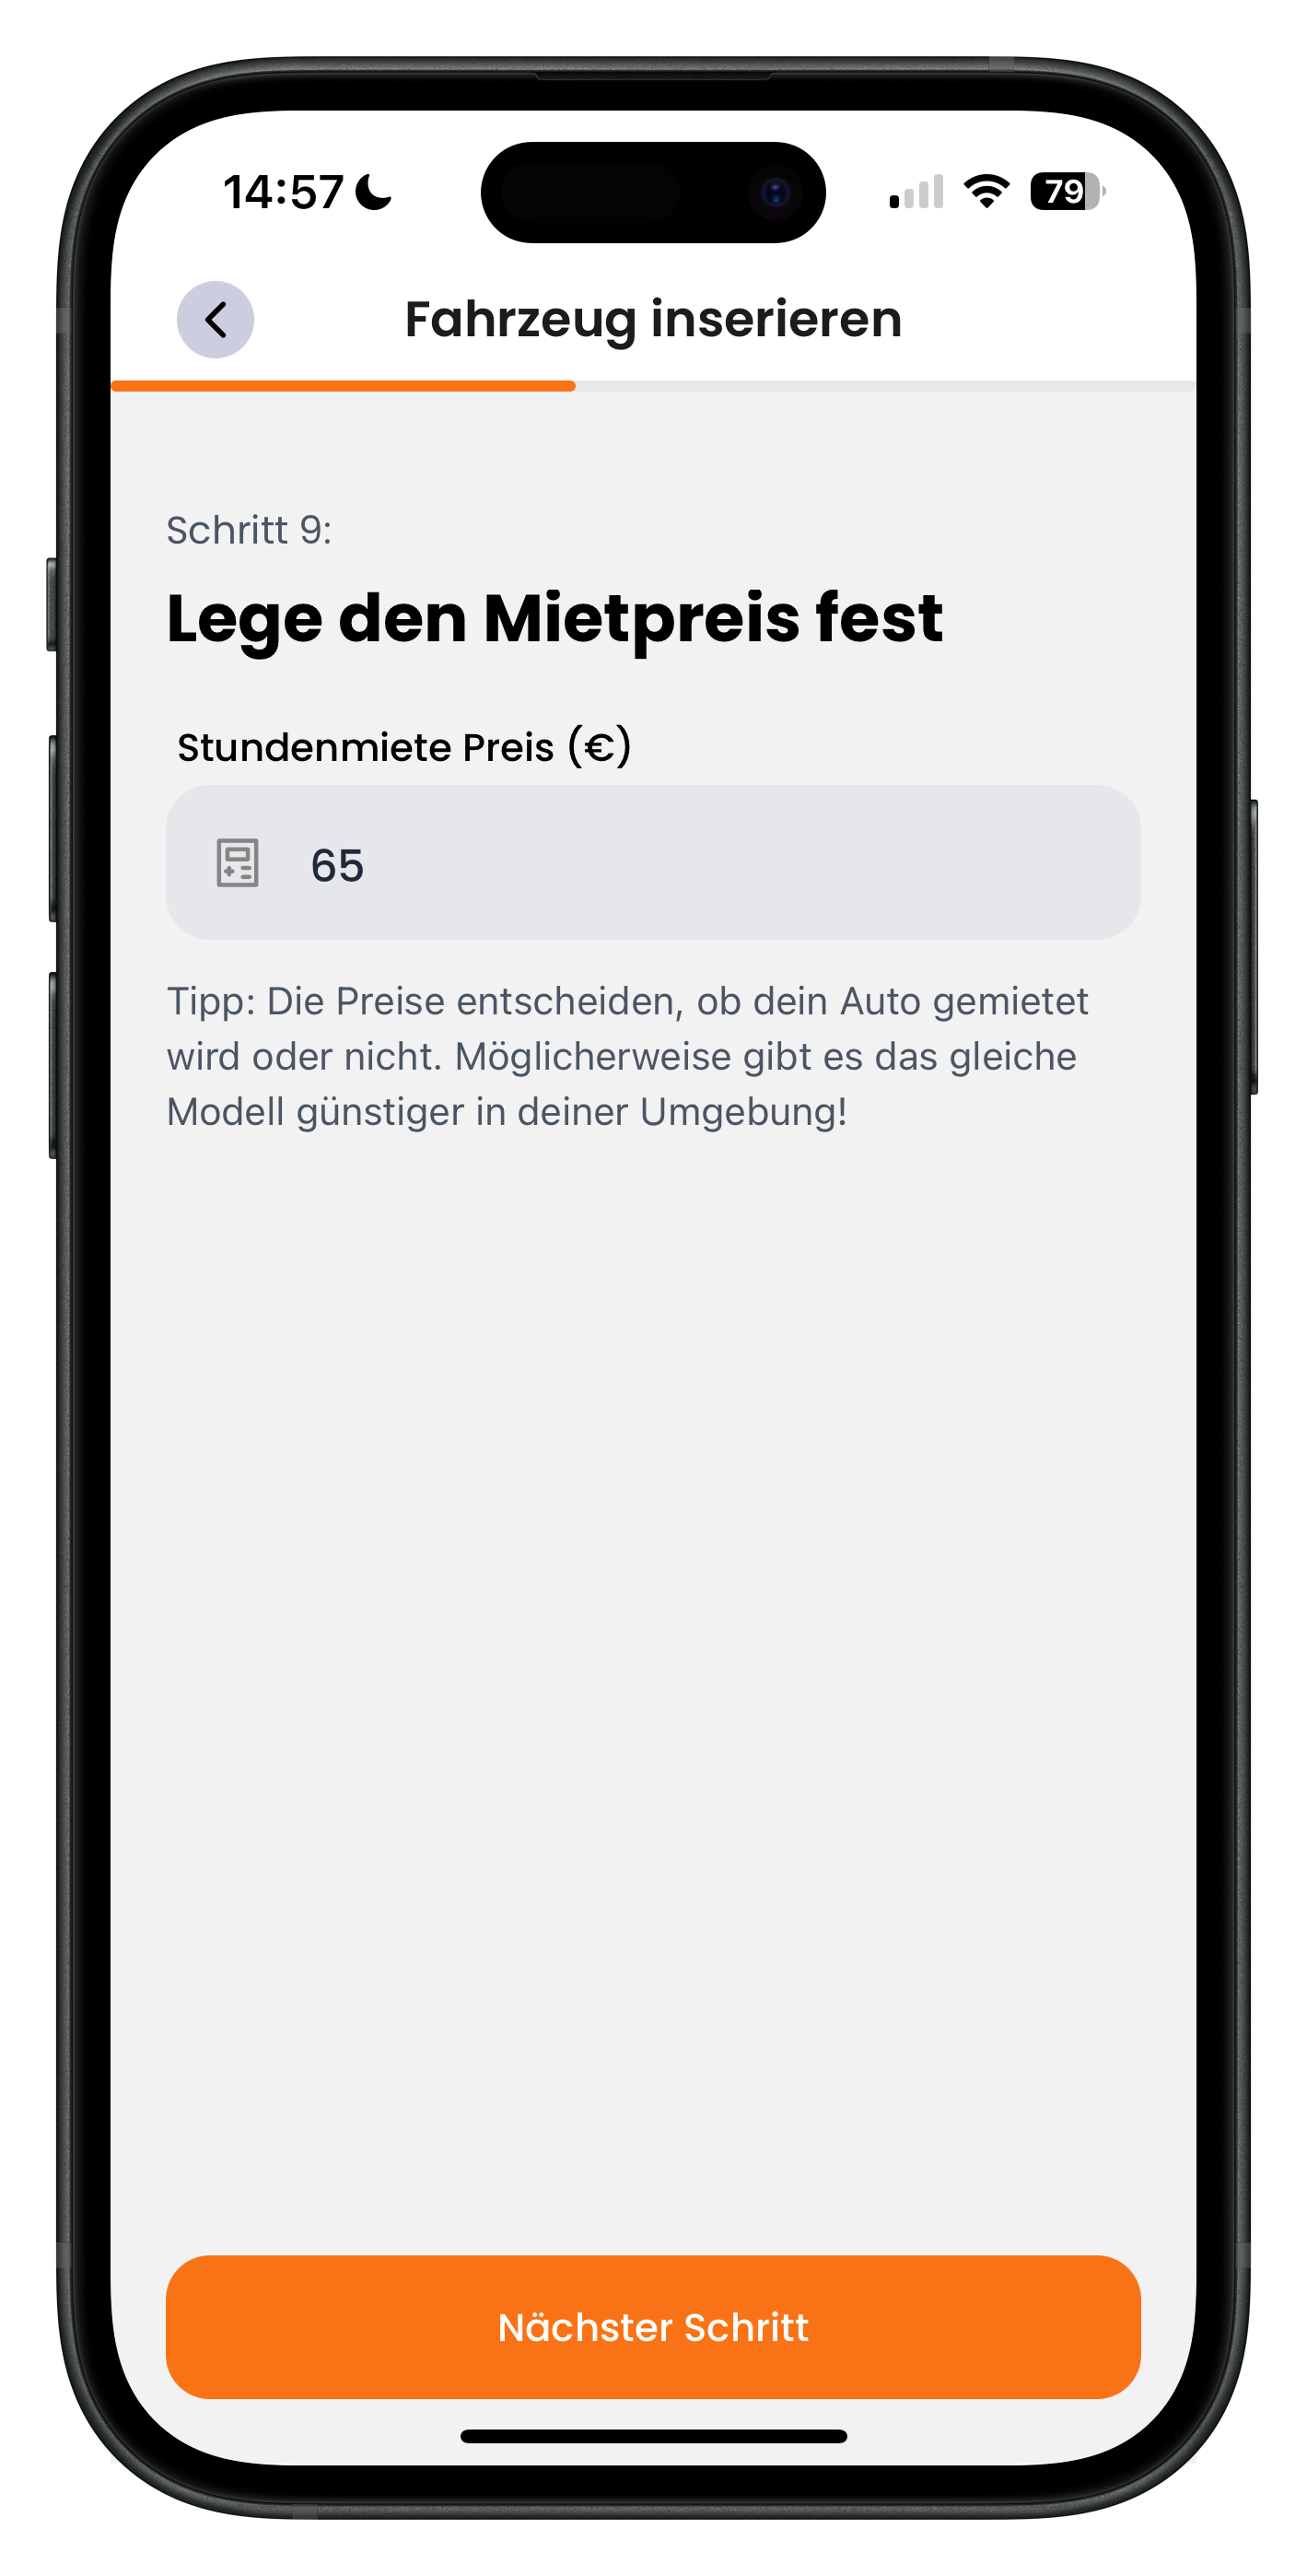
If you've enabled hourly rentals, enter your hourly rate in euros in the Hourly rate field under Set the rental rate — 65 in the example. Below that, a note reminds you that prices determine whether your car gets booked, and that the same model may be available more cheaply nearby. Then tap Next step.
- The hourly rate only applies to short bookings that are less than one full day
- Have a rough look at what others charge in your area to stay competitive
- Set it too high and you'll lose bookings; too low and you'll lose revenue
Deposit & conditions
17
Require a deposit: yes or no
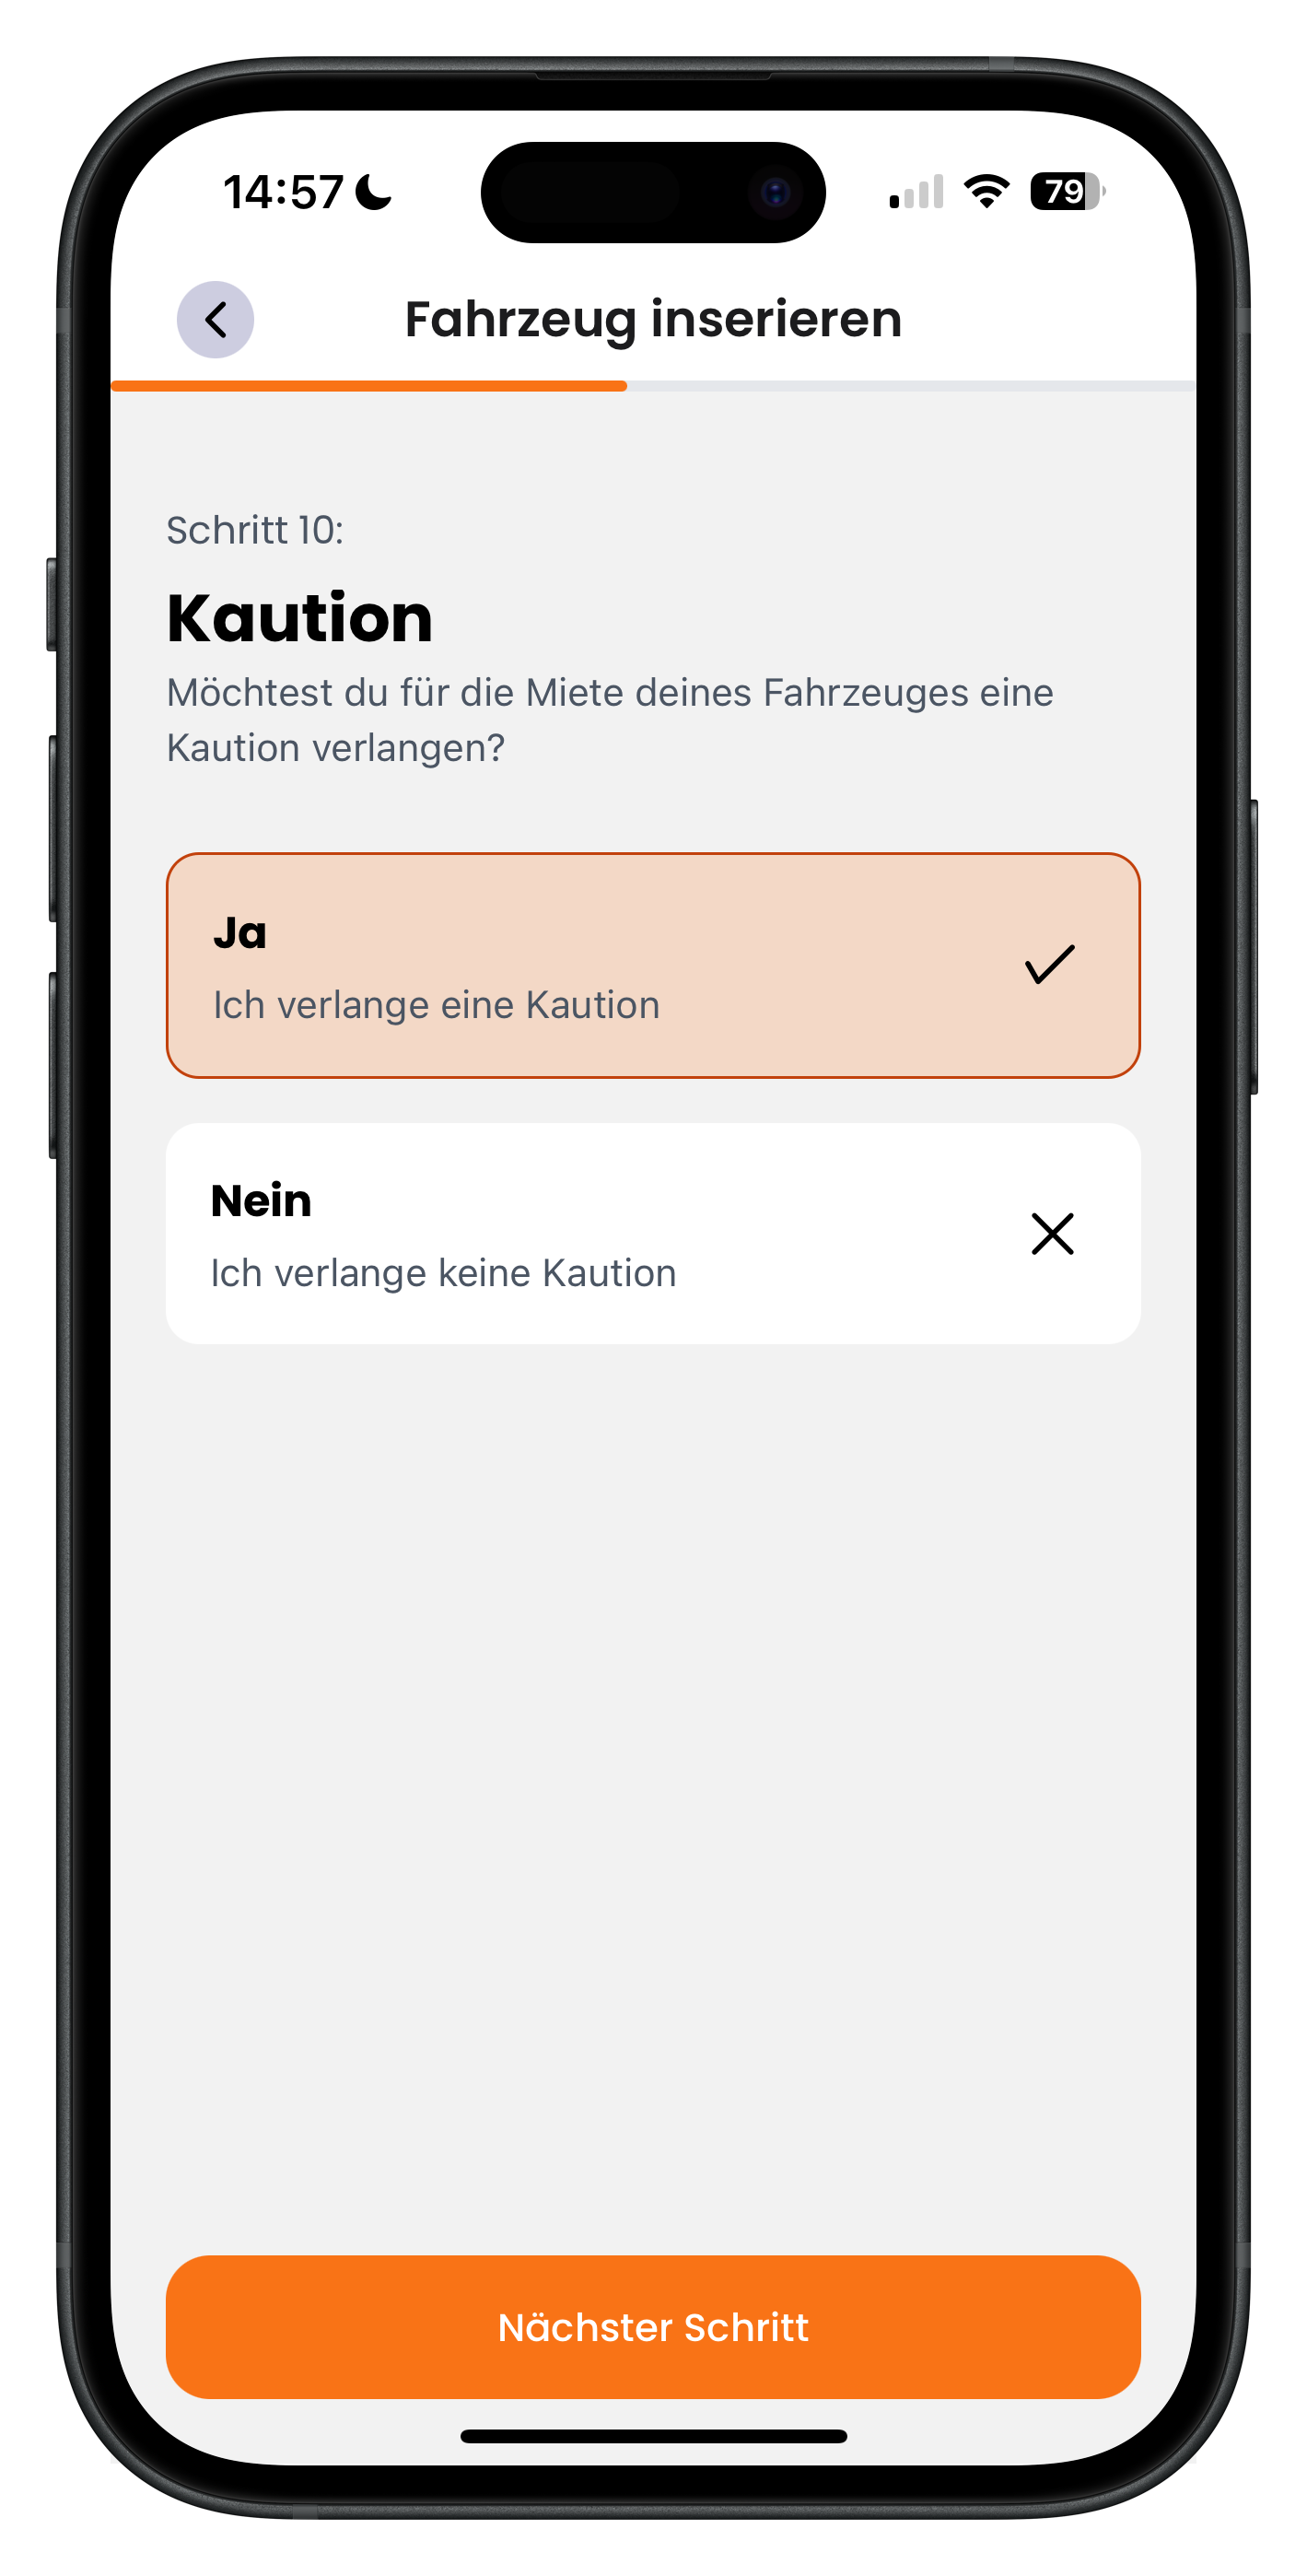
Under Deposit you decide whether you want to take a deposit for your vehicle. Choose Yes (I require a deposit) or No (I don't require a deposit). The active option is highlighted in orange. If you choose Yes, you'll move to the next screen where you set the amount. Then tap Next step.
- A deposit gives you security in case of damage
- Most hosts of high-value vehicles require a deposit
- Whether you ask for one is entirely your choice
18
Deposit amount, excess and vehicle as security
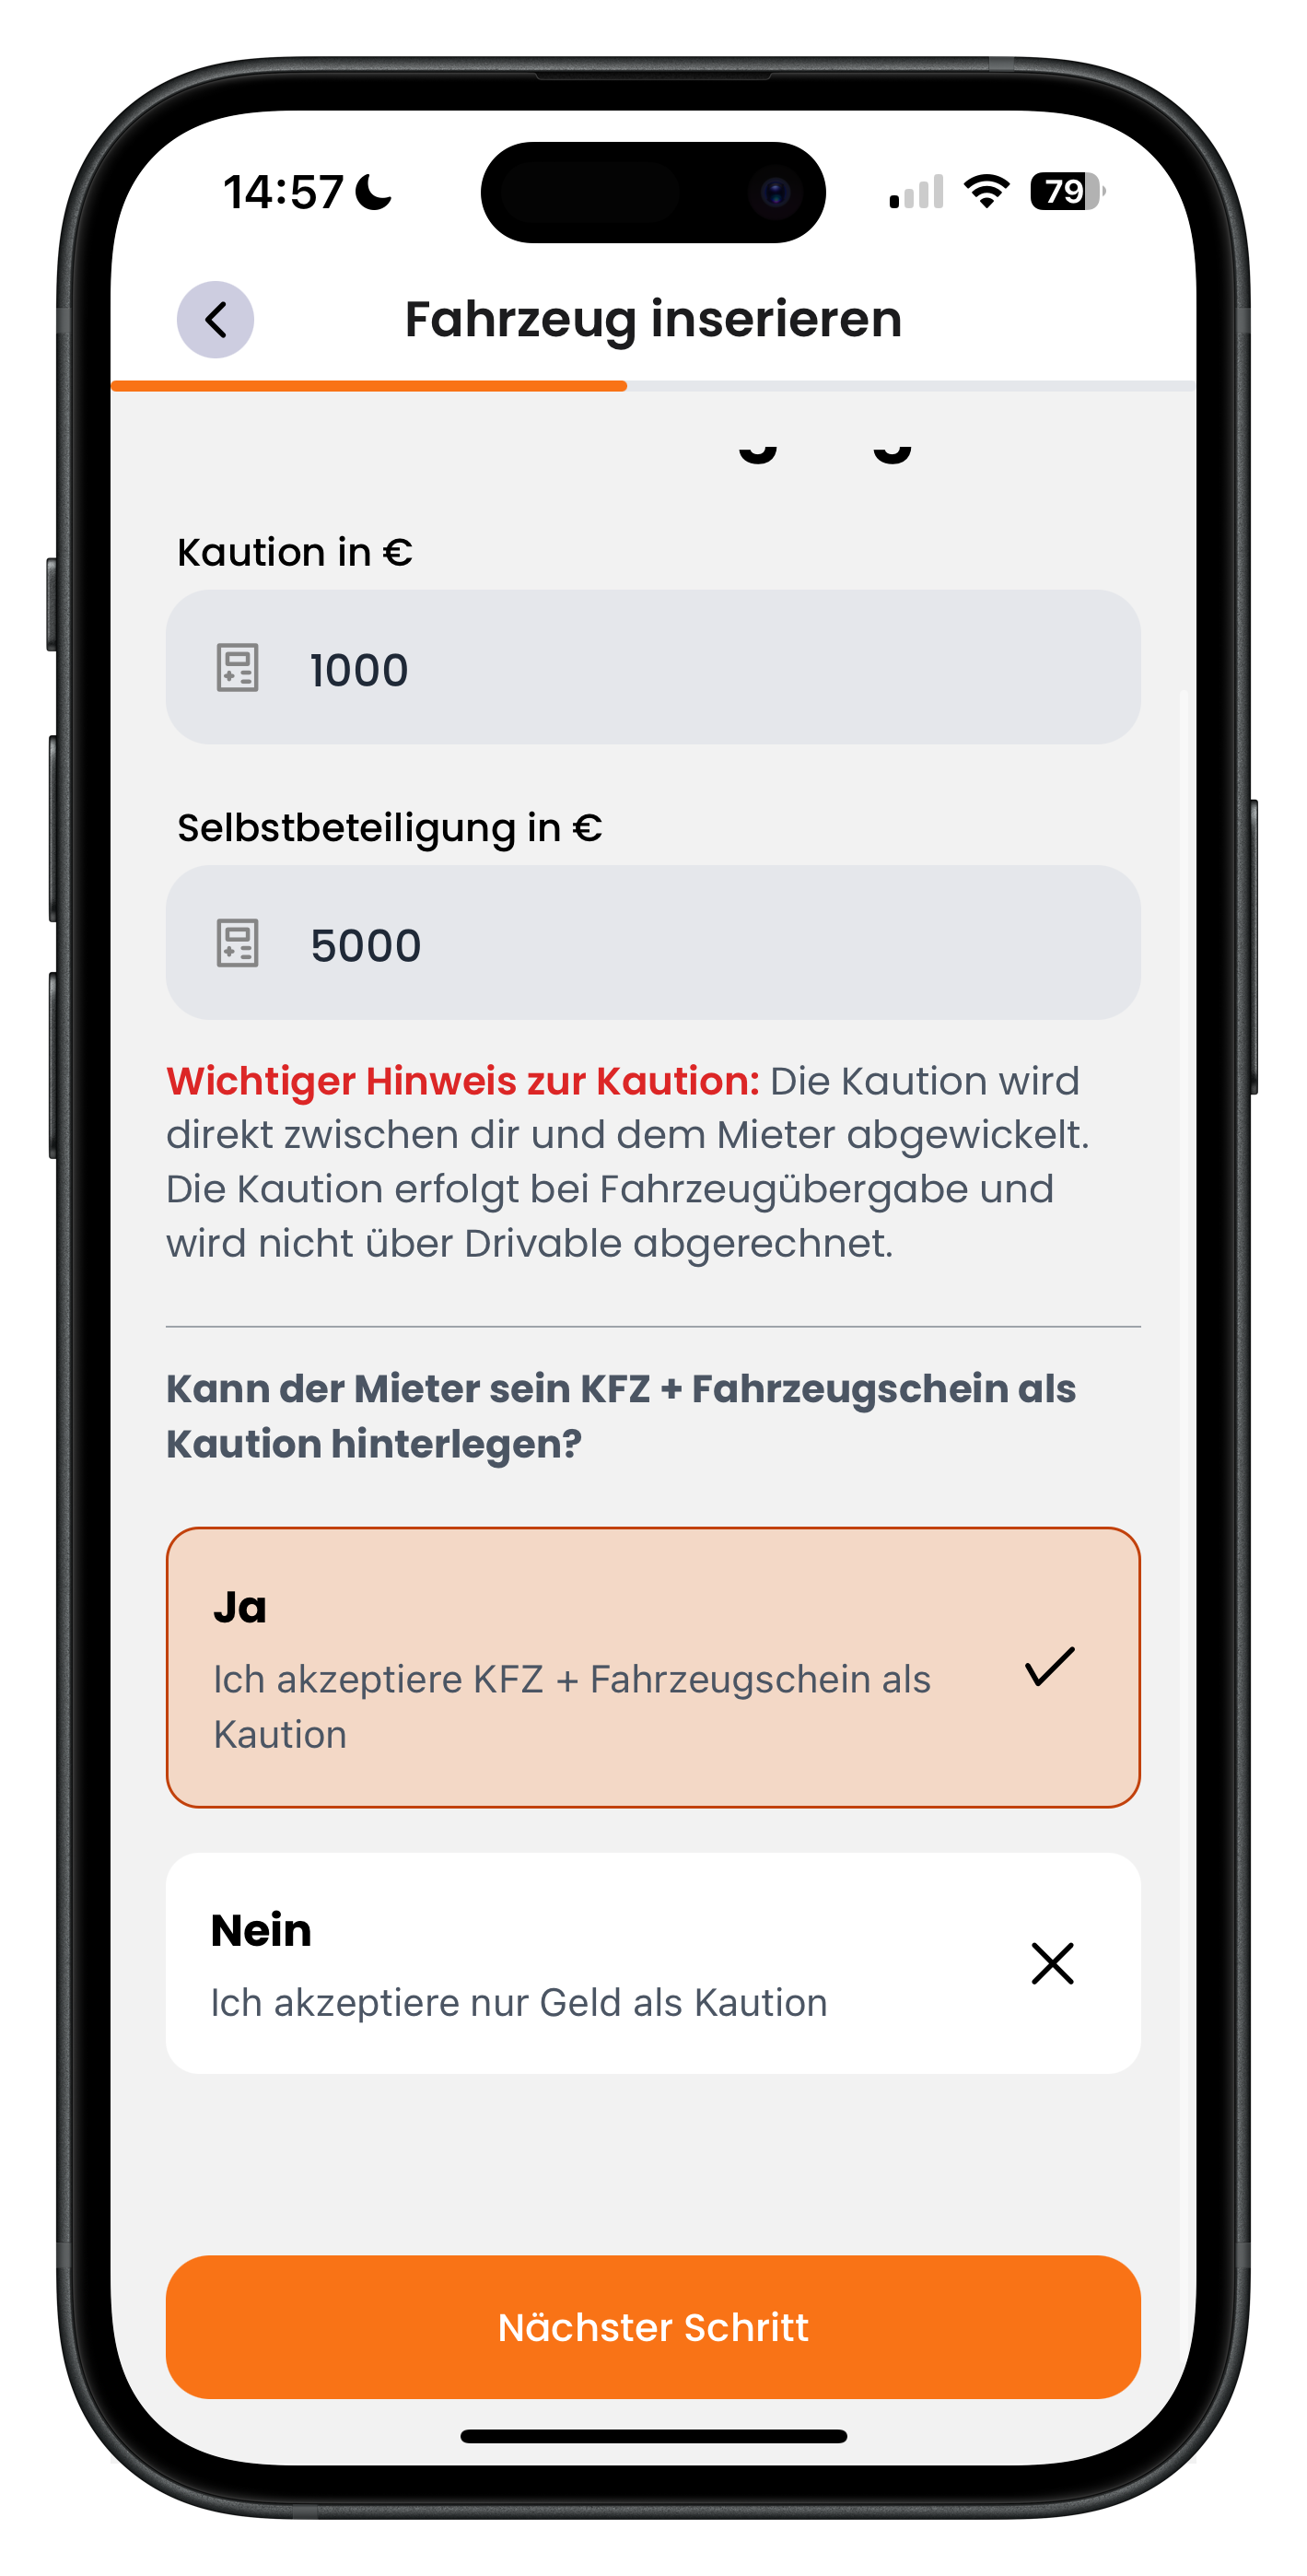
Here you set the details. In the Deposit in euros field, enter the deposit amount (1000 in the example), and in the Excess in euros field, enter your maximum excess (5000 in the example). Below that, a red note states: the deposit is handled directly between you and the renter at the vehicle handover and is not processed through Drivable. Finally, choose whether the renter may leave their own vehicle plus registration document as security: Yes (I accept a vehicle + registration document as deposit) or No (I only accept cash as deposit). Then tap Next step.
- The excess is the maximum amount the renter is liable for — they'll see this upfront
- The deposit is handled in person at the handover, not in the app
- Depending on your preference, you can accept cash, card or PayPal for the deposit on the day
To be clear: the renter pays the rental fee digitally in the app as soon as you accept their request. The deposit, on the other hand, is handled entirely in person between you and the renter and does not appear in Drivable's billing.
19
Set the minimum rental age
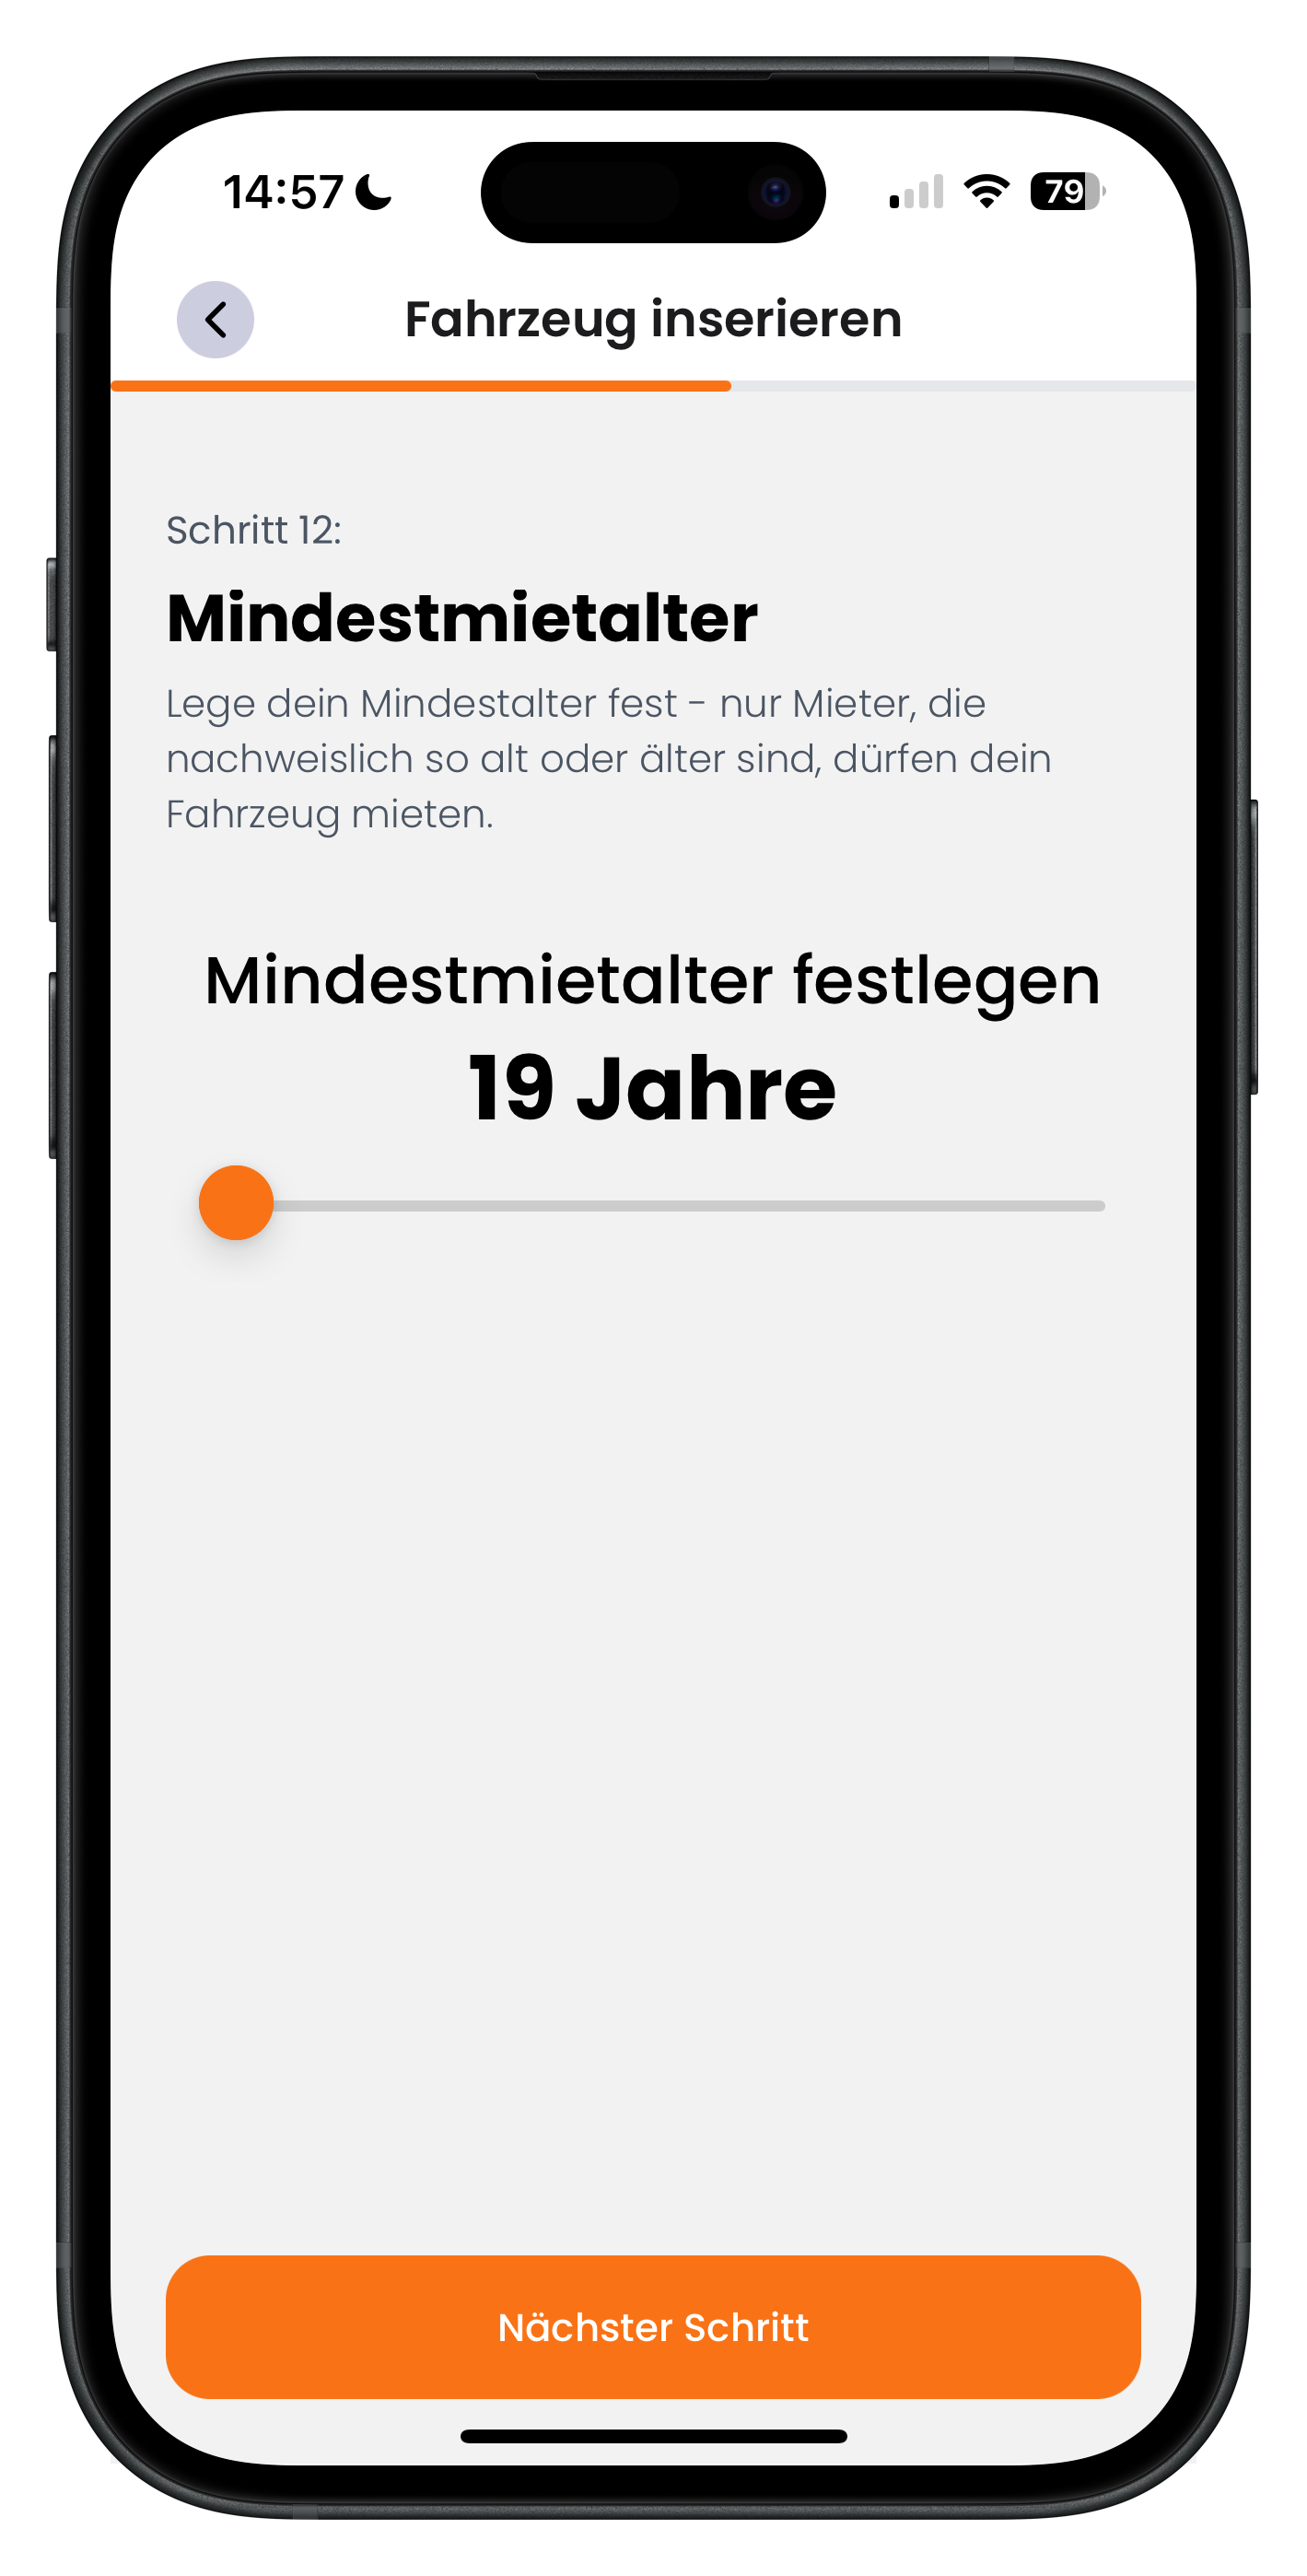
Under Minimum rental age you specify the minimum age a renter must be. Only renters who can verify they meet this age requirement can book your vehicle. Use the slider to set the value — 19 years in the example. Then tap Next step.
- Many hosts set a higher minimum age for more powerful vehicles
- Age is verified through the in-app verification process
- The selected value is displayed prominently above the slider
20
Set the minimum driving licence holding period
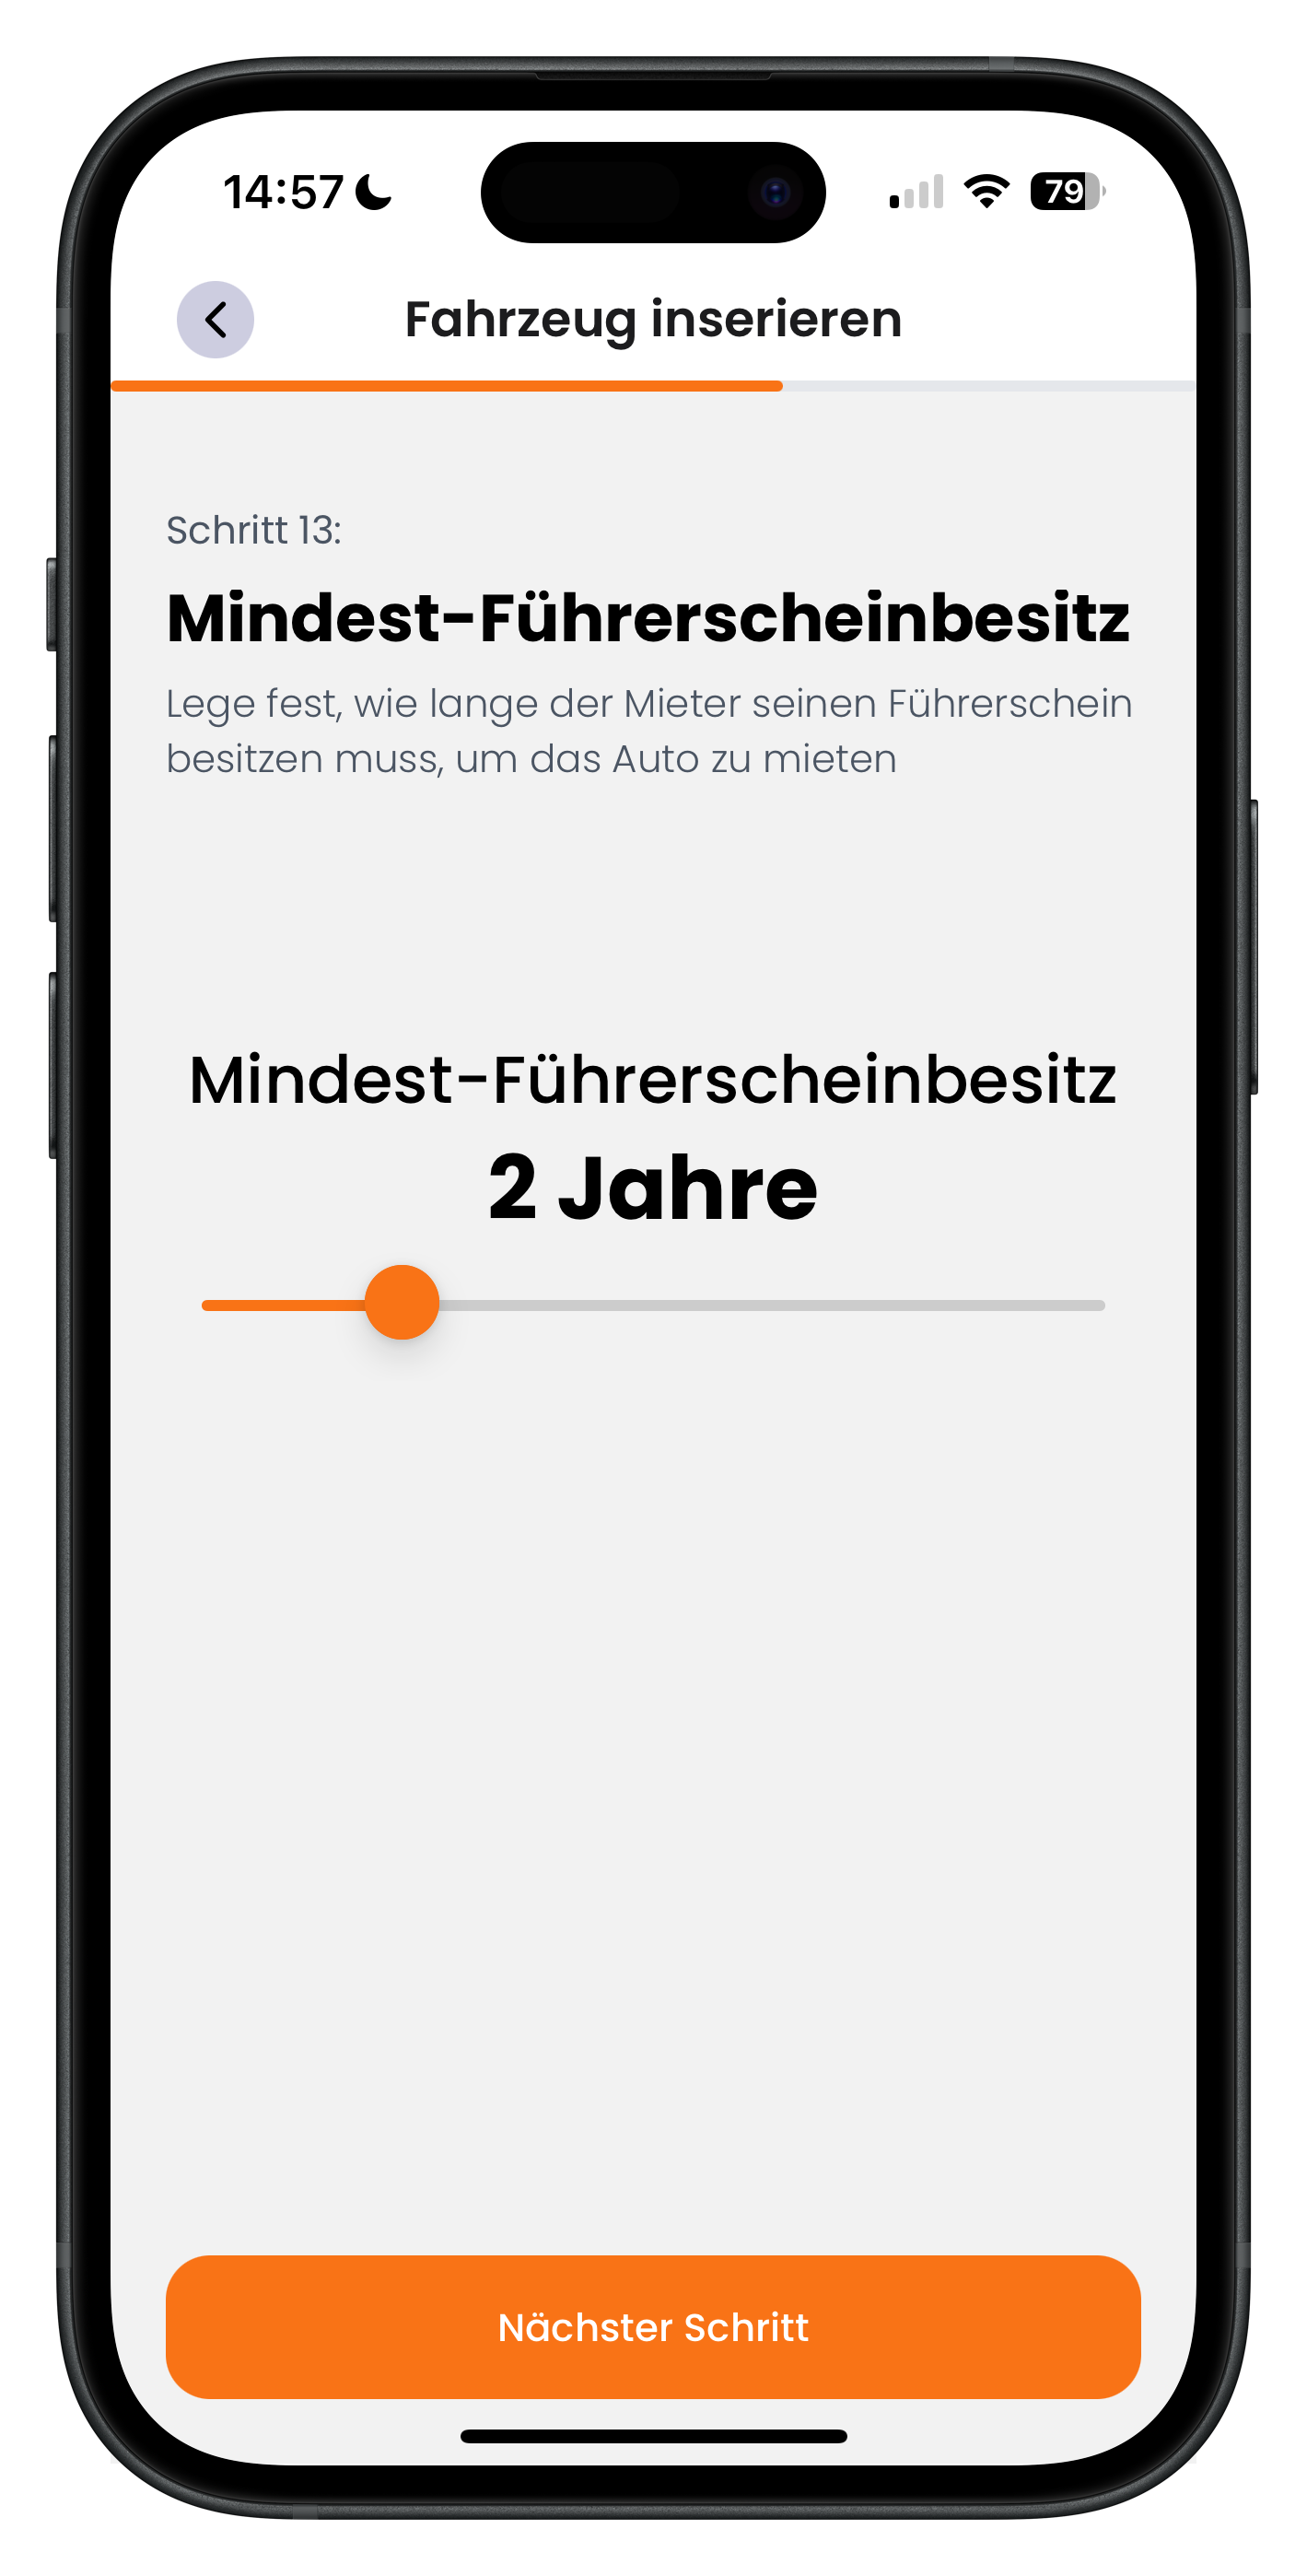
In the Minimum licence held step you specify how long a renter must have held their driving licence to rent the car. Set the value using the slider — 2 years in the example. Then tap Next step.
- This ensures your renters have sufficient driving experience
- Longer holding periods are common for supercars
- This requirement is also verified through the in-app process
21
Choose the fuel policy
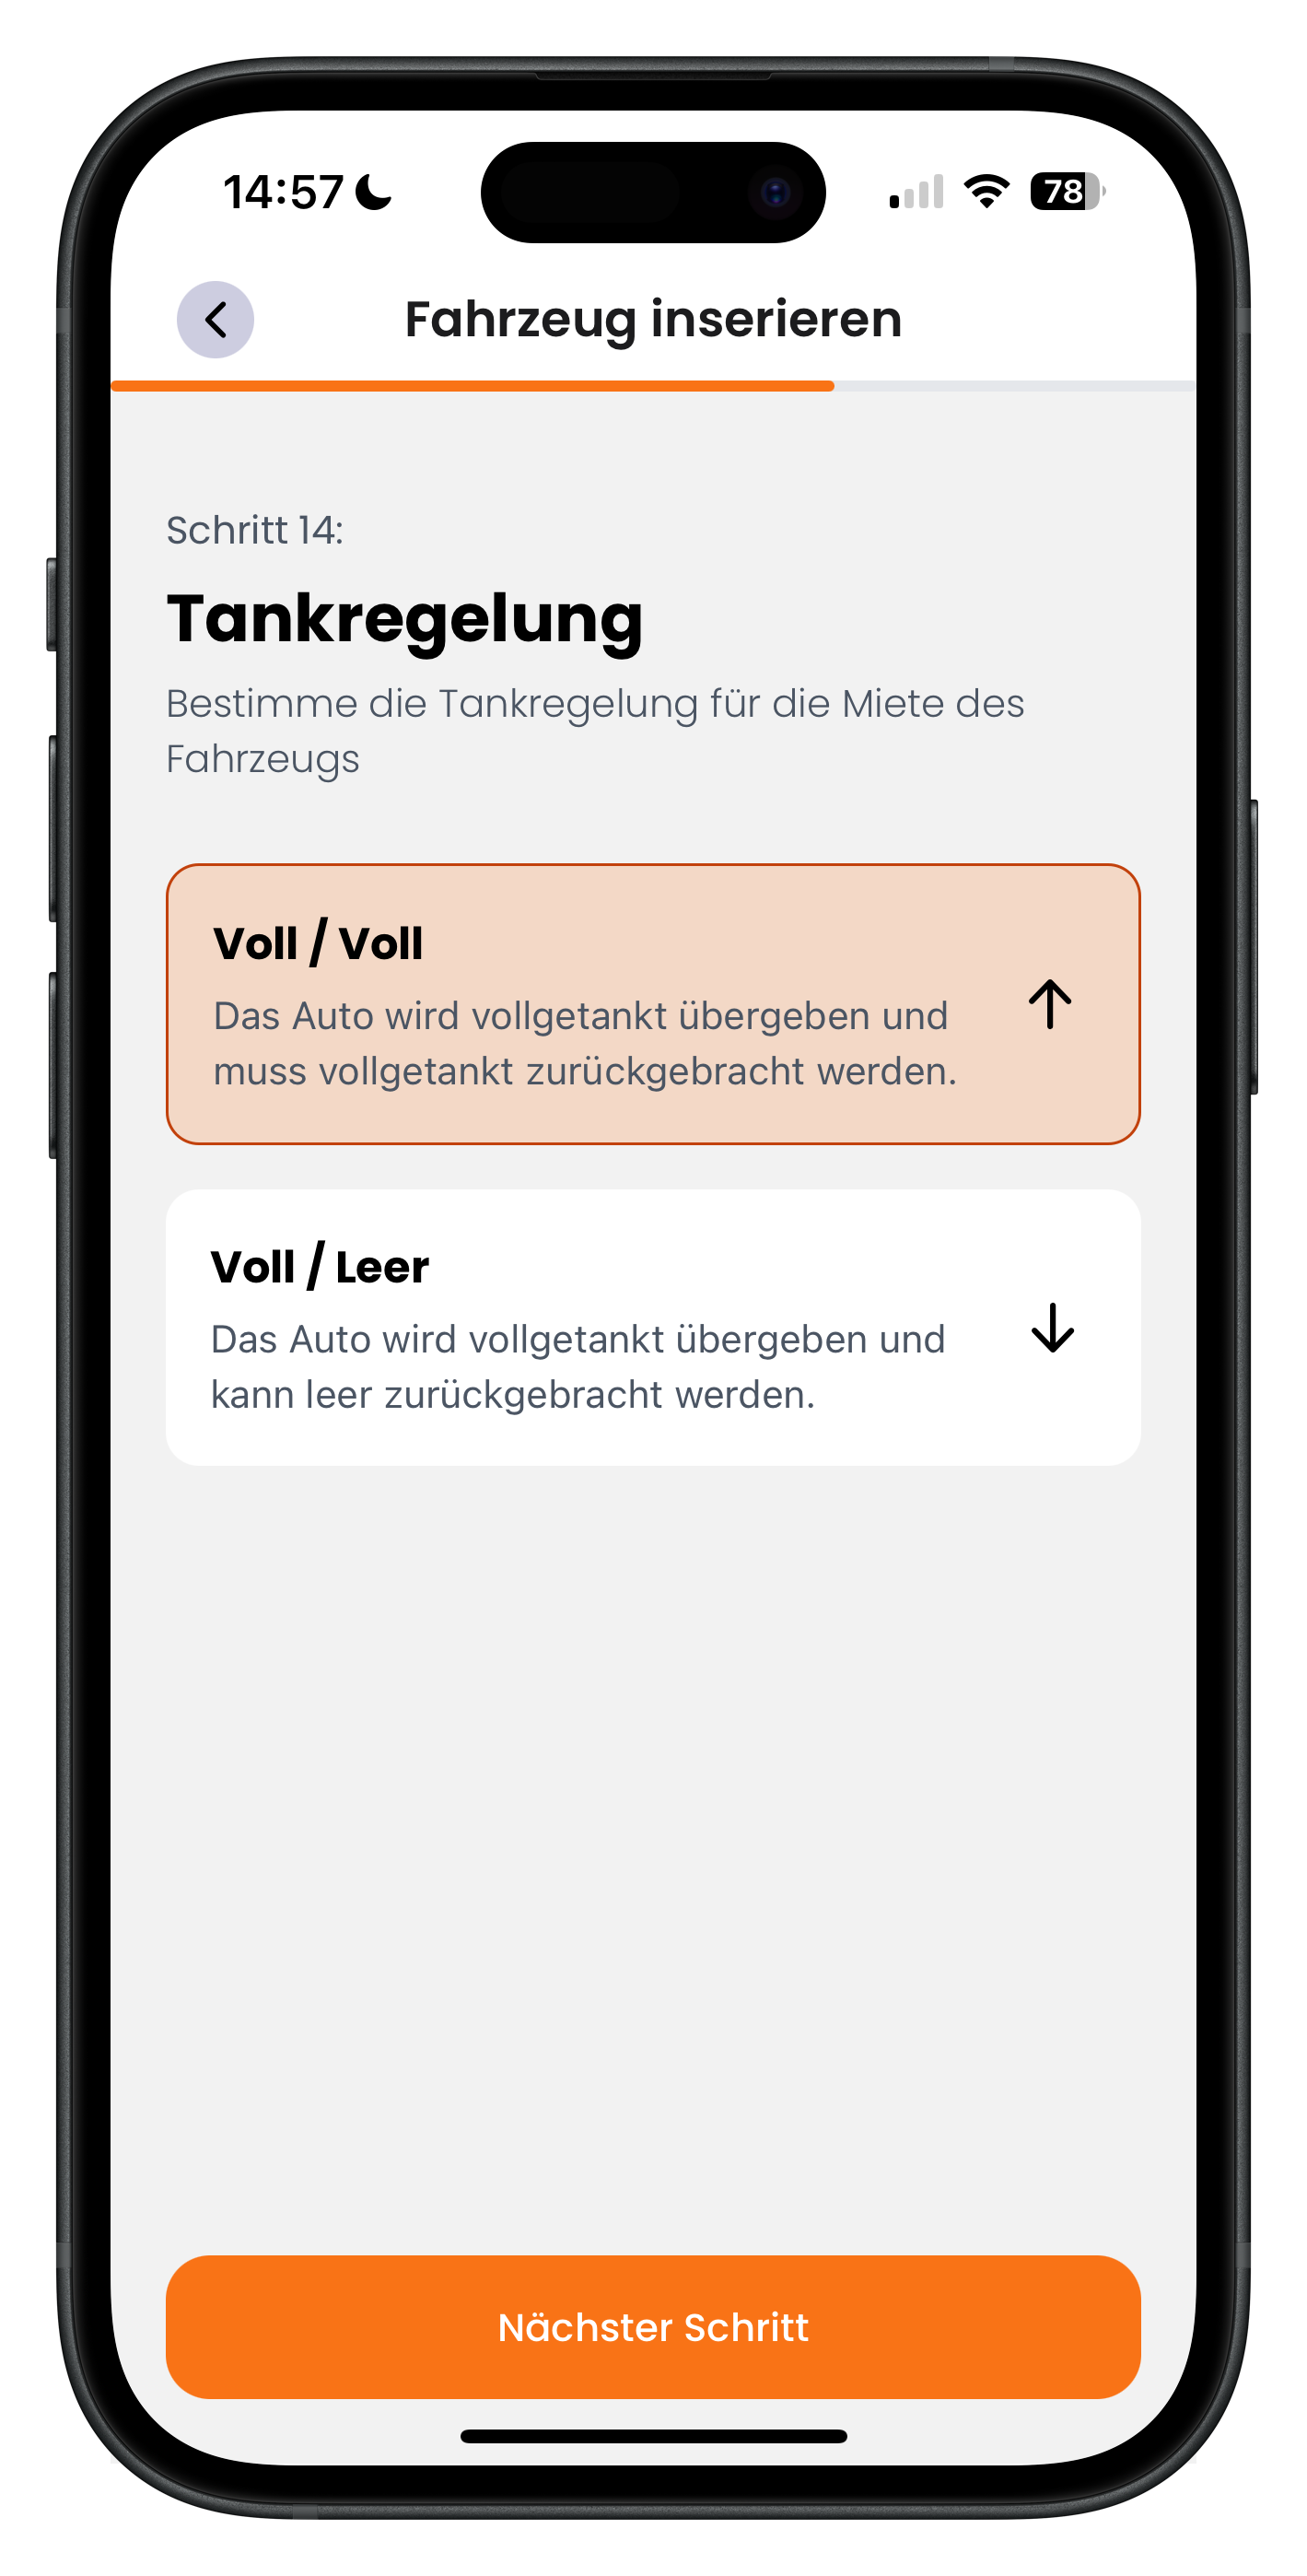
Under Fuel policy you decide how the car must be returned with regard to fuel. Full / Full means: the car is handed over with a full tank and must be returned with a full tank. Full / Empty means: the car is handed over full and can be returned empty. Tap the option that suits you — the active one turns orange — and go to Next step.
- Full/Full is the most common and fairest policy
- With Full/Empty, it's best to factor the fuel cost into your price
- A clear fuel policy prevents disputes at drop-off
22
Allow or restrict international travel
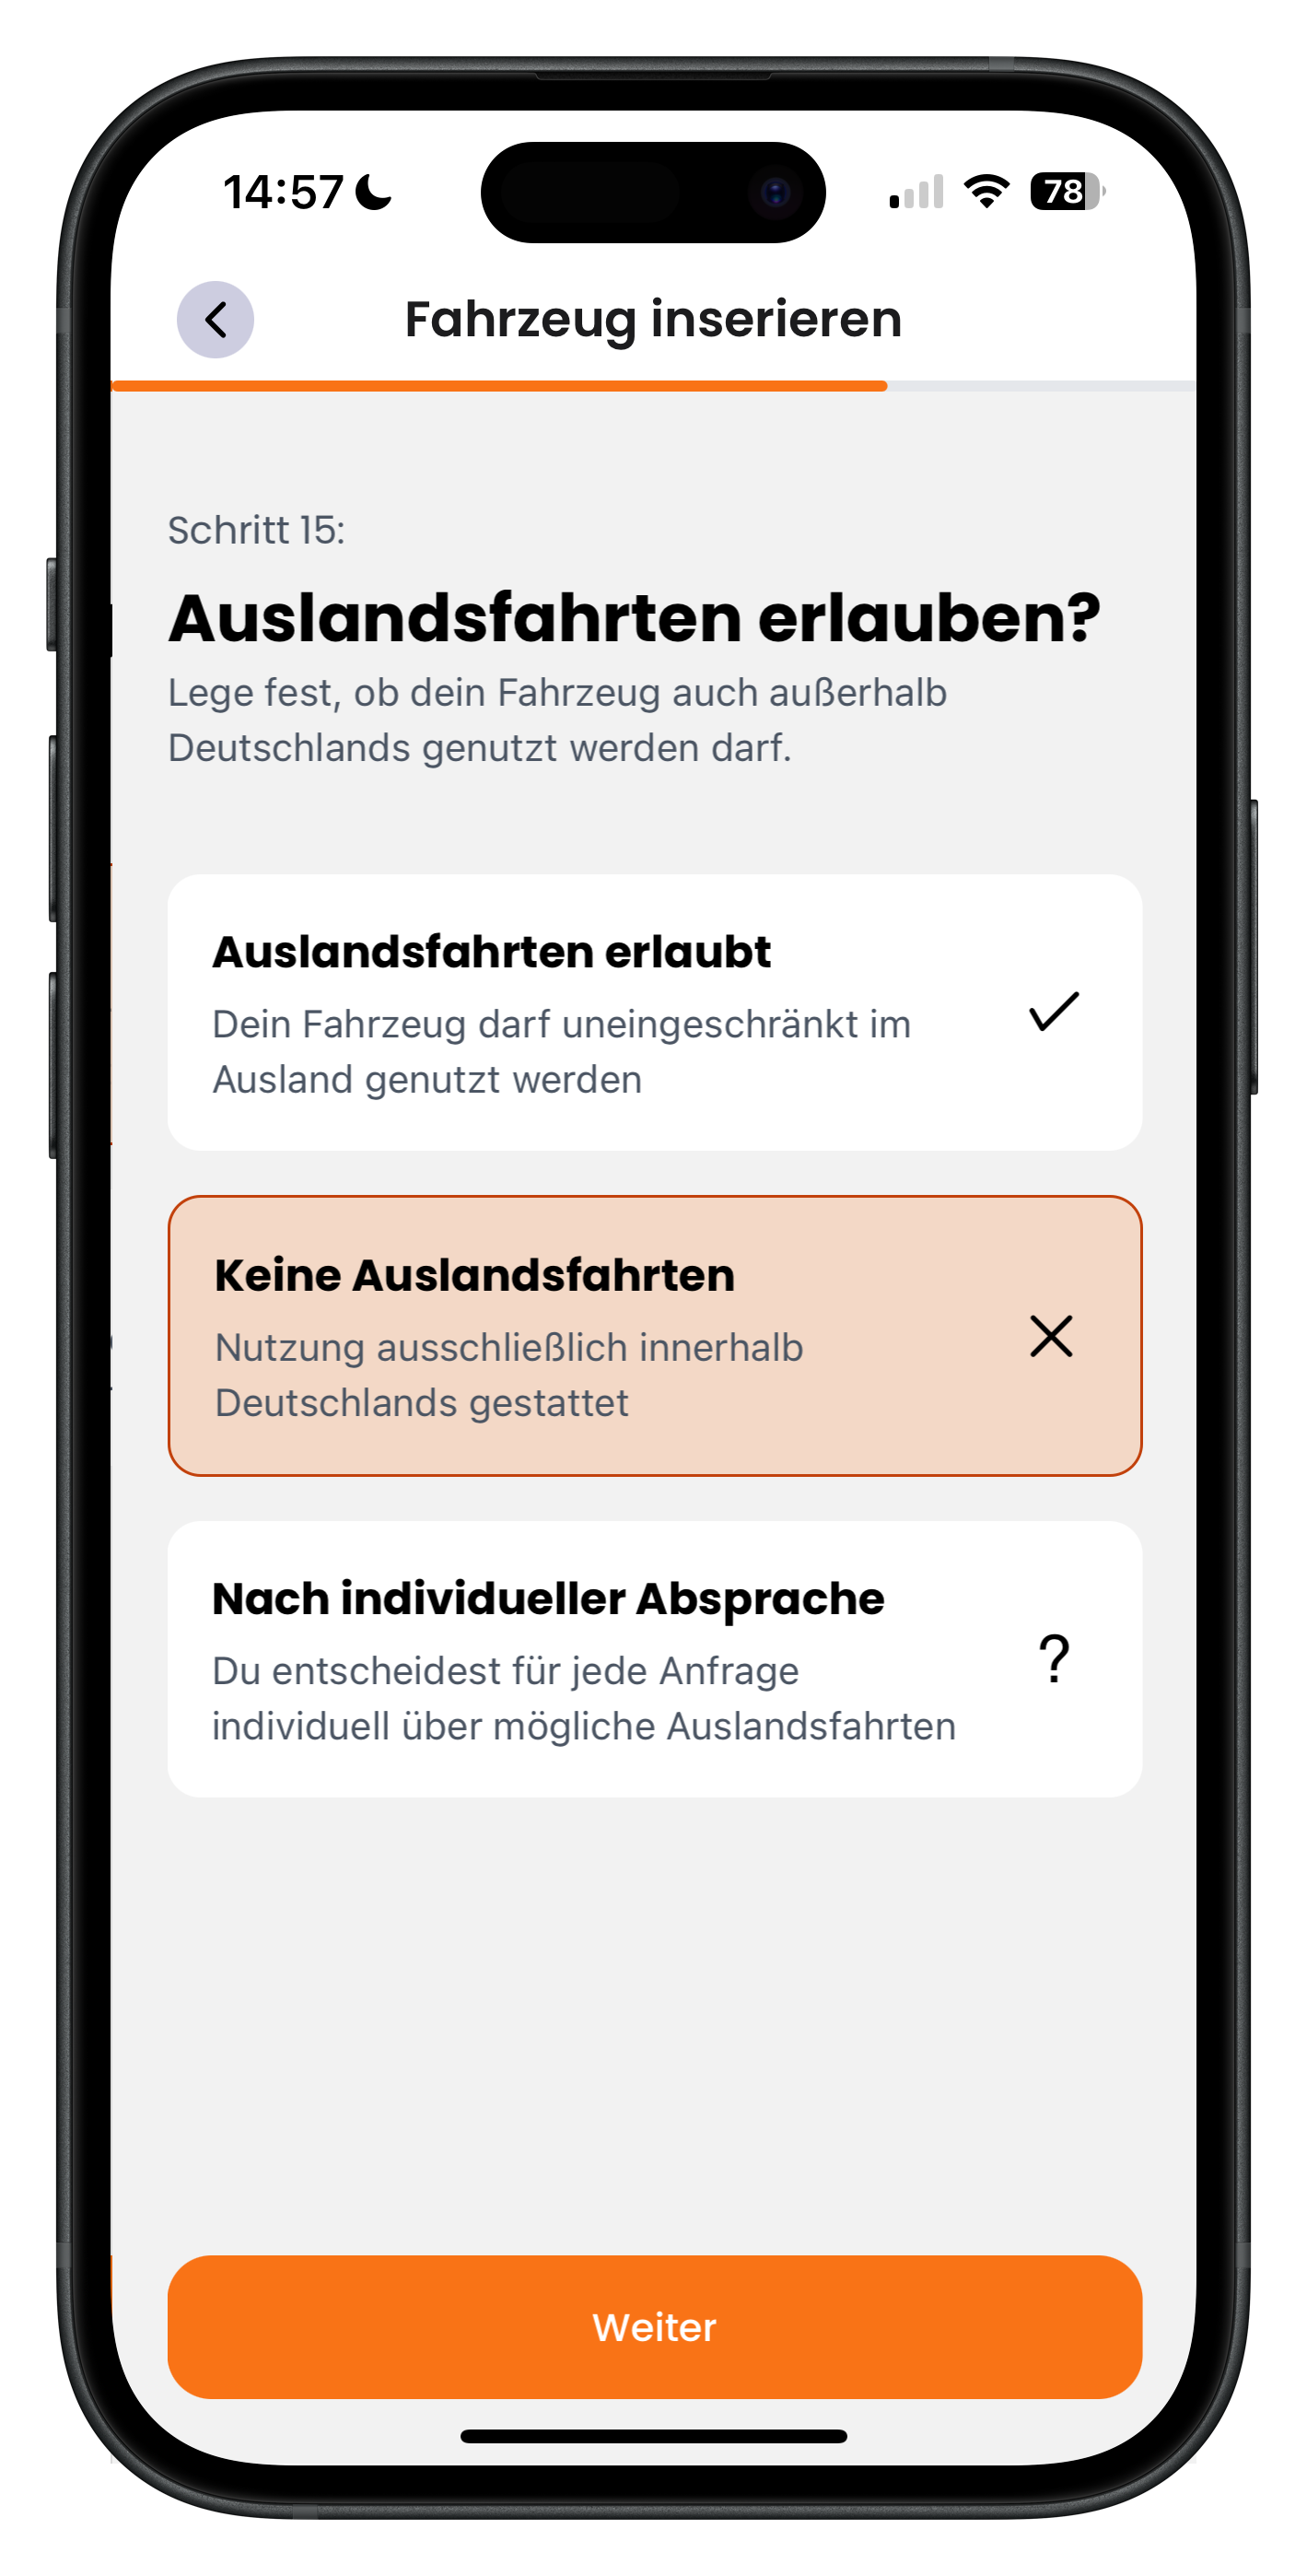
In the Allow international travel? step you decide whether your vehicle may be used outside Germany. There are three options: International travel permitted (unrestricted use abroad), No international travel (use within Germany only) and By individual arrangement (you decide on a case-by-case basis). Tap the right option and go to Continue.
- With individual arrangement, you sort out the details conveniently via the in-app chat
- No international travel gives you full control over where the vehicle is used
- The selected option is highlighted in orange
23
Set the minimum rental period
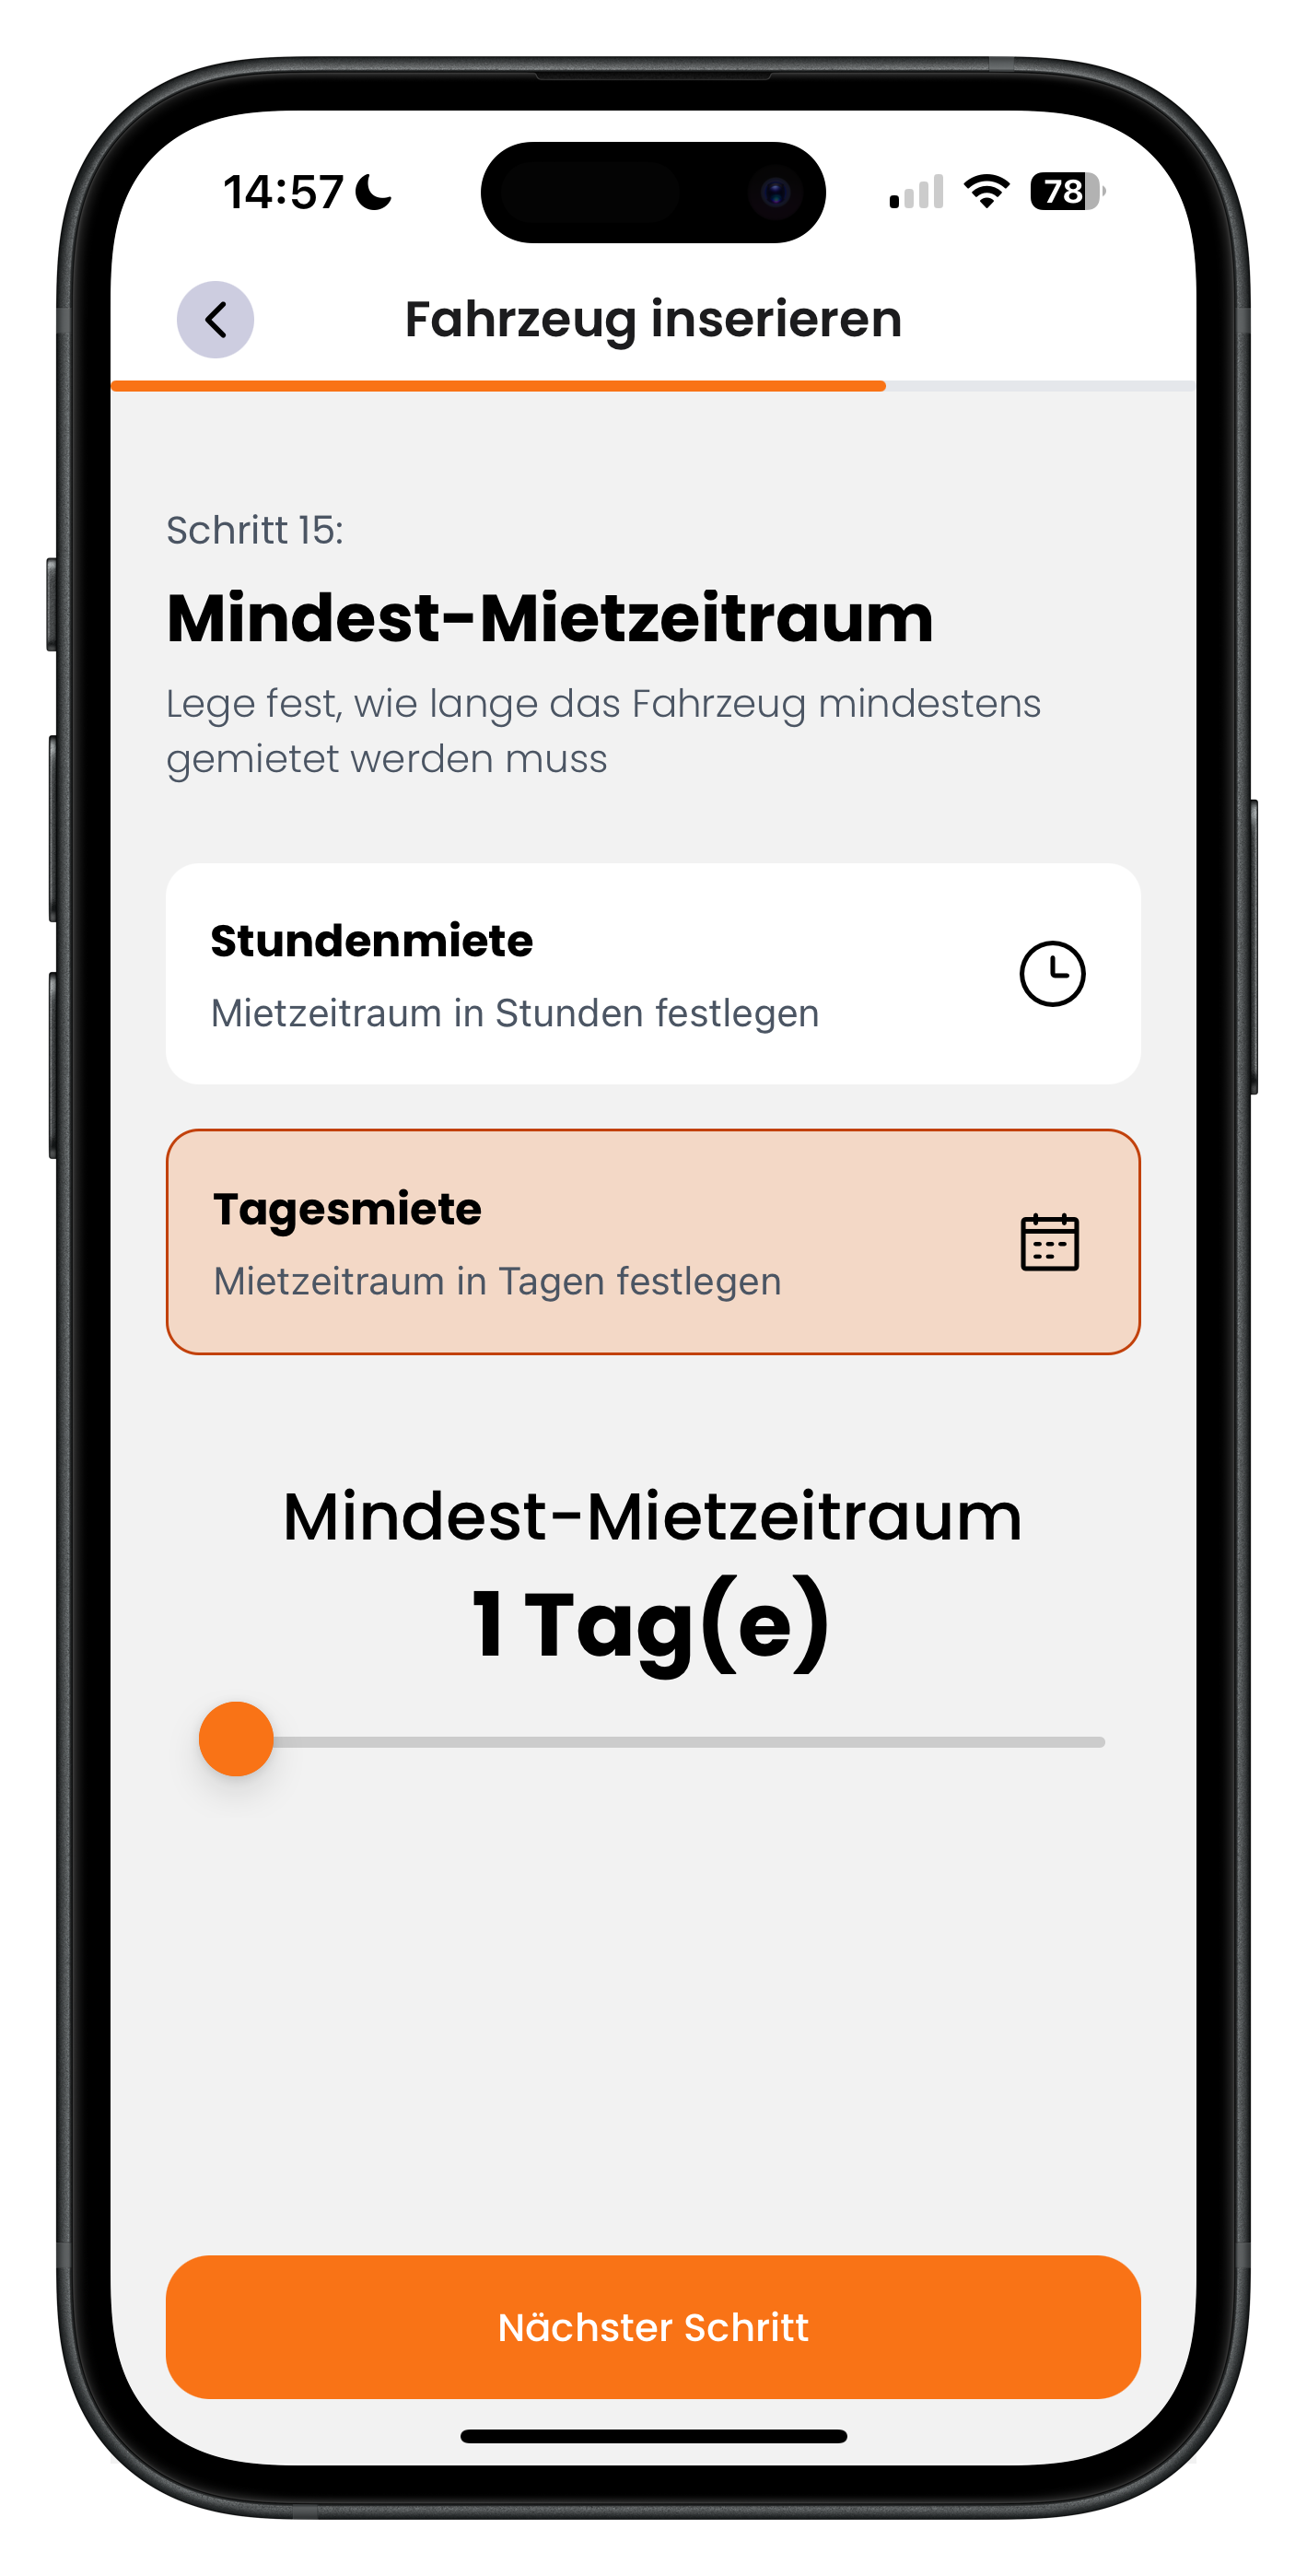
Under Minimum rental period you specify how long the vehicle must be rented for at a minimum. At the top, choose between Hourly rental (period in hours) and Daily rental (period in days). Below that, use the slider to set the minimum — 1 day in the example. Some hosts, for instance, won't rent out a car for fewer than 7 days. Then tap Next step.
- A higher minimum period reduces short, high-effort bookings
- For hourly rentals, set the minimum number of hours here
- The active option — hours or days — is highlighted in orange
24
Included mileage per day and per hour
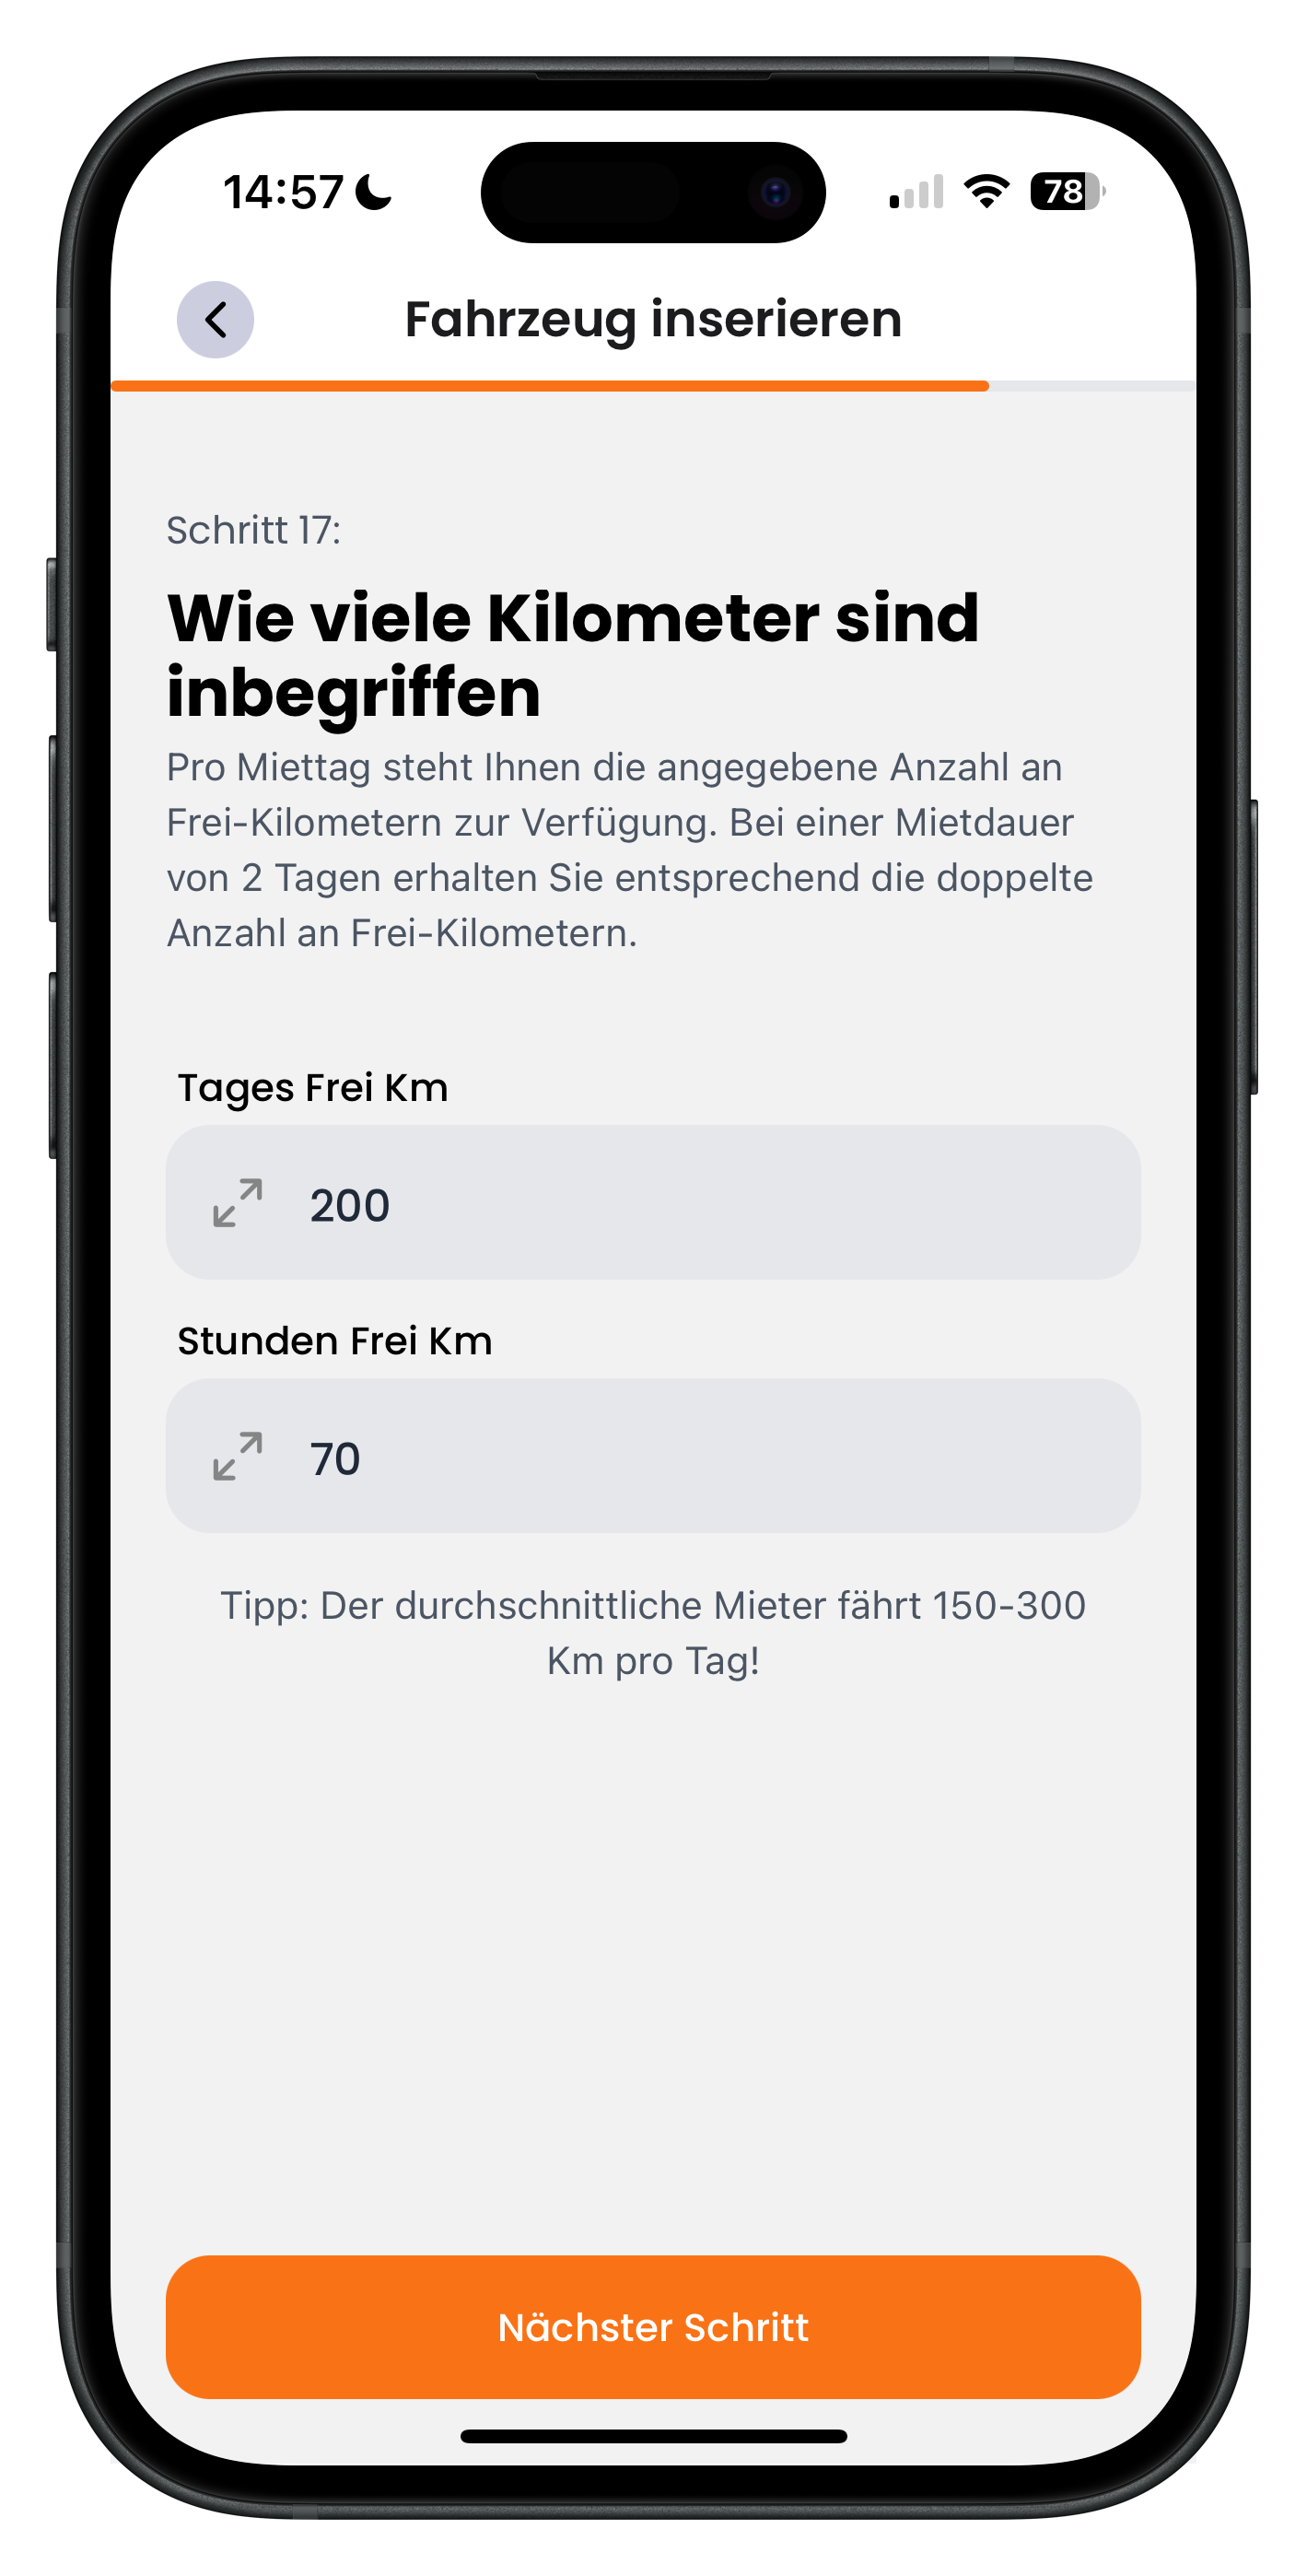
In the How many kilometres are included step you set the included mileage. In the Daily included km field, enter the kilometres per rental day (200 in the example); in the Hourly included km field, the kilometres per hour (70 in the example). The included mileage scales with the rental duration — for two days, renters get double the allowance. The on-screen note cites 150 to 300 km per day as the average. Then tap Next step.
- The included mileage automatically multiplies with the rental duration
- Too few included kilometres puts renters off; too many eats into your earnings
- According to the on-screen note, the average renter drives 150 to 300 km per day
25
Configure mileage packages as upsells
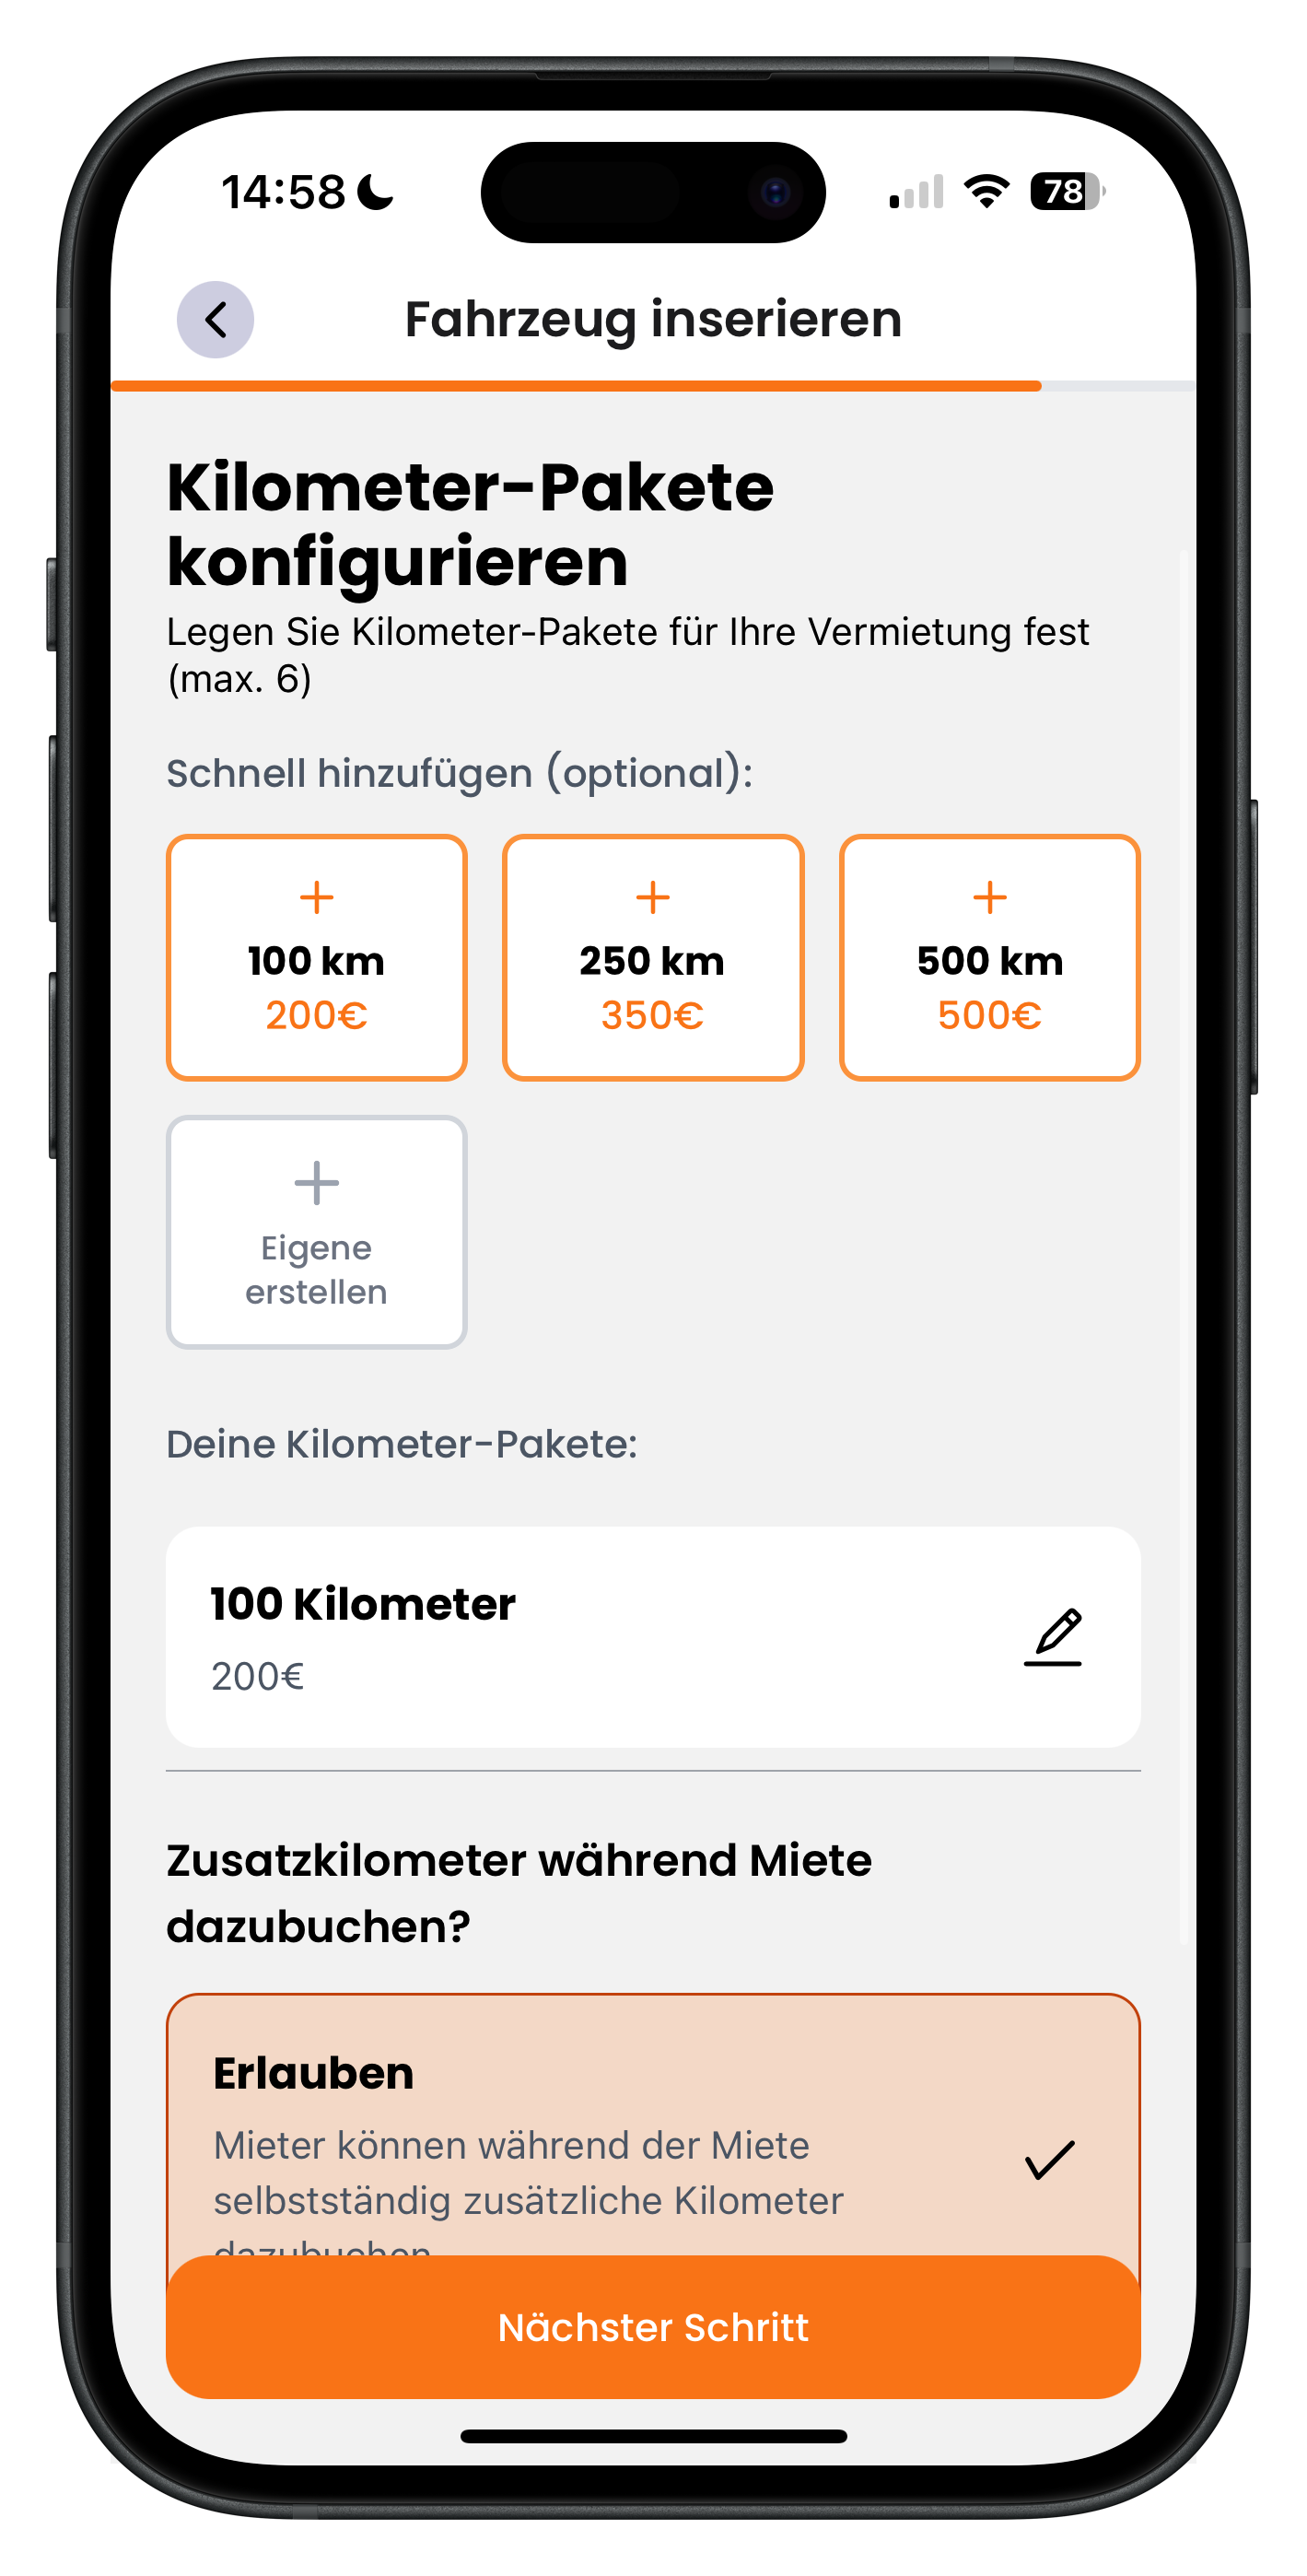
Under Configure mileage packages you can create up to six packages that renters can add to their booking. Via Quick add there are suggestions like 100 km for 200 euros, 250 km for 350 euros or 500 km for 500 euros, or tap Create custom. Your packages appear under Your mileage packages. Below that, you can choose whether renters are allowed to add extra kilometres themselves during the rental. This is a powerful revenue lever: renters scroll past it when making a request and will happily add it if the deal looks good. Then tap Next step.
- Nearly half of all Drivable bookings include extras or packages
- Attractive pricing noticeably increases the add-on booking rate
- Allowing self-service add-ons also takes pressure off you during the rental
Mileage packages and extras are your simplest revenue lever. Nearly 50% of all Drivable bookings include extras, because renters scroll past them when making a request anyway. Add one or two attractive packages and they'll often just throw them in.
Description, cancellation & extras
26
Write your listing title and description
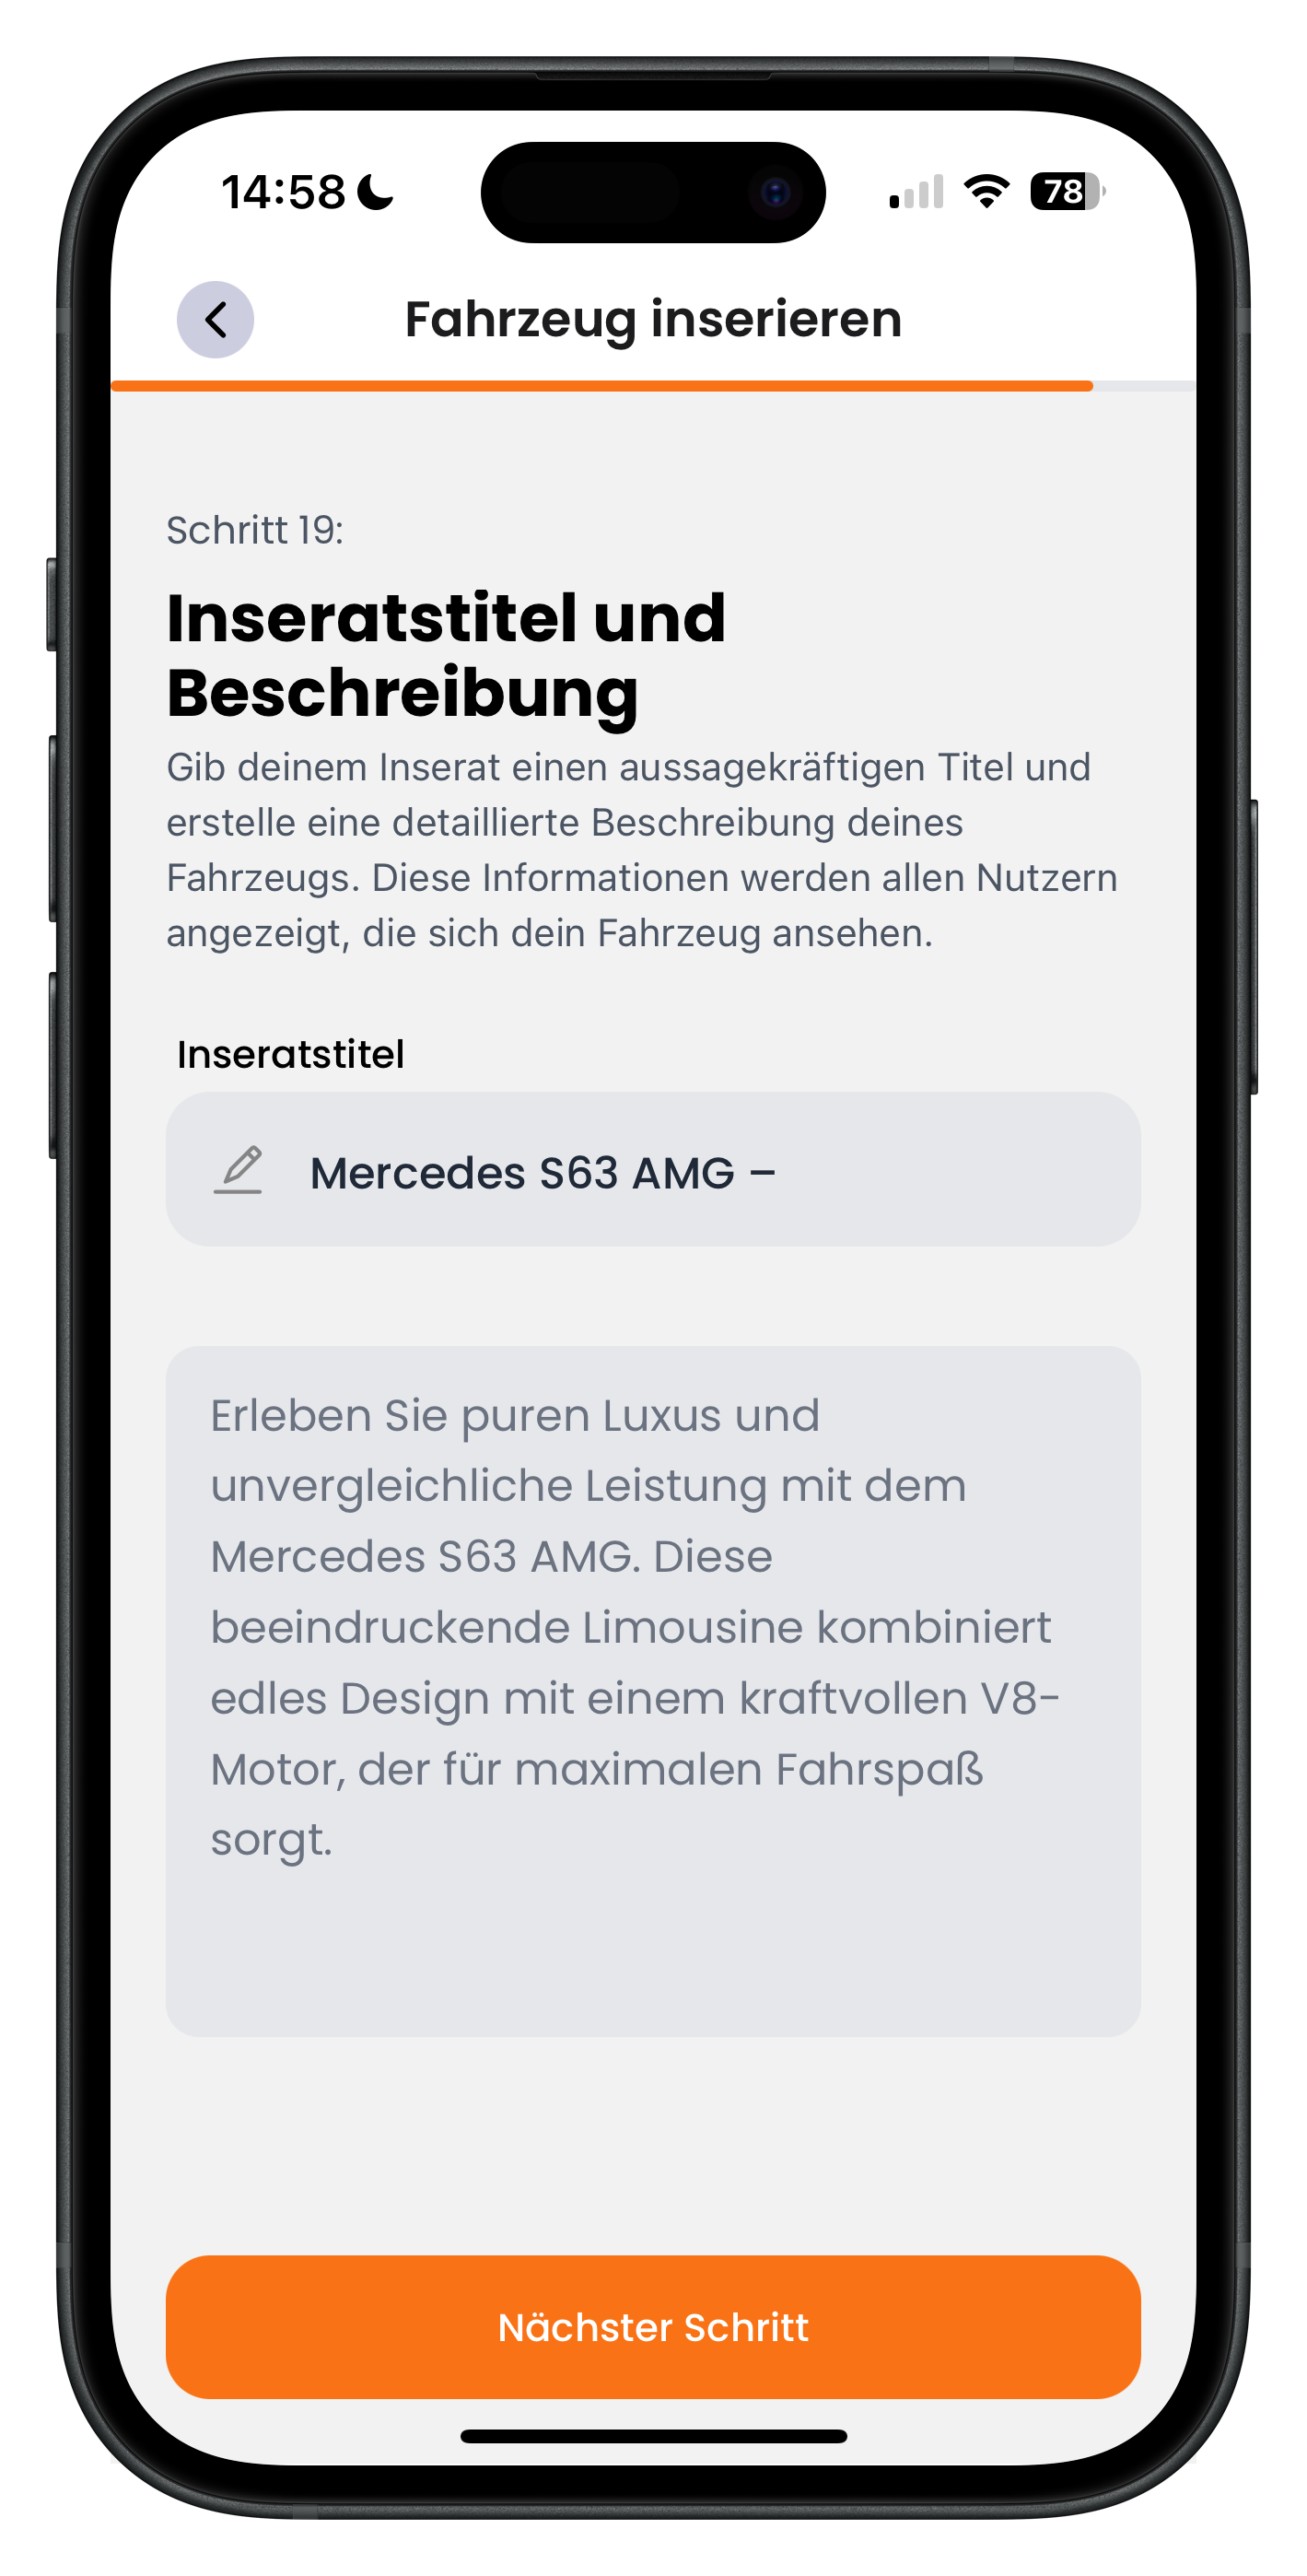
Under Listing title and description you give your listing a clear title and a description. The Listing title field shows Mercedes S63 AMG as an example, and the large text area contains a description about the refined look, the powerful V8 and the driving experience. Everyone who views your vehicle will see this information. Write a clean title with the make and model, and a short, engaging description. Then tap Next step.
- Keep the title clear: include make and model — it also helps with search
- The description can be emotive, but keep it concise and specific
- Highlight what the car is perfect for — a wedding, a road trip or a photo shoot
27
Activate cancellation terms
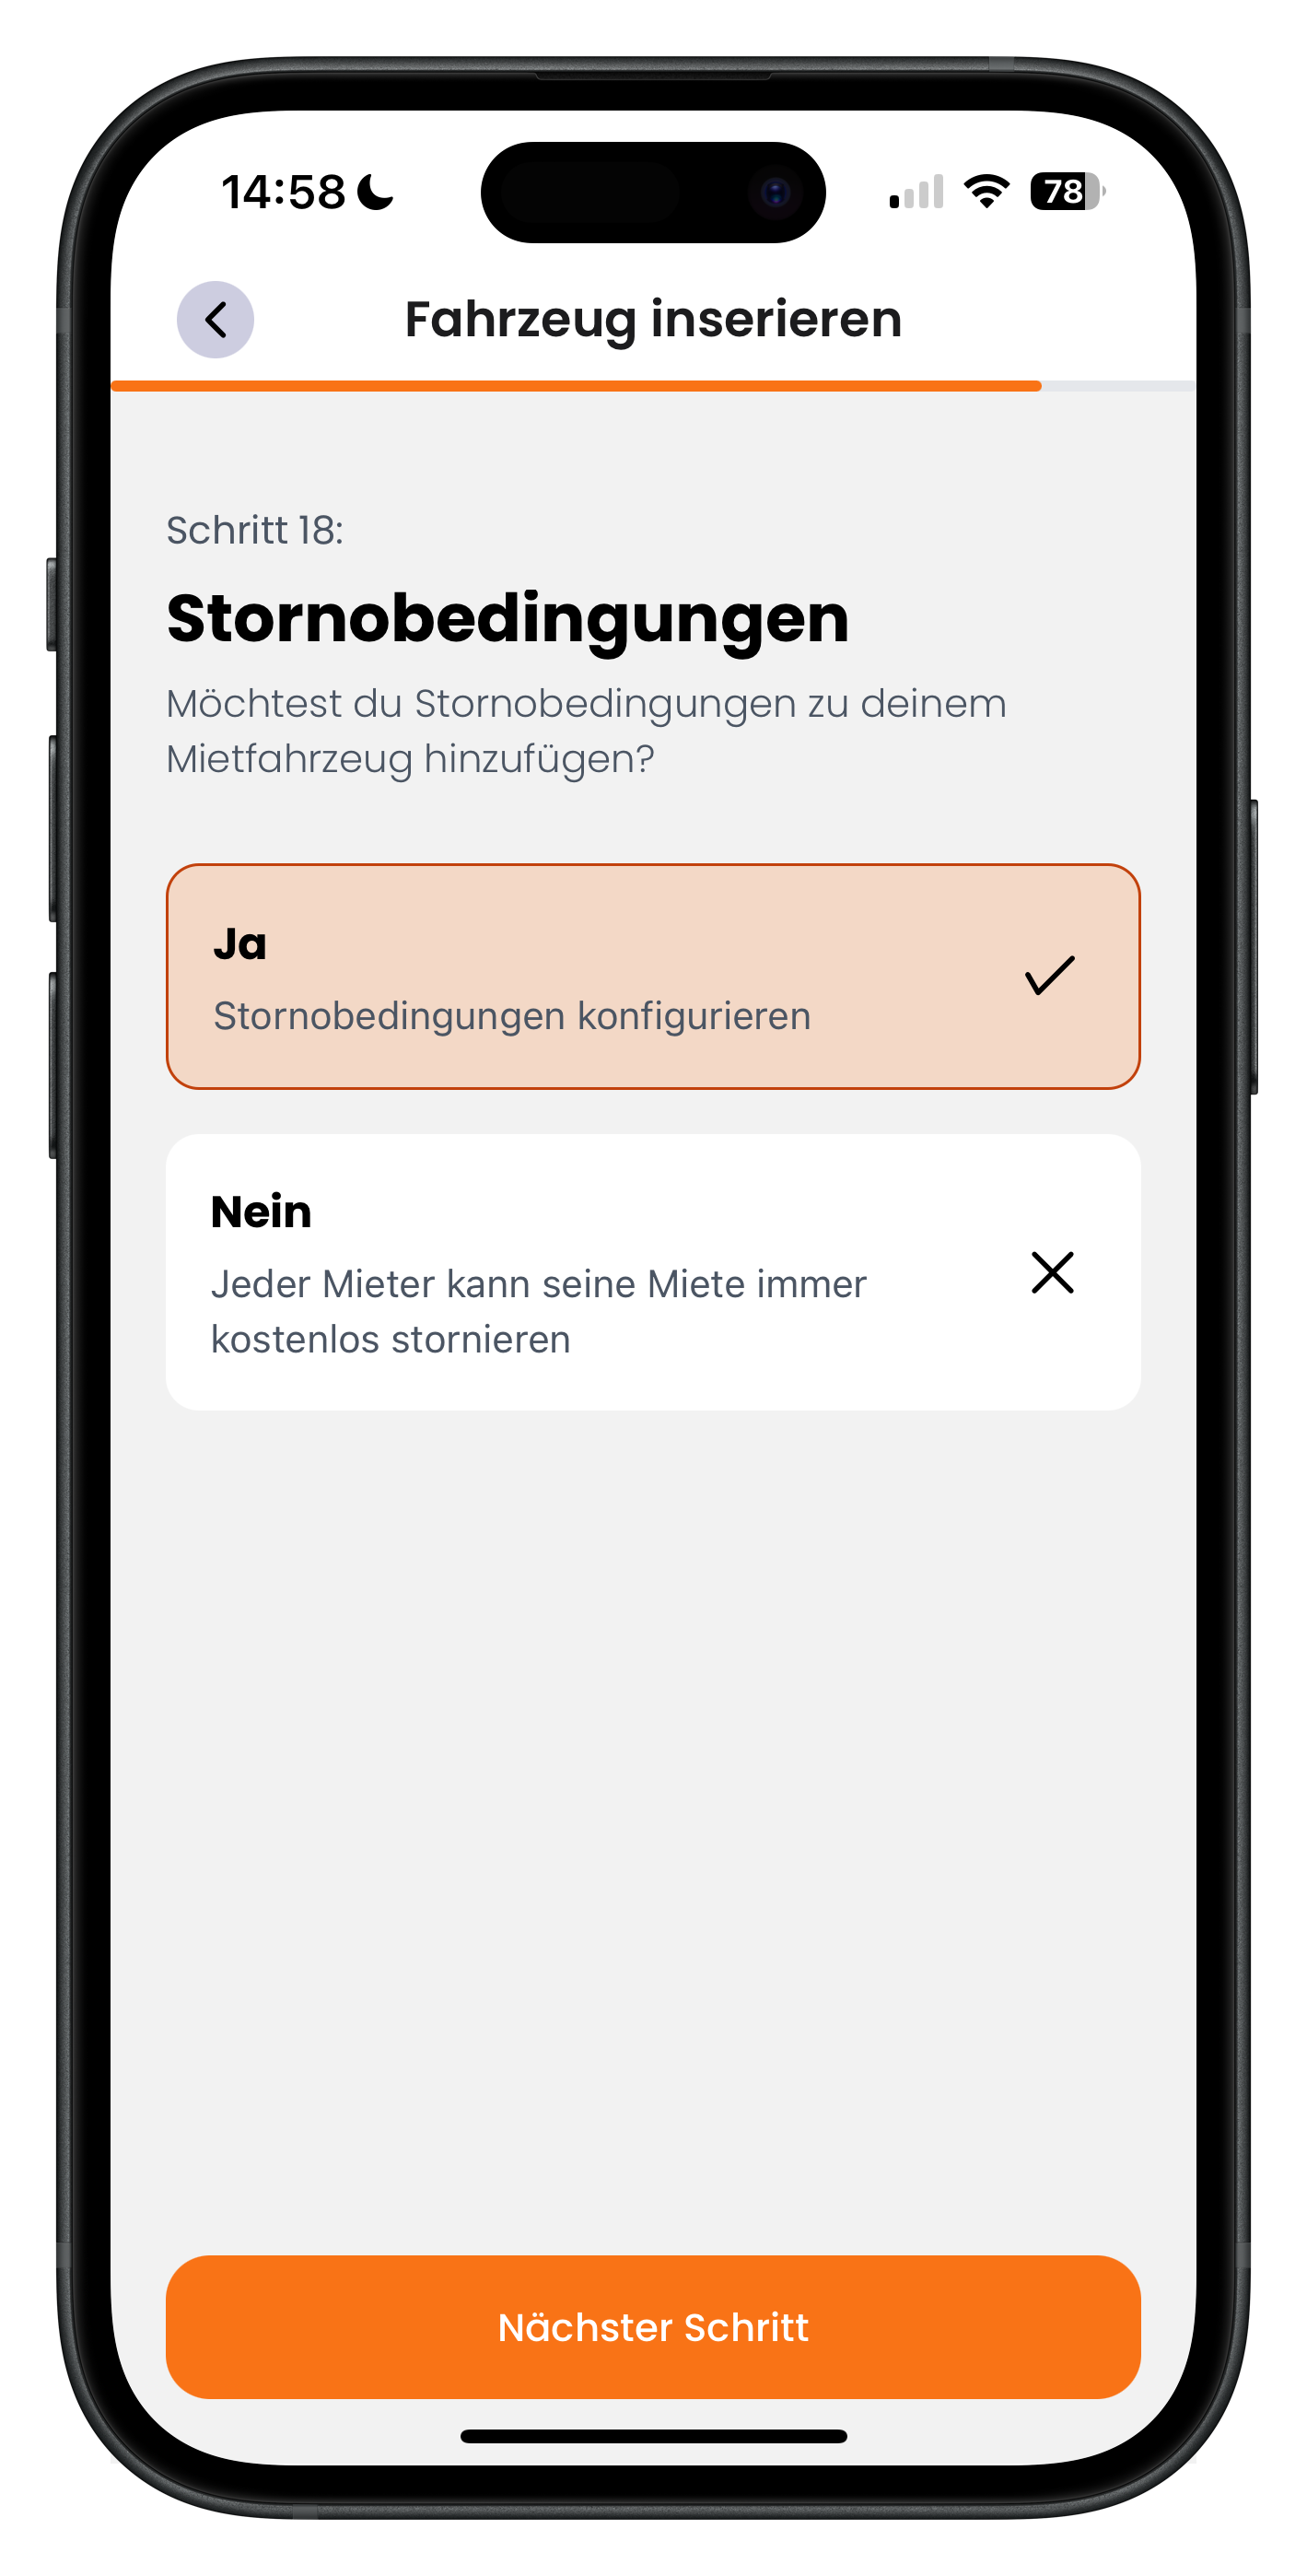
Under Cancellation policy you decide whether to add tiered cancellation rules to your listing. Choose Yes (Configure cancellation policy) or No (renters can always cancel free of charge). The active option is highlighted in orange. Choosing Yes takes you to the configuration screen. Then tap Next step.
- Cancellation terms protect you against last-minute cancellations
- Choosing No means renters can always cancel free of charge
- Fair but clear terms create commitment
28
Create cancellation tiers: days and refund percentage
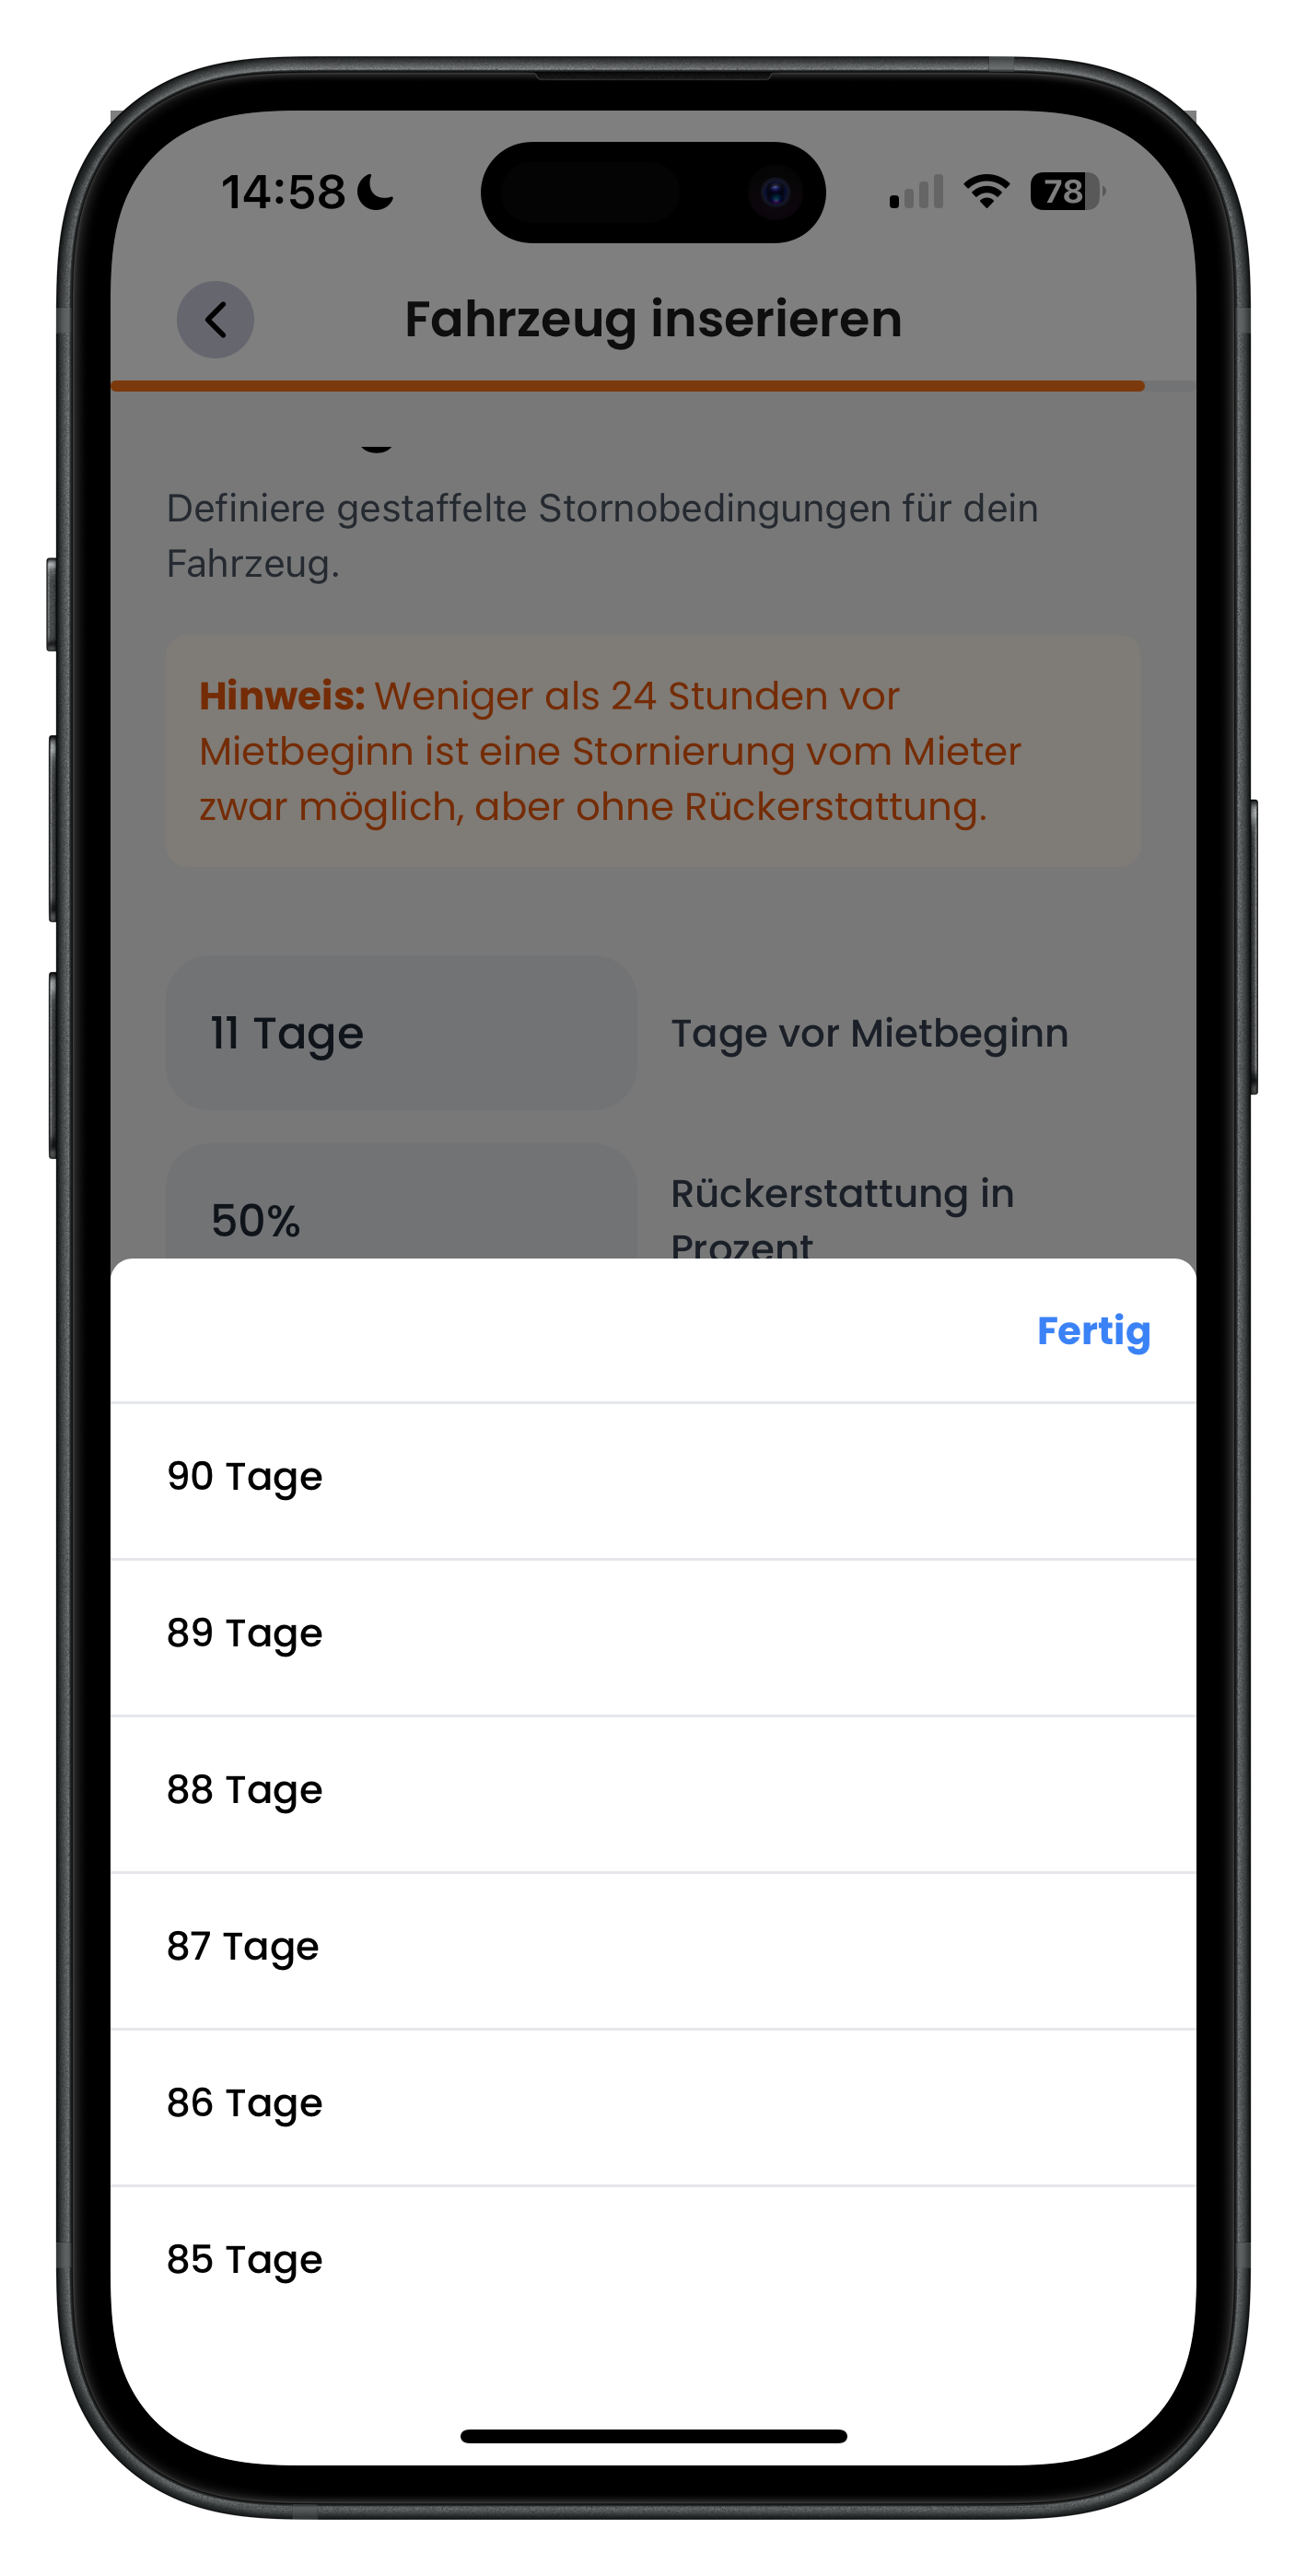
In the configurator you set up tiered cancellation terms. For each tier, use a picker to set how many days before the rental starts it applies (11 days in the example) and what refund percentage the renter receives (for example 50%). Select the value in the scroll wheel that appears and confirm with Done. Pay attention to the orange note at the very top.
- You define windows: if the renter cancels X days in advance, they get X percent back
- You as the host keep the remaining portion of the rental fee
- Set the values easily using the scroll wheel that appears on screen
29
Stack multiple cancellation tiers
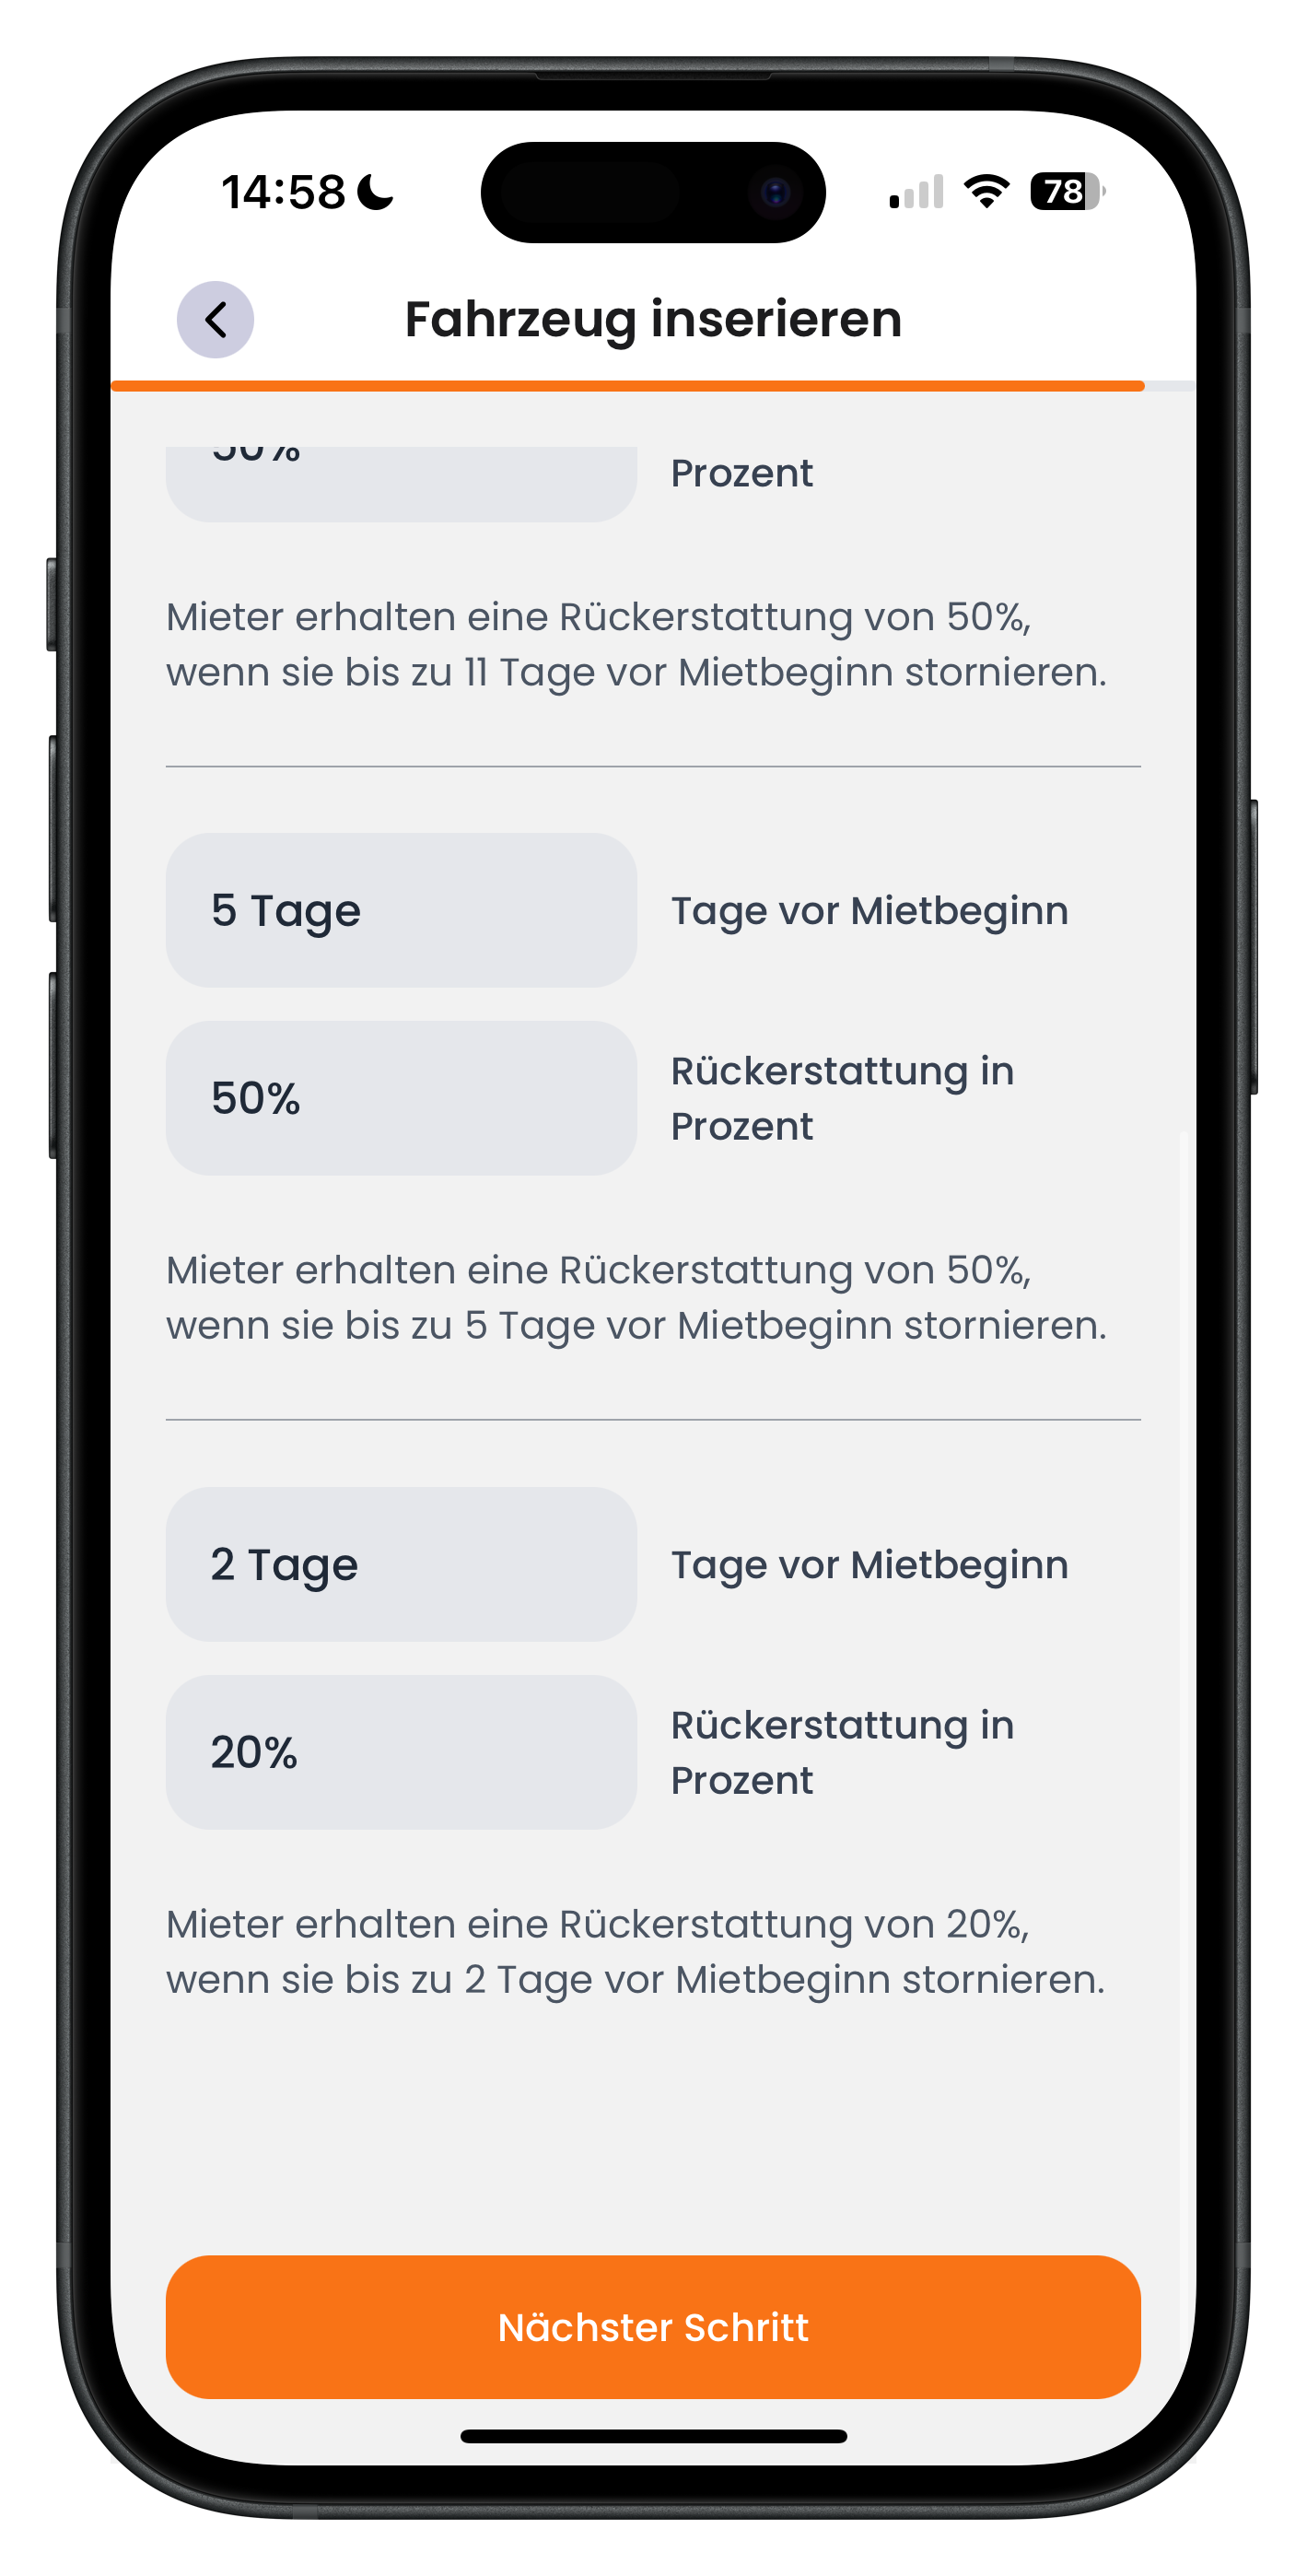
You can create multiple tiers that get progressively stricter as the rental start approaches. In the example: 50% refund if cancelled up to 11 days before, 50% up to 5 days before, and only 20% up to 2 days before. Each tier shows you a summary sentence so it's clear what the renter will get back. Then tap Next step.
- The closer to the rental start, the lower the refund should be
- The summary sentences under each tier make your rules clear and transparent
- This lets you plan with more confidence and reduces last-minute no-shows
Important: if the renter cancels 24 hours or less before the rental starts, they automatically receive 0% back and you as the host receive the full rental amount. This 24-hour rule applies regardless of your tiered cancellation terms.
30
Add extras and create the listing
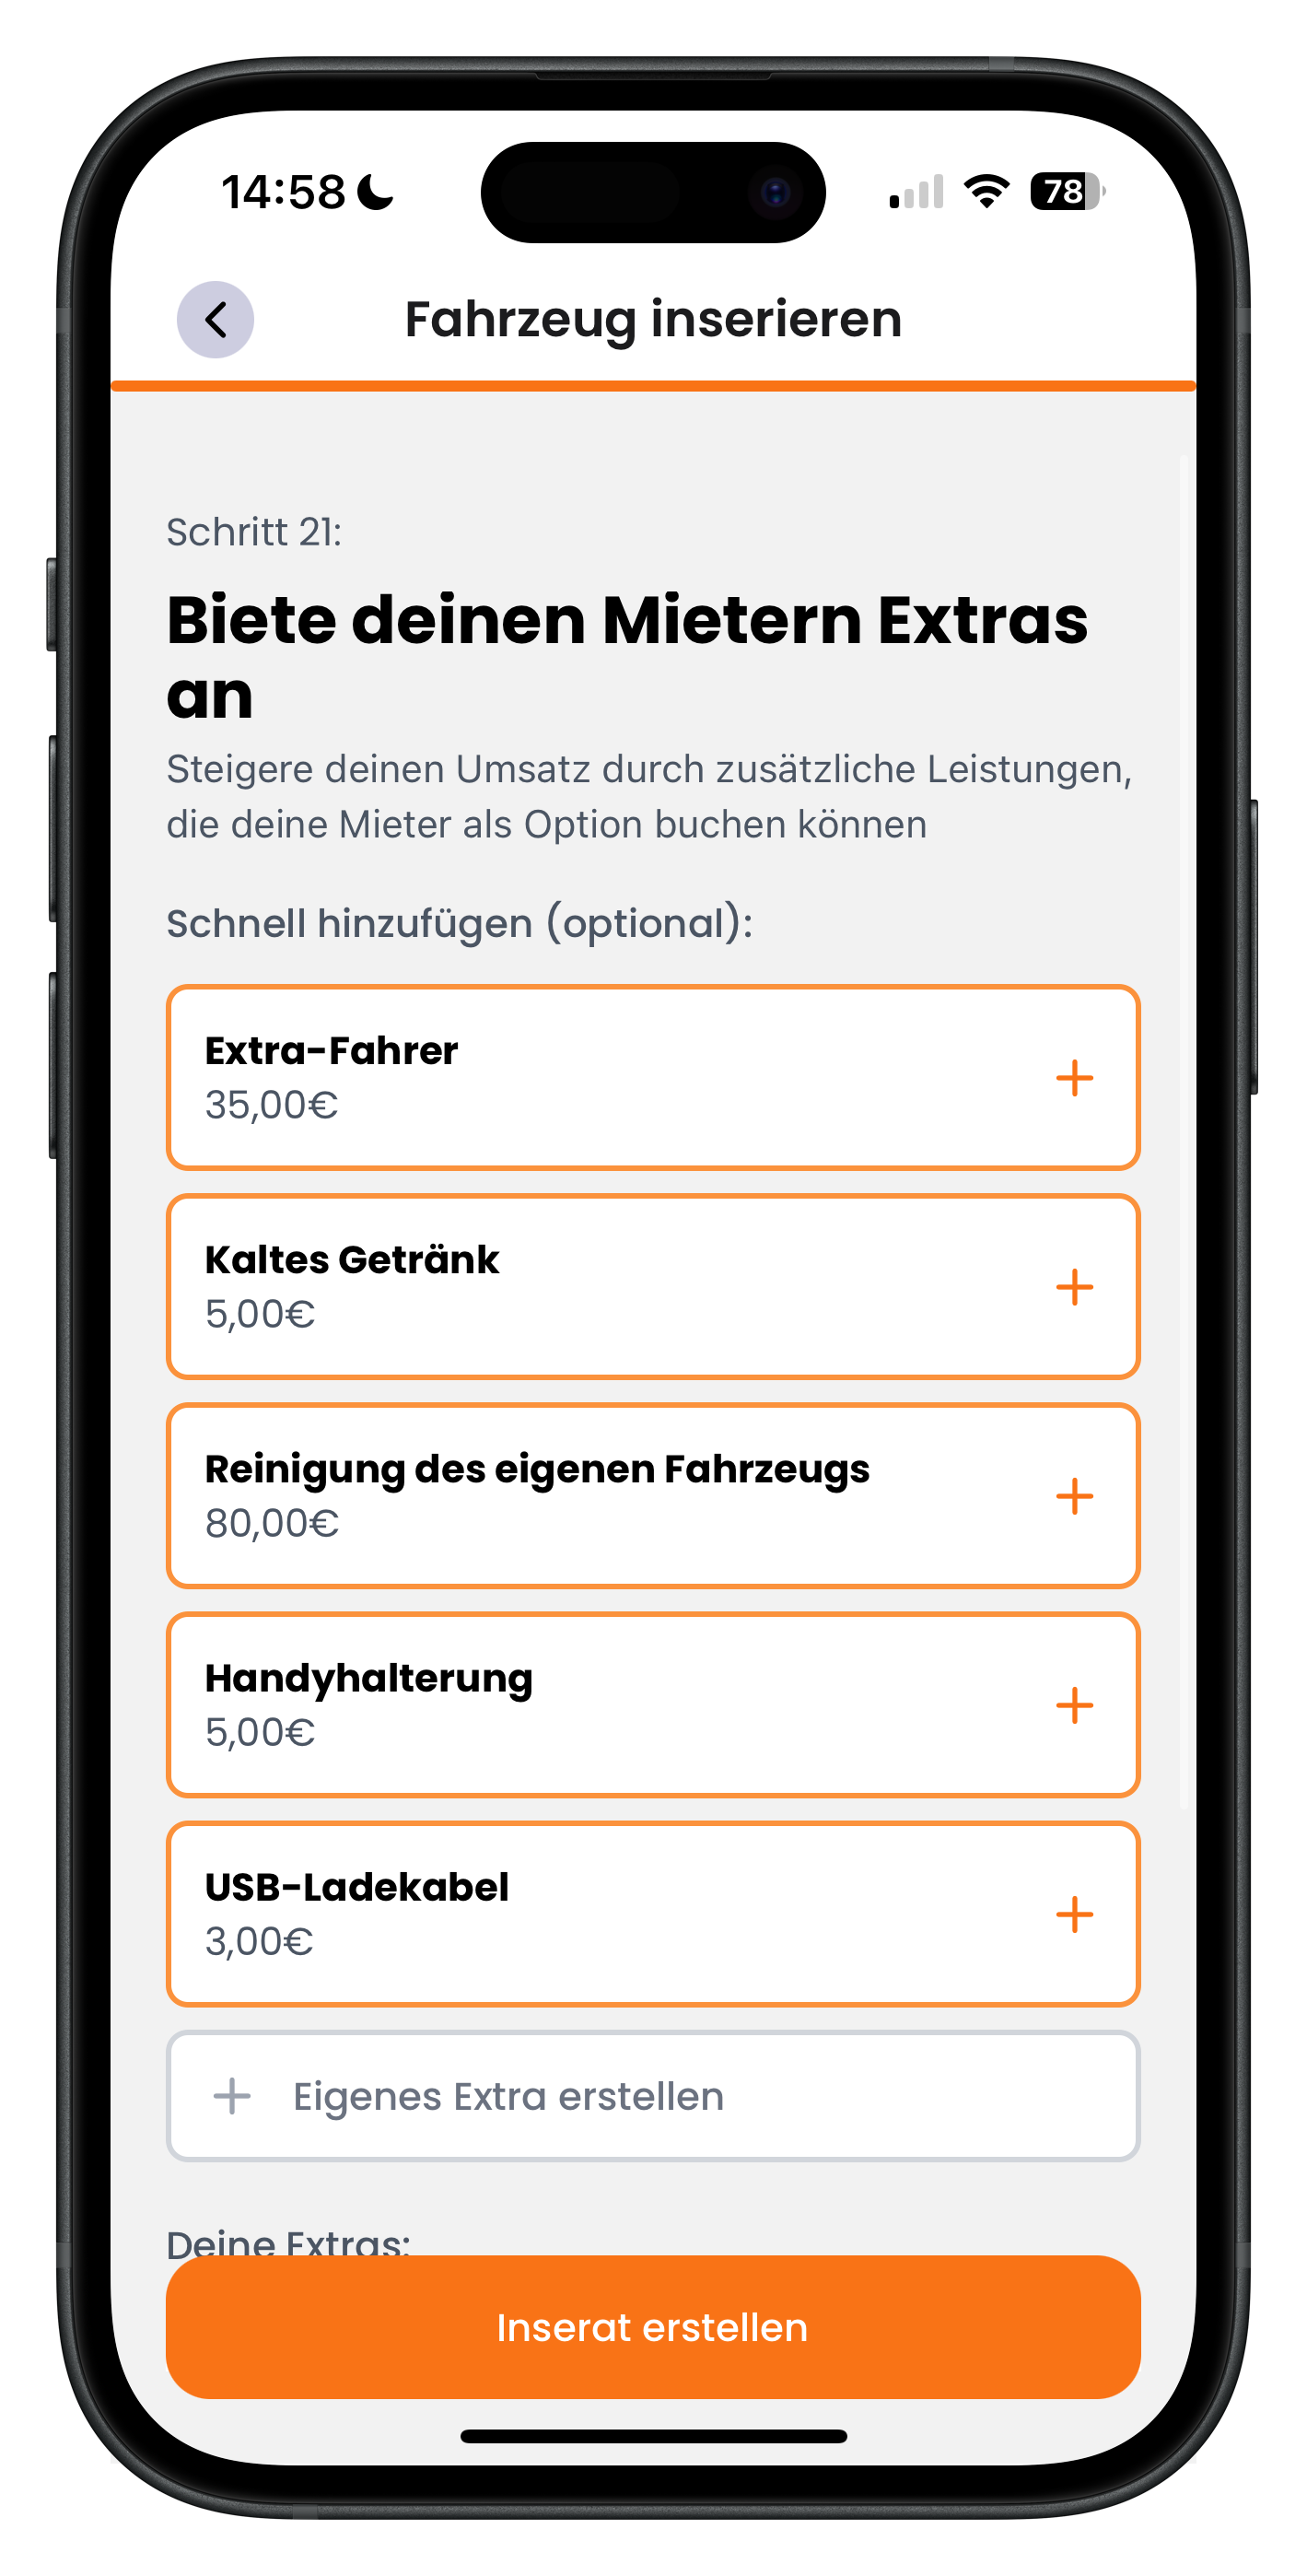
Finally, under Offer your renters extras you add optional add-ons that renters can include when booking. Via Quick add there are suggestions such as Additional driver for 35 euros, Cold drink for 5 euros, Vehicle valet for 80 euros, Phone holder for 5 euros or USB charging cable for 3 euros, or tap Create custom extra. Your extras appear under Your extras. When everything looks good, tap the orange Create listing button at the bottom. That's it — your vehicle is now live.
- Extras are an easy revenue lever because renters scroll past them when booking
- Popular extras include drinks, a vehicle valet, an additional driver and a phone holder
- Tapping Create listing puts your vehicle online and open to booking requests
Next steps
Your listing is live. If you want to change anything later — such as prices or photos — you can do so at any time under Edit listing. To keep your calendar accurate, you can block unavailable dates via Block booking days and boost your occupancy with Discount promotions. Once the first requests start coming in, Handling customer requests will show you how to accept or decline them.
Frequently asked questions

Drivable Team
Help & Support
Das Drivable Team erklärt dir Schritt für Schritt, wie du die Plattform und App nutzen kannst.
21. Juni 2026
War dieser Artikel hilfreich?