Request a vehicle – How to send a booking request
Found your dream car and ready to book it? We walk you through every step: setting your dates and times, adding extras, and sending your non-binding request to the host. A request costs nothing and commits you to nothing.
Found a car you love and ready to book it? Your first step is to send a booking request to the host. One important thing upfront: a request is completely non-binding and costs nothing. All you're doing here is setting out when and how you'd like to rent the car. Payment only happens once the host has accepted your request.
- Choose your rental period and pick-up and drop-off times
- Optionally add extra mileage and extras such as an additional driver
- Optionally enter a delivery address if you'd like the car brought to you
- Review everything in the invoice and send your non-binding request
How does it all work? You send a request, the host reviews and accepts it, and only then do you pay for the booking. The exact handover address and the host's contact details are only shared after payment. That way you're fully protected and take on no risk.
1
Open the listing and tap the bottom bar
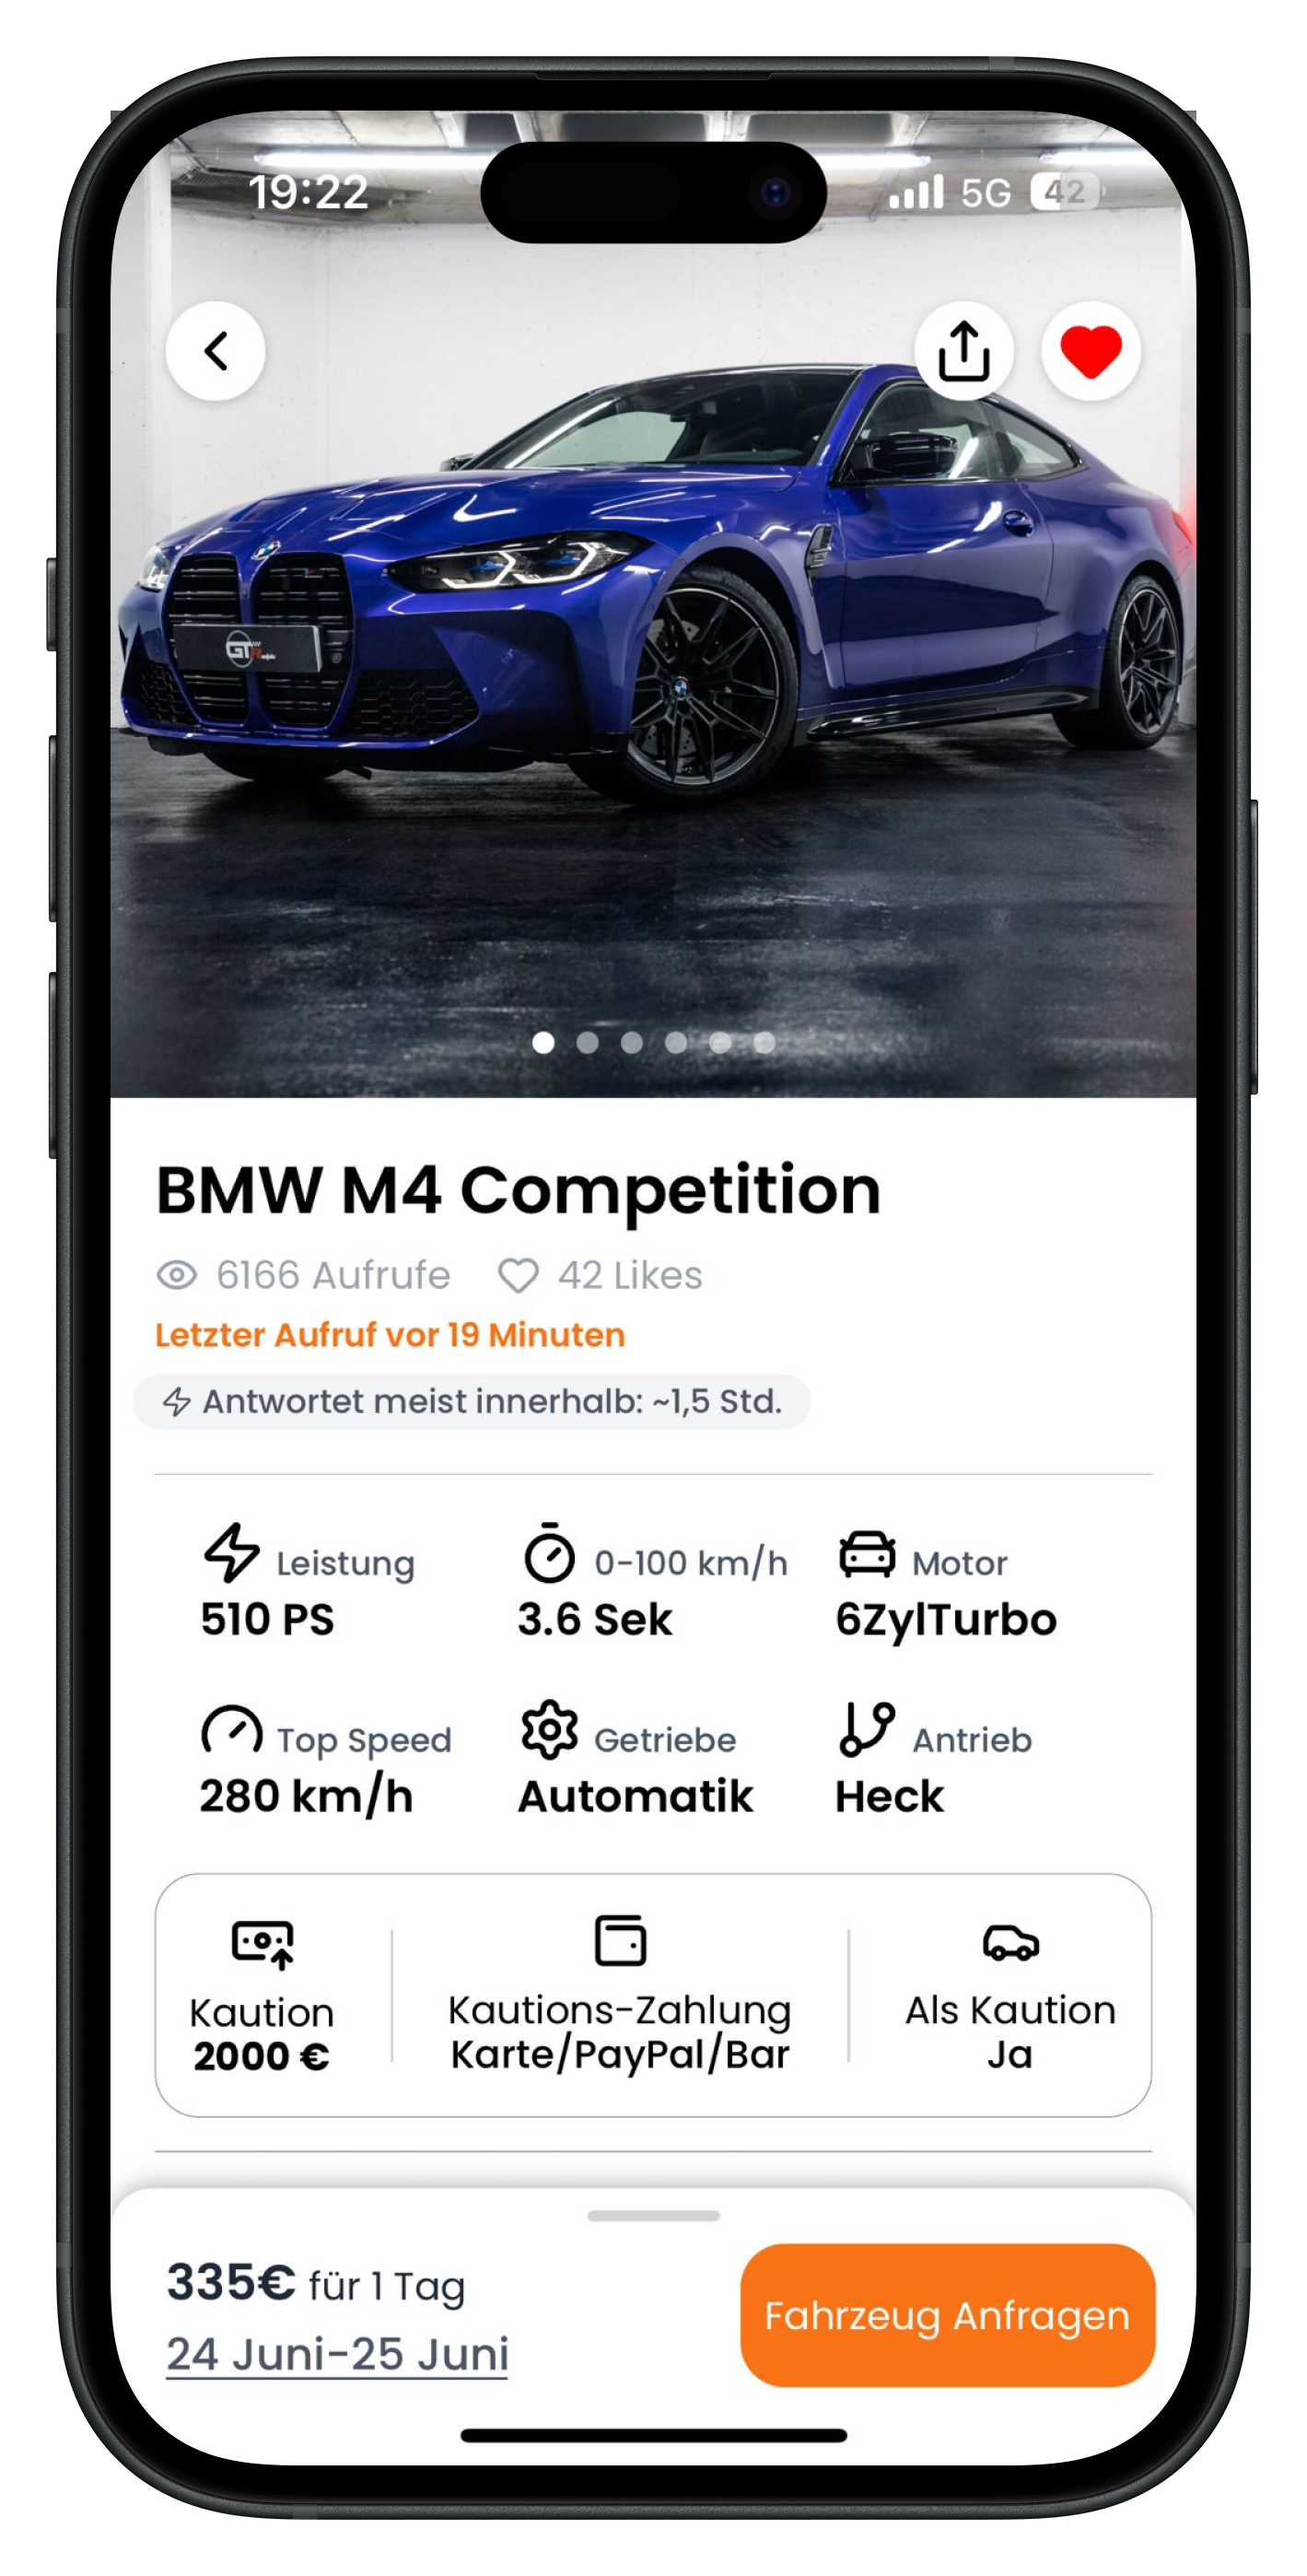
Open the listing for the vehicle you want to rent. At the top you'll see photos of the car, then the name (for example BMW M4 Competition) and all the technical specs such as power, top speed, and gearbox. At the very bottom there's a bar showing the price (here 335€ for 1 day) and the orange Request Vehicle button. Tap this bar or swipe it upwards to open the booking section.
- The bar immediately shows you the price and your selected period
- Full details about the car are in the listing above if you want to check anything
- You can also save the car to your favourites using the heart icon in the top right
Want to know exactly what all the information in the listing means? Take a look at The listing explained. There we walk you through every detail, from power output to deposit.
2
Set your rental period and times in the calendar
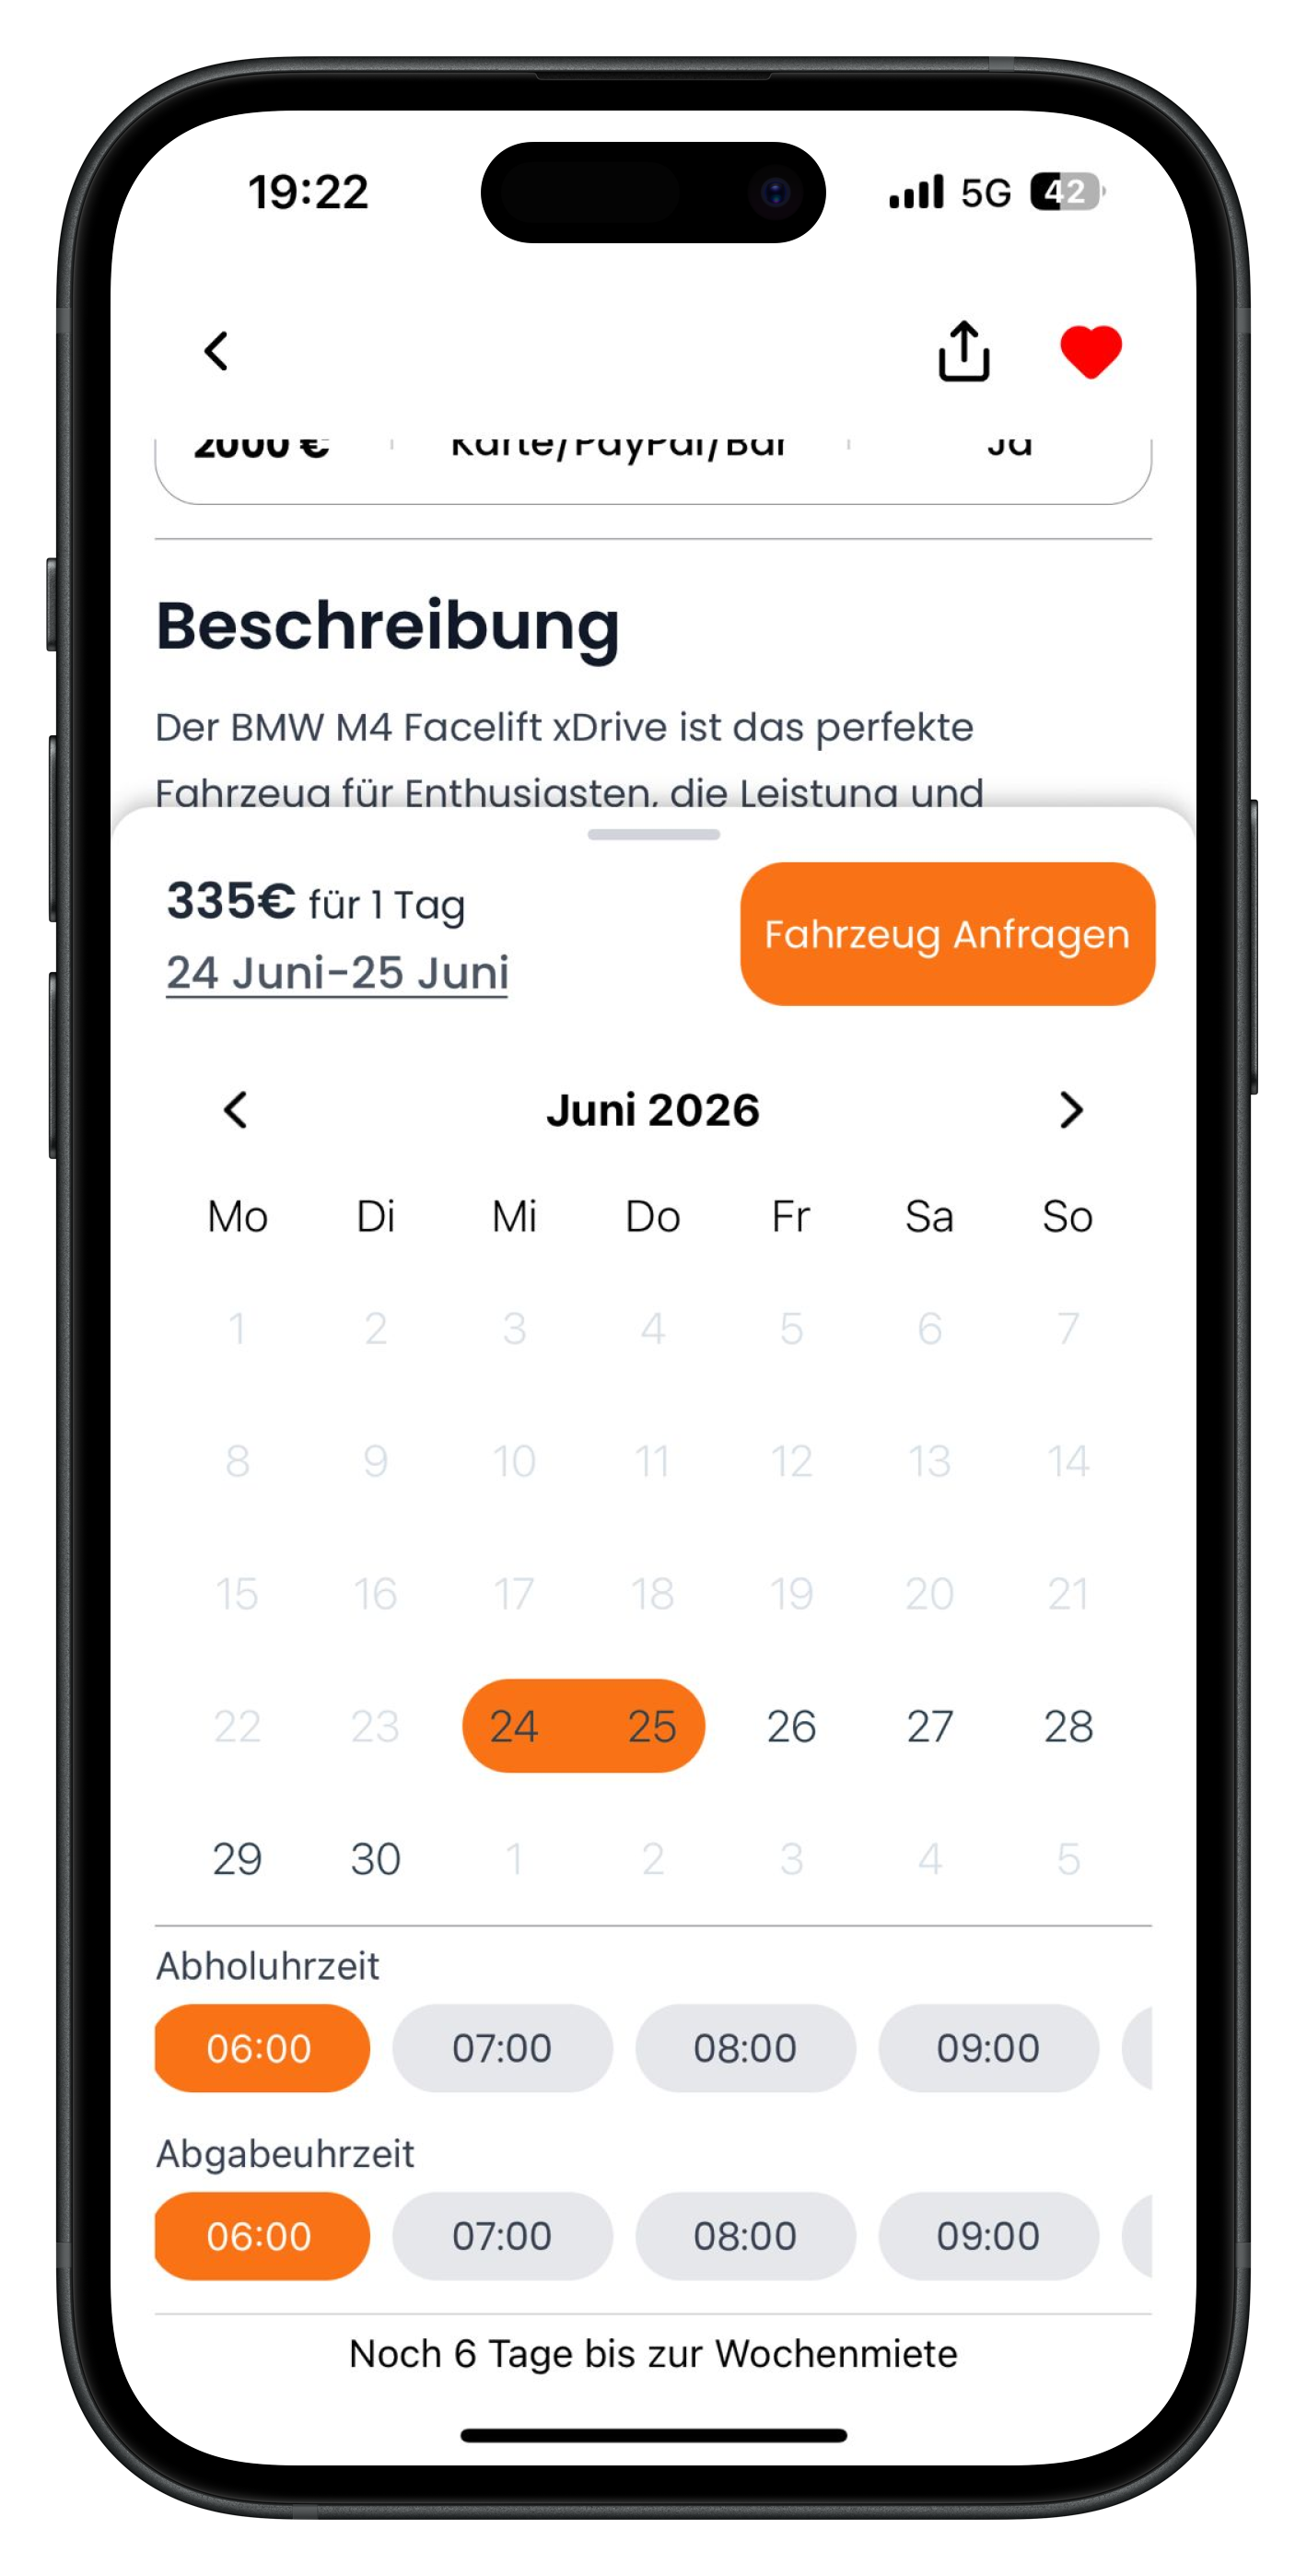
The calendar now opens. Tap your rental start date and end date — the selected days are highlighted in orange (here 24–25 June). Below that, choose the right time from the chips under Pick-up time and Drop-off time; the selected value turns orange. That's how you pin down exactly when you're collecting the car and when you're returning it. Once everything looks right, tap the orange Request Vehicle button at the top.
- Use the arrows next to the month name to navigate to a different month
- Pick-up and drop-off times can be set independently
- You may see a hint such as "6 days until a weekly rental", which is often cheaper
- Greyed-out dates in the past or already booked days cannot be selected
3
Review the booking request screen with all the details
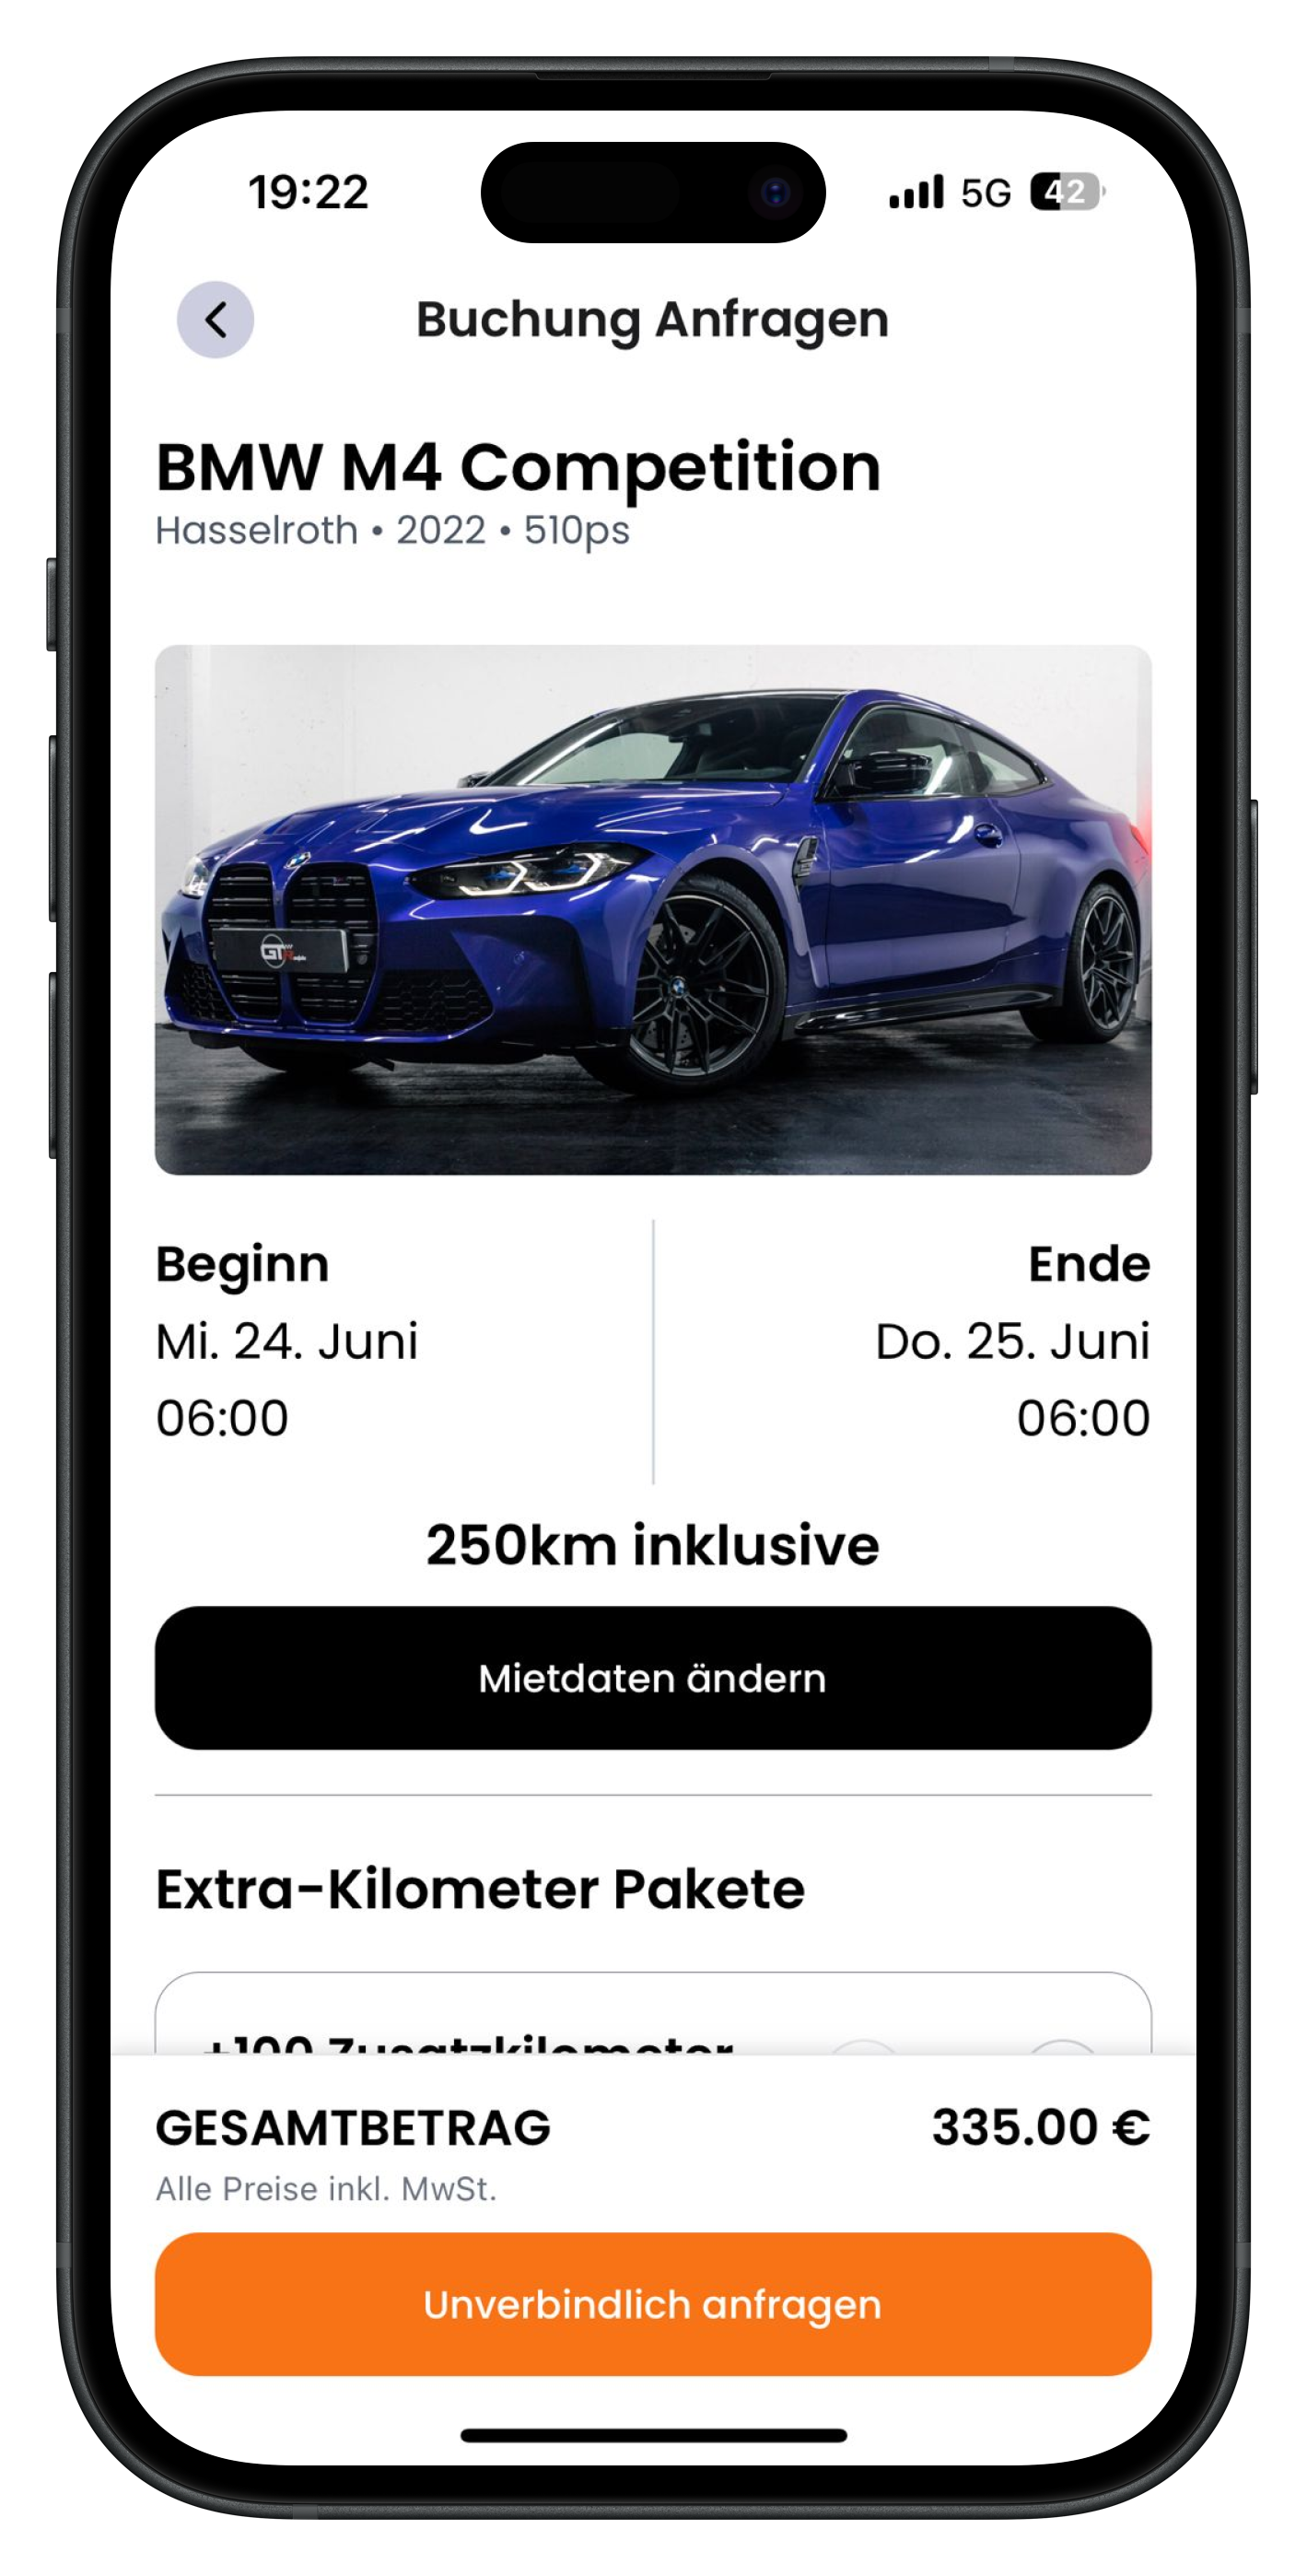
You land on the Request Booking screen. Here you can see the car again with its location and year, your chosen period with Start and End times, and how many kilometres are included (here 250km included). Think of it as your booking summary before you submit it. At the very bottom you'll find the Total amount and the orange Request without obligation button. Before you tap it, you can still adjust anything at the top.
- Take your time to check the date, time, and included kilometres
- Use the black "Change rental details" button to adjust the period again (step 4)
- The total amount updates automatically as you add extras
4
Change your rental details via the modal
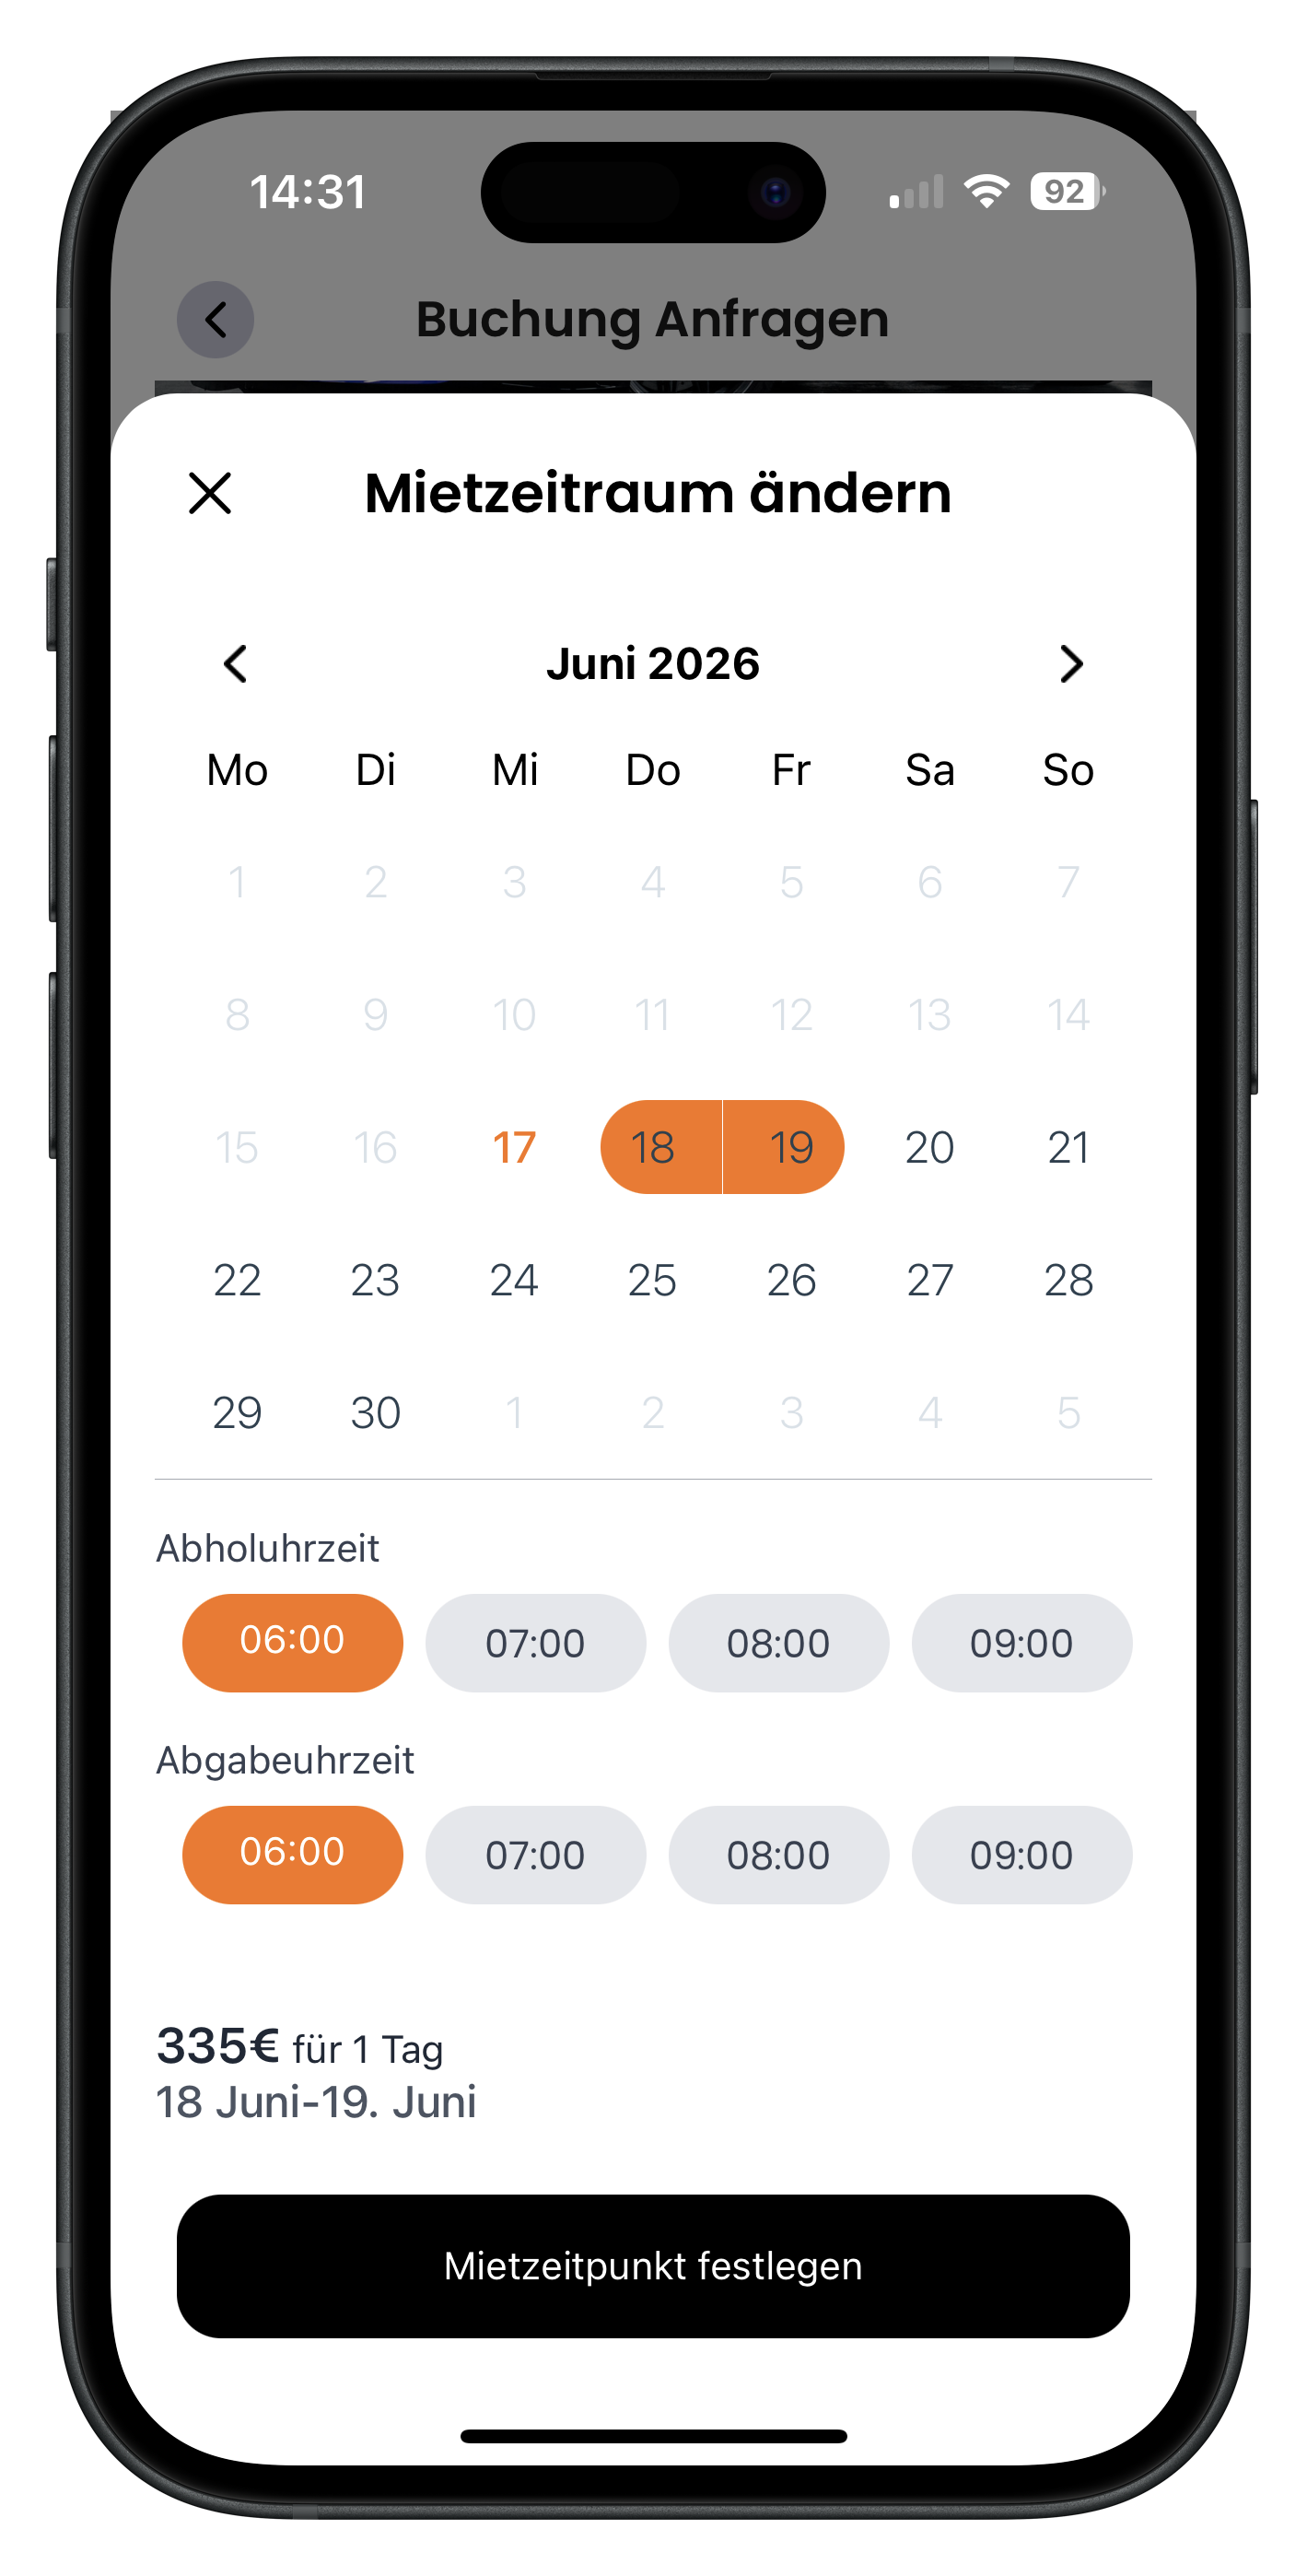
Tapping Change rental details opens the Change rental period window. Here you can adjust your dates and times if you've had a change of mind. Select your start and end days in the calendar again and set your Pick-up time and Drop-off time. Tap the black Confirm rental time button to apply the change, or the X in the top left to close the window without saving.
- Works exactly like the first calendar, just as a follow-up correction
- The price at the top of the window adjusts immediately to your new period
- The X discards the change and keeps your previous details
5
Add extra mileage and extras such as an additional driver
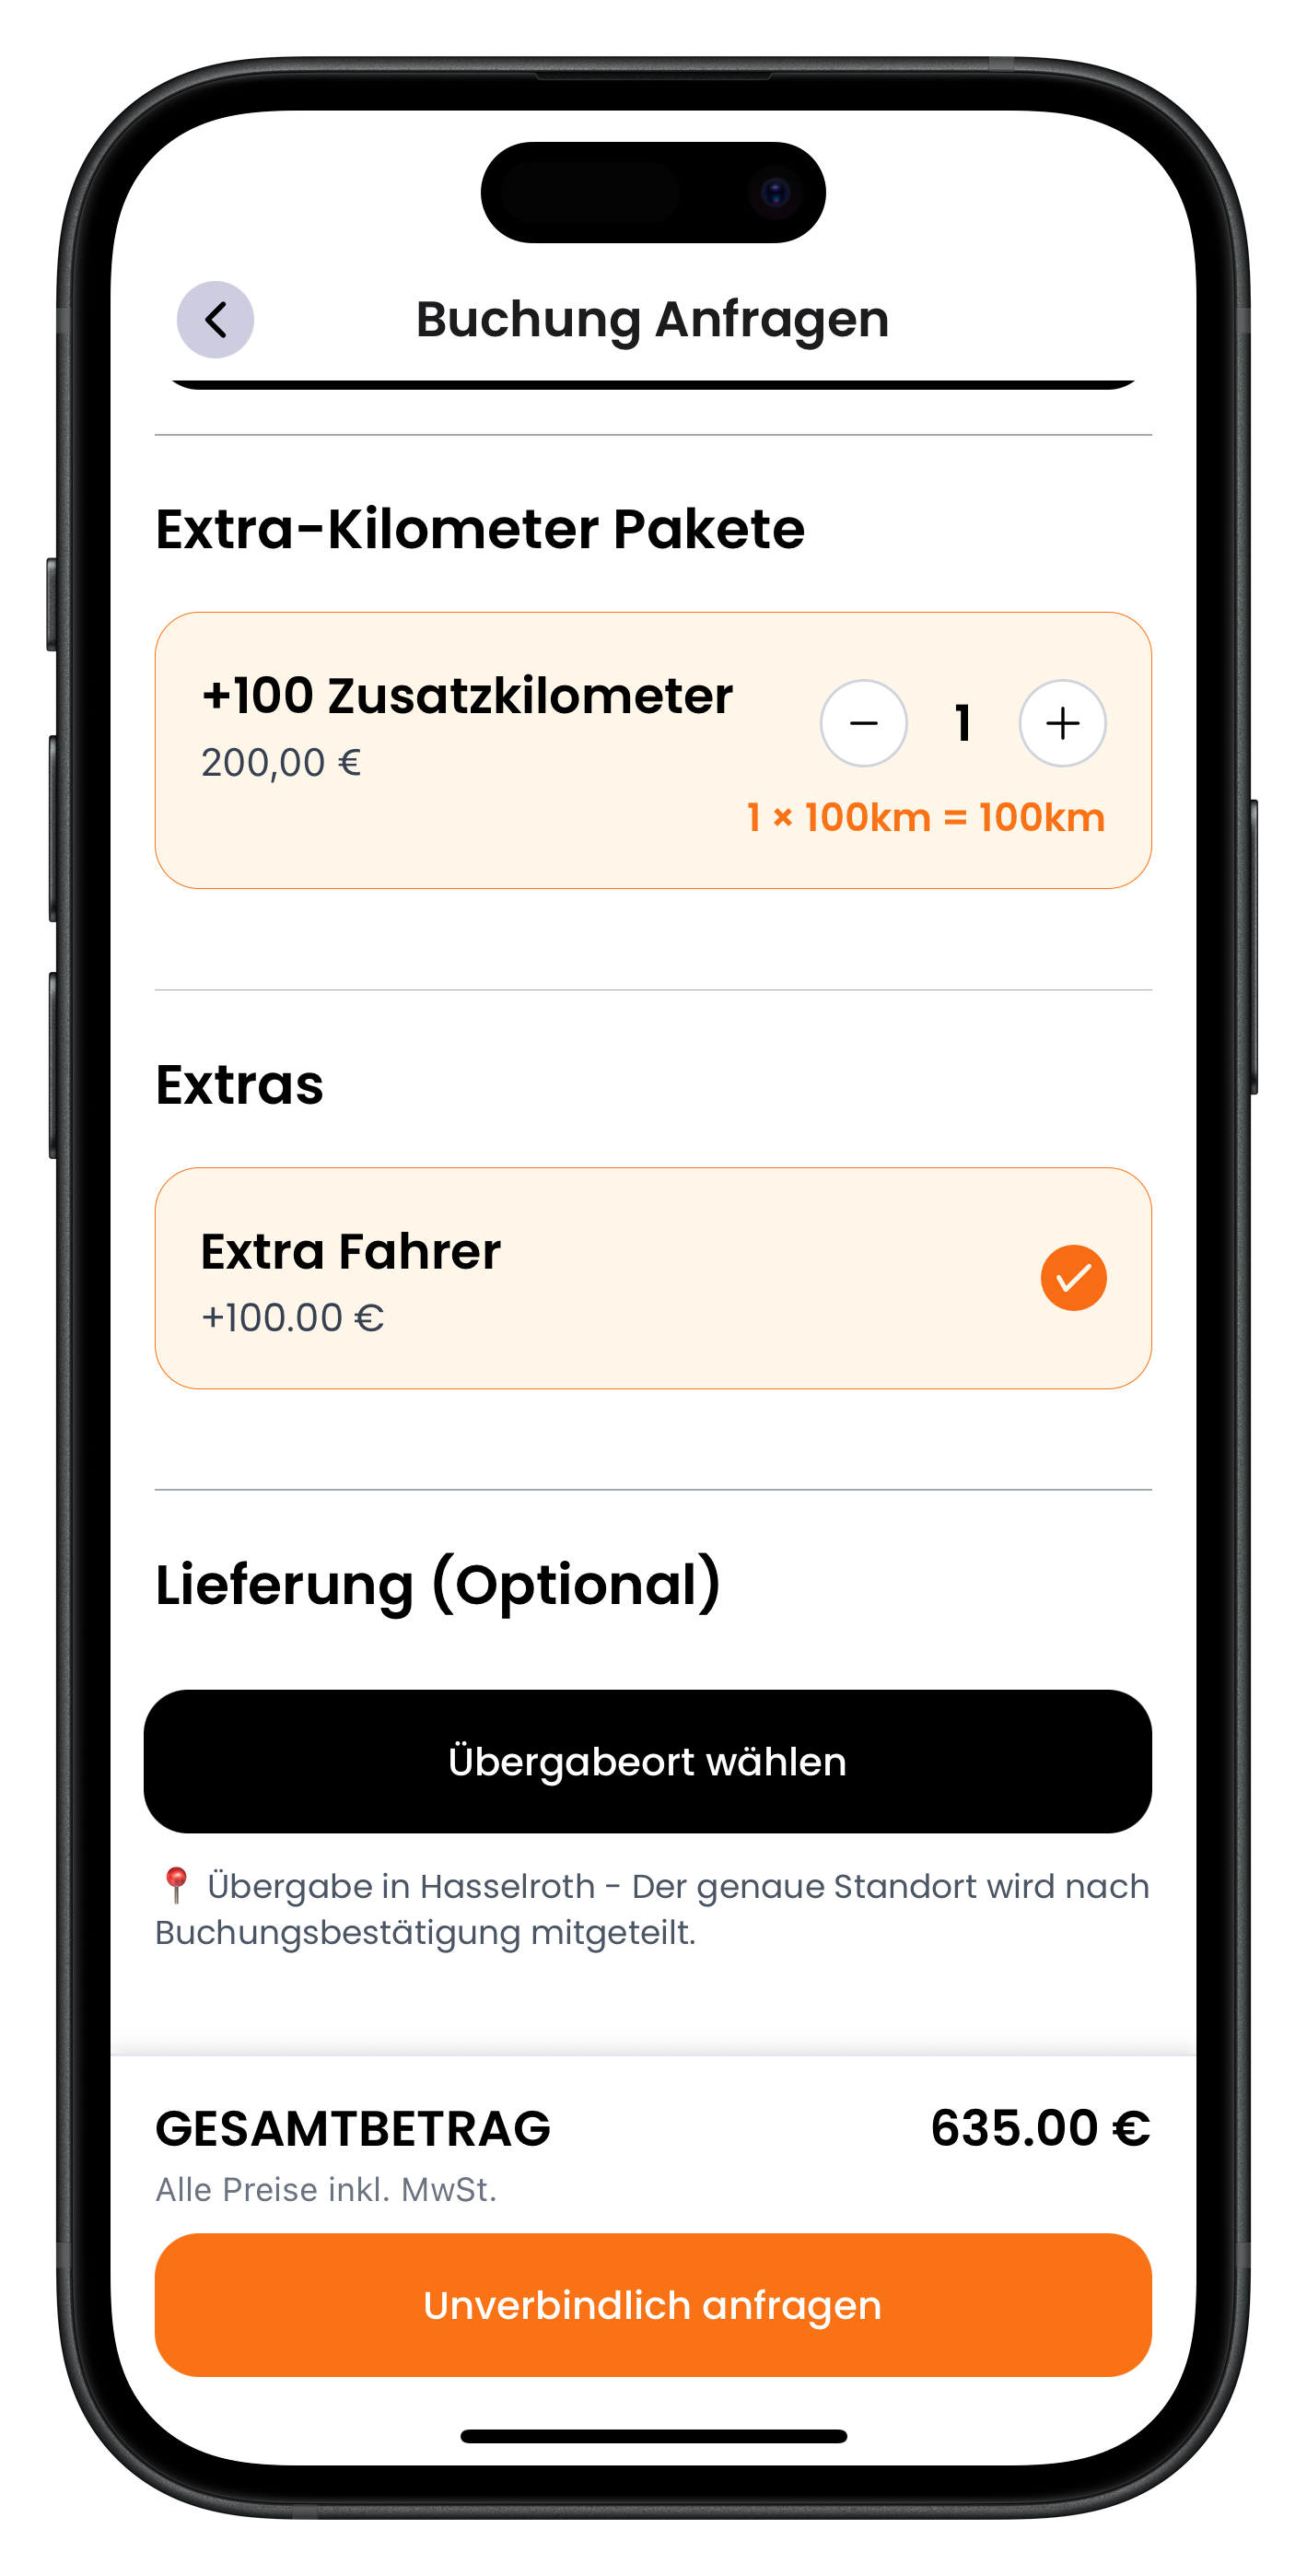
Scroll down a little on the booking screen and you'll reach the Extra Mileage Packages and Extras sections. Use the plus and minus buttons to add, for example, +100 extra kilometres if the included mileage isn't enough. Under Extras you can activate things like an Additional Driver — an orange tick shows what's selected. Just below that you'll find the Delivery (Optional) section with the black Choose handover location button.
- Extra kilometres are worth adding if you're planning a longer trip
- Each extra has a fixed price that is added directly to the total
- Without delivery, you collect the car from the host's location (here Hasselroth)
- The exact location is only shared with you after the booking is confirmed
Delivery is optional. If you'd rather collect the car from the host yourself, simply skip this step. If you do book delivery, the host brings the car to your chosen address and you can see exactly what it costs before you confirm.
6
Enter a delivery address and see the delivery price
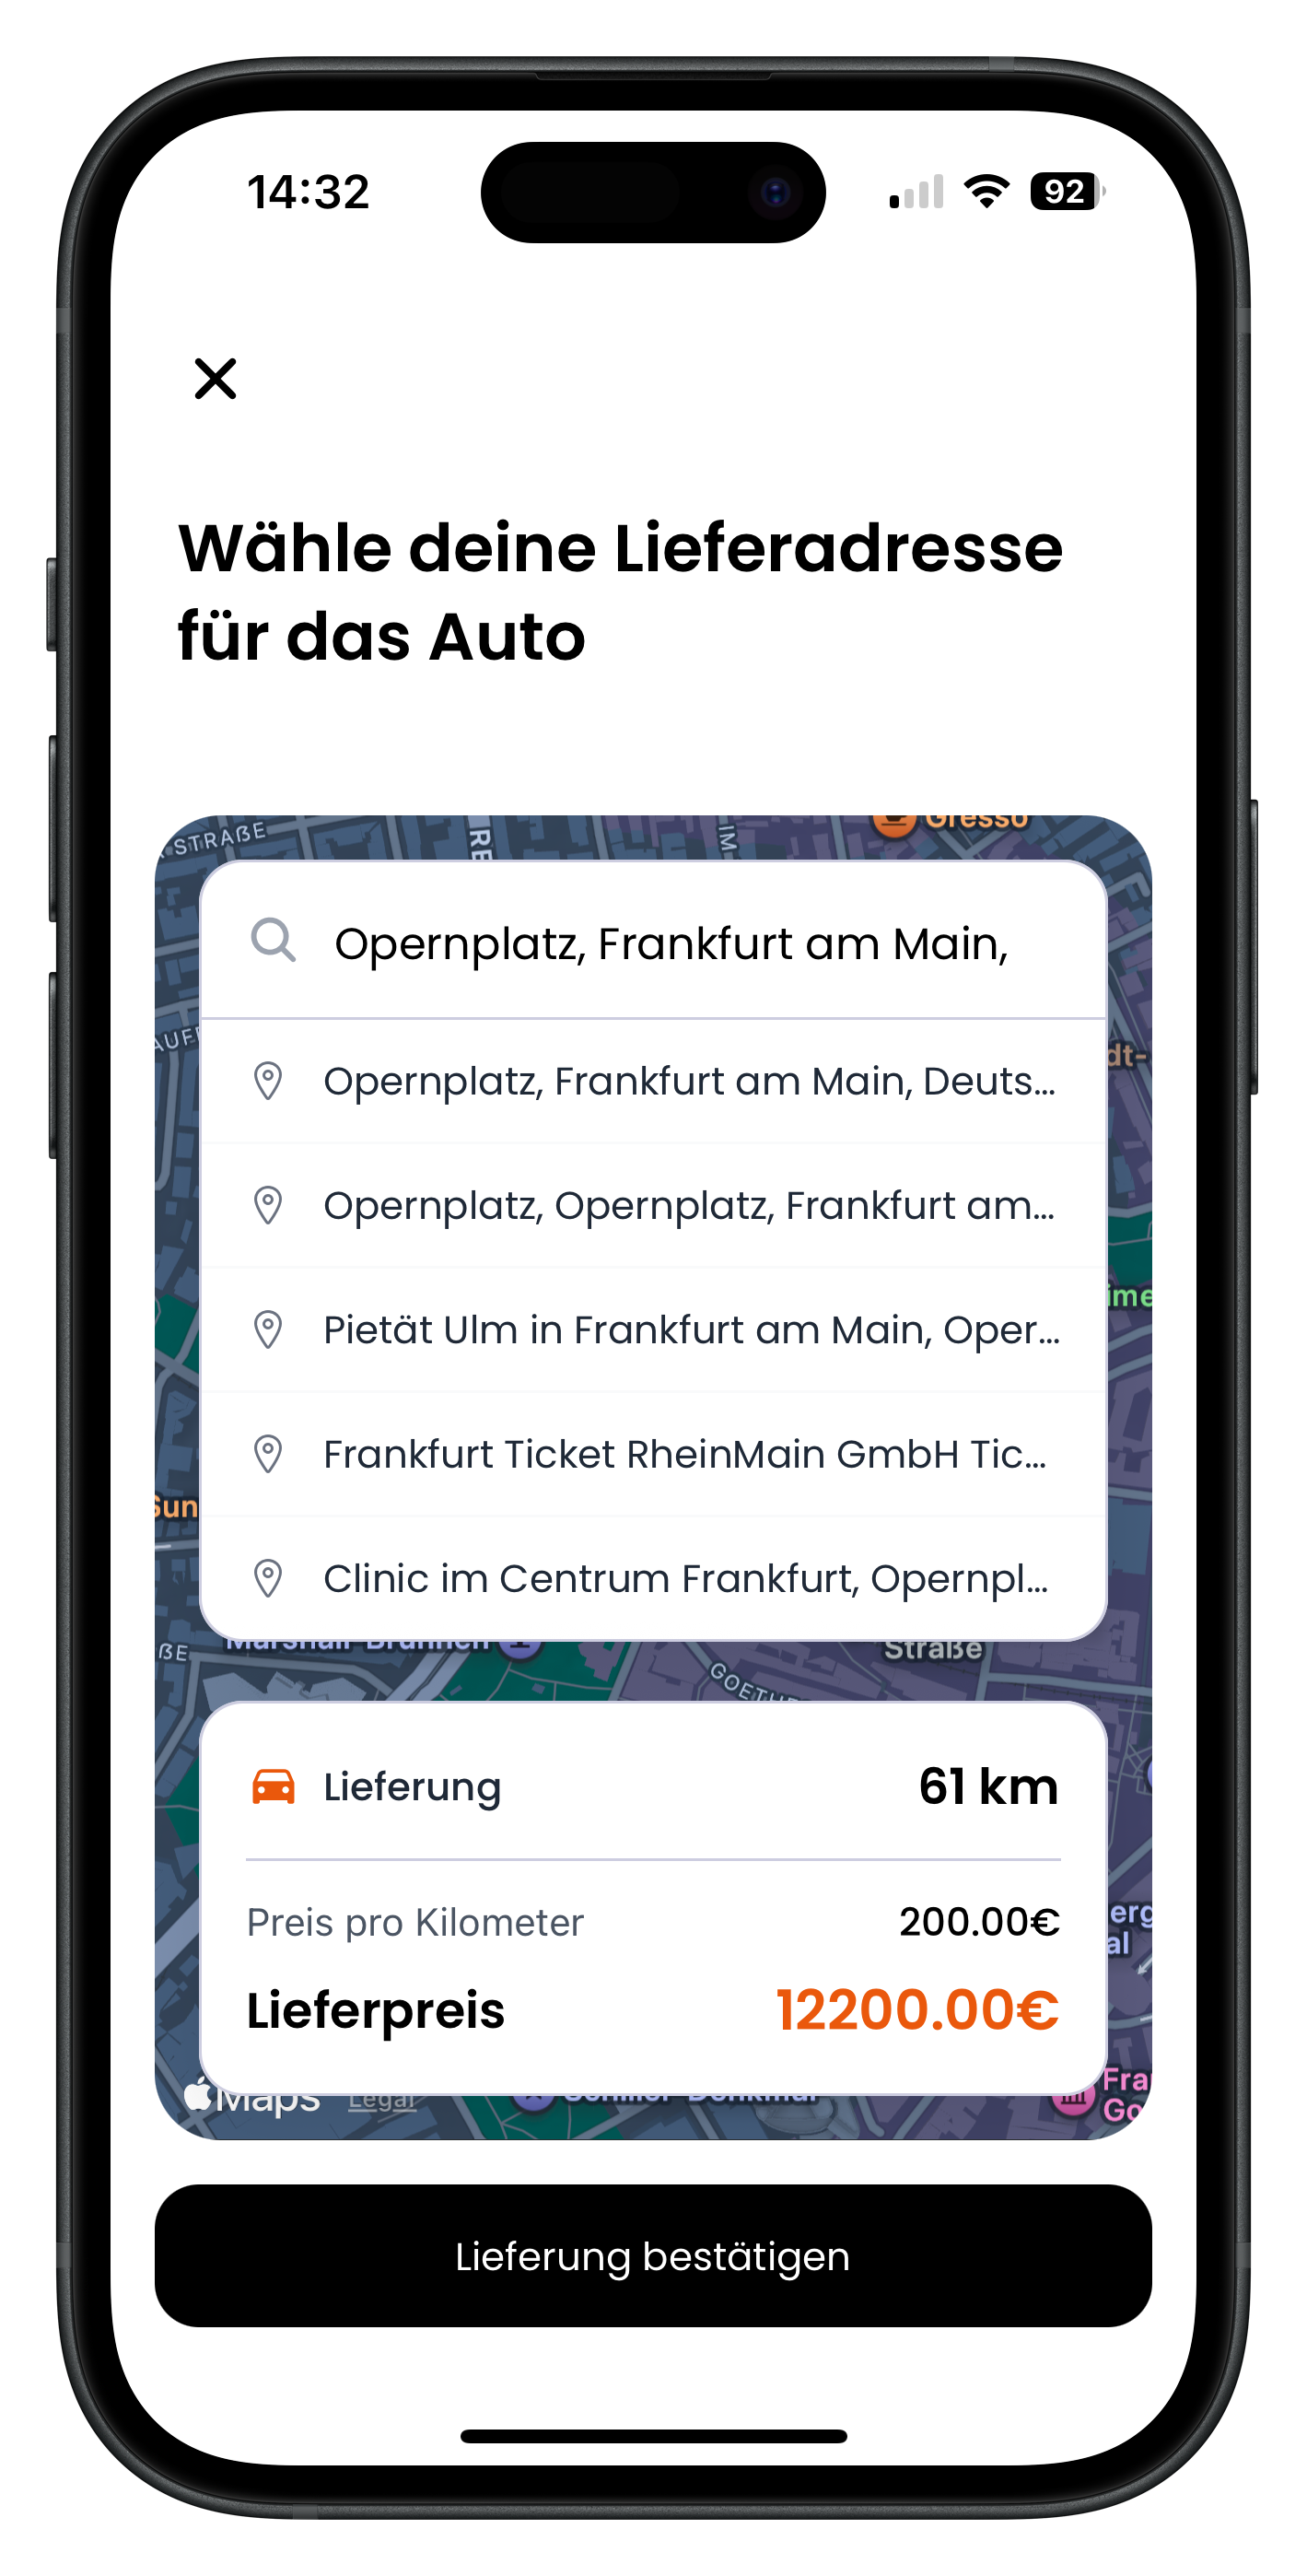
Tapping Choose handover location opens the Choose your delivery address for the car view. Type your address in the search field and select the right suggestion from the list. At the bottom you'll instantly see the Delivery distance in kilometres, the Price per kilometre, and the total Delivery price. So you know exactly what delivery will cost before you confirm it. Tap the black Confirm delivery button to save the address, or the X in the top left to cancel.
- The delivery price depends on the distance between the host and your address
- The further the distance, the higher the delivery price
- The X closes the window without booking a delivery
7
Review your rental note, cancellation policy, and invoice
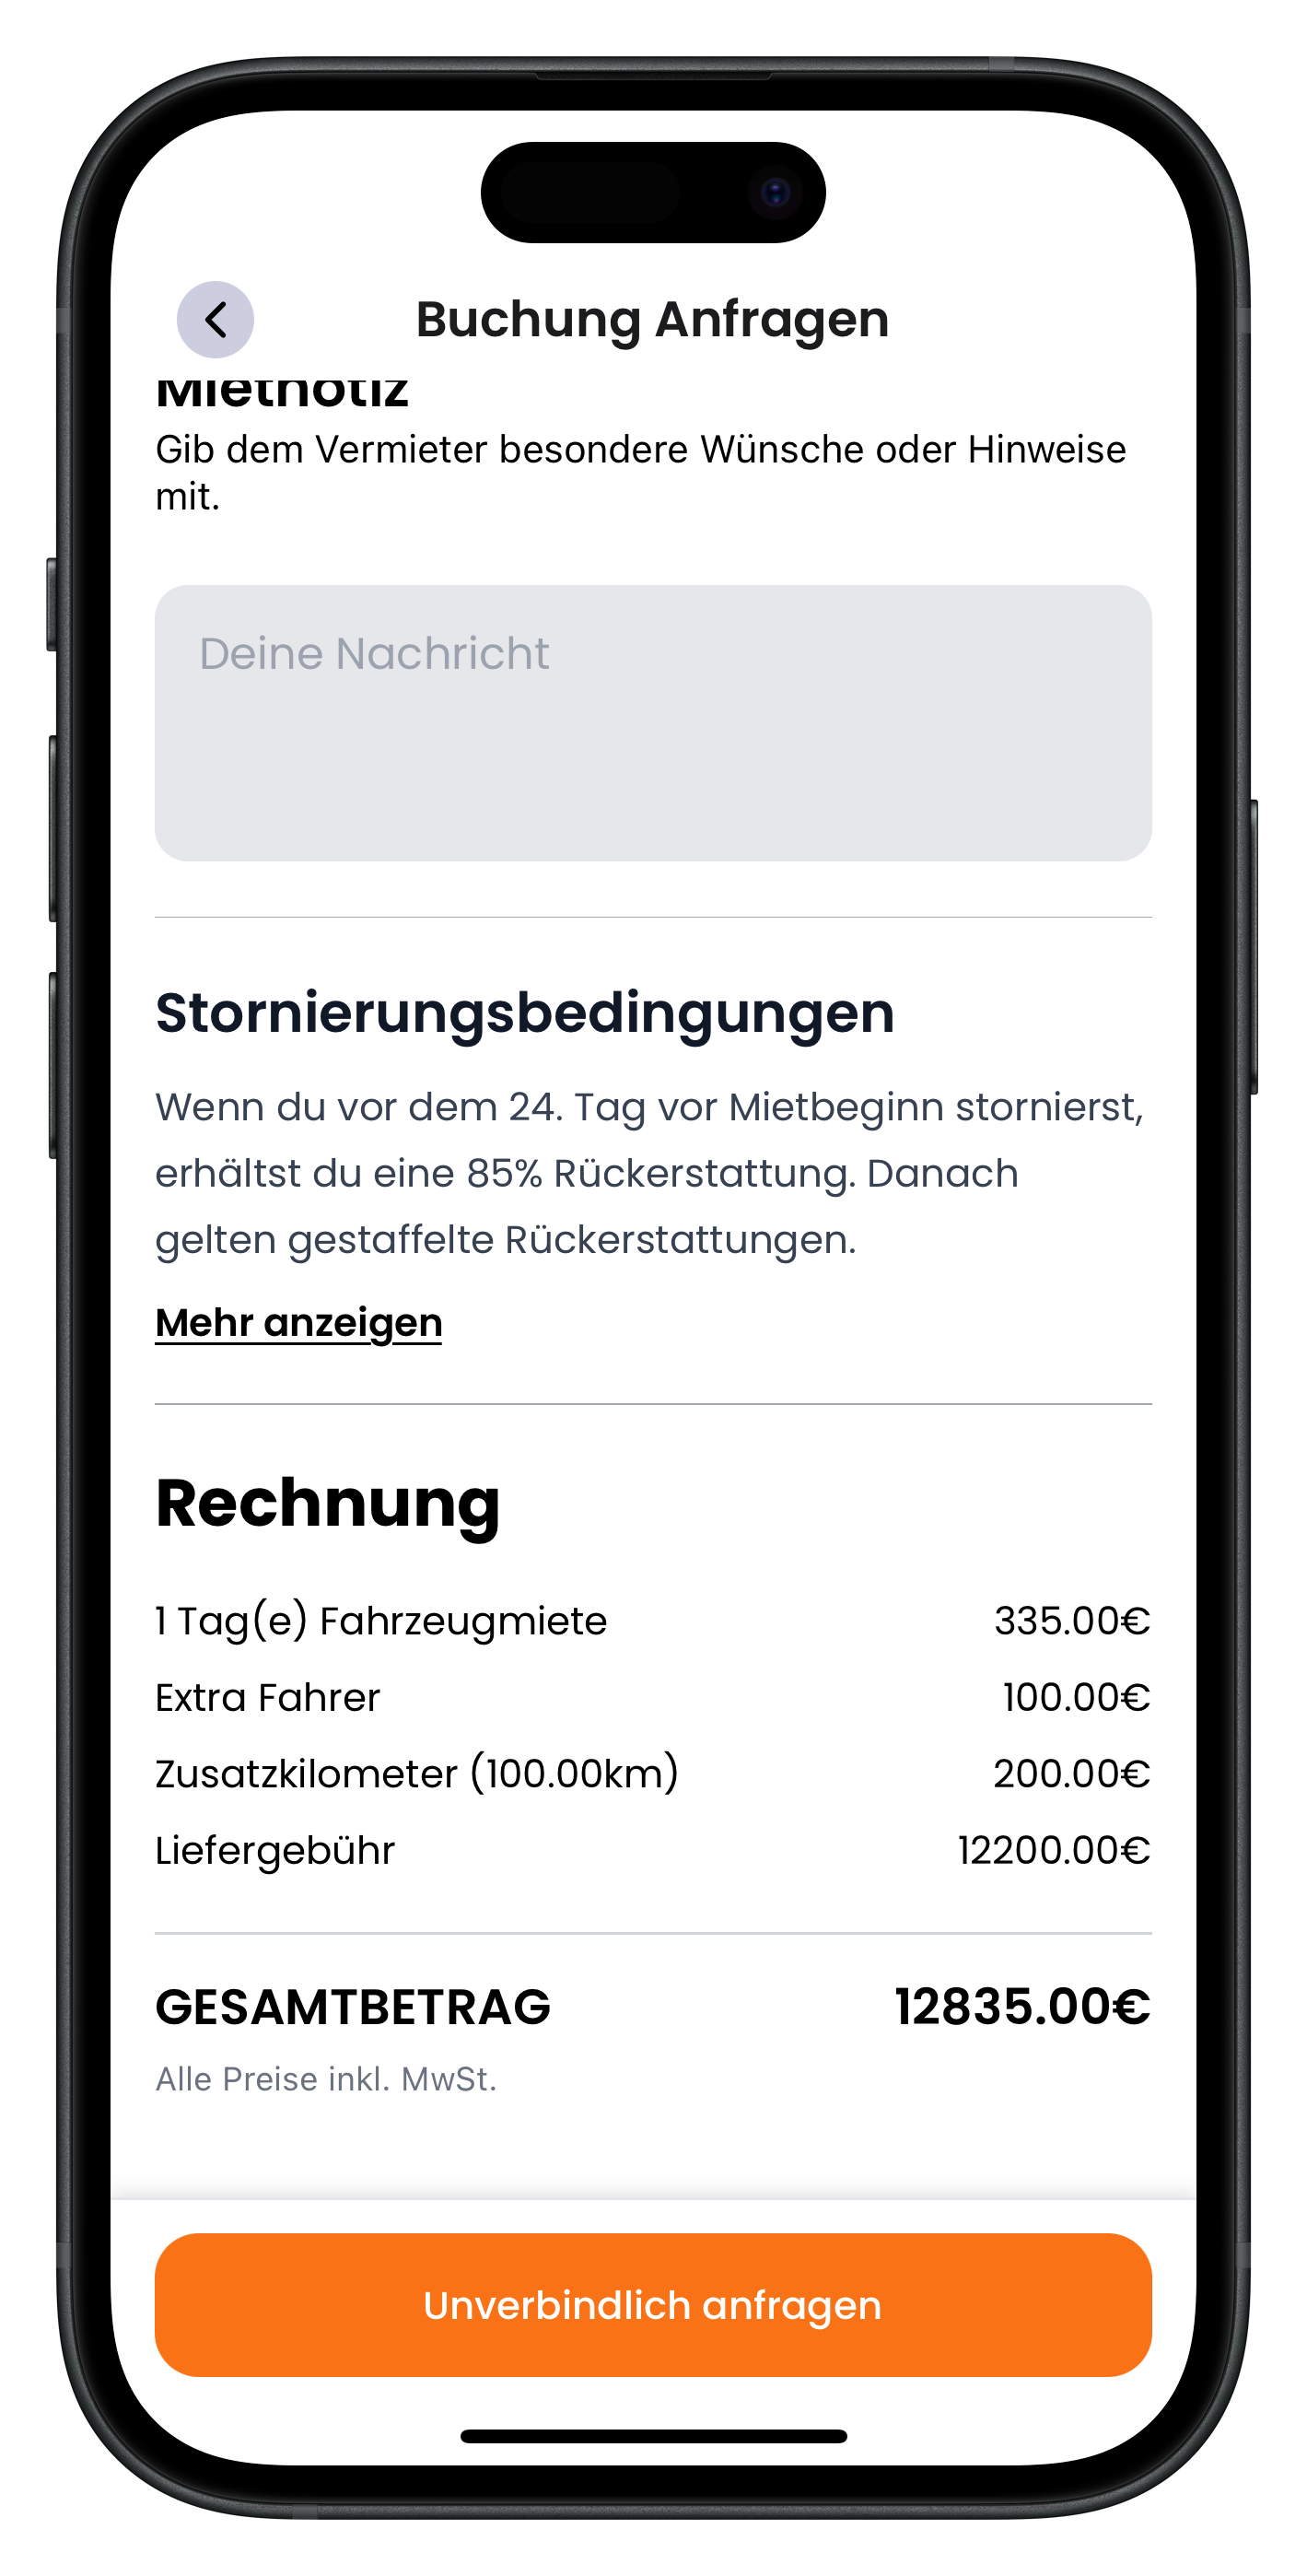
Back on the booking screen, scroll a little further down. Under Rental note you can pass any special requests or notes to the host. Below that are the Cancellation policy details, showing what you'd get back and by when if you decide to cancel. At the very bottom is the full Invoice: vehicle rental fee, extras, extra kilometres, and the delivery fee if applicable — all clearly itemised down to the Total amount. Once everything looks right, tap the orange Request without obligation button.
- In the rental note you can share things like your planned use of the car or any questions you have
- Tap "Show more" to read the full cancellation policy
- The invoice lists every item separately so you can see exactly how the total is made up
- The deposit is not charged here — you'll sort that with the host in person at the handover
Don't worry about tapping the button: Request without obligation really does mean without obligation. You're not paying anything yet and you're not committing to a firm booking. It's only once the host accepts your request that you can pay for the booking and it becomes confirmed.
8
Request sent – what happens next
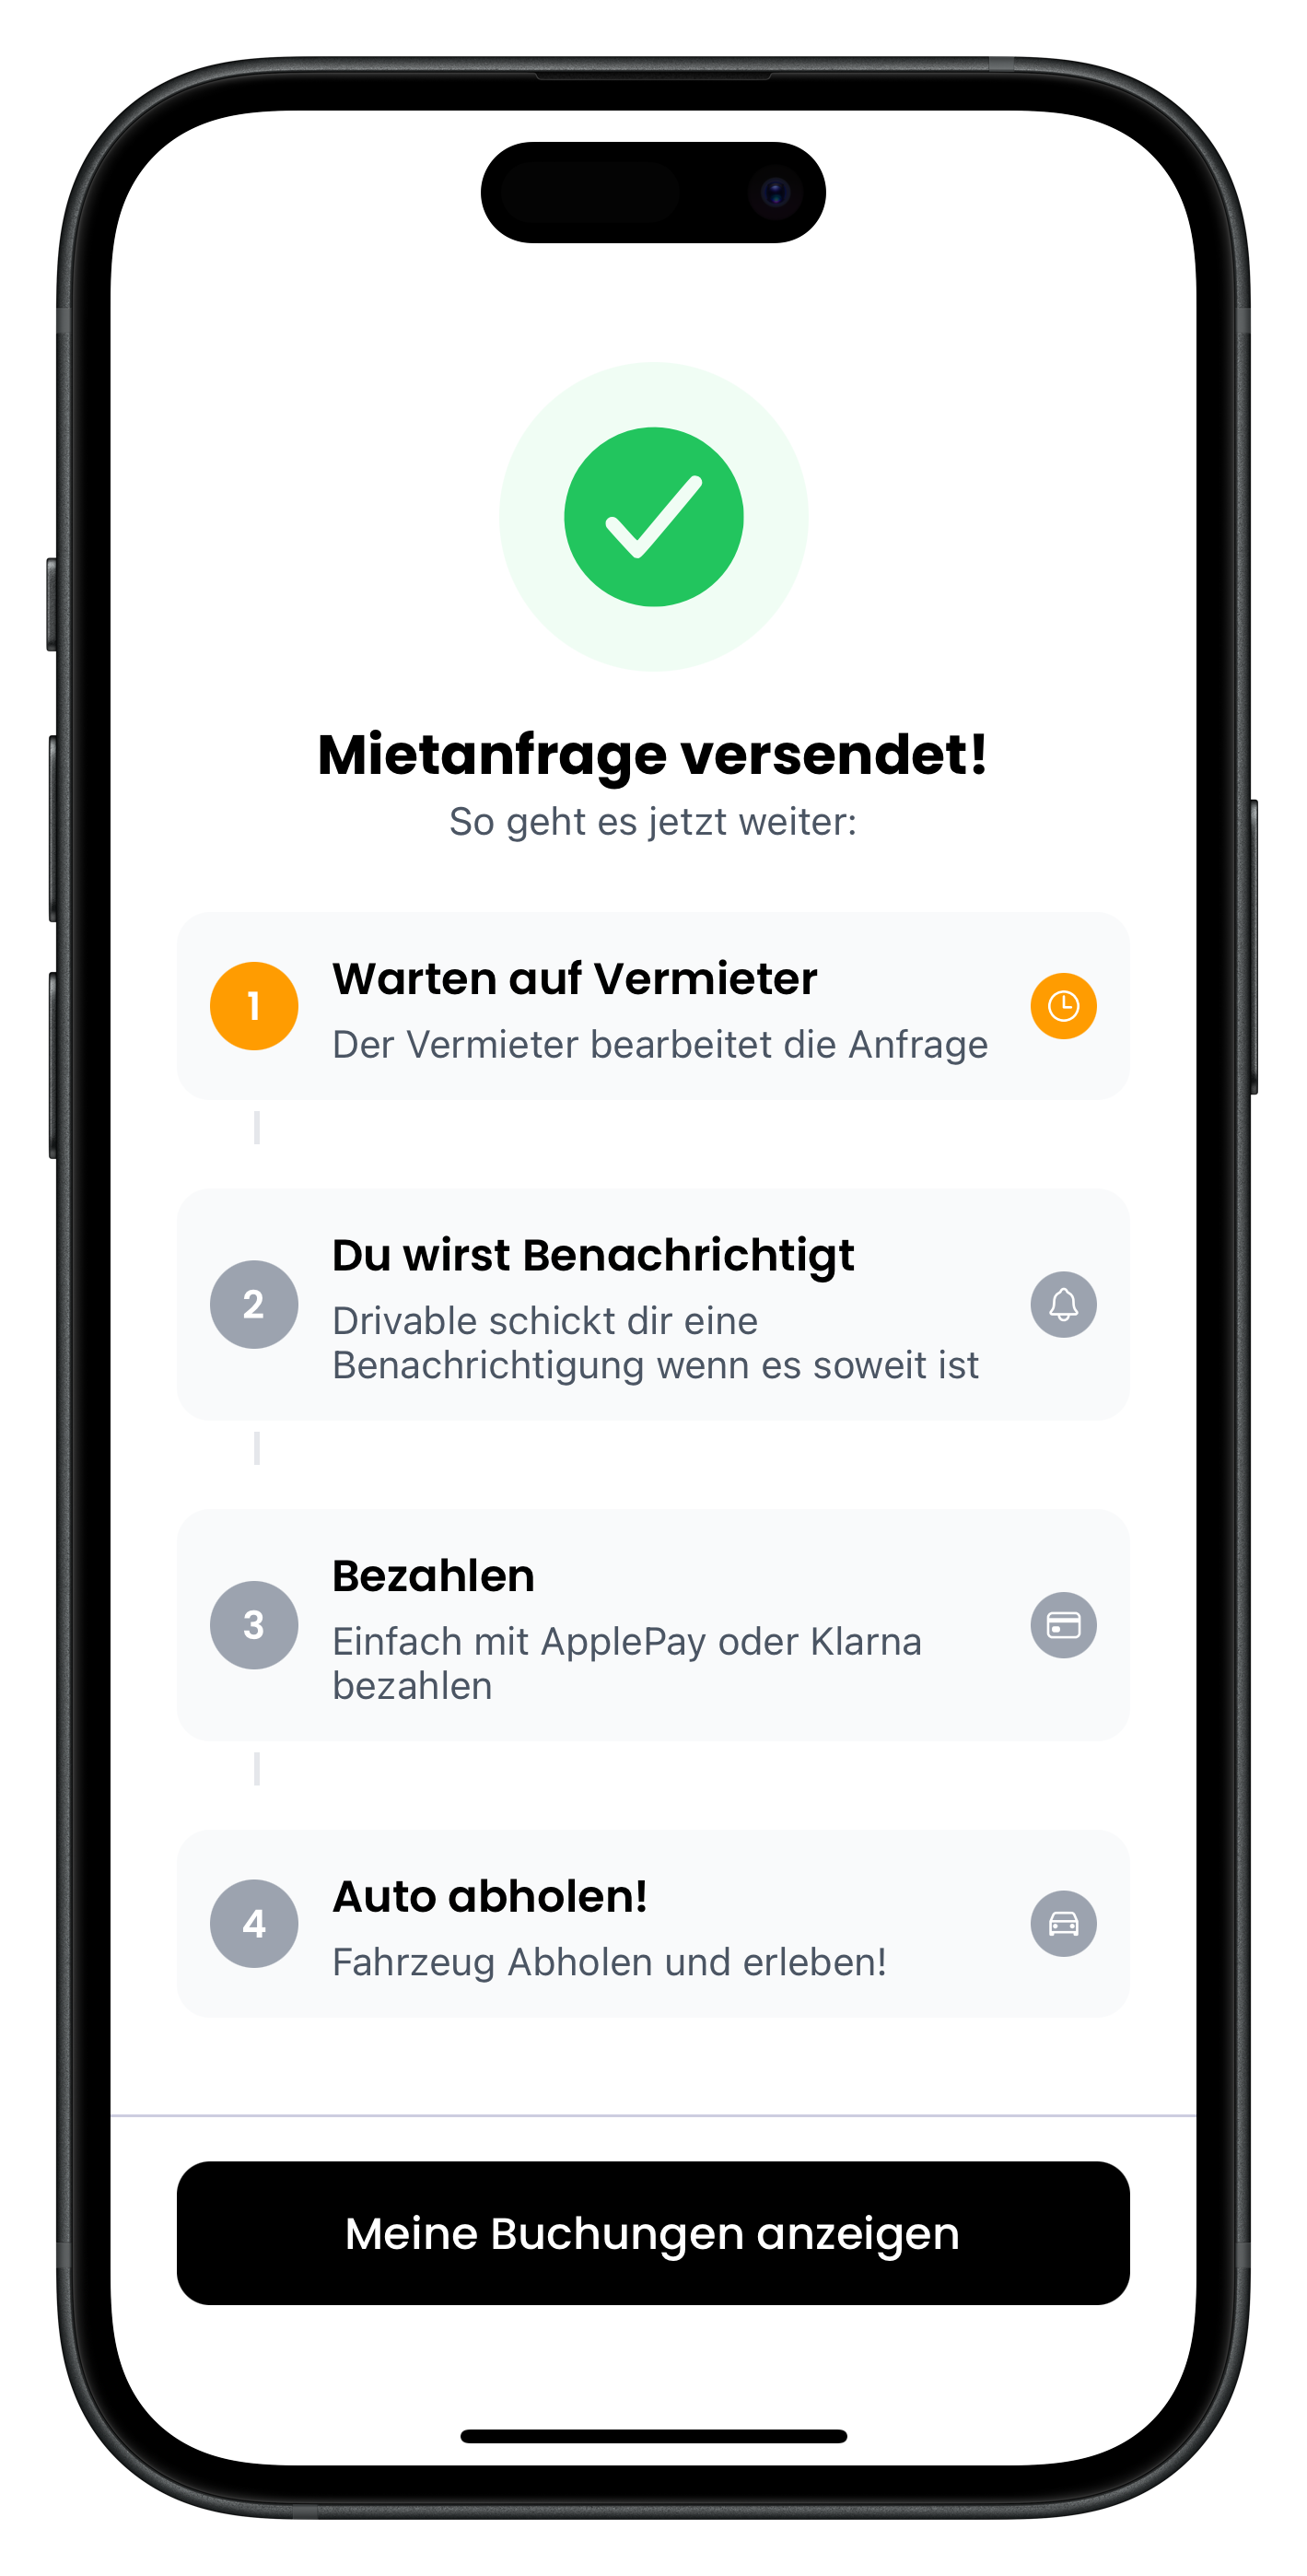
Done. You'll see a green tick and the message Rental request sent!. Below that, Drivable shows you the next steps under What happens now: first Waiting for host while they review your request, then You'll be notified once they've responded, then Pay, and finally Collect the car. You can get back to your request overview at any time via the black View my bookings button.
- You only pay after the host has accepted your request
- Drivable will send you a notification as soon as the host takes action
- You can check the status of your request at any time under "My bookings"
- As long as the host hasn't accepted yet, you can still withdraw the request
After sending your request, you can contact the host directly via the in-app chat — for example if you have questions about collection or any special requests. All communication and payment takes place securely through the Drivable app.
Next steps
Once the host accepts your request, it's time to pay. Find out how that works and how to confirm your booking in Pay for your booking & confirm. If you decide to withdraw your request or cancel a confirmed booking, Cancel or withdraw a request has you covered.
Frequently asked questions

Drivable Team
Help & Support
Das Drivable Team erklärt dir Schritt für Schritt, wie du die Plattform und App nutzen kannst.
21. Juni 2026
War dieser Artikel hilfreich?